How To Use WordPress Menus
 In this tutorial, you will learn how to create, edit, and use custom navigation menus in WordPress.
This tutorial covers the following sections:
- Overview of the WordPress menu editor
- How to create menus
- How to edit menus
- Editing Menu Items
- How to delete menus
- Additional Information
Overview of WordPress Menu Editor
WordPress provides a powerful and flexible built-in menu editor that lets you:
- Create multiple custom menus (as many as you like).
- Add different link types to each menu (e.g. pages, posts, product pages, categories, tags, external URLs, etc.
- Rearrange the order of your menu items using drag and drop or clicking ordering links.
- Organize menu items into hierarchical lists with submenus nested many levels deep.
- Automatically add links to menus when you add new pages, posts, etc. to your site.
- Place your custom navigation menus anywhere you like on your site (e.g. sidebar, header, footer, etc.) using blocks and widgets.
![]()
Notes:
- Where and how you place menus on your site depends on your active WordPress theme and whether you are using the WordPress Block Editor or WordPress Classic Editor.
- Make sure that you already have added pages, posts, categories, etc. to your site before creating menus.
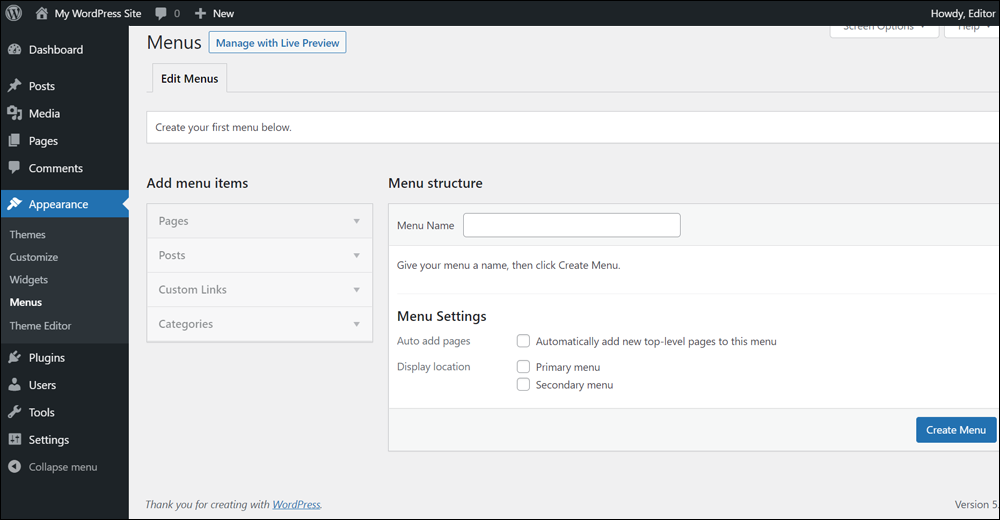
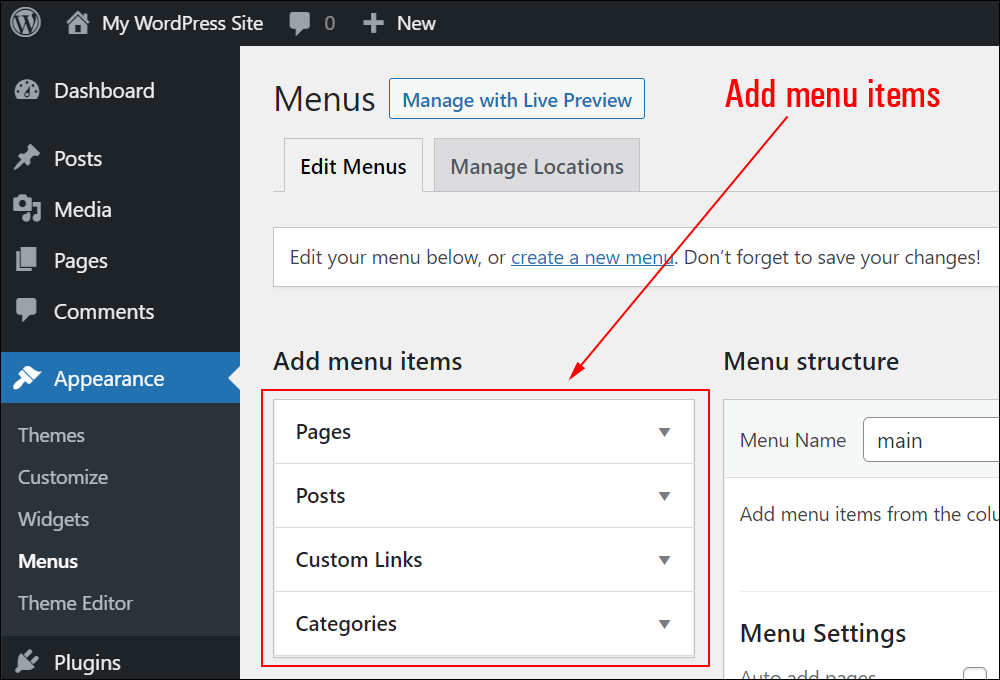
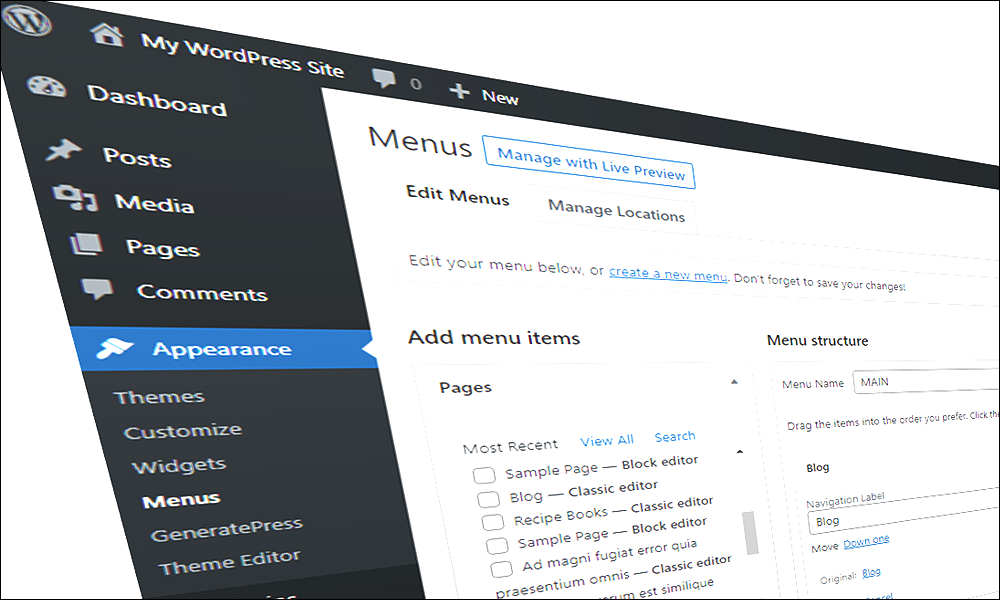
To access and manage your menus, log into your WordPress administration area and go to Appearance > Menus.
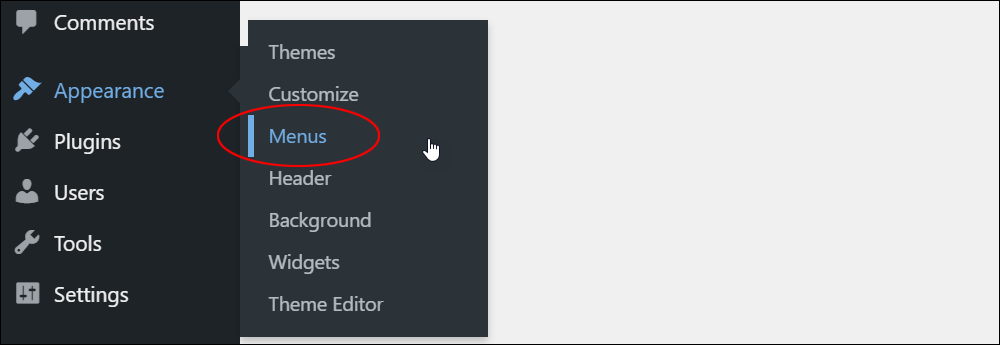
This brings up the Menus screen.
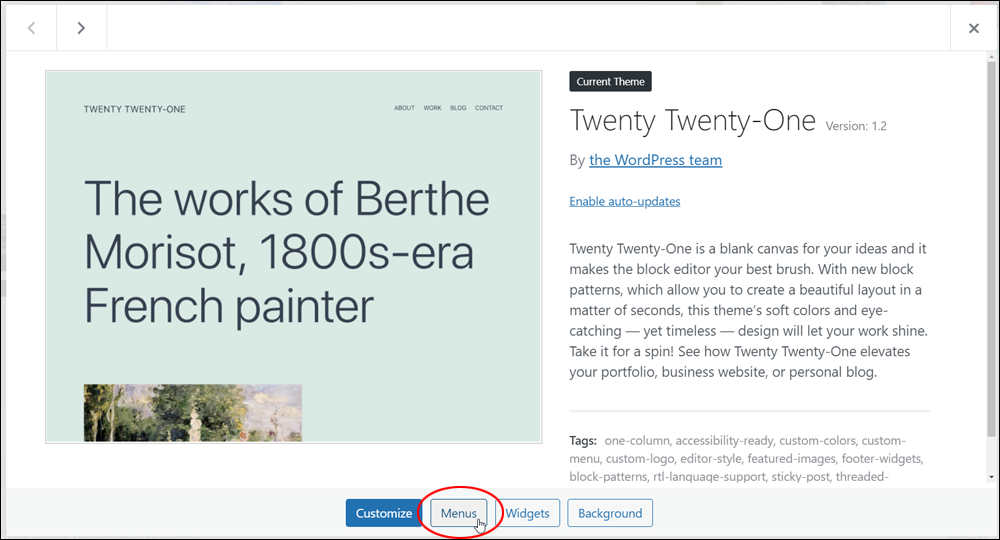
You can also access the Menus screen from your theme management area by going to Appearance > Themes, selecting your currently active theme, and clicking on the Menus button.
Creating A Menu
The Menus screen is where you can create multiple menus, customize these with different link types, and add custom navigation menus to different areas of your site.
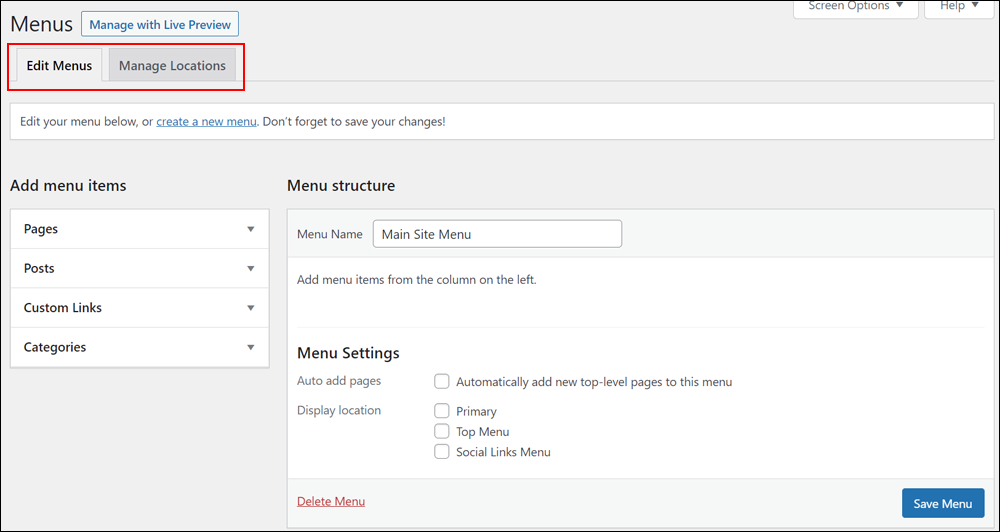
If no menus have been created yet, the Menus screen will display a blank menu template with a single tab called ‘Edit Menus’ and a prompt to create your first menu.
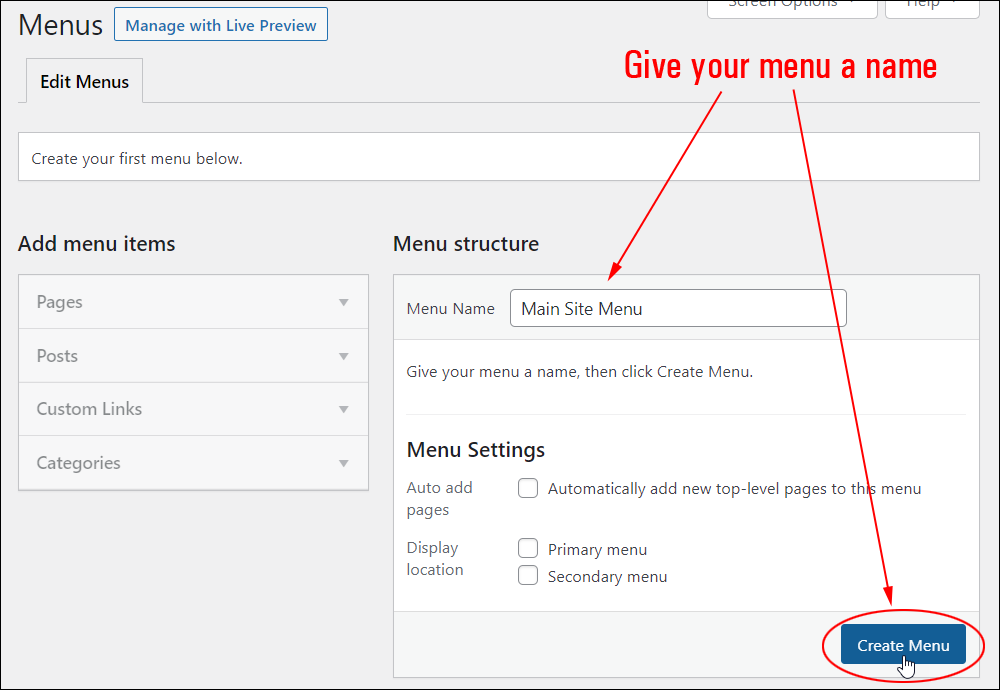
To create a new menu, give your menu a name (in the Edit Menus tab > Menu structure section > Menu Name field) and click on the Create Menu button.
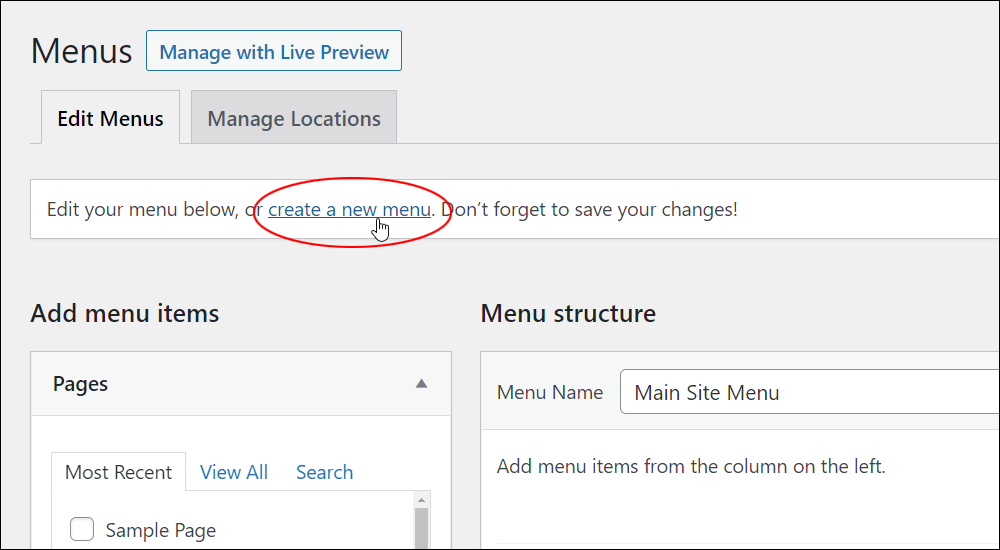
You can also create a new menu by clicking on the ‘create a new menu’ link below the Menus screen tab as shown below.
Once the first menu has been created, the Menus screen displays the following tabs:
- Edit Menus
- Manage Locations
Let’s go through each of these tabs.
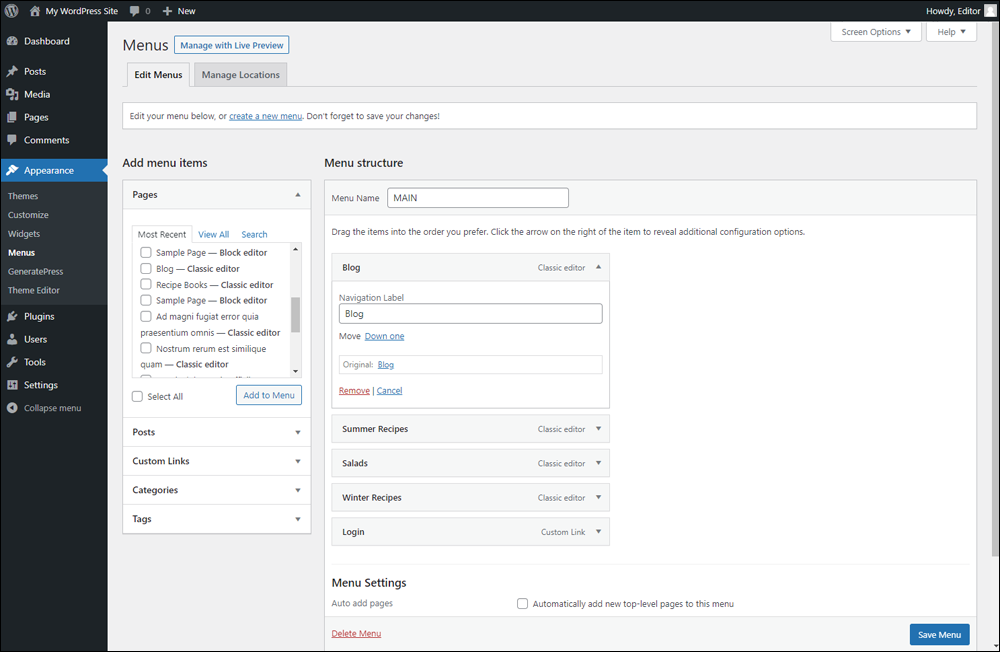
WordPress Menus – Edit Menus
Navigating the Edit Menus tab
The Edit Menus tab includes the following sections:
- ‘Select a menu to edit’ drop-down menu or create a new menu.
- Add menu items
- Menu structure
- Menu Settings
- Delete menu link
- Save/Update Menu button
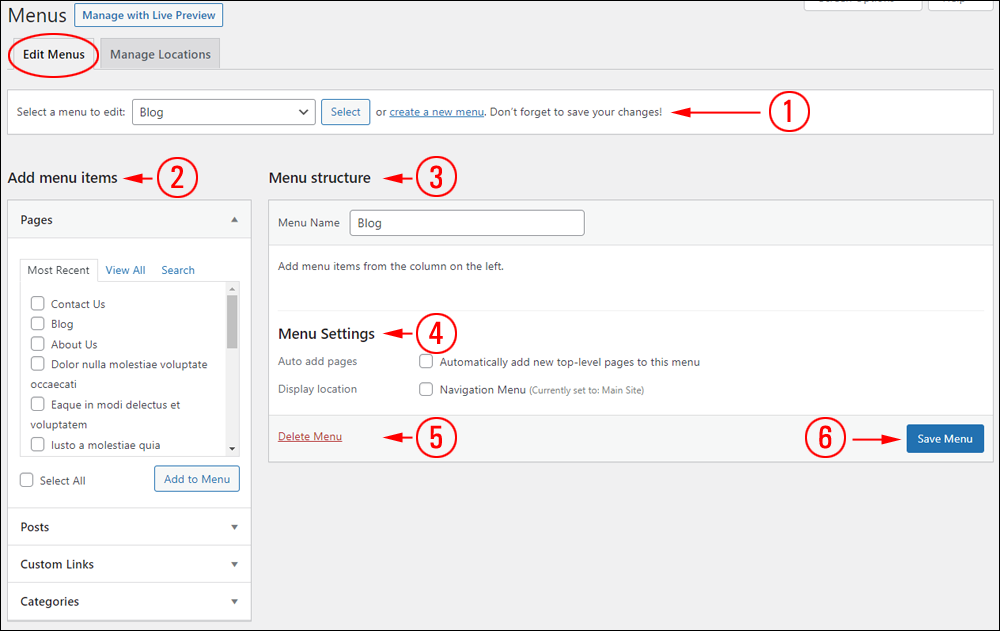
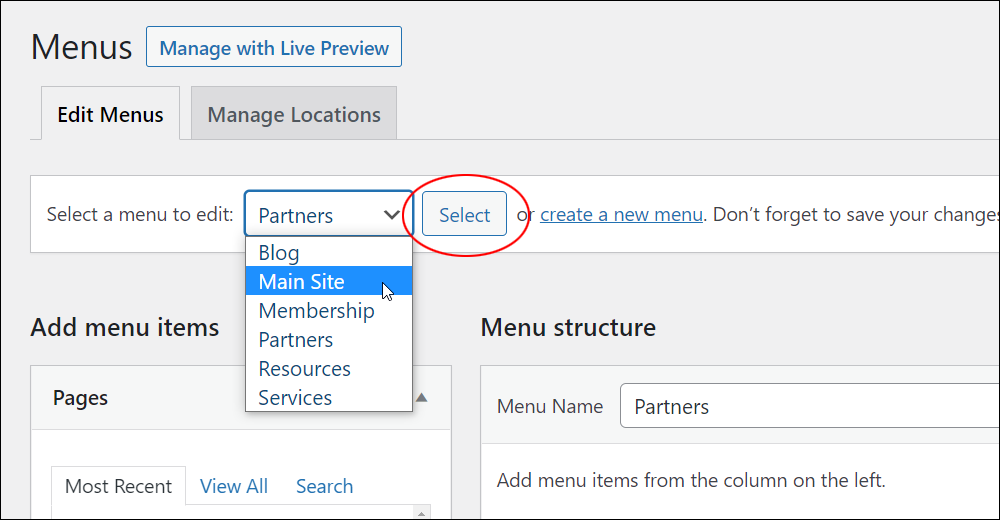
Once you have created a new menu, you can edit it by going to the Edit Menus tab, selecting the menu from the Select a menu to edit drop-down menu, and clicking the Select button.
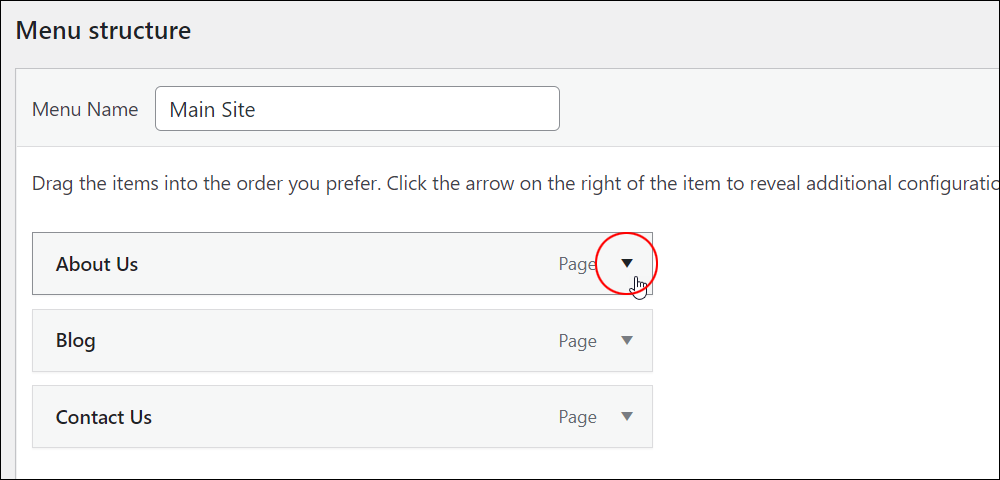
To avoid cluttering your screen, the Menu items and elements on this screen are collapsible.
Click on the little black triangle to expand or collapse items.
Additionally, many items in the WordPress Menu editor include internal features and options like tabs, search and navigation links, and various fields, some of which you can choose to display or hide on your screen.
Now that you understand how to navigate the Edit Menus tab, the next step is to add links (e.g. pages, posts, etc.) to your menu.
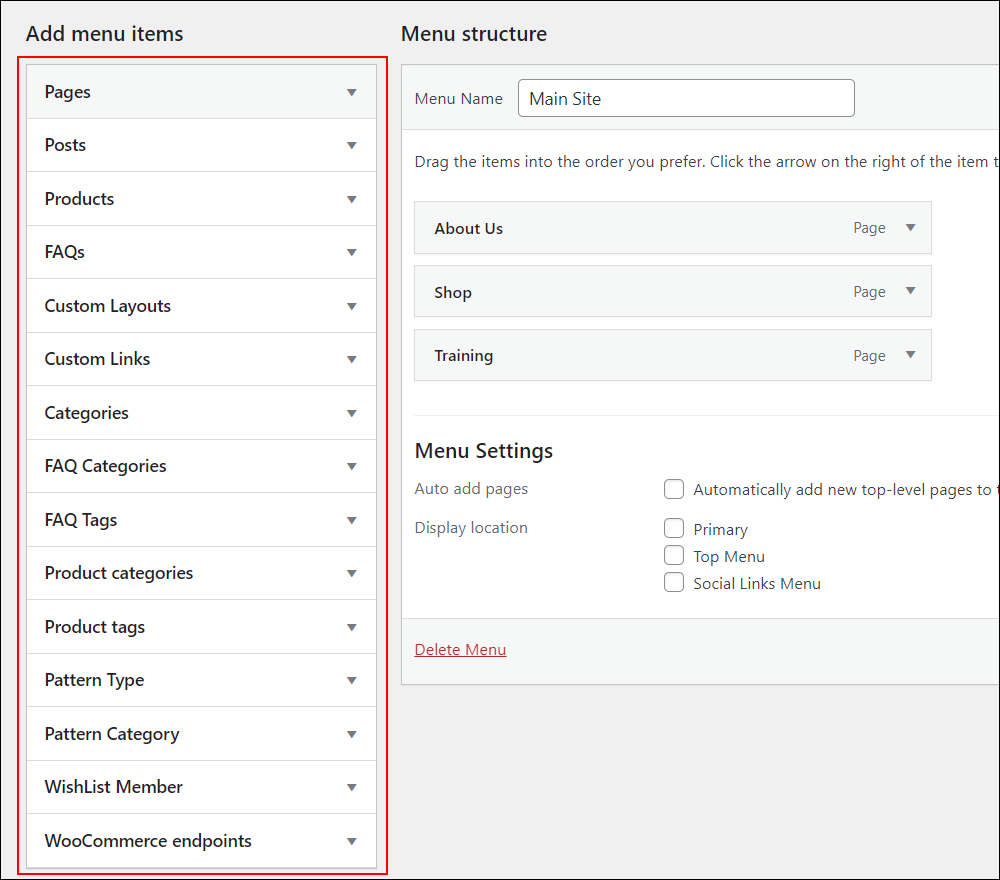
Adding Menu Items
Some common menu items you can add to your menu(s) include:
- Pages
- Posts
- Custom Links
- Categories
- Tags
- FAQs
- etc.
Depending on the theme and plugins installed on your site, you may find additional menu items in this column.
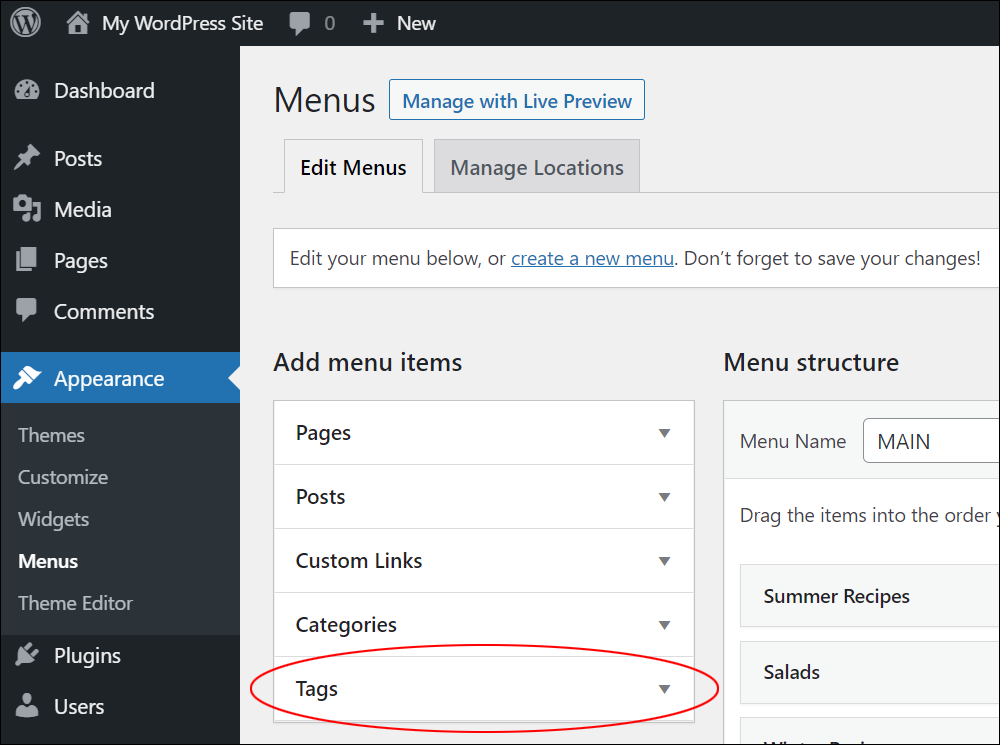
In the screenshot below, you can see that there are no menu items listed in the Menu Structure section.
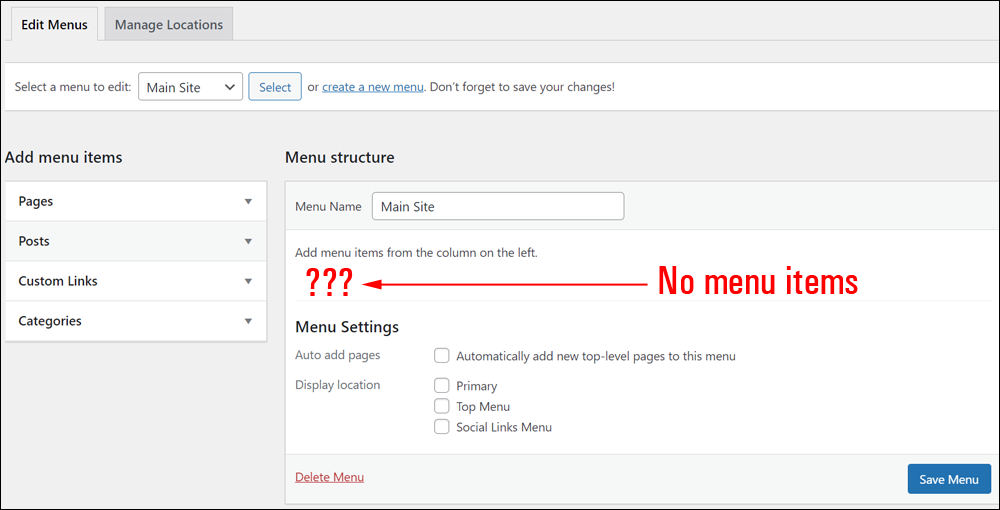
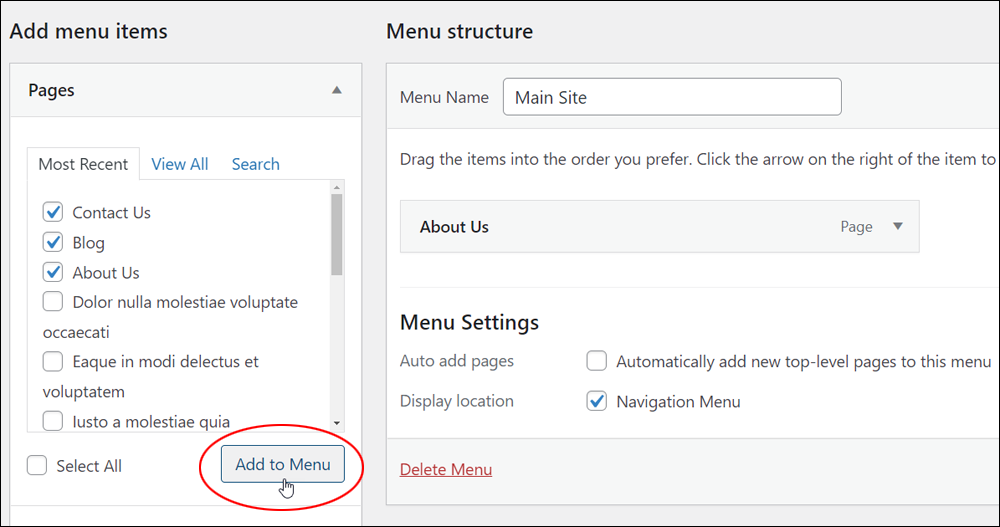
To add links to pages, posts, etc. to your menu, select link types from the list of menu items on the left column of your screen by ticking their checkboxes, and click the Add to Menu button.
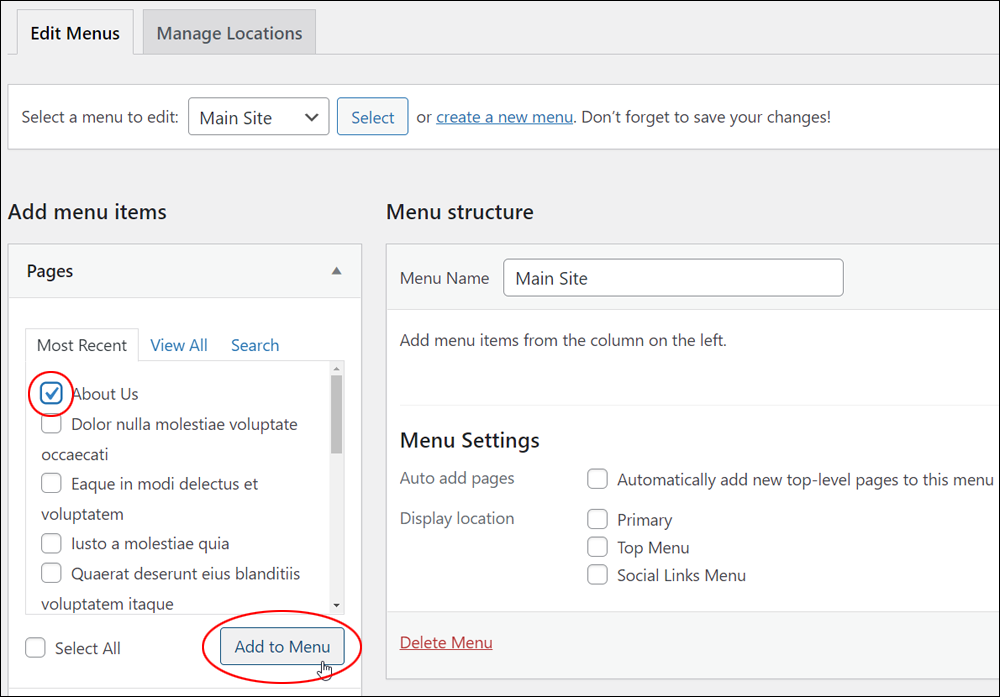
The item(s) will be added to the Menu Structure section.
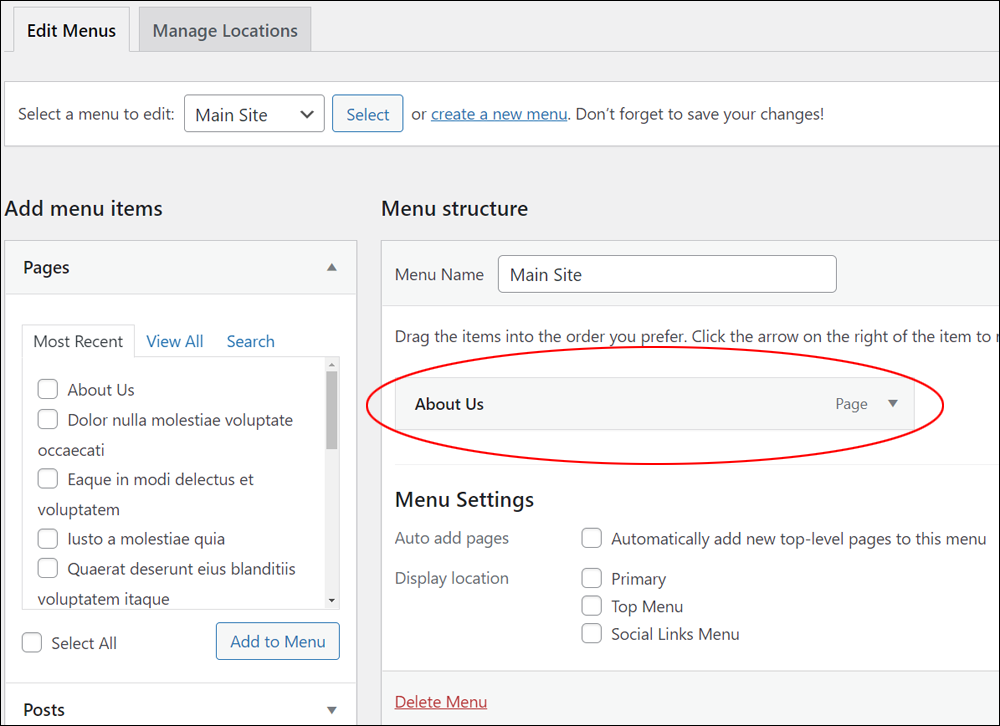
Repeat this process to continue adding new items to the Menu structure section.
You can add items from each of the different link types shown in the Add menu items column.
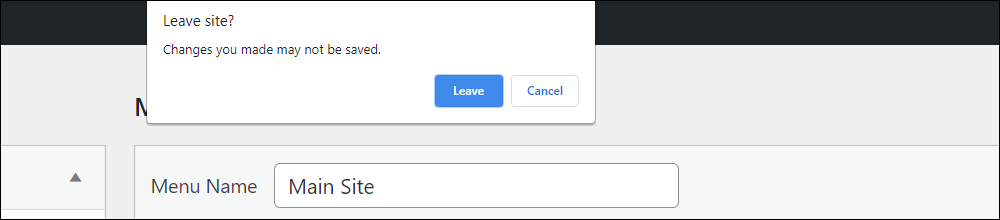
After adding new item(s) to your menu, remember to click on the Save Menu button to save and update your menu settings.
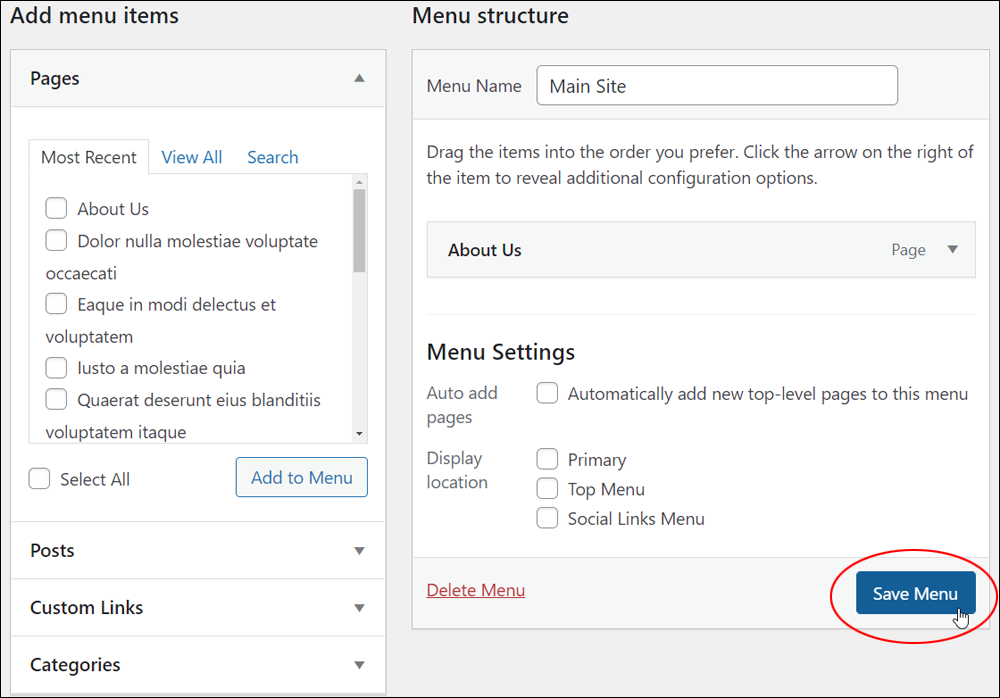
If you don’t save your changes, a window will pop up asking you to confirm if you want to leave the page and lose your changes. Click Cancel to stay on the page.
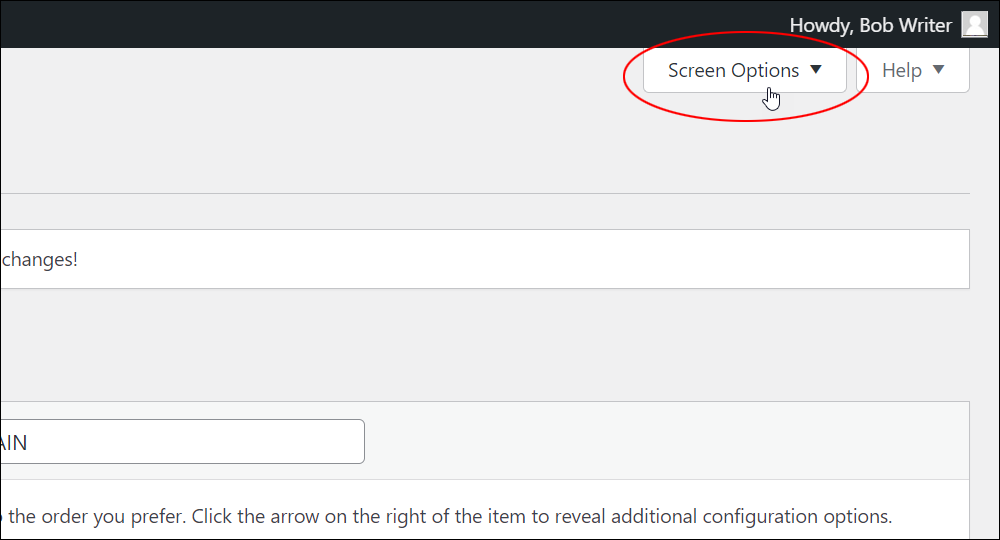
Show/Hide Menu Fields
Some menu elements will NOT display in the Edit Menus section unless you add specific plugins or functions to your site that support custom menu features.
Other elements, however, are initially hidden by default.
For example, you can add links to posts, and even tag pages to your menus. If you don’t see these listed on your menu screen, do the following to display these:
Scroll to the top right-hand corner of your Edit Menus screen and click on the Screen Options tab.
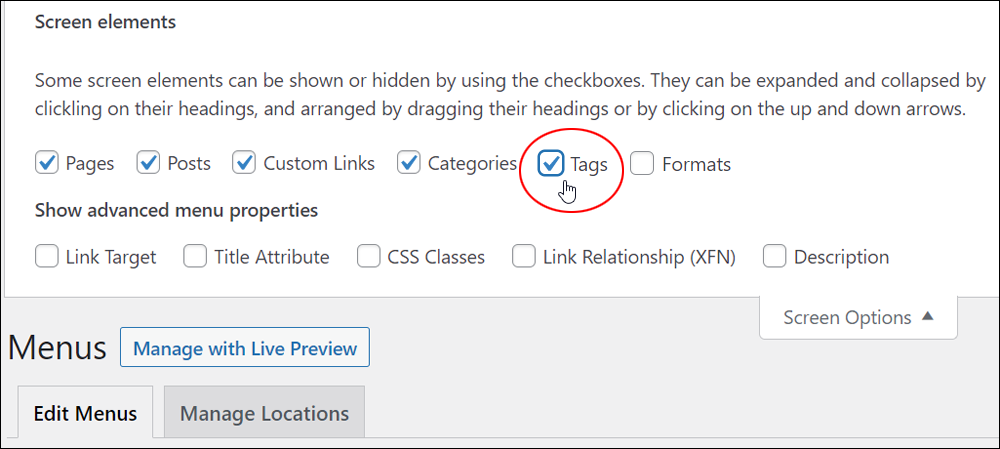
In the Screen elements section, tick the checkboxes next to any elements that you would like to display.
The item will now appear on the Add menu items section.
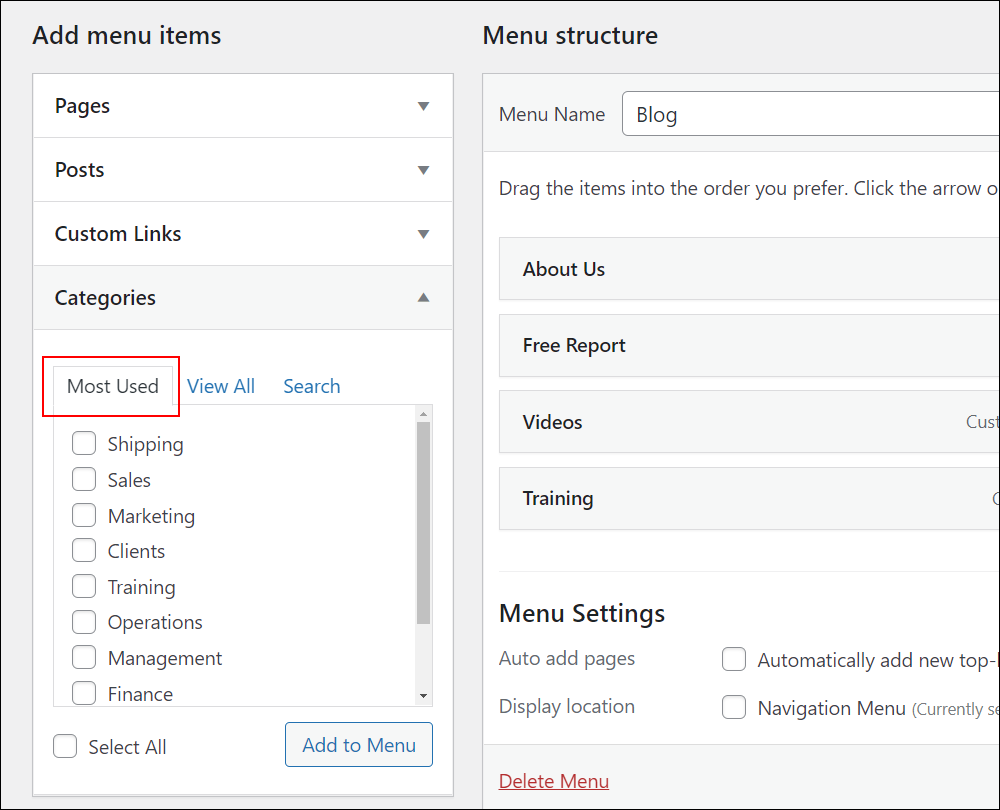
In the Add menu items section of certain link types (e.g. Pages and Posts), you can choose to view only your most recent items, view all items, or search for specific items (just type a word into the search field and WordPress will automatically search and return matching results).
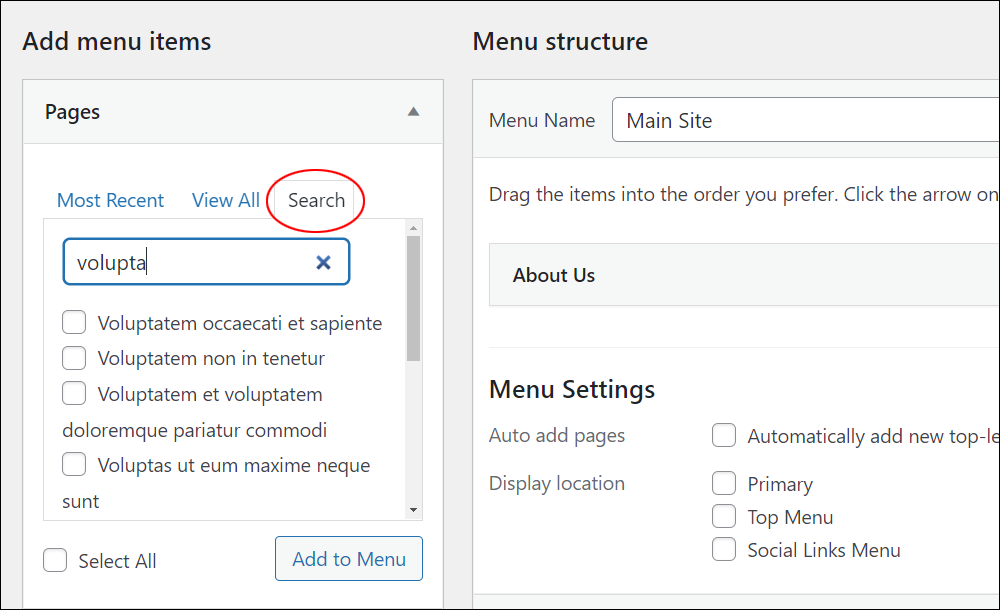
With other link types (e.g. categories and tags), you will see slightly different options (e.g. Most Used).
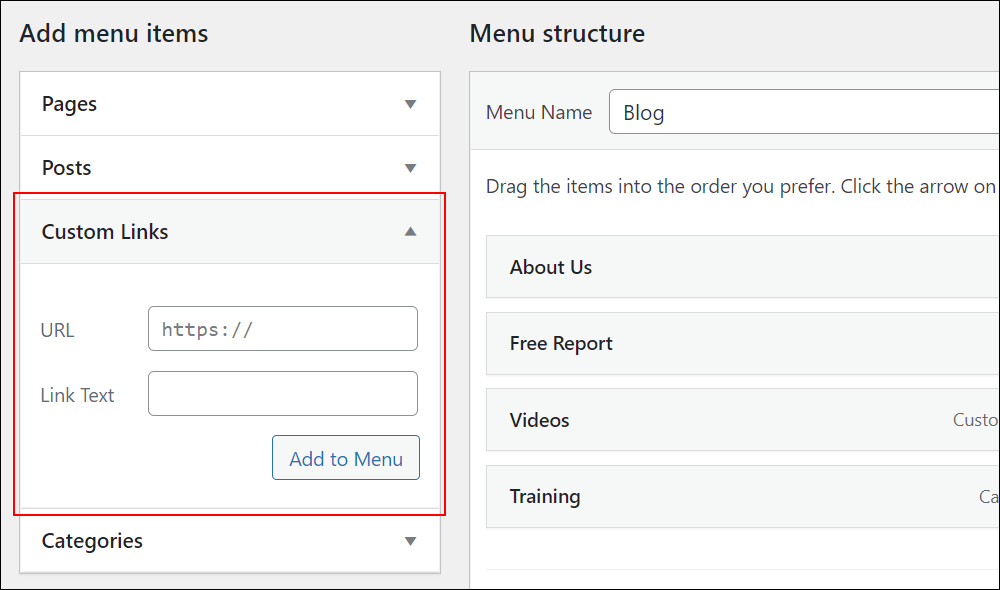
Some items have no additional inline options (e.g. Custom Links).
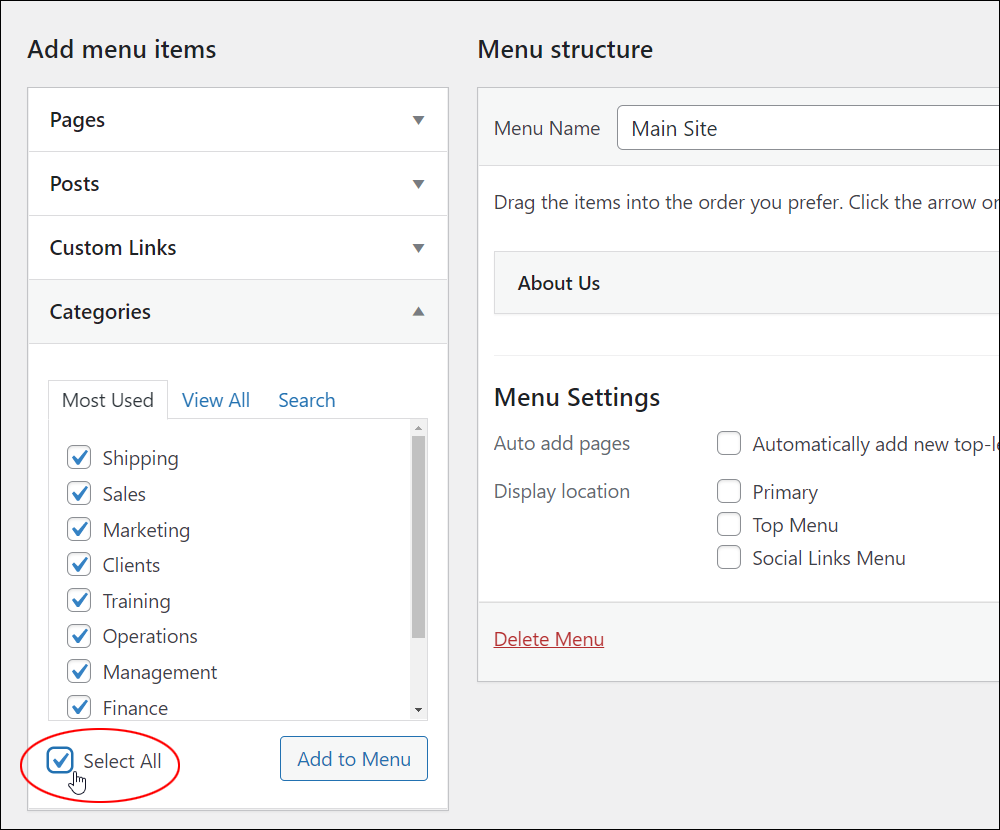
To add multiple items to your menu structure select multiple checkboxes and click on the Add to Menu button.
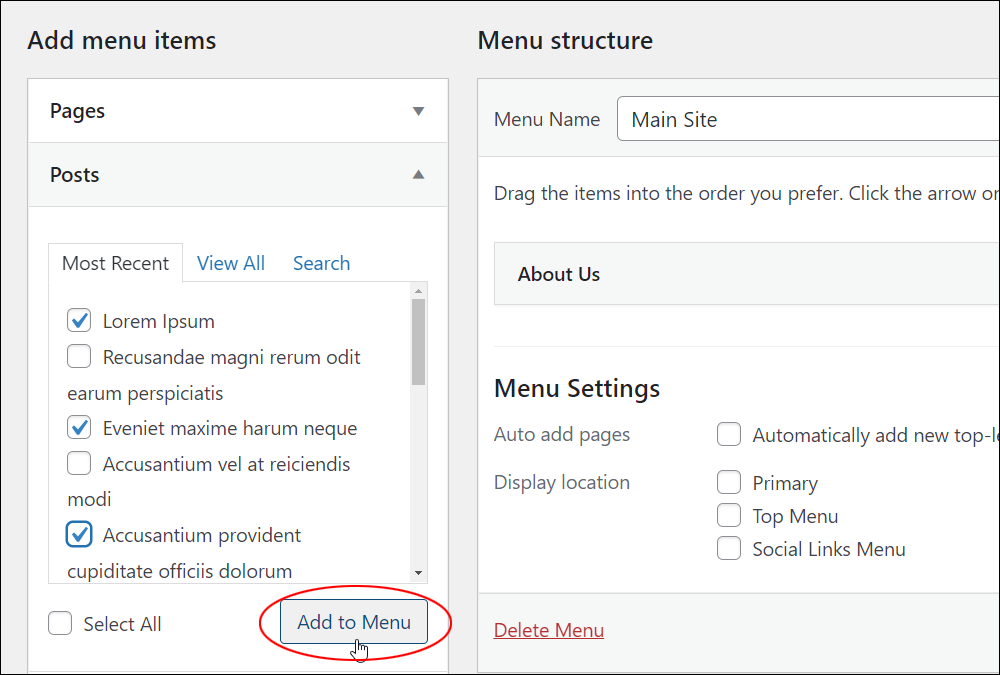
Or, add all the items in a list by clicking the Select All link then the Add to Menu button.
You can also add links to external URLs to your menu, using the Custom Links panel.
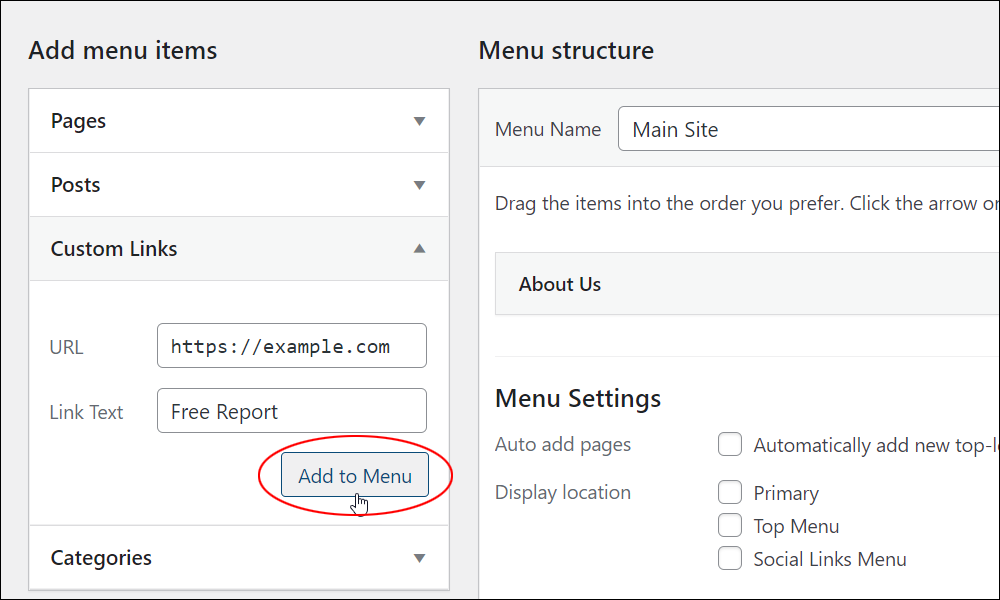
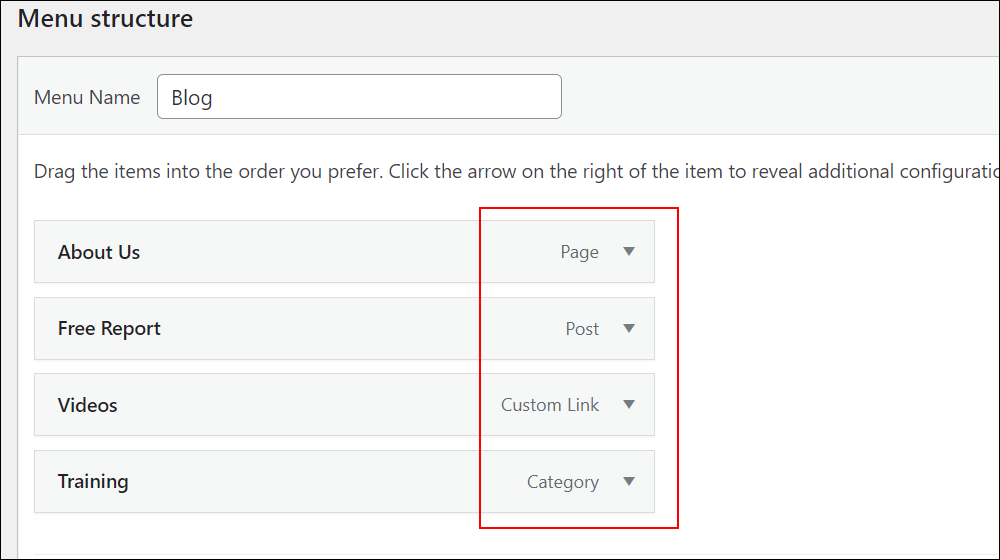
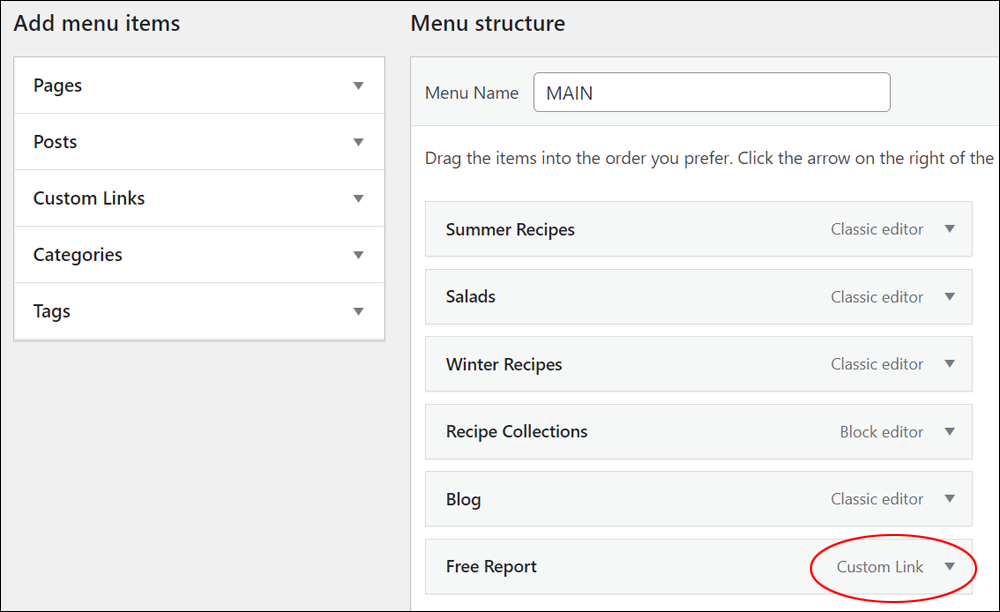
You can easily identify custom links in your menu structure, as the menu will display a Custom Link tag.
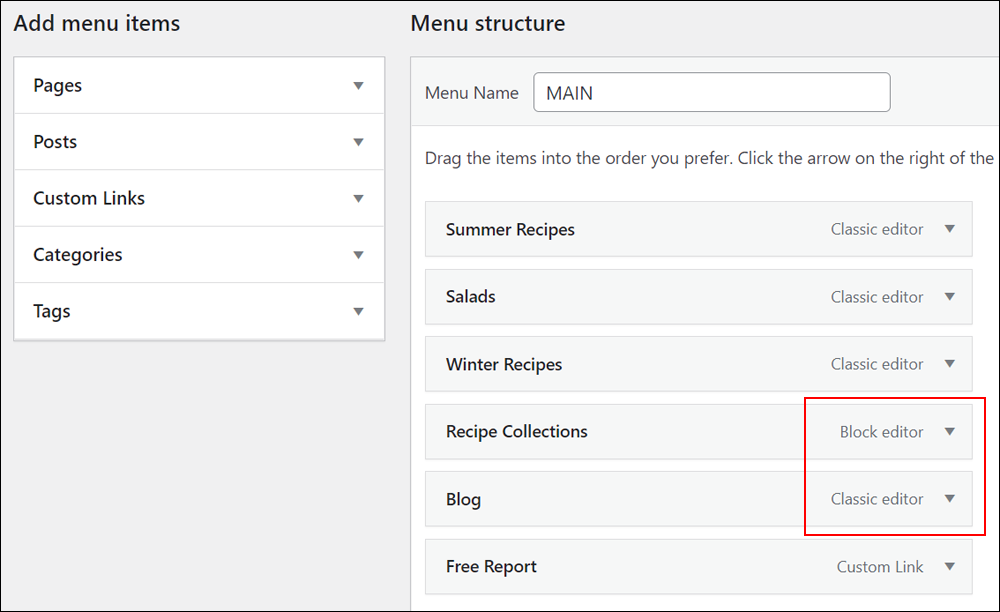
Note too that if you’re using a single editor only (e.g. the Block editor), menus simply display their link type (e.g. Post or Page).
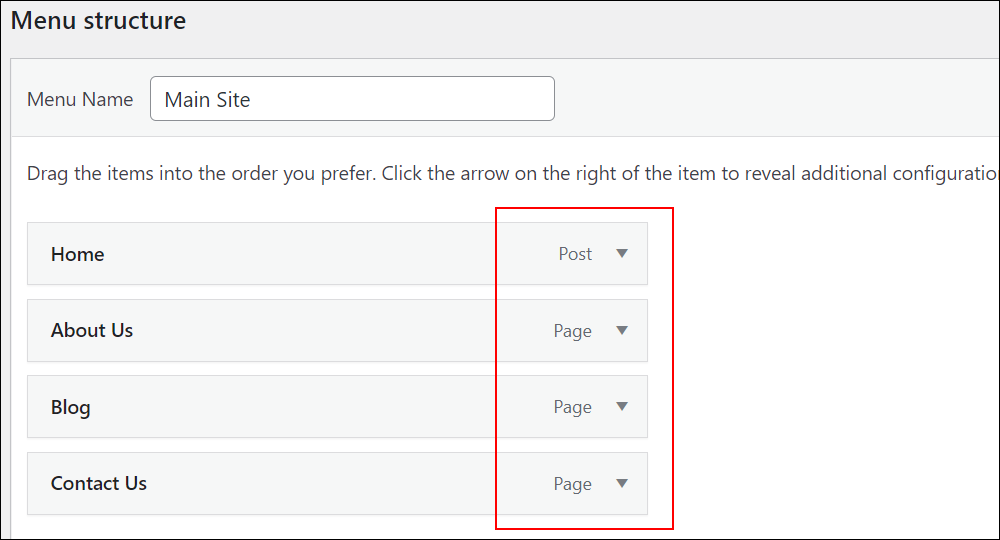
If, however, you are using both the WordPress classic editor and the block editor to create posts and pages, WordPress will tag these in the menu item descriptors.
Editing Menu Items
After adding items to your menu, you can further modify and customize these.
Expand Or Collapse Menu Items
As mentioned earlier, you can expand or collapse a menu item by clicking on the little triangle on the right-hand corner of the title bar.
Open Navigation Menu Links In A New Browser Tab
Opening navigation menu links in a new browser tab means allows visitors to stay on the page after closing the tab.
By default, WordPress hides the option to open navigation menu links in a new tab to prevent cluttering up your menu item panel.
If you want a menu item to open on a new tab when visitors click on the menu link, do the following:
First, expand the menu item.
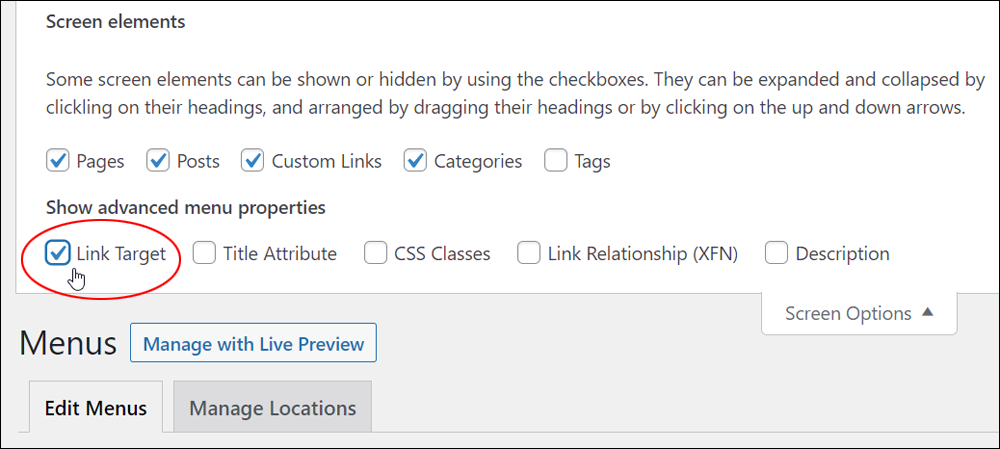
If you can’t see the Open link in a new tab field below the Navigation Label field, open the Screen Options tab and make sure that the Link Target checkbox is selected in the Show advanced menu properties section.
You should now see the Open link in a new tab option. Tick this checkbox to open the link in a new tab when visitors click on the menu link.
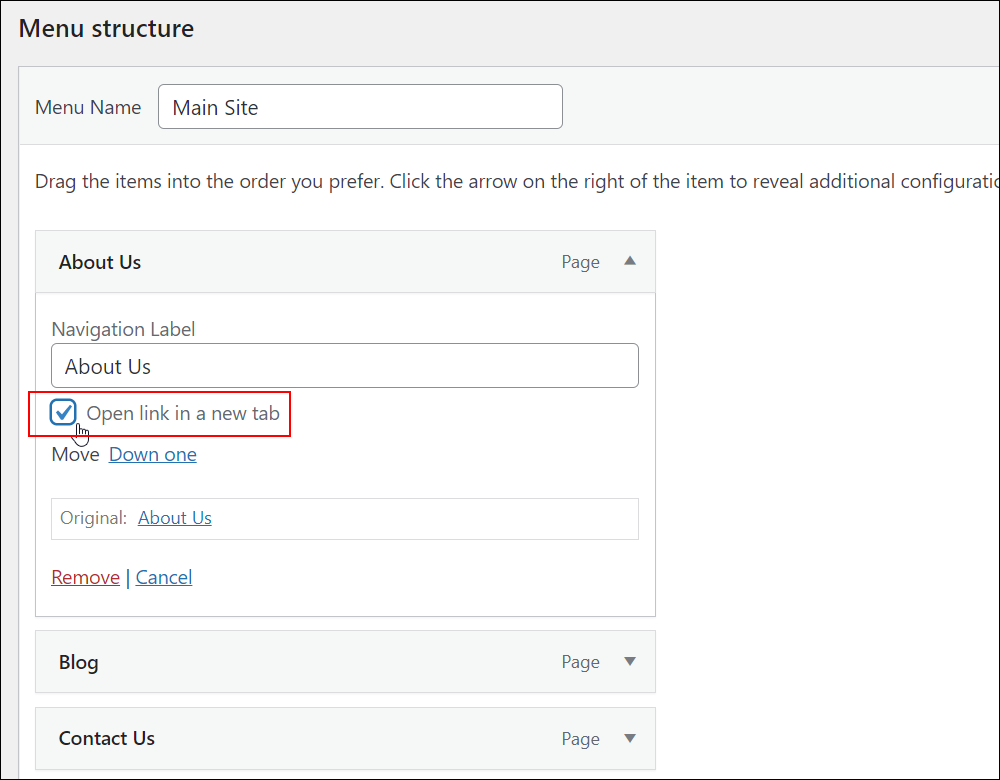
Remember to save your changes when done to update your menu settings.
Advanced Menu Properties
Advanced menu properties are mostly used by web developers and WordPress theme designers to further enhance, style, and customize menu options.
![]()
Your theme must support advanced menu properties for these options to work.
The screenshot below shows an item with all the advanced options displayed (you can enable these options in the Screen Options tab):
- Title Attribute
- CSS Classes (optional)
- Link Relationship (XFN)
- Description
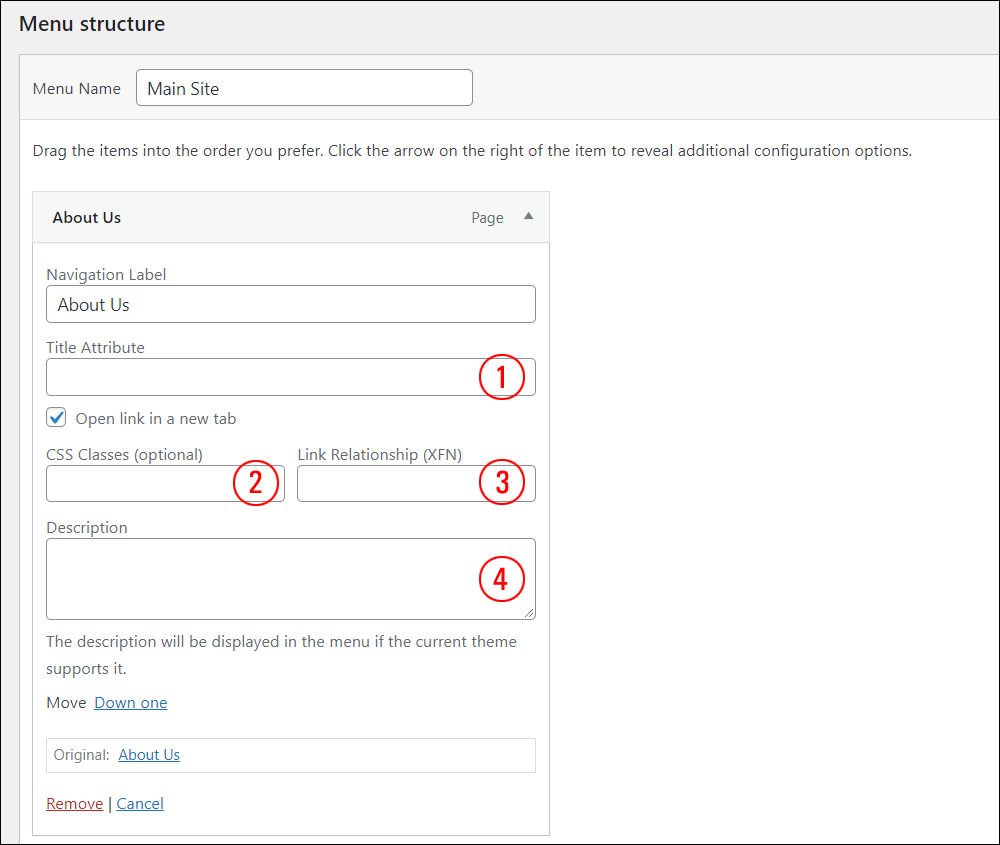
Let’s take a brief look at each of these properties.
Title Attribute: This field specifies the Alternative (‘Alt’) text for the menu item. This text displays when a visitor hovers over a menu item.
For example, if you add the following line into the Title Attribute field and then save your menu…
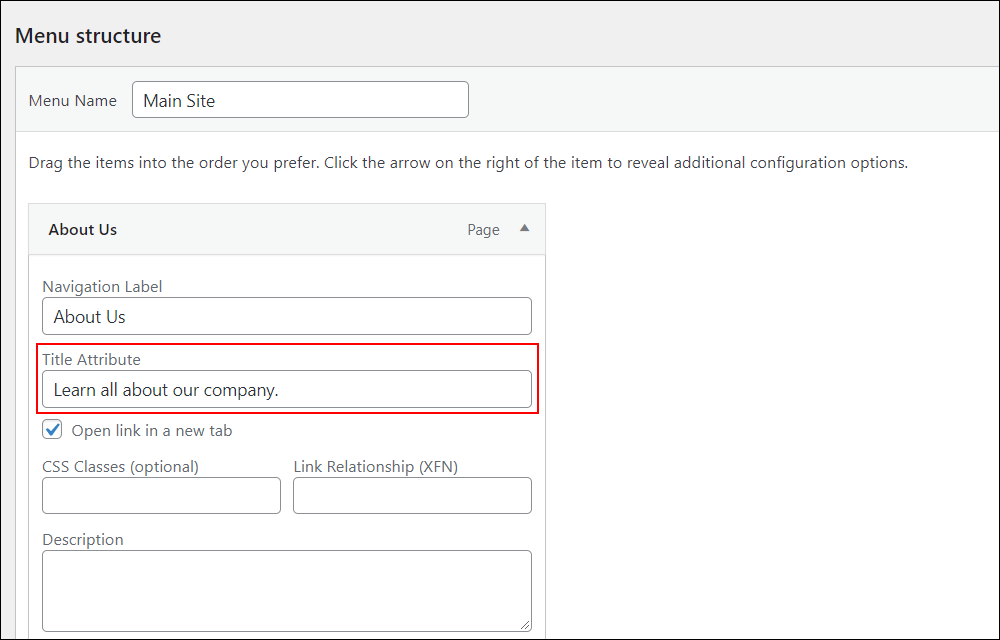
Here is what your visitors will see if they hover over the menu link…

CSS Classes: This allows you to style your links using CSS (Cascading Style Sheets). After adding a CSS class to a menu link, you can then target the classes you have assigned from within your stylesheet. Note: This requires knowledge of CSS.
Link relationship (XFN): XFN (XHTML Friends Network) is a simple way to represent the relationships you share with the owners or authors of other websites using links.
This allows certain programs such as search engines and specialized services to understand and display the relationships you share with other people, such as friends, professional contacts, etc.
For more information, go here: XFN
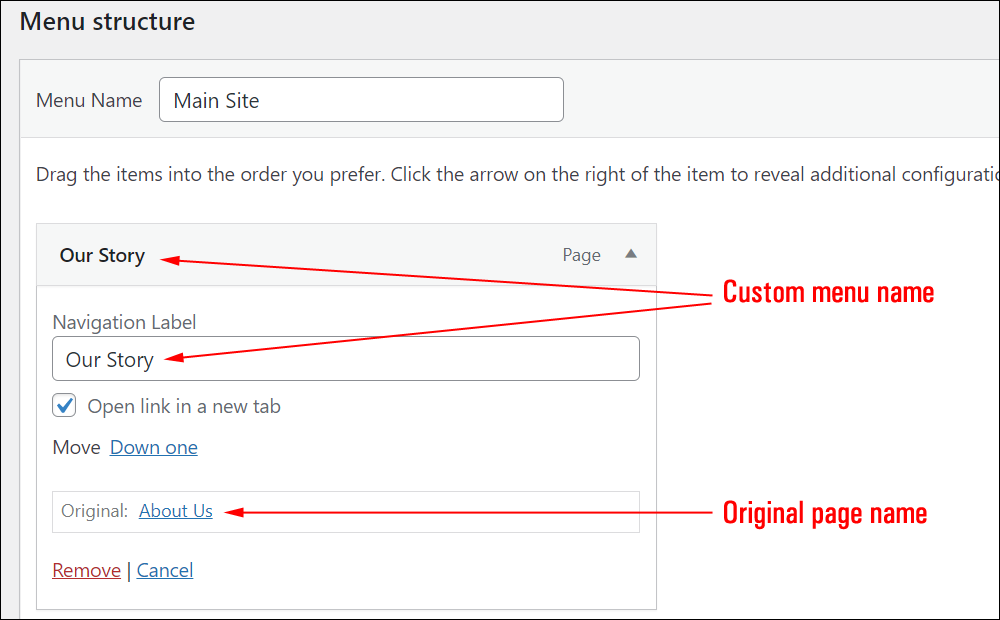
Description: This field can be used to add a short description to a menu label.
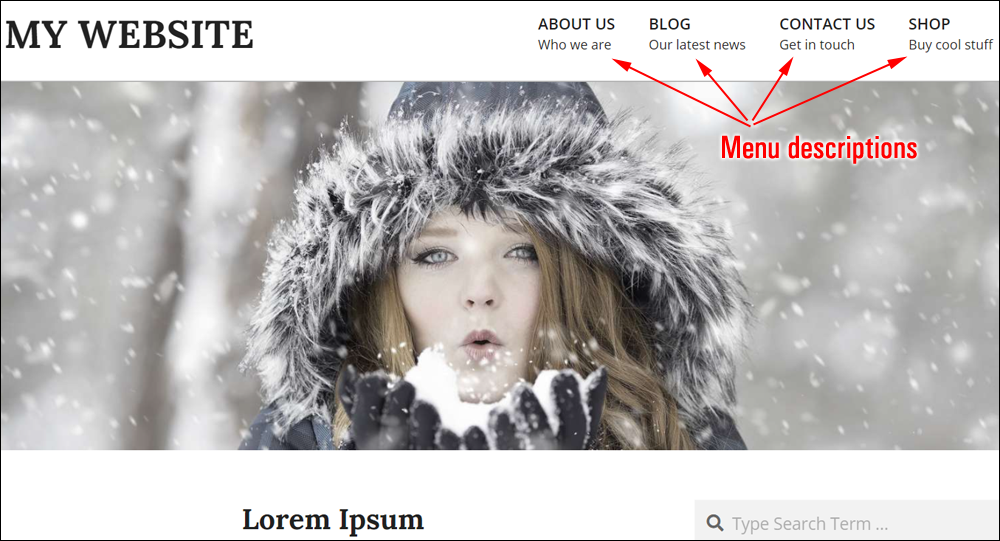
You can also give your menu label a custom name that is different from the name of your original page name.
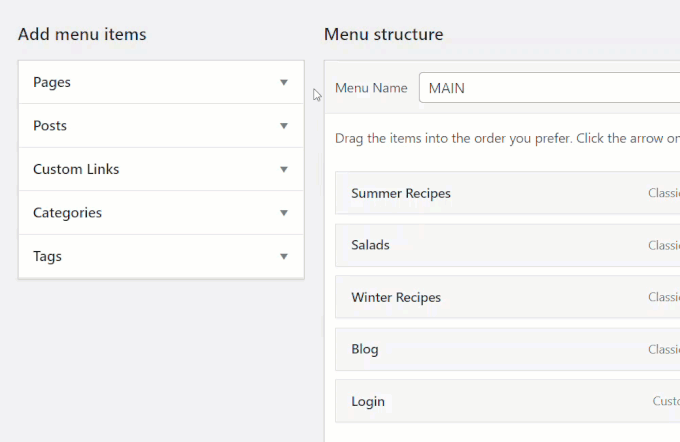
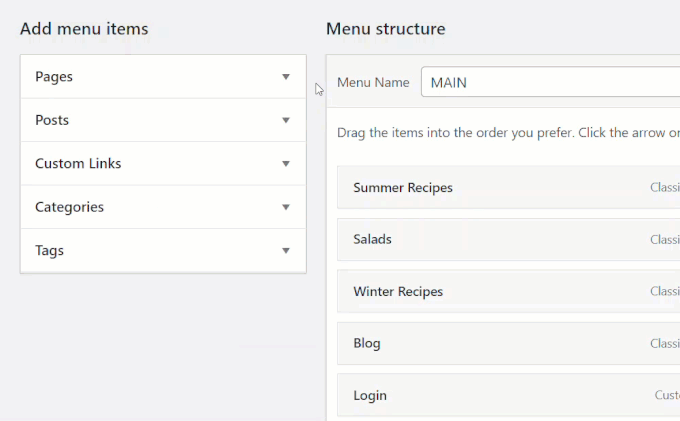
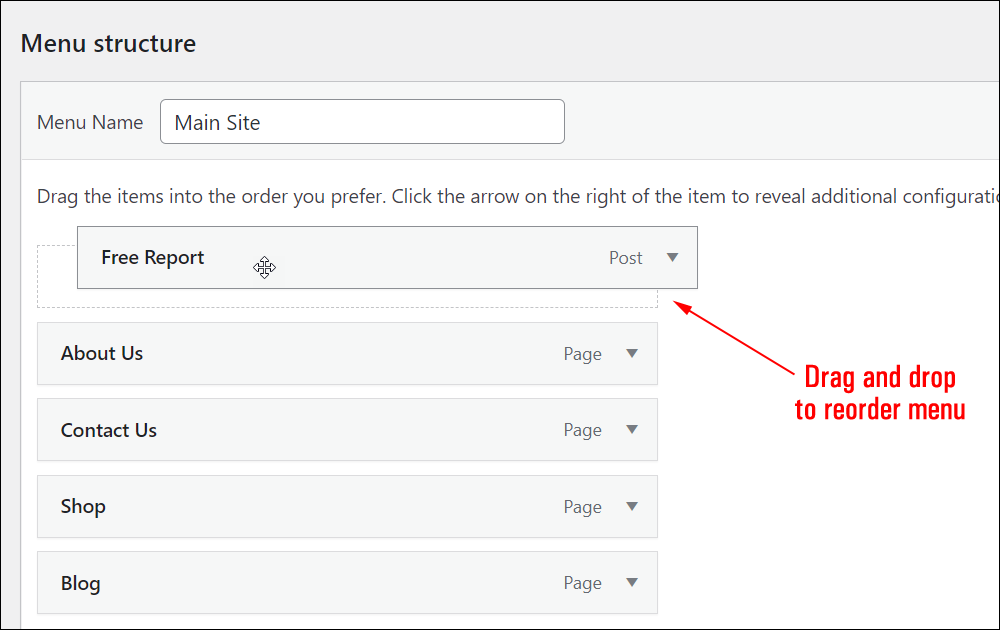
Reordering Menus
The WordPress menu editor lets you easily reorder items on your menus.
To rearrange menu items, first, make sure you have added some items to your menu.
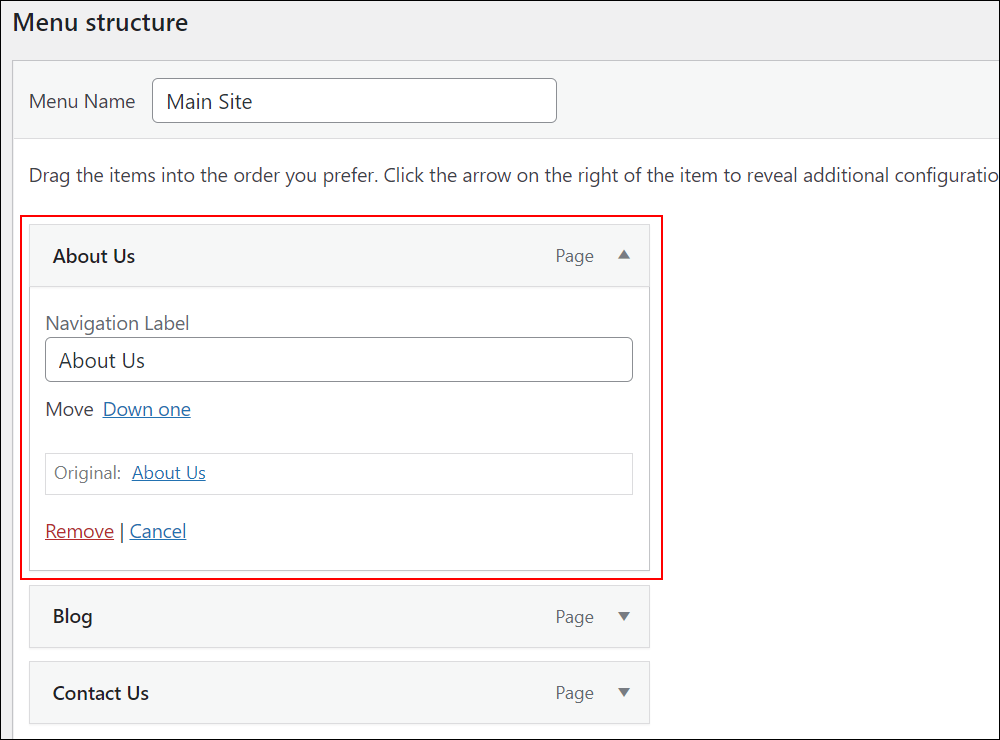
After adding menu items, notice that “Move” options will display in your item’s details section, allowing you to move the position of your item on the menu bar relative to other menu items (e.g. move up, move down, move to the top, nest under the item shown above, etc.).
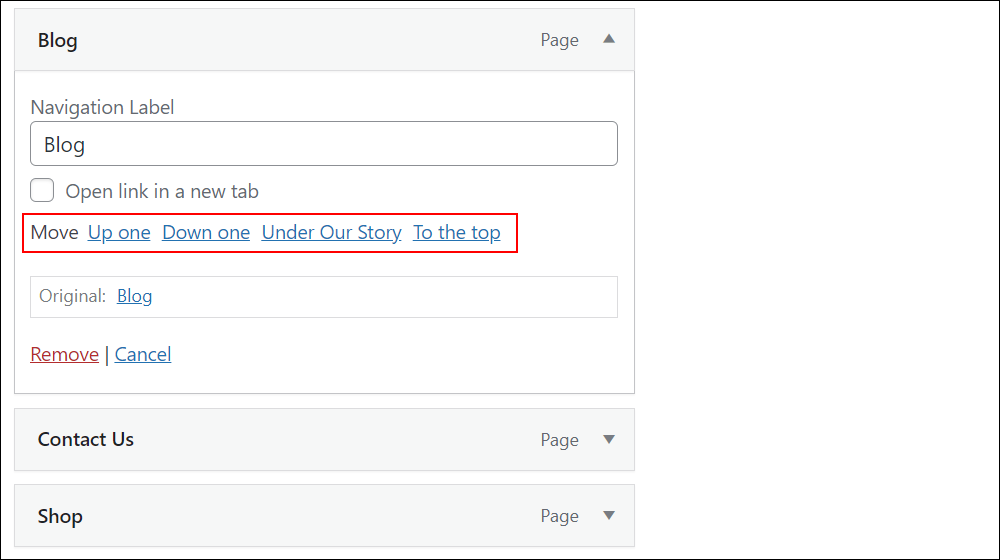
To rearrange your menu items, you can either click on a “Move” option or click the title bar of an item, hold, then drag and drop it into another position.
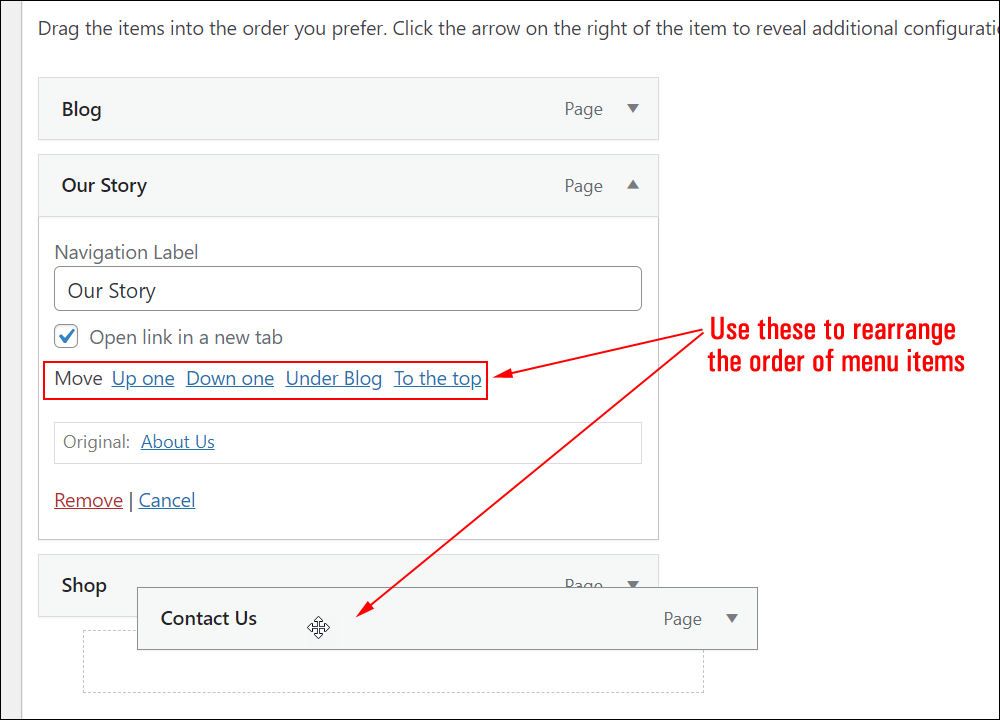
You can use a combination of both methods to get your menu items ordered exactly how you would like them to display.
How you order menu items in the menu editor is how your visitors will see them.
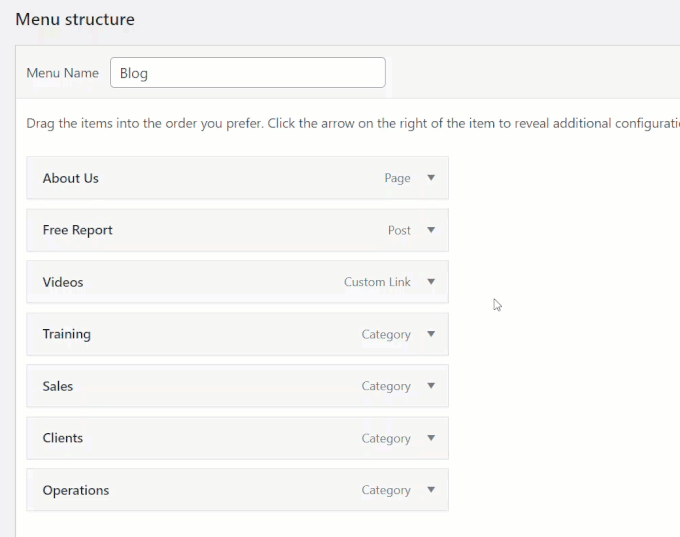
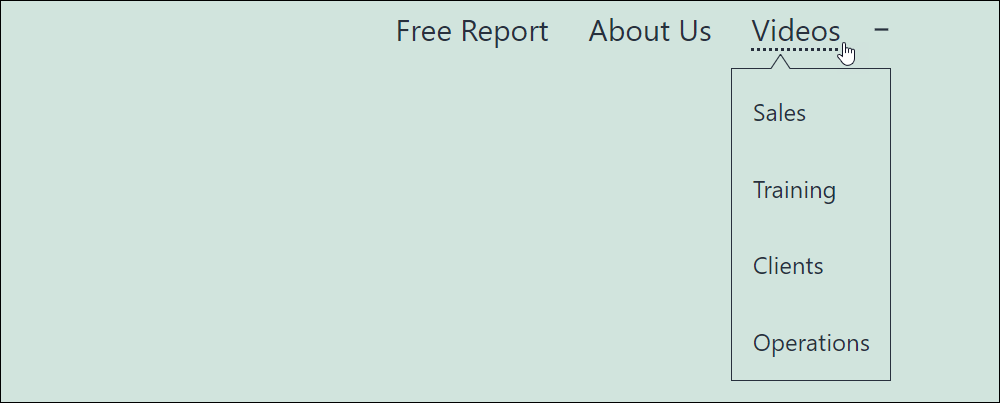
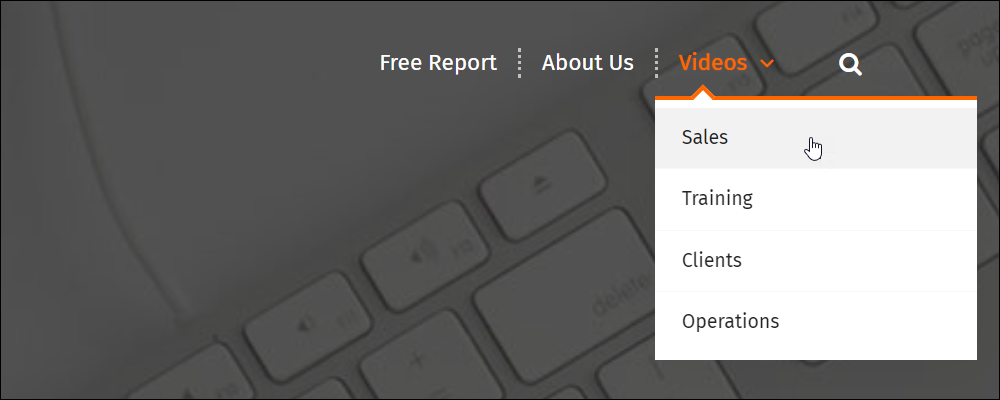
For example, here is a screenshot of a menu placed below the theme header, with items displayed in a certain order…

If we now rearrange the order of menu items to look like this…
The reordered menu links will automatically display to visitors as you have arranged them in the menu editor.

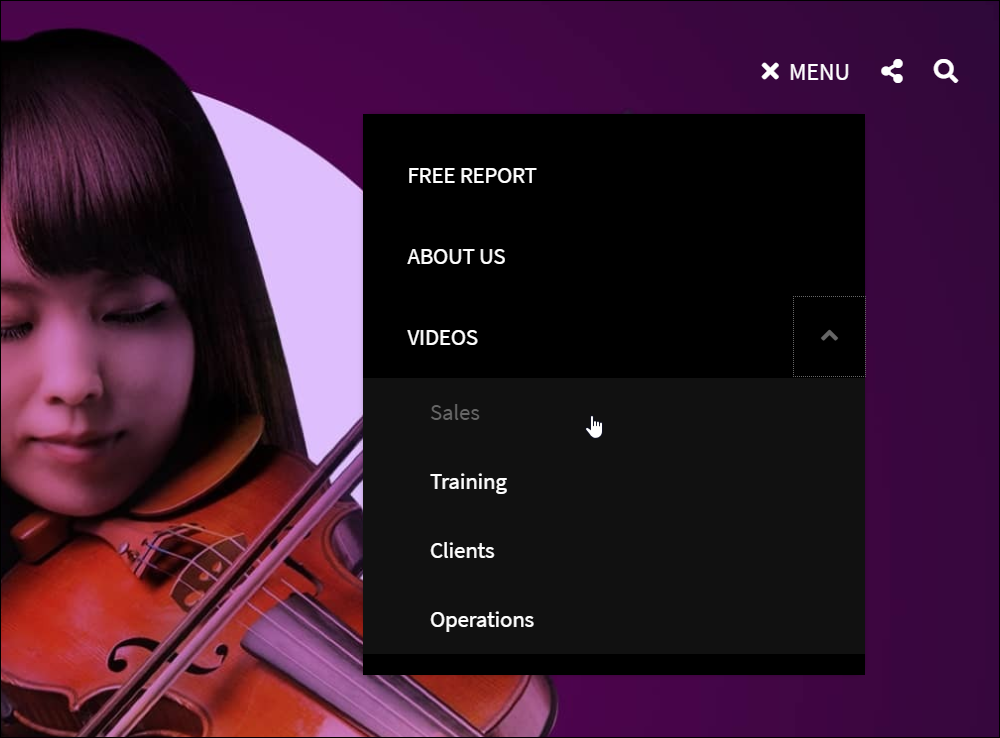
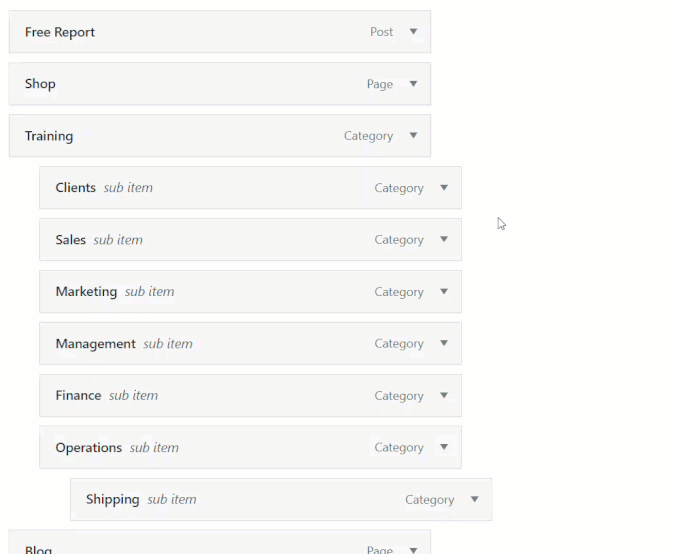
You can also create nested menus using drag-and-drop by shifting their position away from the left margin.
You can nest menu items multiple levels deep.
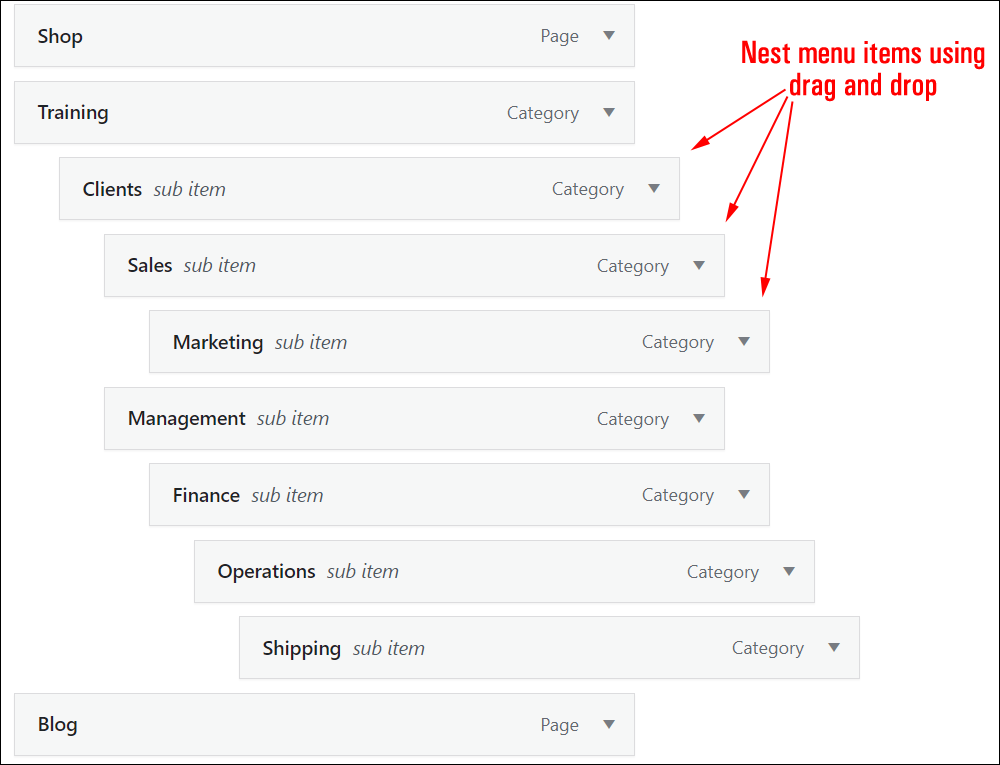
Here is an example of the resulting nested menu configuration created in the previous screenshot.
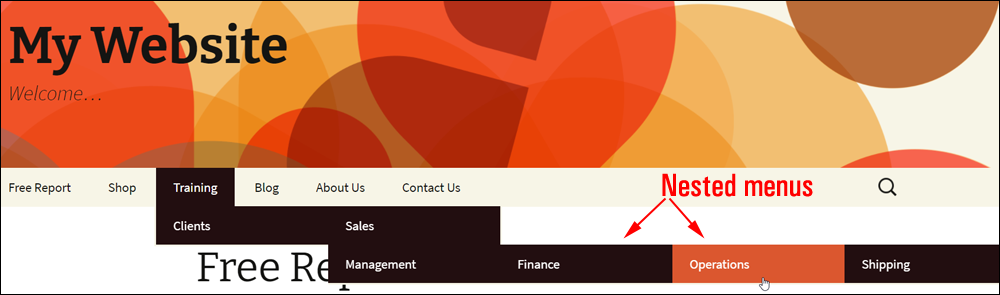
Note: menu styles are controlled by the styling options in your theme and will display differently depending on the WordPress theme installed on your site.
Here are some examples of using different themes with the same menu:
Example #1…

Example #2…
Example #3…
Example #4…
If you need help finding themes for your site, see this tutorial: Where To Find WordPress Themes
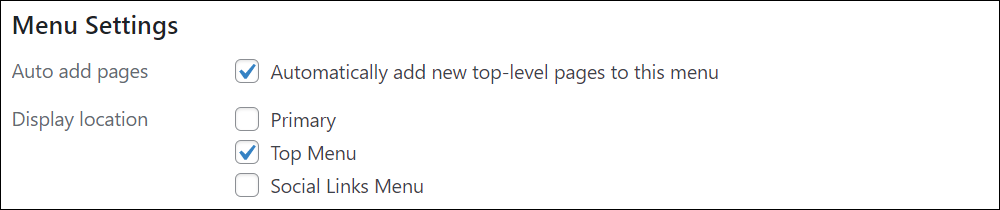
Menu Settings
The Menu Settings section lets you automatically add pages to menus depending on the options you choose:
- Auto Add Pages: Automatically add new top-level pages to this menu. When you check this box, every new page you create on your site will be automatically added to the selected menu. Note: Use this option with caution because your menu will change if you use this feature.
- Display location: Enable or disable the locations where you would like the selected menu to appear on your site. Options displayed in this section depend on your currently active theme.
![]()
Most WordPress themes support custom menus.
- If your current theme supports custom menus, you will be able to add your new menu to one of the Display locations.
- If your current theme does not support custom menus, you will need to add your new menu via the Custom Menu widget.
Manage Locations
For menus to display on your site, you will need to assign your menus to a location on your theme (e.g. header, footer, sidebar, etc.).
Some WordPress themes provide only one menu location, even if you have created multiple custom menus.
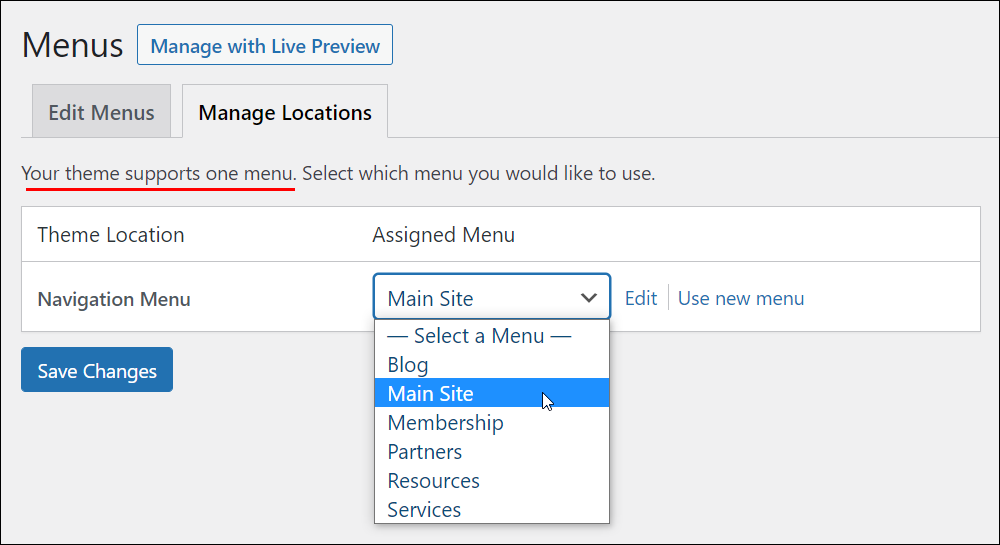
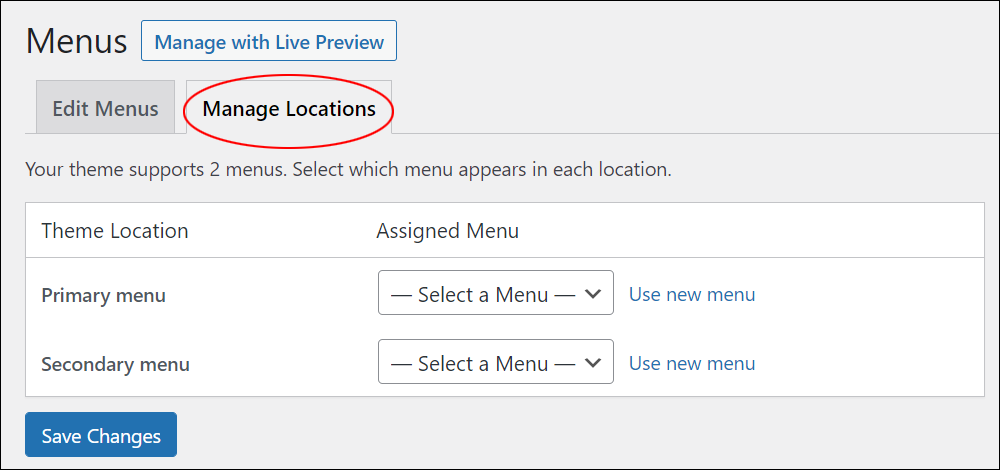
This theme supports two menu locations…
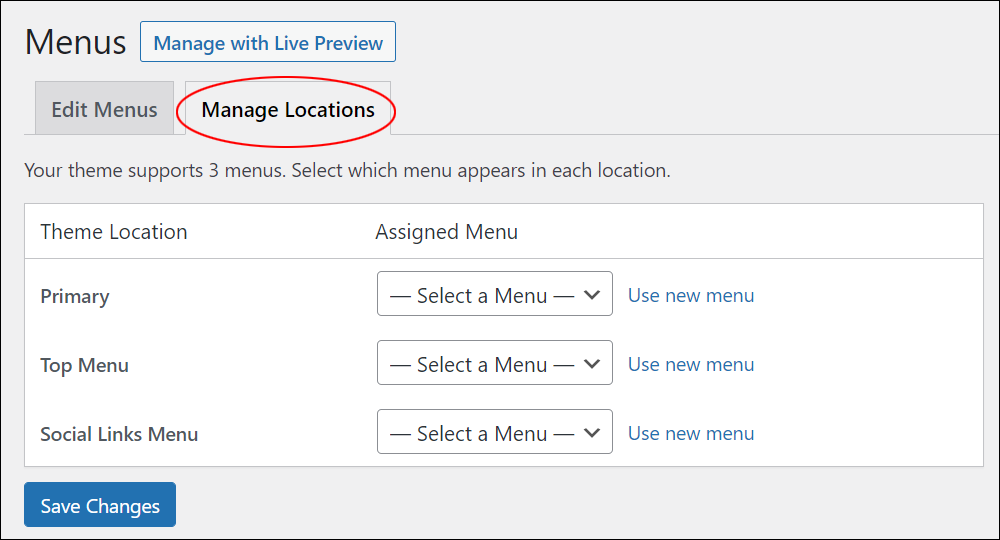
And this one has three menu locations…
Some themes support multiple menu locations, and some themes support only one menu. It all depends on your theme.
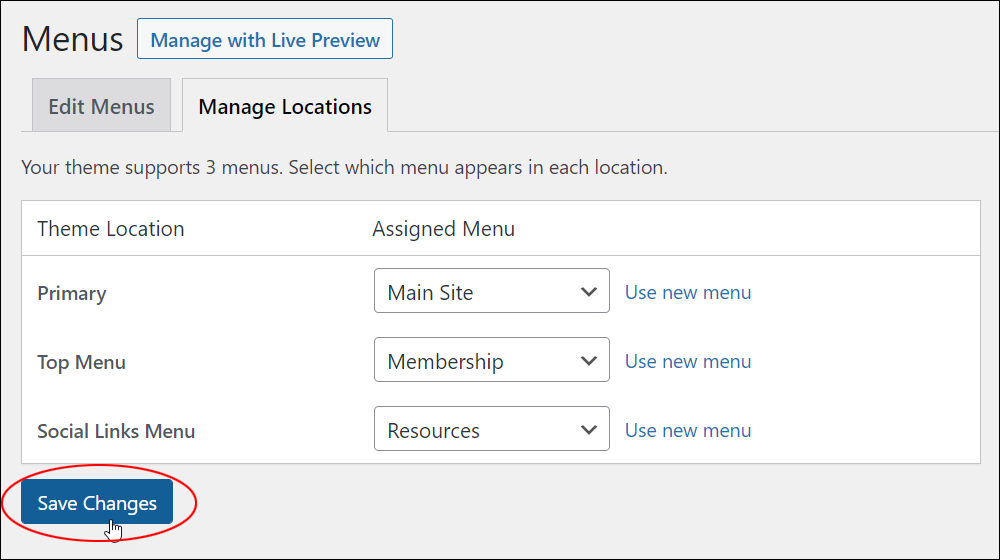
To assign an existing menu to a location on your theme, choose one of the menus you have created from the dropdown menus in the Assigned Menu column.

If your theme supports multiple menus, repeat the above process to assign menus to all menu locations.
Click on the Save Changes button when done to save your menu configuration.
Your menu locations will now be updated.

Make sure to visit your site to check that the custom menu you have created is displaying correctly in the assigned location of your theme.

Remove Menu Items
To remove an item from your menu, expand the item and click on the Remove link.
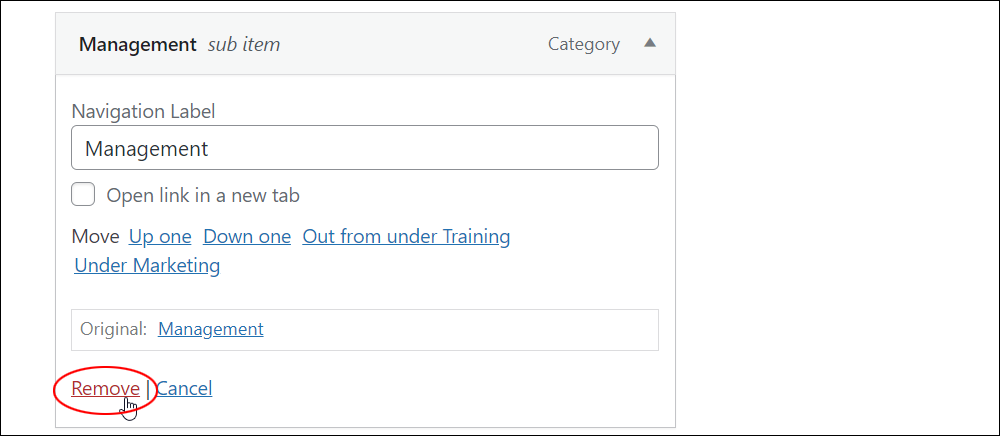
You can also delete multiple items from your menu.
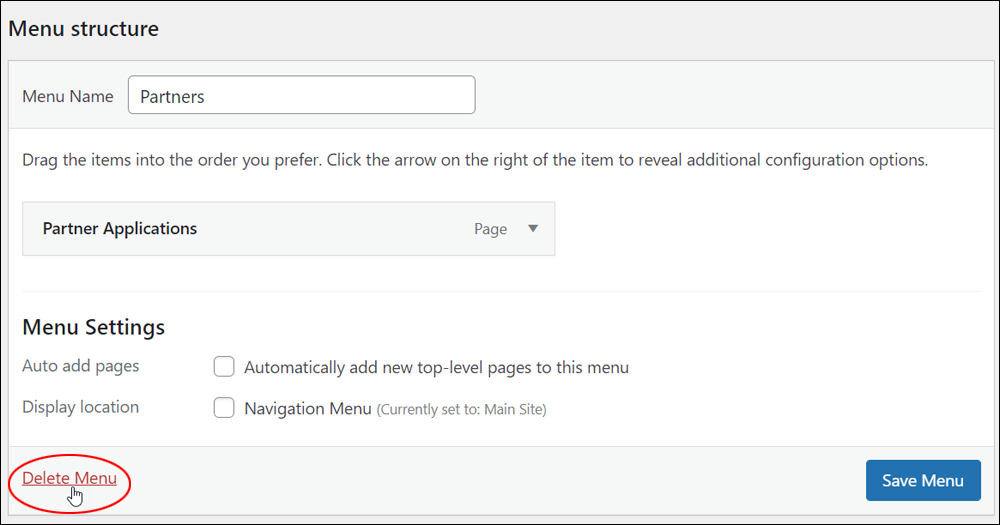
Delete Menus
To delete the menu itself, load the menu in the Edit Menus screen. Make sure that you have selected the right menu (especially if you have multiple menus), then scroll down to the bottom of the page and click on the Delete Menu link.
You will be asked to confirm the deletion. Click OK to proceed or Cancel to escape.
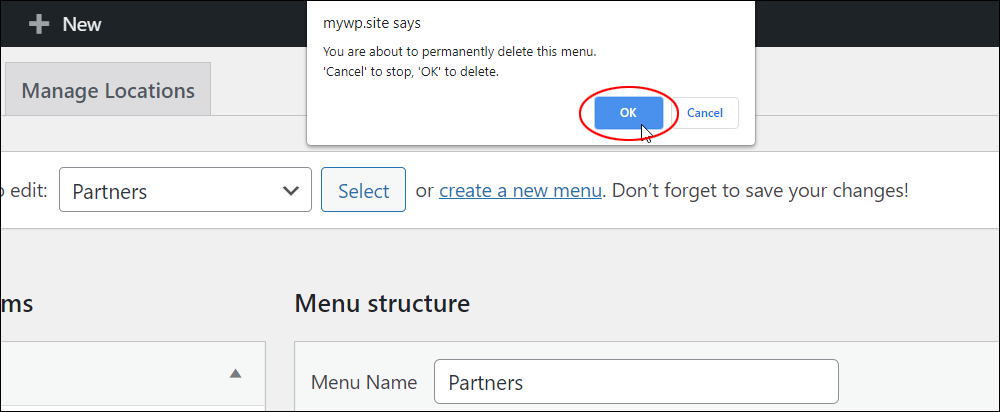
The selected menu will be deleted.

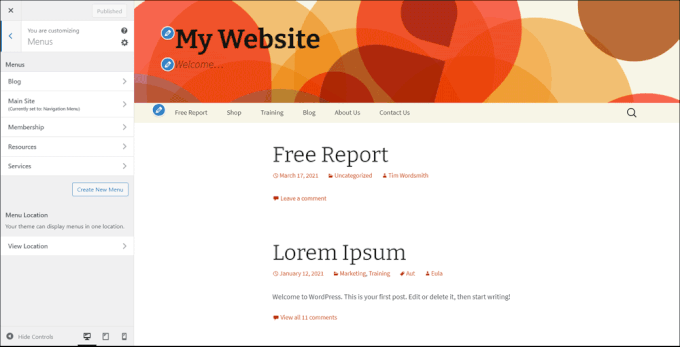
Manage With Live Preview
Use the Manage with Live Preview feature to view any changes made to your menus before permanently saving these.

This will bring up the Theme Customizer screen and Live Preview feature.
If you need help using this feature, see this tutorial: How To Use The WordPress Theme Customizer
Using Custom Menus With Widgets
Custom menus can be added to your sidebar and other menu locations using widgets.
To learn how to add menus to your site using widgets, see this tutorial: How To Use Widgets – Part 3
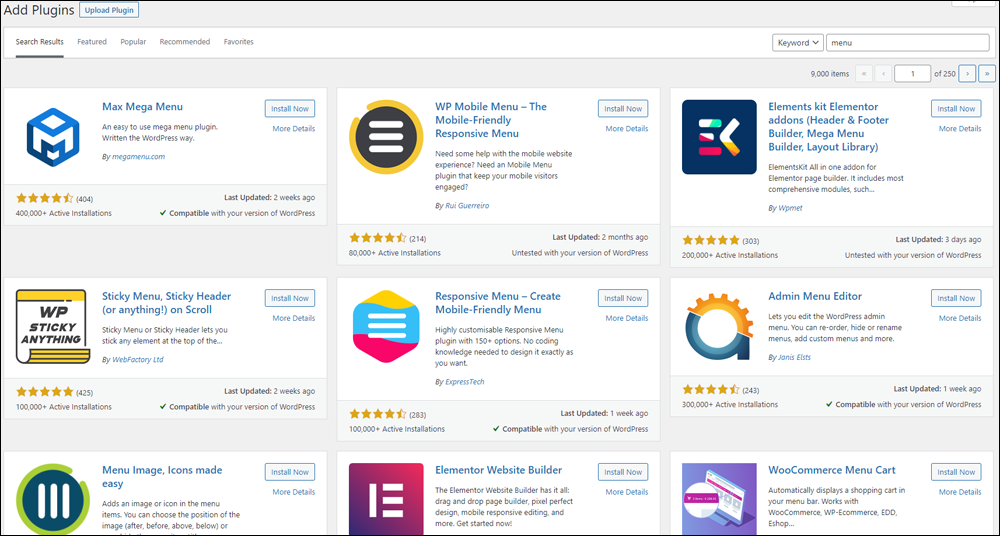
Additional Information
There are many plugins you can use to enhance your WordPress menus.
You can search for WordPress menu plugins inside your WordPress dashboard (Plugins > Add New), or the WordPress Free Plugin Directory.
Congratulations! Now you know how to create and use custom navigation menus in WordPress.
***

Updated: April 9th, 2023