
How To Edit Your WordPress User Profile
 The Users Profile section lets you configure aspects of your profile like how your name will display on your site, your administrative/login e-mail address and password, and other settings associated with your user account, such as your author bio, profile image, and personal and security options.
In this tutorial, you will learn how to configure and edit your user profile in WordPress.
We will also show you how to set up an effective author bio that will automatically display information about you in the “Author Archives” section of your blog and link to your published content, and how to use this feature to better promote yourself and your business online.
Refer to the tutorials below for additional information on topics related to this tutorial:
- How To Log Into WordPress
- How To Log Out Of WordPress
- How To Reset Your WordPress Password
- The WordPress Dashboard
- How To Customize Your WordPress Dashboard
- How To Use WordPress Gravatars
- How To Use The WordPress Classic Editor
Editing Your User Profile
On the far right-hand side at the top of your admin dashboard is the Howdy, User Name section.
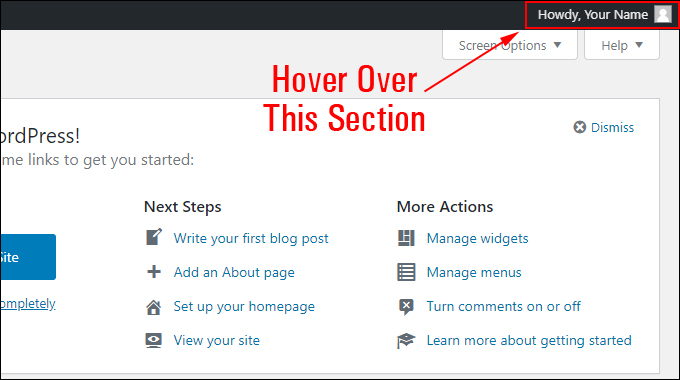
If you hover over this section, it will expand and display your profile image (Gravatar), your name and username, with links pointing to your Profile screen and a link that lets you log out of your site securely.
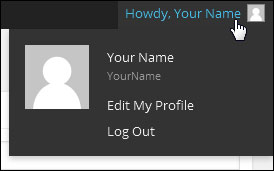
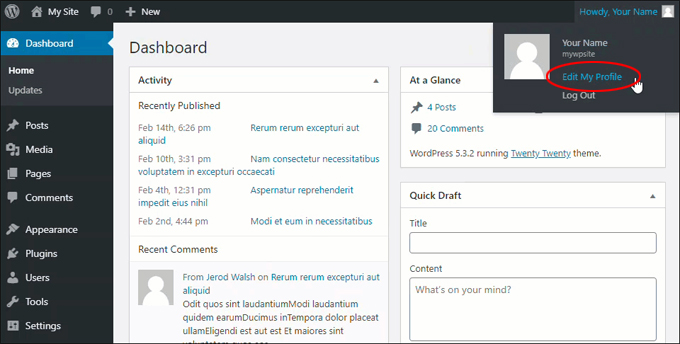
To access your User Profile section, select Edit My Profile.
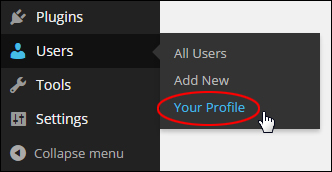
You can also access your user profile screen from the main navigation menu by selecting Users > Your Profile.
This brings you to the Profile screen.
The Profile screen contains various subsections that let you configure, view, and manage information about your user account.
These subsections include:
- Personal Options
- Name
- Contact Info
- About Yourself
- Account Management
Let’s go through each of these subsections.
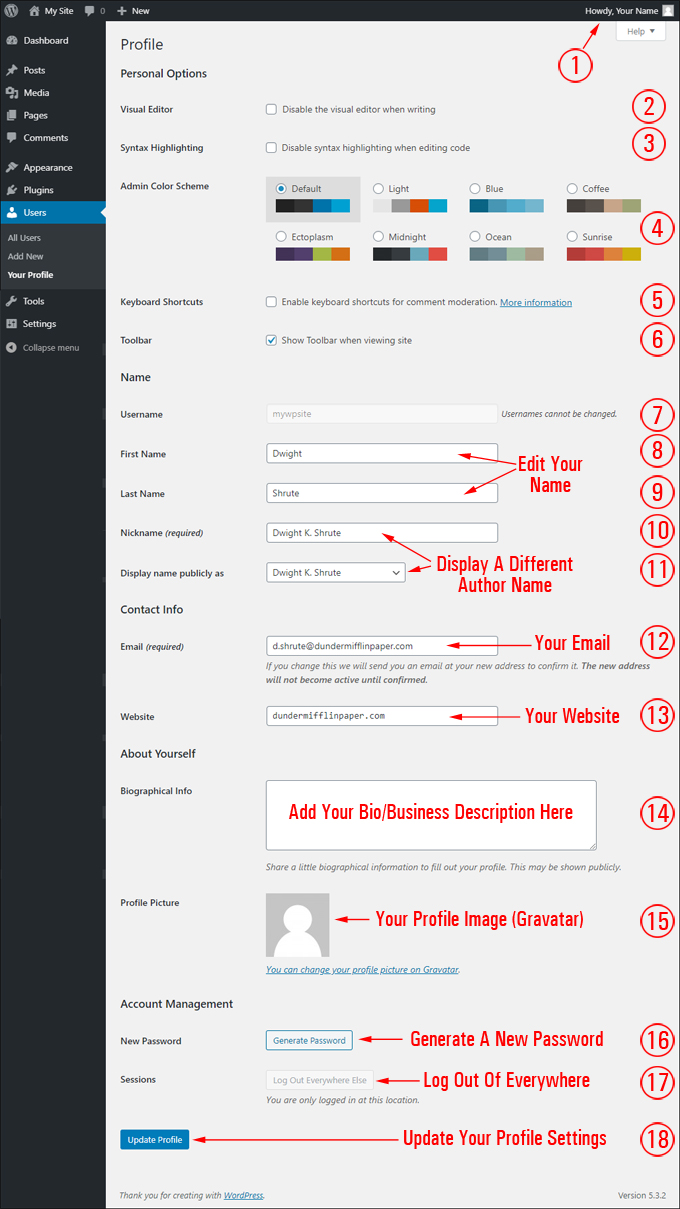
Your Profile Sections
Please refer to the above screenshot as you work through the sections below.
User Profile Screen
Accessing Your User Profile [1]
As previously mentioned, you can access your profile by clicking on the “Howdy, User Name” section, located on the top right-hand side of the screen, and selecting “Edit My Profile” from the drop-down menu, or selecting Users > Your Profile from the main navigation menu.
Profile > Personal Options
You can ignore this section unless you specifically want to customize aspects of your WordPress site administration area that are only visible to you (no one else), such as disabling the visual editor when writing, changing the admin area’s color scheme, or enabling keyboard shortcuts for comment moderation.
Visual Editor [2]
Tick the “Disable the visual editor when writing” checkbox to disable the visual editor and use the plain HTML editor instead. [2]
![]()
Tip: If you experience any issues trying to insert code into your posts or pages (e.g. HTML), try disabling the visual editor by ticking the checkbox in this section.
Syntax Highlighting [3]
Enabling this option allows code inserted into a post or page to be highlighted. In most cases, you can leave the checkbox unticked and ignore this section unless you plan to use code extensively in your content.
Admin Color Scheme [4]
You can customize the look of your WordPress Dashboard by selecting a new WordPress admin color scheme.
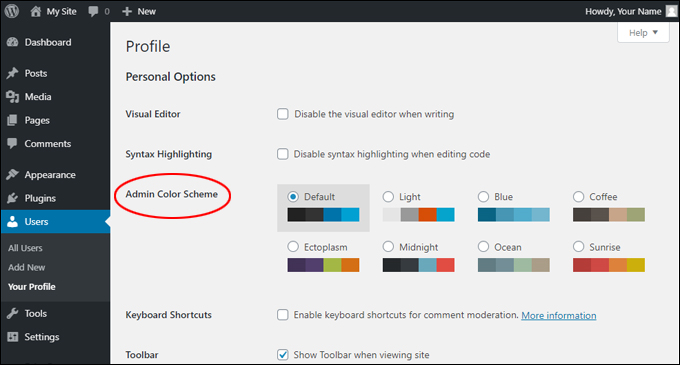
WordPress User Profile: Changing And Customizing Your Default WordPress Color Scheme
You can choose a different color scheme for your site’s admin area using the default choices provided in this section or add a custom color scheme using various WordPress plugins.
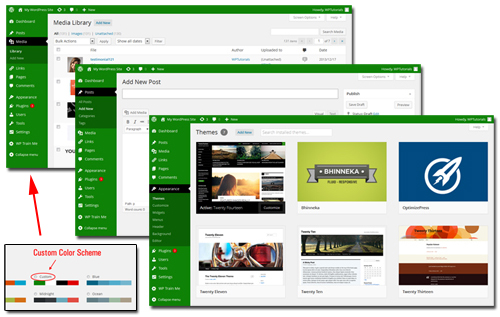
Note: Although this has no impact on what your visitors will see when they visit your site as your theme controls the design of your website, this feature allows users to customize the backend of their admin area to suit their personal preferences, brand it with your corporate colors, etc.
![]()
To learn how to customize your WordPress dashboard, see this tutorial: How To Customize Your WordPress Dashboard
Keyboard Shortcuts [5]
Tick the “Enable keyboard shortcuts for comment moderation” box to use keyboard shortcuts when moderating comments and to perform faster actions.
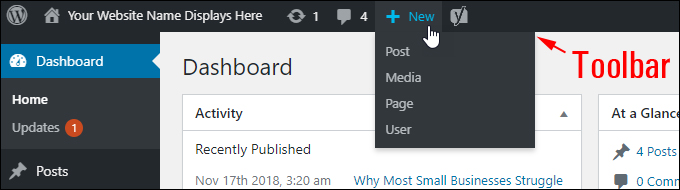
Toolbar [6]
The Admin Toolbar appears at the very top of your admin screen and provides you (and other logged-in users) with access to useful functions, features, information, and shortcuts.
![]()
Note: Leave the “Show Toolbar when viewing site” checkbox enabled to display the Admin Toolbar in your WordPress admin area.
To learn more about using the WordPress admin toolbar, see this tutorial: The WordPress Dashboard
Profile > Name
Username [7]
You cannot change your username in the User Profile screen. Not even the site administrator can do this.
There are two ways to change your username:
- By editing the username field in your WordPress database (requires knowledge of editing MySQL database tables).
- By creating a new user profile with your desired username (for help with this, see our tutorial on How To Manage WordPress Users)
Note: Changing your username will affect your login as your username is required to log into your site.
First Name [8] / Last Name [9]
Change your First Name and Last Name details in this section.
Simply enter your first name and last name into the corresponding text fields.

Nickname [10] / Display Name Publicly As [11]
Select a nickname from the Display name publicly as drop-down menu if you want to display a different author name in your posts than the name shown in the Nickname (required) field.
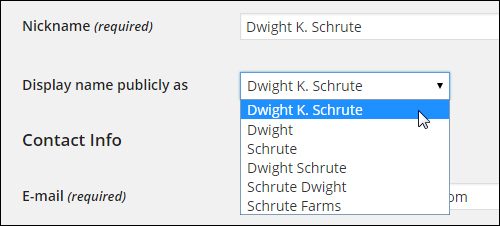
Note: You can add multiple nicknames to your profile section.
Once you select a new nickname, all your published posts and comments will display using this nickname.
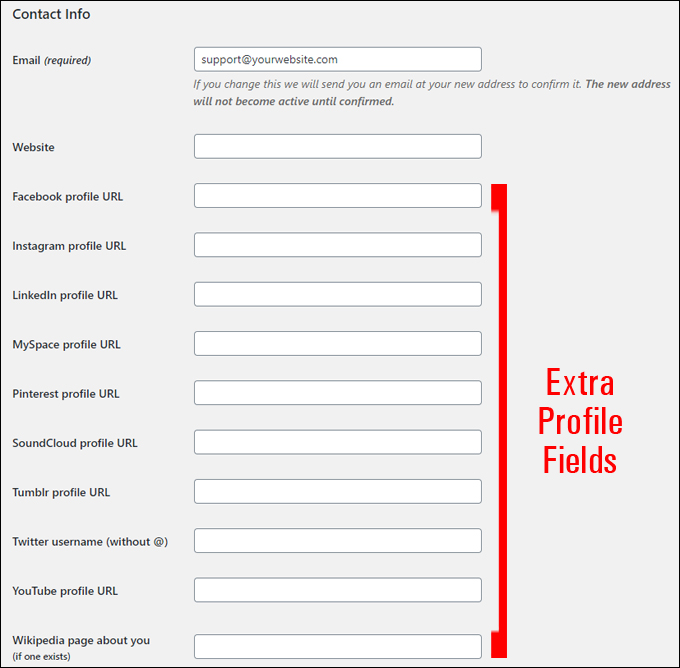
Profile > Contact Info
Email [12]
Make sure to enter your correct email address into the Email (required) field. This is a required field (see “Notes” section below for more information).
Website [13]
Enter the web address of your website or blog into the Website field (optional).
If you have another website that you would like to promote in your profile, then enter the address of that website instead.
Profile > About Yourself
Biographical Info [14]
Add a personal or business description for your site visitors or blog readers into the bio box.
![]()
The bio section of your profile is a useful feature for:
- Telling site visitors about yourself or your business,
- Establishing authority, brand, likeability, or context for your readers,
- Promoting your products or services,
- Inviting readers to subscribe to your newsletter or download a special report.
For more details about using this feature, see the “Your User Profile: Additional Tips” section below.
Profile Picture [15]
Your profile image will display in this section if you have set up a profile using the WordPress Gravatar service.
To learn how to set up a Gravatar account and add our profile picture, see this tutorial: How To Use WordPress Gravatars
Profile > Account Management
Password Settings [16]
This section lets you change your login password.
Use the New Password section only if you need to change or reset your login password.
Note: You will need to confirm your new password before the system can accept your password change.
To learn more about changing or resetting your login password in WordPress or what to do if you have lost/forgotten your password, see this tutorial: How To Reset Your WordPress Password
Log Out Of All Other Sessions [17]
WordPress lets you log out of all current sessions except the one in your current browser. This is useful if, for example, you have left your account logged in at a public computer, or if you’ve lost or misplaced your phone.
To learn more about logging out securely in WordPress, see this tutorial: How To Log Out Of WordPress
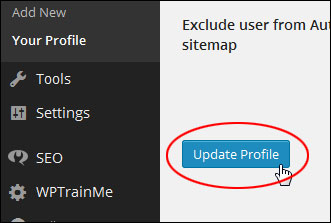
Update Profile [18]
Remember to click the Update Profile button if you make any changes to your profile section. This saves your changes and updates your profile settings.
Your User Profile: Important Notes
- WordPress only requires an email address and a nickname in your User Profile section. Everything else is optional.
- Your email address is only used for administrative purposes.
- Your email address is never sent to any other site (including WordPress) and is never displayed on your site (unless you choose to publish or display it or use a WordPress theme that displays your email address – e.g. in a ‘Contact Us’ section).
- Only registered users on your site can access the email address you provide if certain permissions or plugins are used.
- Every email address associated with a registered user must be unique.
Also …
Installing certain plugins gives you the ability to add, remove, or customize fields in your User Profile screen (e.g. adding social media URLs or additional functionality via plugins, themes, etc.)
Your User Profile: Additional Tips
Tip #1: Check that Show Toolbar when viewing site is enabled in the Toolbar section of your Profile screen.

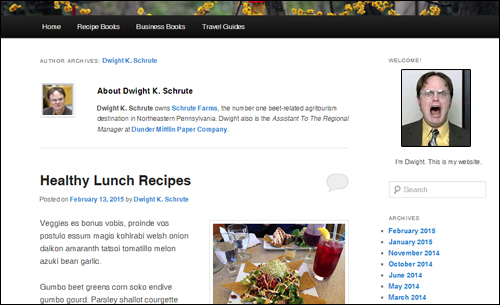
Tip #2: Your user profile gives you an opportunity to promote your business to your post readers and visitors and link to other sections of your site or to external sites (e.g. social media pages).
To start with, add a Nickname and select the author name you would like to display on your posts.
After you have set this up, a link with your nickname will display on all the posts you publish (unless your site’s theme has been configured to hide the post author link).
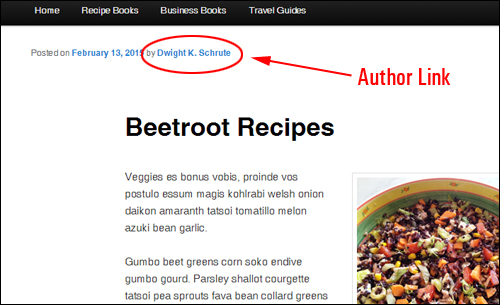
Clicking on this link will send your visitors to the Author Archives section of your site, where they can then learn more about you and view all the posts you have published.
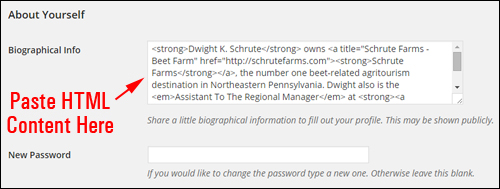
Your bio box lets you include basic HTML elements like hyperlinks and simple text formatting (e.g. bold and italicized words).
Add text formatting and links to enhance your author’s description and to promote yourself or your services, products, other websites, etc.
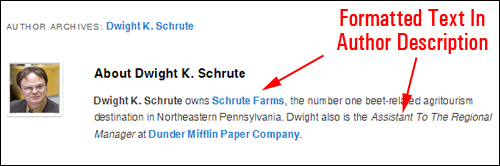
To create your description, simply type, or paste in HTML formatted content into the About Yourself > Biographical Info text area in your Profile section.
For a tutorial on how to use basic HTML to format text and make words bold, italicized, use colored text, etc., see this tutorial: A Basic Guide To HTML For Beginners
WordPress User Profile – FAQs
Here are frequently asked questions about WordPress user profiles:
How do I access my WordPress user profile?
You can access your WordPress user profile by logging into your WordPress dashboard and navigating to the “Users” section. Click on your username to view and edit your profile settings.
Can I change my WordPress username?
WordPress doesn’t allow users to change their usernames by default due to security reasons. However, you can create a new user with the desired username and transfer your content to the new account.
What information can I edit in my WordPress user profile?
You can edit various details in your WordPress user profile, including your display name, email address, password, biography, and profile picture.
How do I find all my posts and replies on WordPress?
You can find a list of all your posts and replies on your WordPress user profile page.
Can I customize my WordPress user profile page?
Yes, you can customize your WordPress user profile page by using plugins or custom code to add additional fields, change the layout, or enhance the user experience.
How do I add a profile picture to my WordPress user profile?
Users can add or change their profile picture by navigating to their profile page and clicking on the “Change Profile Picture” option.
Is it possible to add social media links to my WordPress user profile?
Yes, you can add social media links to your WordPress user profile by using plugins or by editing your profile to include custom fields for social media URLs.
How do I enable users to register and create their own profiles on my WordPress site?
You can enable user registration in WordPress by going to Settings > General and checking the “Anyone can register” option. You can then customize the registration process and user roles in the WordPress dashboard.
How can I display additional information on user profiles?
Additional information on user profiles can be displayed using custom fields, which can be added via plugins or by customizing the theme’s code.
What permissions can be granted to different user roles regarding profile editing?
WordPress provides various user roles with different permissions. Administrators have full access to edit any profile, while other roles like Authors or Contributors may have limited editing capabilities.
Are there plugins available to enhance user profiles?
Yes, numerous plugins are available on the WordPress plugin repository to enhance user profiles with features like social media links, biographies, and more.
Can users other than administrators edit their profiles?
Yes, users can edit their profiles by accessing the “Edit Profile” page in the WordPress dashboard.
Can users delete their own accounts?
Depending on the settings configured by administrators, users may have the option to delete their accounts from their profile settings.
Congratulations! Now you know how to edit your user profile and settings in WordPress.
***
Dwight Schrute is a fictional character from The Office. Images of the actor (Rainn Wilson) were used in this tutorial for illustrative/educational purposes only under fair use copyright.

Updated: April 23rd, 2024