How To Make Sticky Posts In WordPress
 In this tutorial, you will learn what a ‘sticky’ post is and how to make a sticky post in WordPress.
Please make sure to complete the tutorials below. They will help you get the most out of this tutorial:
- WordPress Posts vs WordPress Pages Explained
- How To Create A Post In WordPress – Part 1
- How To Create A Post In WordPress – Part 2
- How To Edit and Delete Posts In WordPress – Part 1
- How To Edit and Delete Posts In WordPress – Part 2
- How To Use The WordPress Quick Edit Feature
- How To Create A Blog Page In WordPress
What Is A Sticky Post?
If you frequent any online forums or discussion groups, then you are probably familiar with the concept of a ‘featured’ topic, thread, or post.
This is where a selected item remains “pinned” to the top of the screen and does not get displaced from its position by more recent entries. It stays fixed in its position, as older entries get pushed lower down the page.
Similarly, WordPress also lets you feature posts at the top of your blog page even as you add newer posts, which then display below your featured item and older entries get pushed down the page.
In WordPress, featured, fixed, or pinned posts are referred to as ‘sticky’ posts.
How To Create A Sticky Post In WordPress – Step-By-Step Tutorial
By default, WordPress displays posts on your blog post page in reverse chronological order (i.e. newer posts are listed at the top and older posts get pushed down the page).
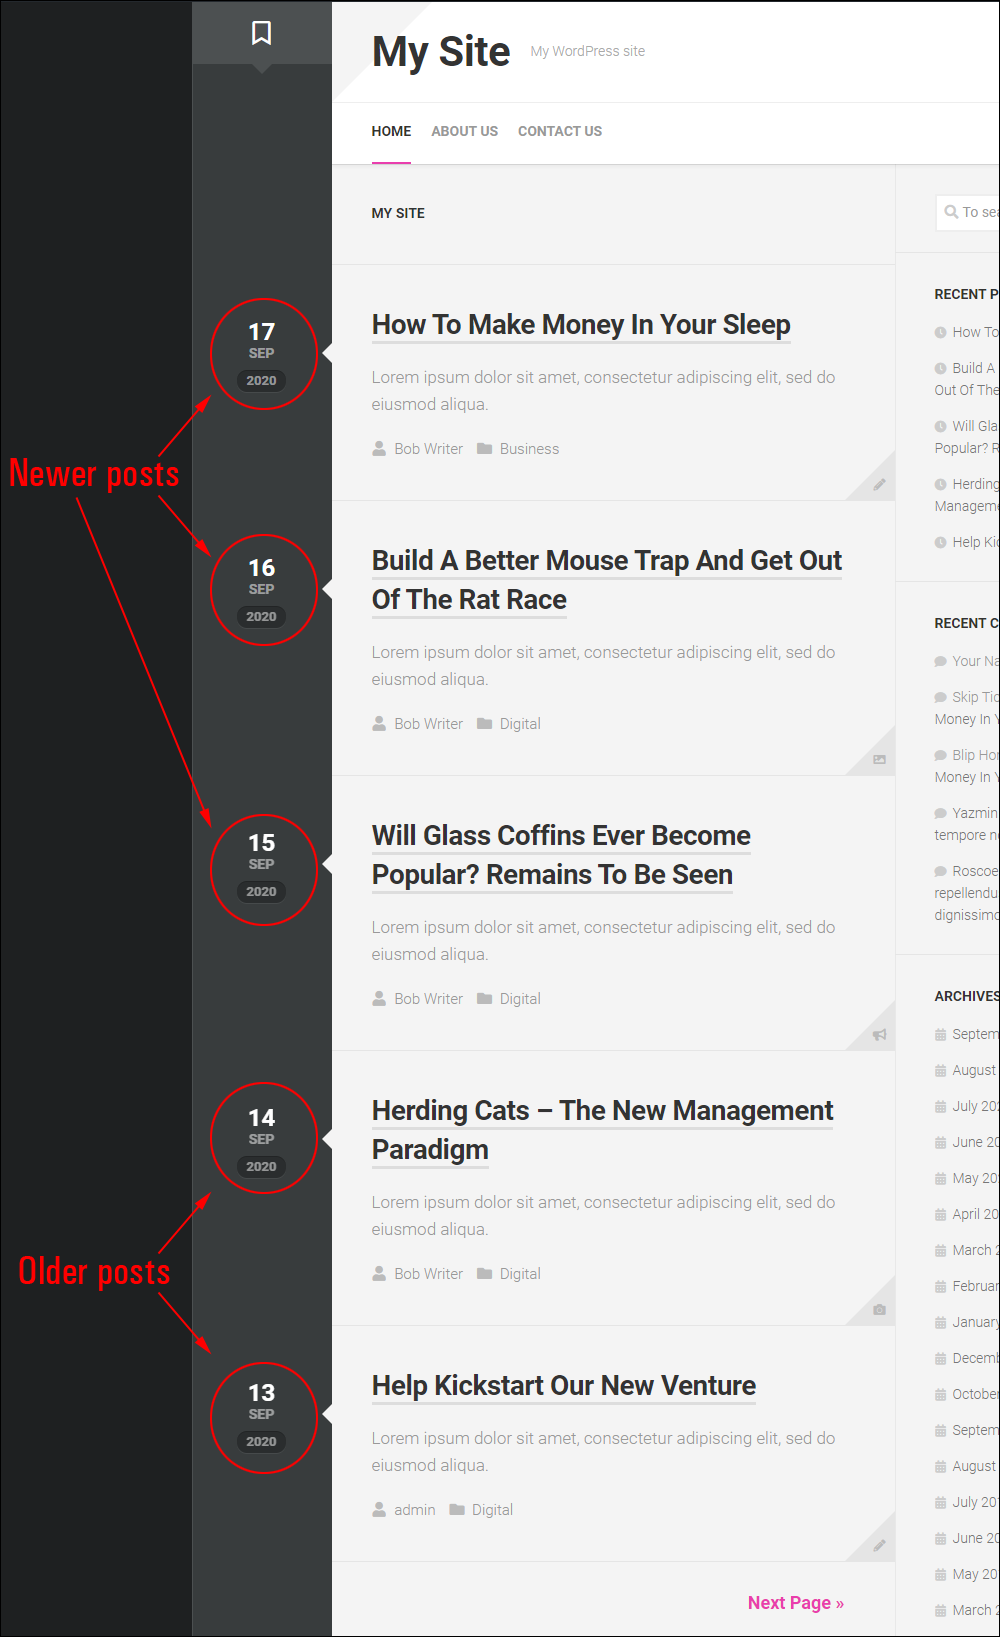
In WordPress, you can designate posts to feature and display at the top of your blog page by making them sticky. Your visitors will then see these posts above all other posts.
Sticky posts will remain pinned at the top of your blog page until you remove the ‘sticky’ option on your Post Edit screen.
Follow the steps below to make any post on your site ‘sticky’:
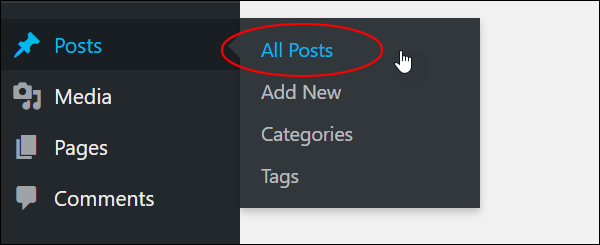
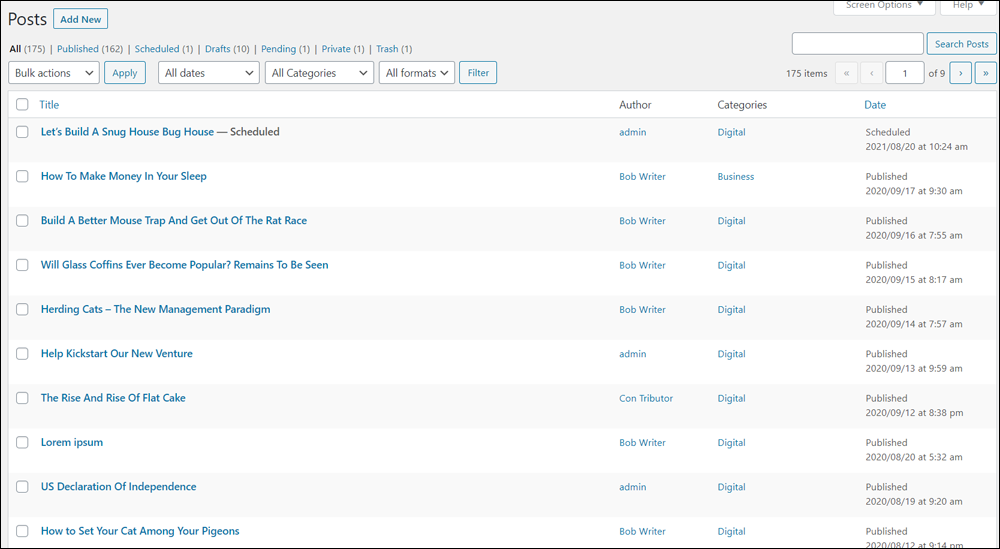
Log into your WordPress administration area and select Posts > All Posts from the main menu.
This will bring up the Posts screen with your Table of Posts.
From here, there are two ways to make your posts sticky.
Let’s look at each of these methods:
1. Make A Post Sticky In WordPress Using Quick Edit
In the Posts screen, locate the post you would like to make sticky, then hover over the post title to view the options menu and click on the ‘Quick Edit’ link.

The inline editor will expand and display all of your post editing options. Look for the ‘Make this post sticky’ option.
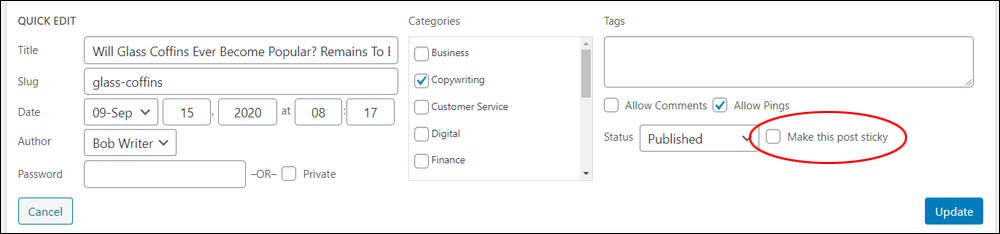
Tick the ‘Make this post sticky’ checkbox.
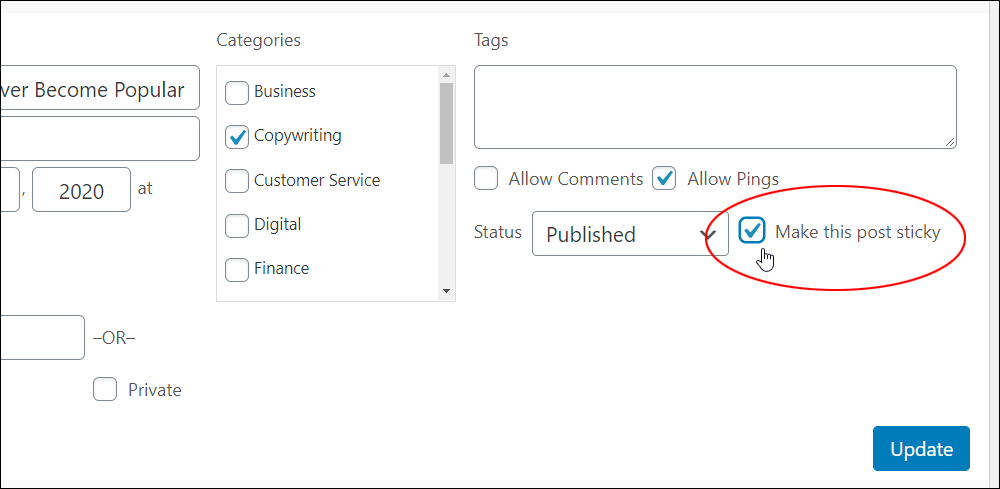
Click the ‘Update’ button to save your changes and update your post settings.

Your post is now ‘sticky.’
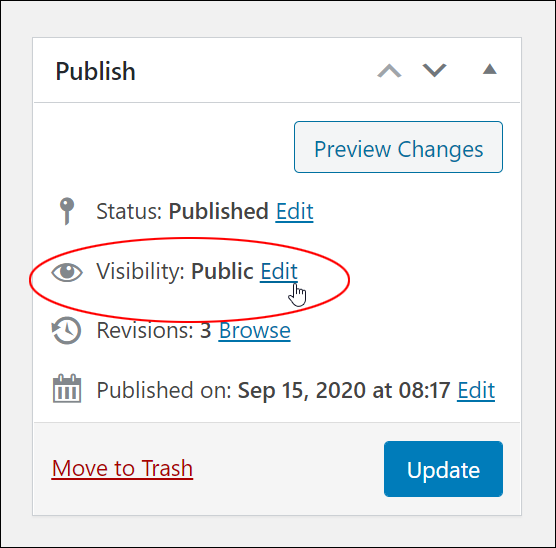
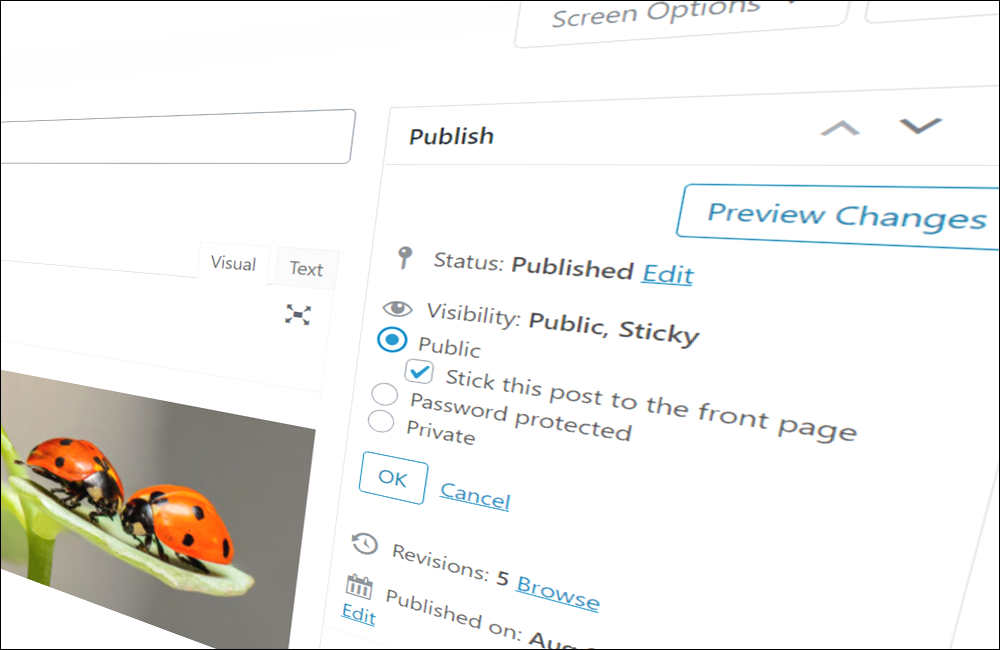
2. Make A Post Sticky From The Post Edit Screen
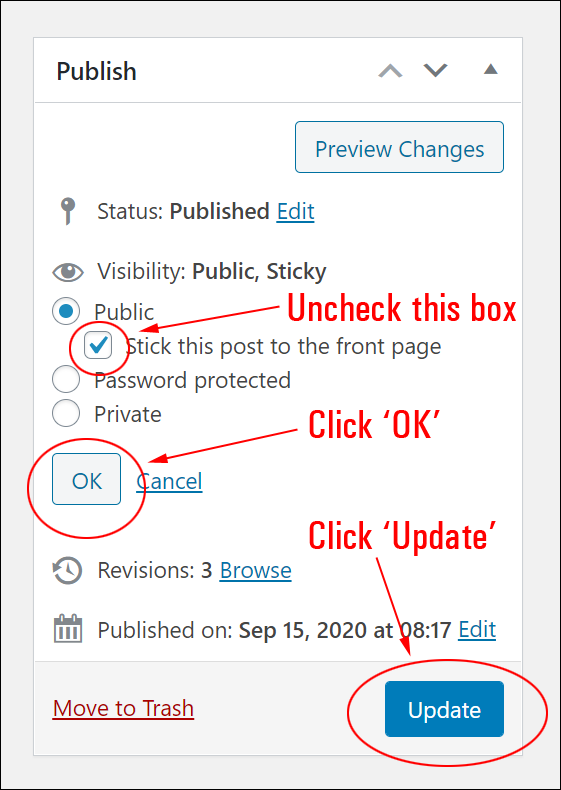
If you are creating a new post or editing the content of an existing post, you can make the post sticky by clicking the Publish Box > Visibility: Public > Edit link as shown below.
Tick the checkbox next to ‘Stick this post to the front page’ then click the OK and Update buttons to save your changes and update your settings.
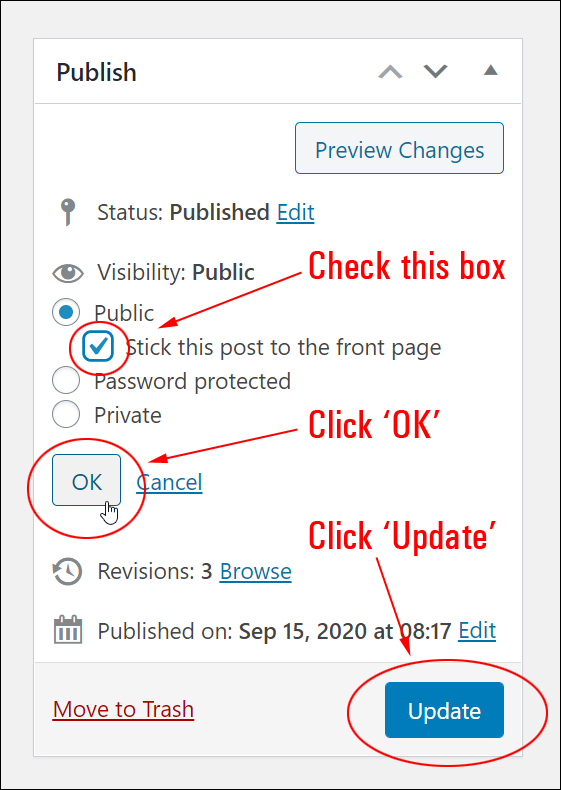
Your post is now ‘sticky.’
Using Sticky Posts In WordPress
When you make a post sticky in WordPress, its post status will display as ‘Sticky’ in the Table of Posts.

The post will then feature at the top of your blog page above all other regular posts. It will remain pinned to the top even as newer posts are added.
![]()
Notes:
- The style of your featured or sticky post depends on the active theme you have installed on your site.
- Some themes do not style sticky posts (i.e. posts marked as sticky don’t look any different from regular posts).
- You can have more than one sticky/featured post on your blog page.
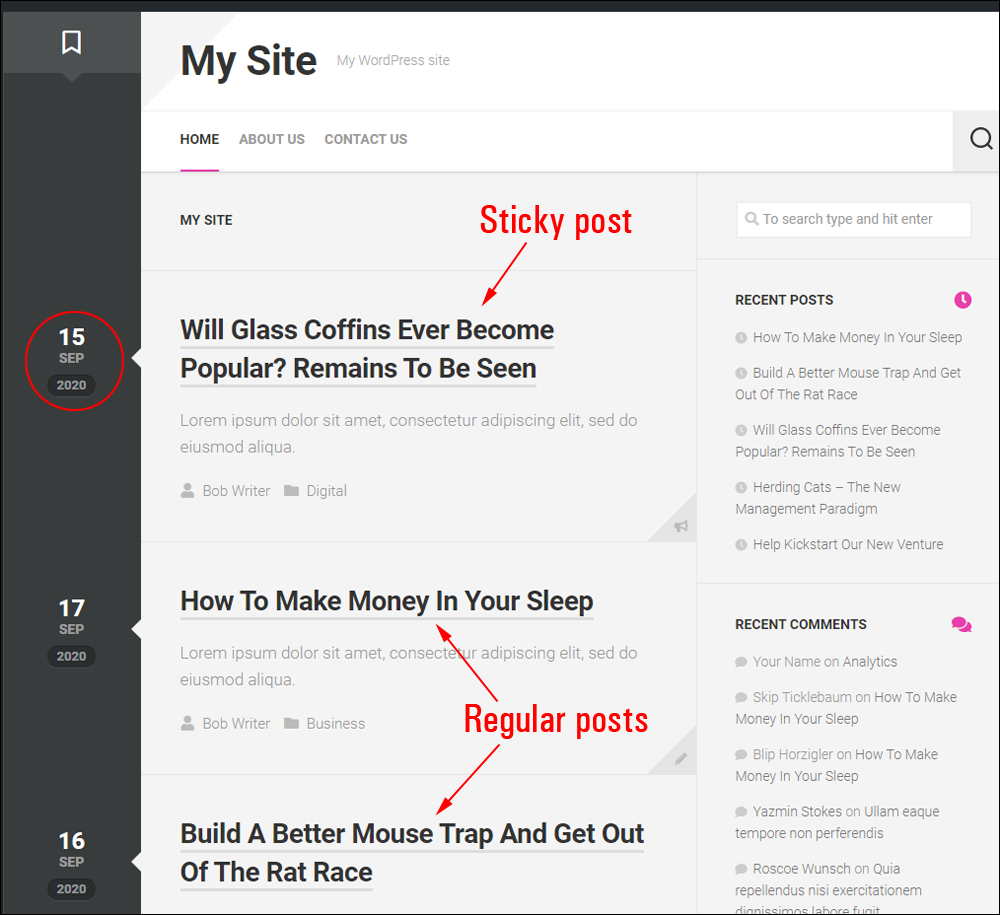
As mentioned above, the style of your sticky post depends on the active theme you have installed. In some themes, sticky posts really stand out from regular posts, while in other themes, visitors will barely notice that a post is being featured on the blog page.
For example, the theme below displays a pin icon and the word ‘Featured’ when you make a post sticky.

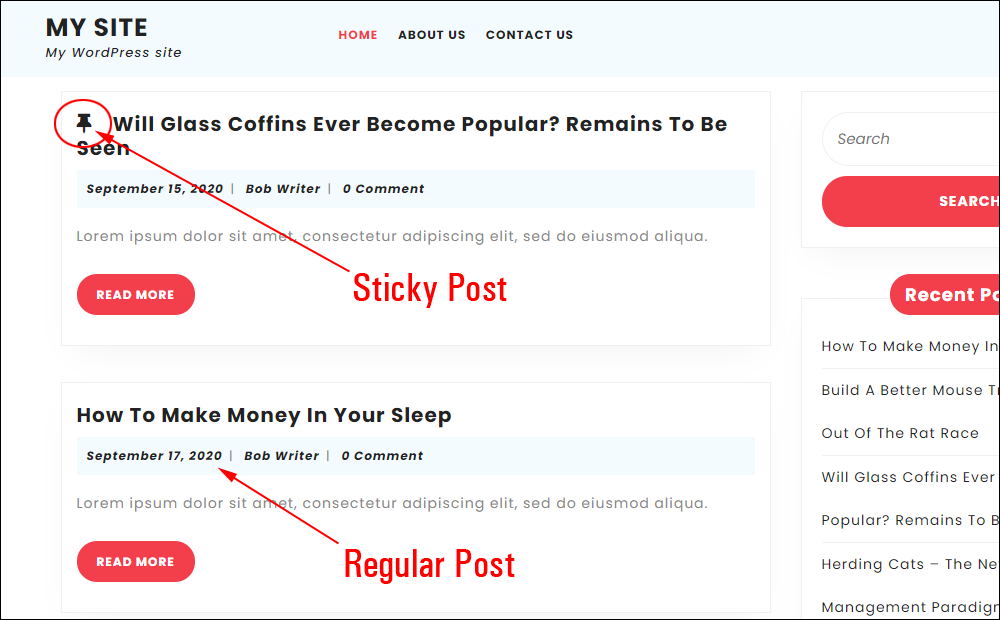
Here’s the same example with a different theme installed. This theme displays only the pin icon for a sticky post.
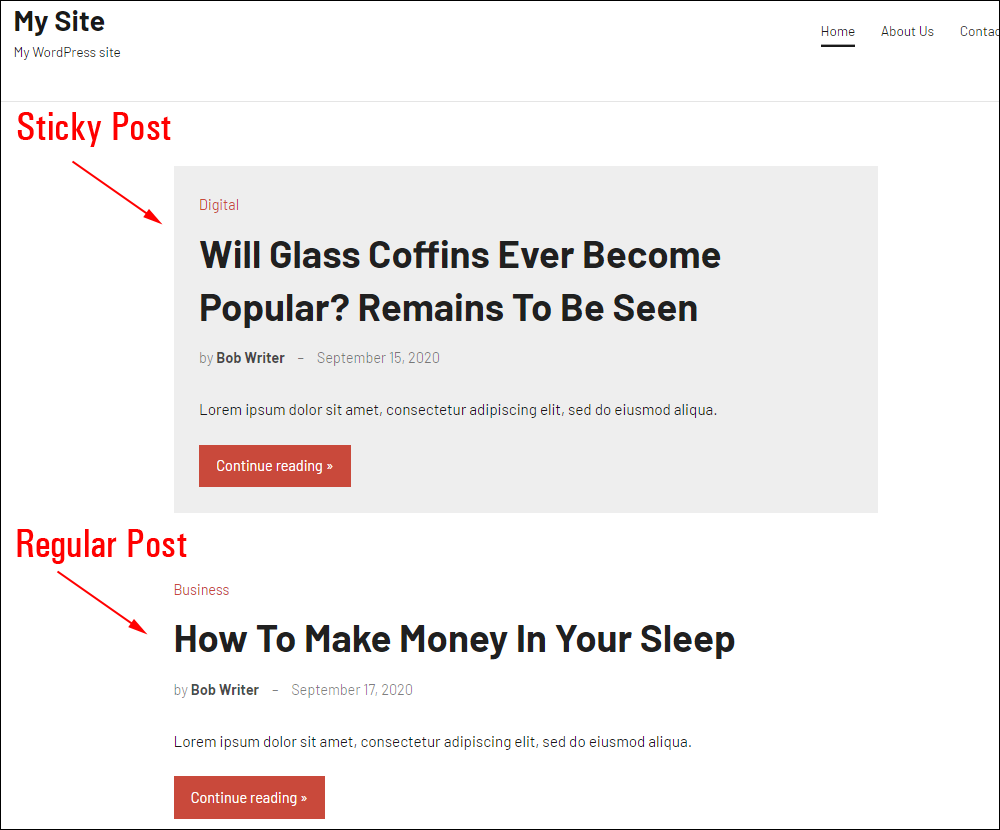
Some themes will make sticky posts stand out with a distinctive style or background color.
Sticky posts remain sticky until you choose to “unstick” them.
How To Unstick A Sticky Post
Unsticking posts is as simple as reversing the process used to make your posts sticky.
To unstick a post, return to the Posts screen area (Posts > All Posts) and click on the ‘Sticky’ menu link above the Table of Posts.
This will return a list of all posts marked as sticky.

Hover over the post title to display the options menu and click on the ‘Quick Edit’ link.

Deselect the ‘Make this post sticky’ checkbox and click the ‘Update’ button to save your changes and update your settings.

Alternatively, if you are editing an existing post, you can unstick it by clicking on the Publish Box > Visibility: Public > Edit link.

Uncheck the ‘Stick this post to the front page’ checkbox, then click OK and Update to save your changes.
Your post will no longer be sticky and will behave like all your regular posts.
WordPress Sticky Posts – FAQs
Here are frequently asked questions about WordPress sticky posts:
What are WordPress sticky posts?
Sticky posts are featured posts that remain at the top of your blog’s front page, regardless of when they were published. They are useful for highlighting important or timely content.
How do I make a post sticky in WordPress?
To make a post sticky, go to the post editor, find the ‘Visibility’ option in the ‘Publish’ meta box, click ‘Edit’, and then check the box labeled ‘Stick this post to the front page’.
Can I have multiple sticky posts in WordPress?
By default, WordPress allows only one sticky post at a time. However, plugins or custom code can enable multiple sticky posts functionality.
Why isn’t my sticky post staying at the top of my blog’s front page?
Check if your theme supports sticky posts. Also, ensure that the sticky post’s publish date is earlier than other non-sticky posts. Some themes may have specific settings affecting sticky post behavior.
How do I remove a sticky post in WordPress?
To unstick a post, edit the post and uncheck the ‘Stick this post to the front page’ option in the ‘Visibility’ settings under the ‘Publish’ meta box.
Do sticky posts affect pagination on my WordPress site?
No, sticky posts do not affect pagination. Pagination is based on the total number of posts, including sticky posts, but they do not influence the number of posts displayed per page.
Can I style sticky posts differently from regular posts?
Yes, you can use custom CSS or modify your theme to apply different styles to sticky posts, making them visually distinct from regular posts.
Do sticky posts impact SEO in WordPress?
Sticky posts themselves do not directly impact SEO. However, they can influence user engagement by drawing attention to important content, which indirectly affects SEO.
***
Congratulations! Now you know how to create a sticky post in WordPress.
***

Updated: April 23rd, 2024