How To Use WordPress Post Categories
 Post categories help you keep your site’s content organized for search engines and visitors. It also makes it easier to find information about related topics on your site.
In other words, learning how to use post categories in WordPress can improve your user’s experience and search engine rankings.
In this tutorial, you will learn how to add, edit, and delete post categories in WordPress.
***
Step 1: Configure Your Permalinks
By default, WordPress Post URLs are not search engine friendly.
If your site’s settings have not been configured after installation, a WordPress Post URL looks like this…
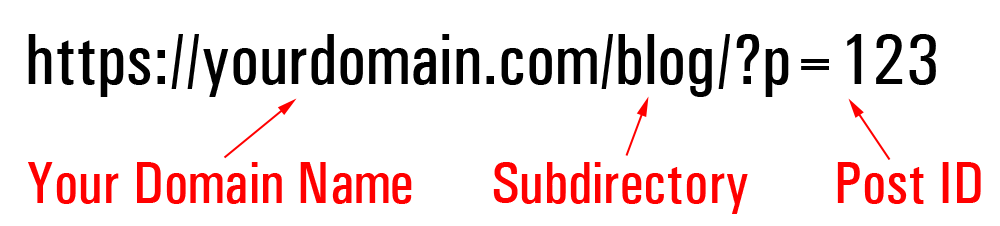
In the example above, instead of converting your post title into something more user and search engine friendly, WordPress simply assigns your posts an ID number (e.g. “123”).
To make the best use of post categories in WordPress, your Post URLs should first be optimized for search engines.
To do this, you will first need to modify the way WordPress displays your post URLs. You can do this by configuring your Permalink settings (WordPress Menu > Settings > Permalinks).
Permalinks allow you to display search engine-friendly URLs.
So…instead of having your post’s web address look like this:

You can display the same post URL like this:

If the permalink settings on your WordPress site have not been configured for optimal search engine indexing, you may not be getting the full SEO benefit of using post categories.
To learn more about using permalinks, see this tutorial: How To Link Content In WordPress
Step 2: List Your Main Content Topics
As mentioned earlier, keeping your site’s content organized not only improves user experience by making it easier and faster for visitors to find information on your site but it also helps search engines better find and index your content, which can boost your site’s rankings in search engine results.
It’s important, therefore, to plan the broad “topics” your site will be covering with your content. These can be topics related to your niche, your products or services, business, industry, etc.
This is also part of effective website planning, which we have covered in this comprehensive tutorial series: How To Plan Your Website
![]()
To create a list of post categories, think about the broad topics users are searching for related to your niche, business, or industry and the best 1-3 words to describe these.
For example, let’s say that you would like to promote a marriage celebrant business online. After a little brainstorming and competitive research, some of the broad topics you may expect to see on an authoritative wedding celebrant’s site could include categories like:
- Marriage Celebrant FAQs
- Marriage Celebrant Services
- Wedding Planning Tips
- Wedding Locations
- Commitment Ceremonies
- Marriage Vows
Step 3: Choose Relevant Category Keywords
It’s difficult to dominate an entire vertical market (e.g. Weddings, Travel, Health, Pets, Fashion, Beauty, Business, Technology, etc.).
It’s better to focus on establishing your authority online in a specific niche of your market instead.
If you look at the example below…

In the above hierarchy (Market > Niche > Subniche), “Marriage Celebrant Course” is a subniche (i.e. a subcategory) of the “Marriage Celebrant” niche (a category), which is a subcategory of the “Weddings” market (another category).
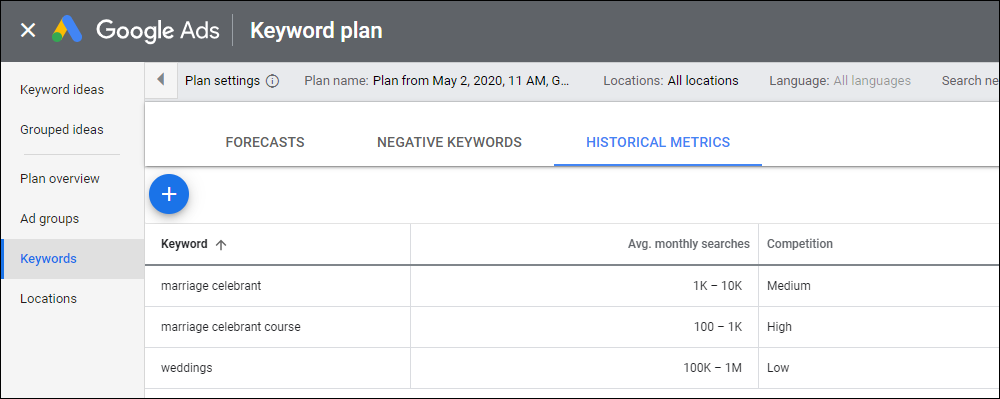
When choosing keywords for your post categories, it’s a good idea to consider market factors like competition, keyword searches, etc.
For example, the screenshot below shows Google’s estimated number of average monthly searches and competition level for each of the keywords in our example:
Using a strategic approach to research and plan your post category keywords has many benefits. These include:
- Better content planning.
- Identifying new opportunities in your business or niche.
- Improved user experience and content/site navigation.
- Improved search engine optimization.
- Gaining a competitive advantage.
Setting unrealistic goals like hoping to dominate highly competitive niches without doing sufficient market research, keyword planning, or having adequate resources can leave you feeling discouraged and disappointed.
It’s better to focus on a narrower (but still highly searched for) area of your market, such as a low competition niche, subniche, or microniche.
Step 4: Set Up Your WordPress Post Categories
After mapping out your top-level site topics and figuring out what your main keywords will be for publishing and filing your content under, the next step is to add these to your WordPress site as post categories.
To add Post categories to your WordPress site, log into your administration area and in the WordPress dashboard menu, select Posts > Categories.
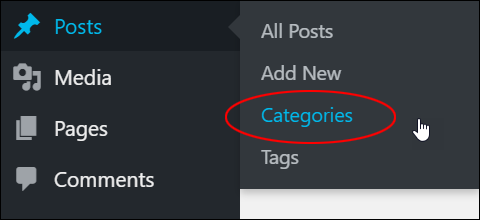
This brings up the Categories screen.
Here you can add, edit, and delete categories, add descriptions and optimize post categories for SEO, and perform additional functions depending on what plugins you have installed.
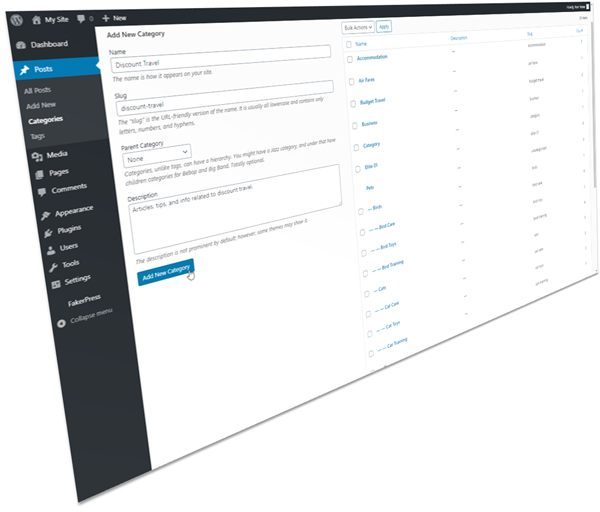
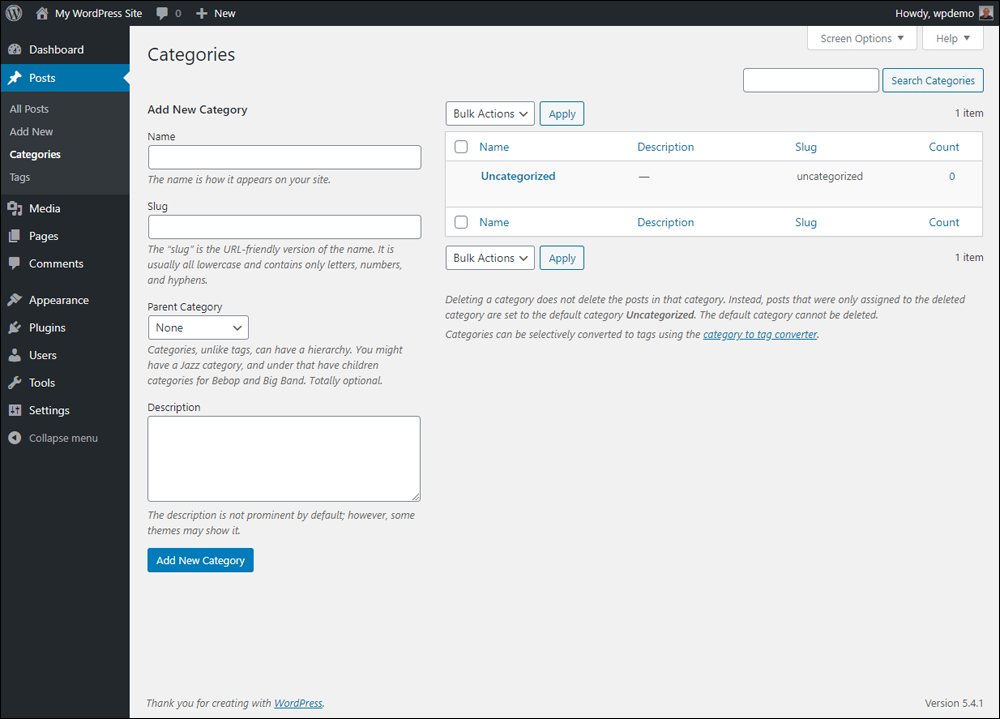
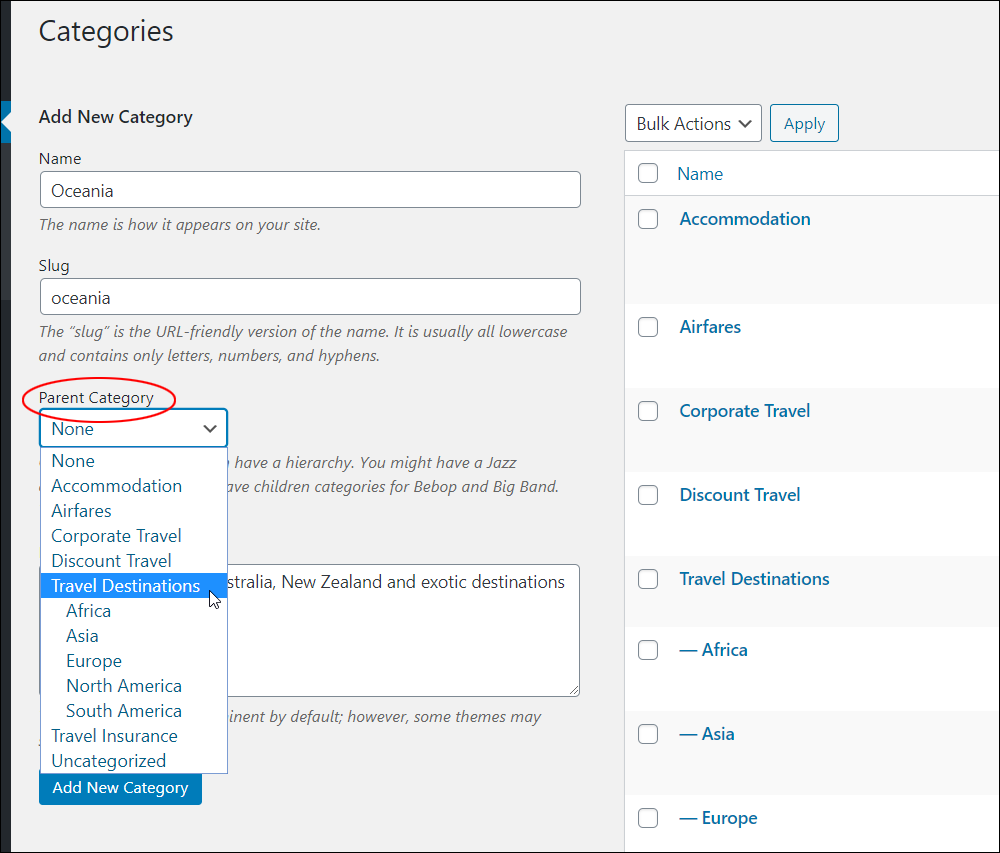
How To Add Post Categories To WordPress
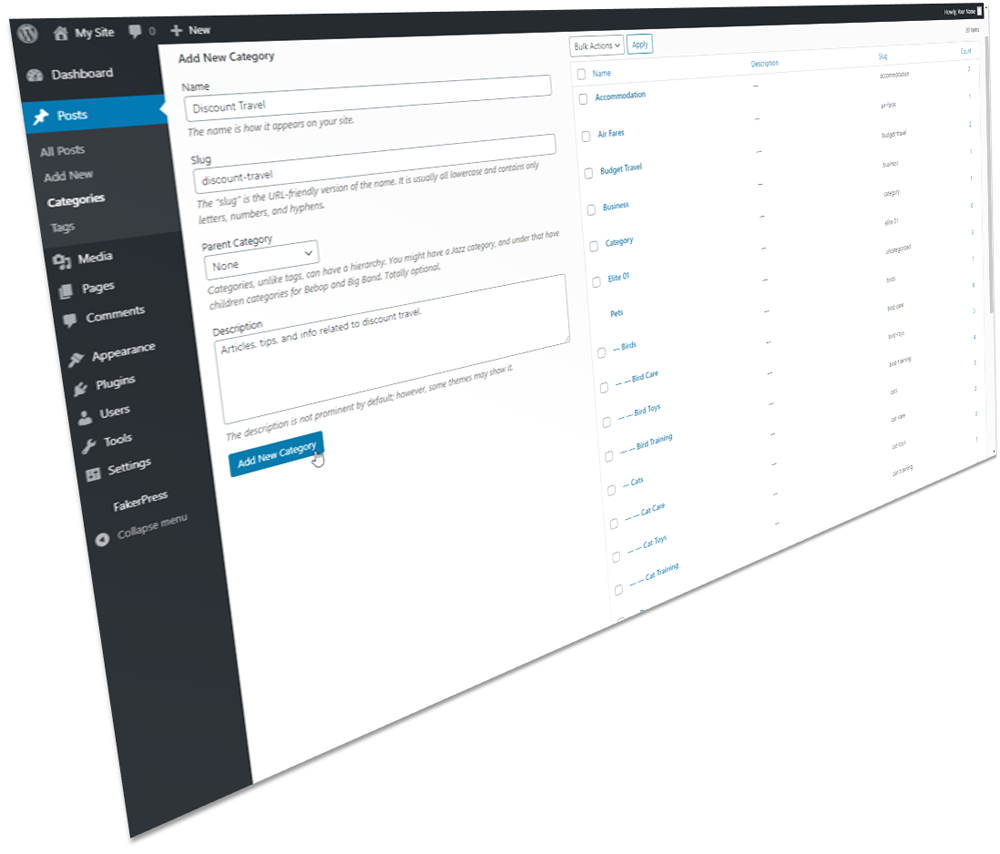
To create a new post category in WordPress, simply fill the fields in the ‘Add New Category’ section as shown in the example below:
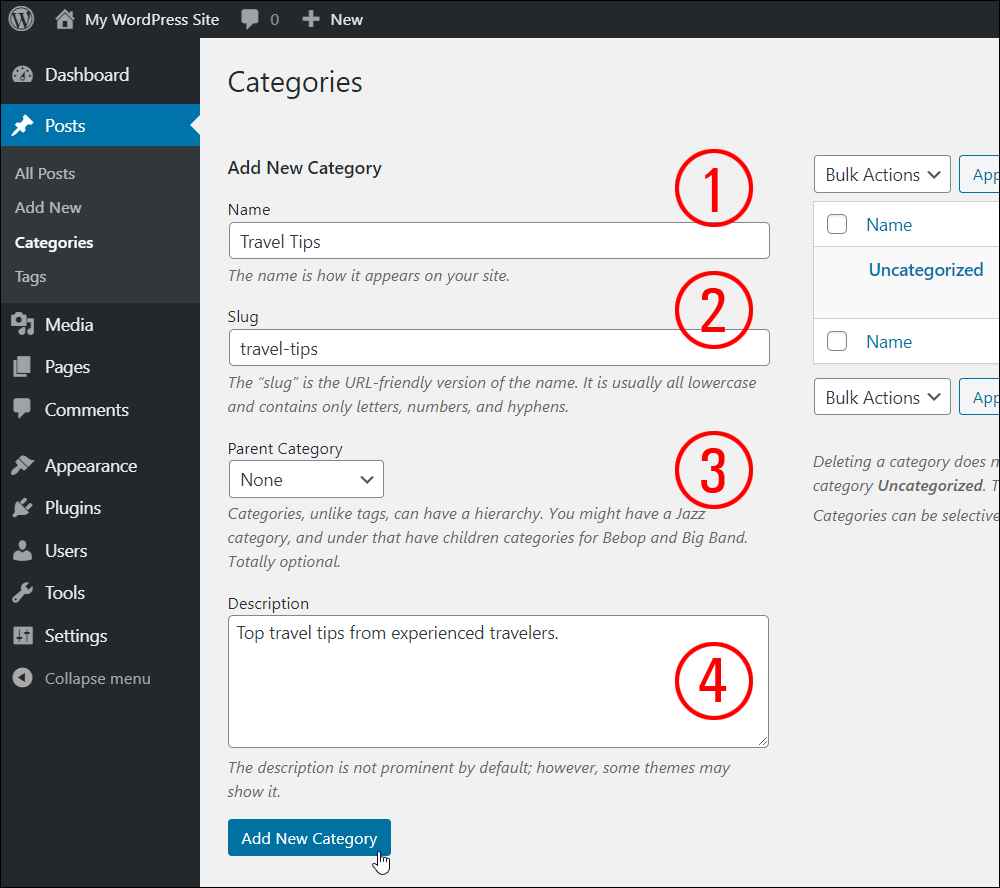
- Name – Enter a short category name here, preferably one that uses your main keyword (e.g. if you have a “Travel” related blog, you could have categories like “Travel Tips”, “Travel Destinations”, etc.). This category name will display wherever WordPress makes category-related sections of your site available.
- Slug – Category post slugs display in the URL of all posts published under that specific category, provided you have configured your site’s Permalink settings to include Post categories in the URL. For example, if you have set Permalinks to display post categories and your post category’s slug is ‘travel-tips’ all posts published under this category will include the post slug and display as https://yourdomainname.com/travel-tips/your-post-title-here. Your post slug can be different than your category name. Note: Keep all words lower case and make sure they only contain letters, numbers, and hyphens (i.e. no spaces between words). If you don’t enter a slug into this field, WordPress will automatically create one for you using a lower-case version of your category name.
- Parent – Ignore this field, unless you plan to create nested hierarchies of categories on your site (this is explained further below).
- Description – Add a brief description of your category here. Some WordPress themes display this category description, and it can help with search engine optimization. WordPress uses the category description you write here for the category page’s meta description.
Click the Add New Category button to add your new category.
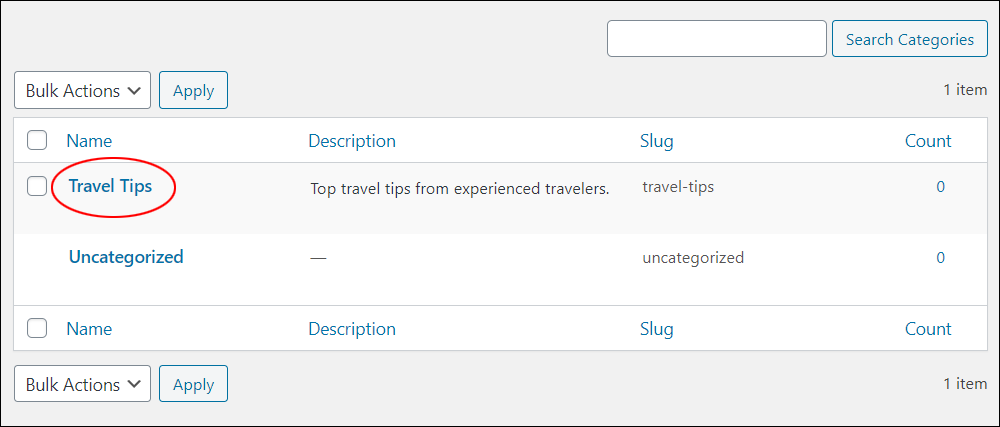
Your new post category will be added to the Categories list.
Repeat this process to continue adding new post categories to your Categories list.
You can also create a list of nested (i.e. hierarchical) post categories.
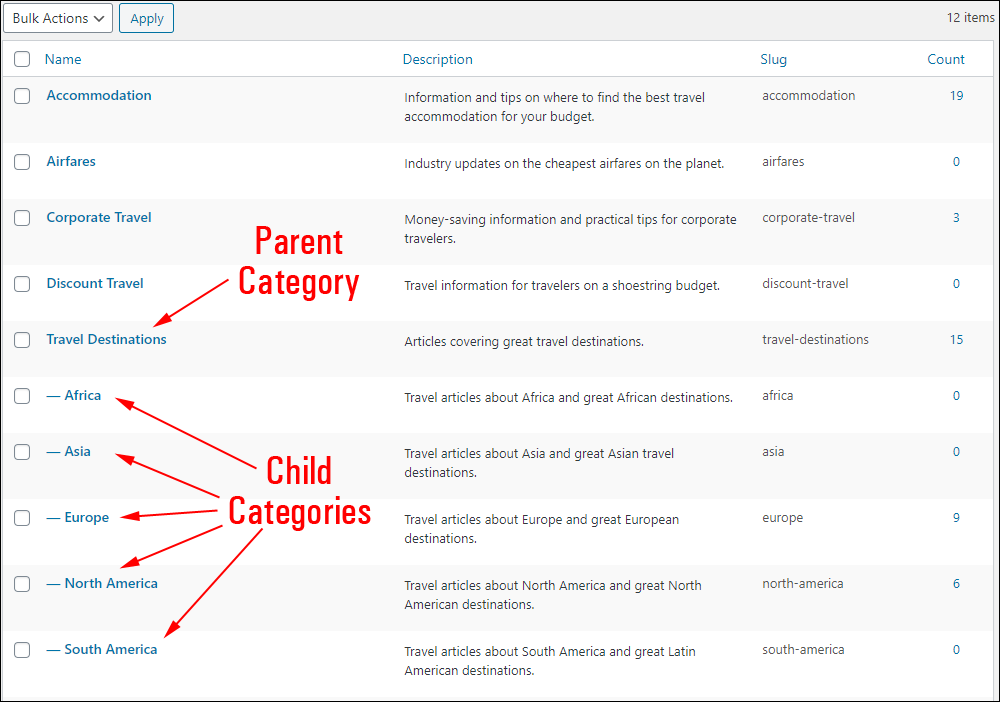
To create nested post categories, add a new child post category to your list, and select a parent category from the Parent drop-down menu.
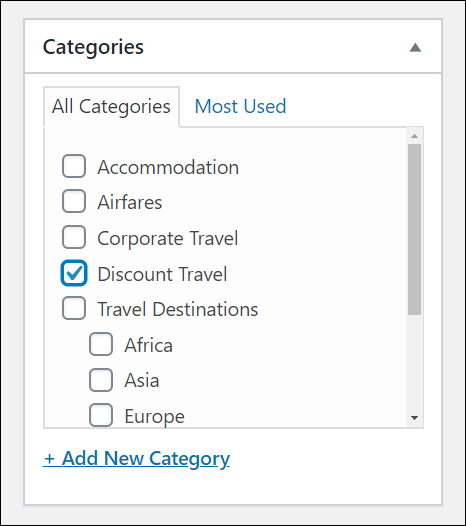
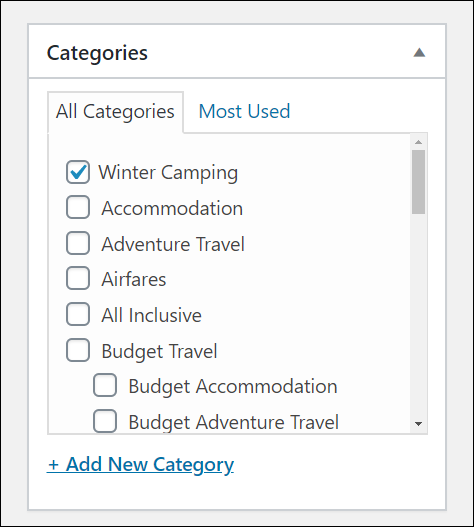
You can also add a new category when creating or editing posts.
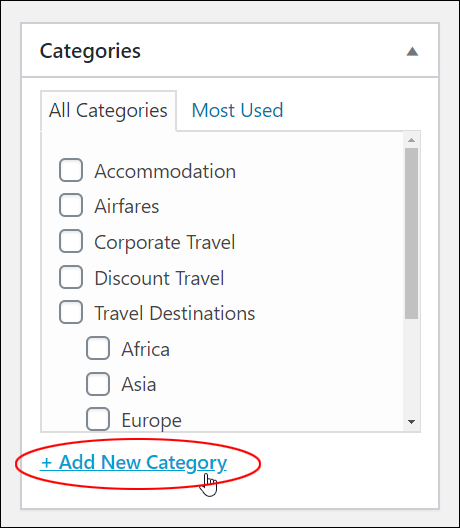
![]()
To add a new category while creating or editing a post:
- Click on the ‘+Add New Category’ link,
- Enter your new category name (and select an optional ‘parent’ category to create nested categories),
- Click the + Add New Category link.
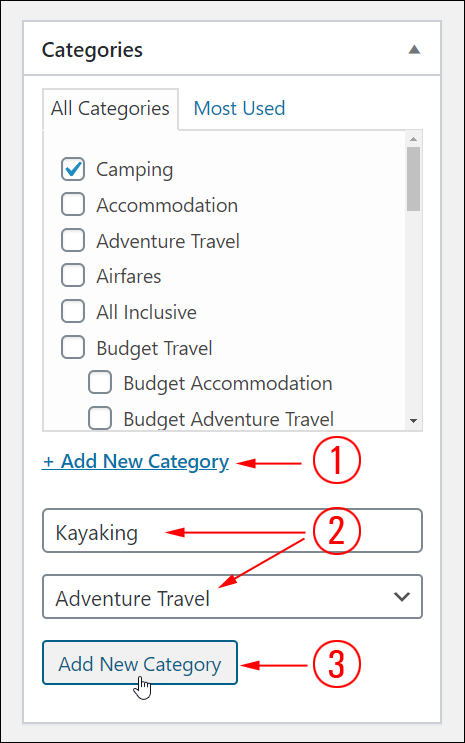
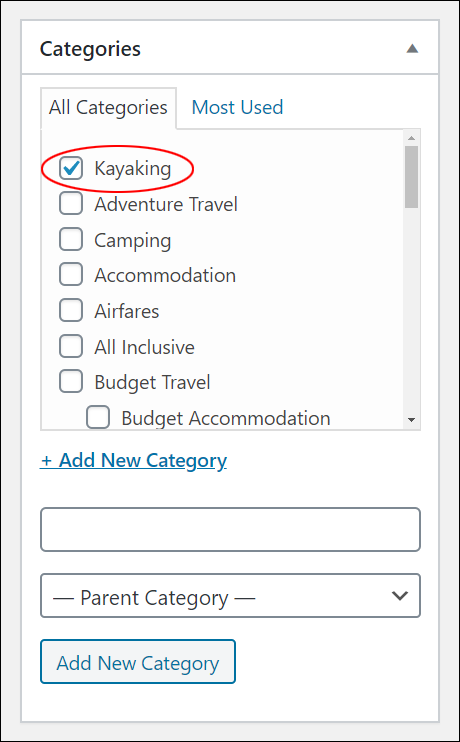
Your new post category will be added to your list and become instantly available for selection.
If you need help creating and editing posts in WordPress, see these tutorials:
How To Delete Post Categories In WordPress
![]()
Removing a category does not delete the posts assigned to that category. Instead, any posts assigned to the deleted category will be reassigned to the WordPress default ‘uncategorized’ category (covered further below).
You can delete post categories individually, or in bulk.
How To Delete An Individual Post Category
To delete an individual post category in WordPress, hover over the category you would like to delete. A menu will display containing various options.
Click Delete to remove the category from your list.
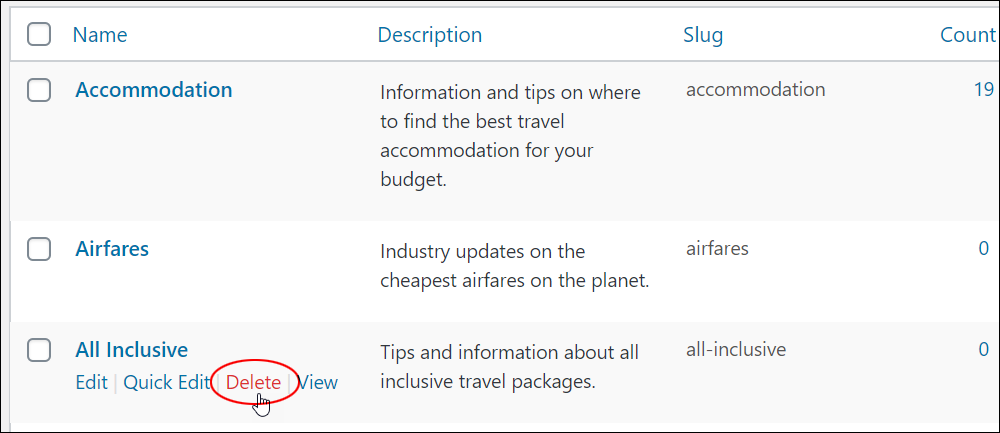
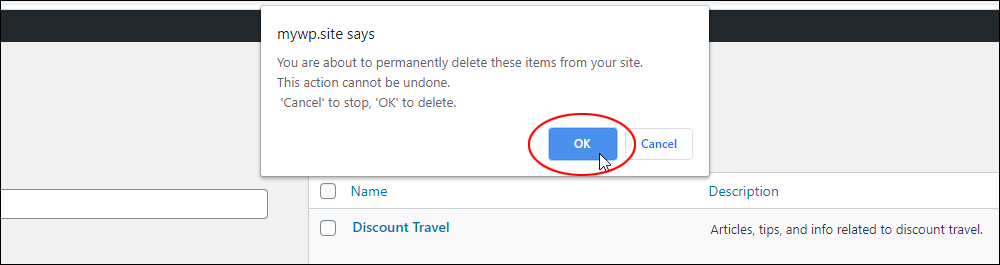
A warning message will ask you to confirm this deletion. Click OK to proceed or Cancel to abort this operation.
How To Delete Multiple WordPress Post Categories (Bulk Post Category Deletion)
Let’s say that you import a list of product manufacturers or a large e-commerce catalog into your WordPress site containing many categories.
The bulk post categories delete feature is a handy tool for reducing the number of imported post categories to a single category (or fewer categories).
The Bulk delete feature lets you reassign your imported posts to another category. If there are too many categories to delete individually, this is where the bulk delete feature comes in handy.
![]()
Important: Make sure that any posts that could be affected by deleting unwanted categories are reassigned to an existing or a new category.
For more details on how to reassign post categories in WordPress, see this tutorial: How To Edit And Delete Posts In WordPress
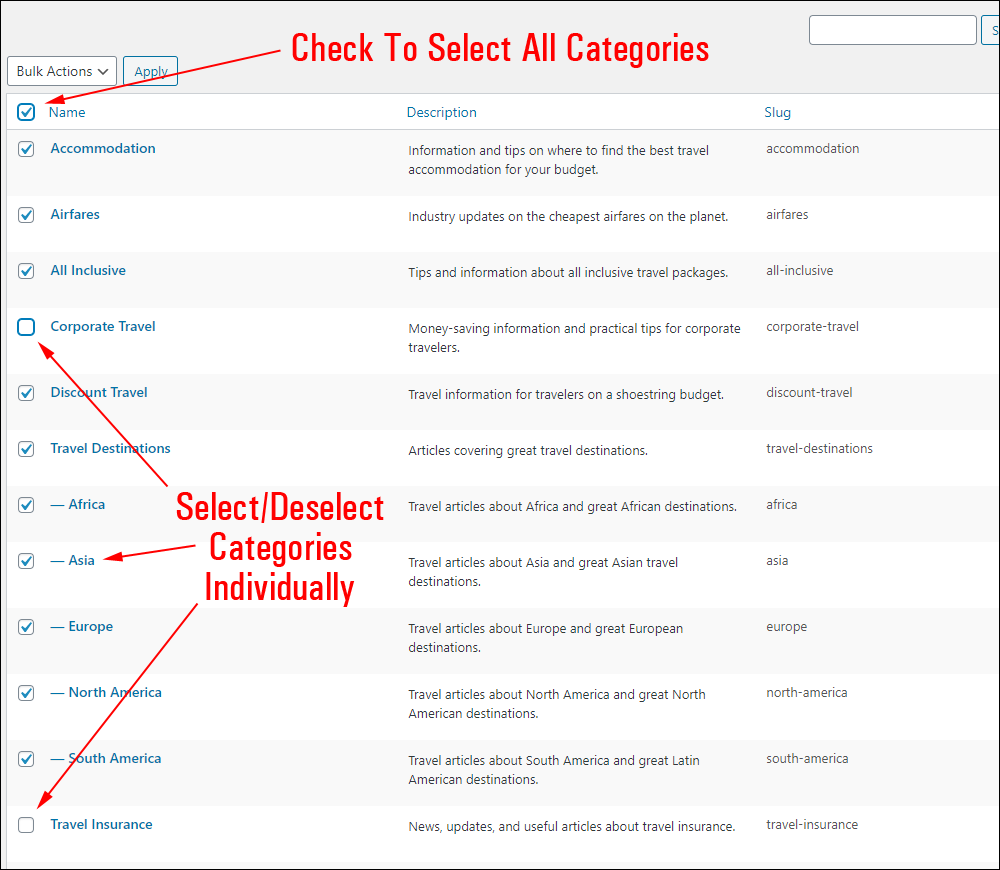
To bulk delete WordPress categories, click on the main checkbox in the header row next to the ‘Name’ column title. This will select all category entries on the screen.
Next, go through the list and unselect any categories that you DO NOT want to delete. Select categories by toggling on the checkbox next to each entry.
After ticking all the categories you would like to delete, select Delete from the ‘Bulk Actions’ drop-down menu.
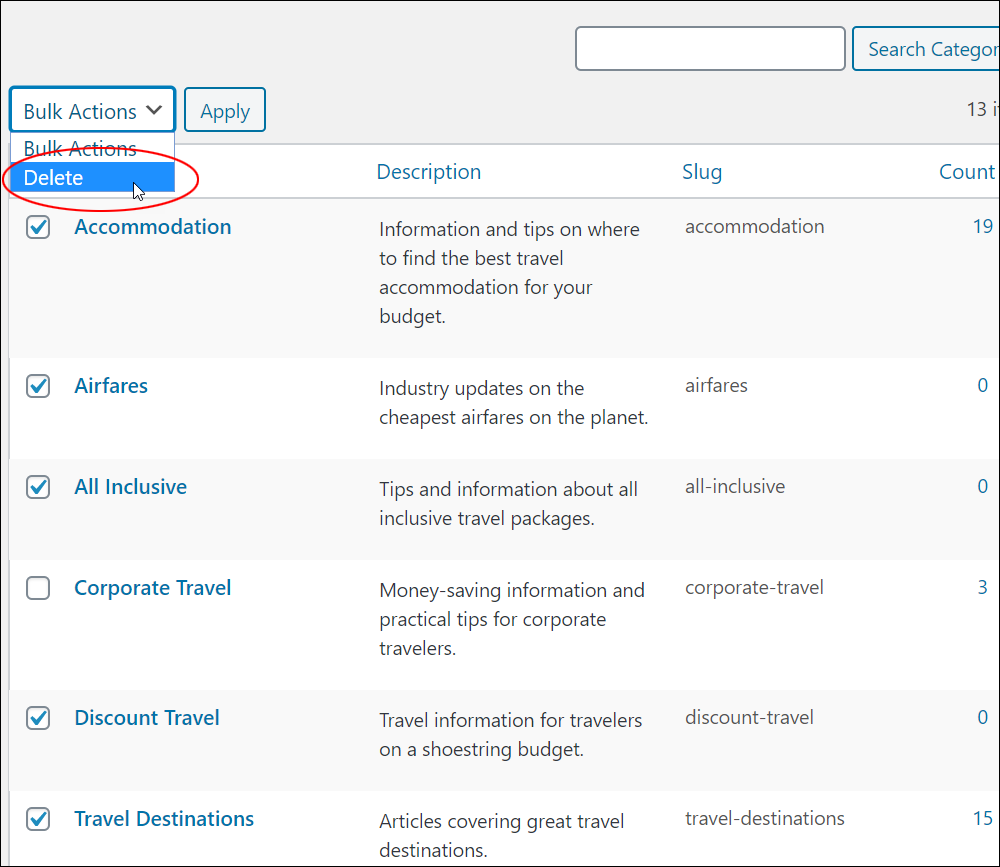
With the ‘Delete’ option selected in the dropdown menu, click the Apply button.
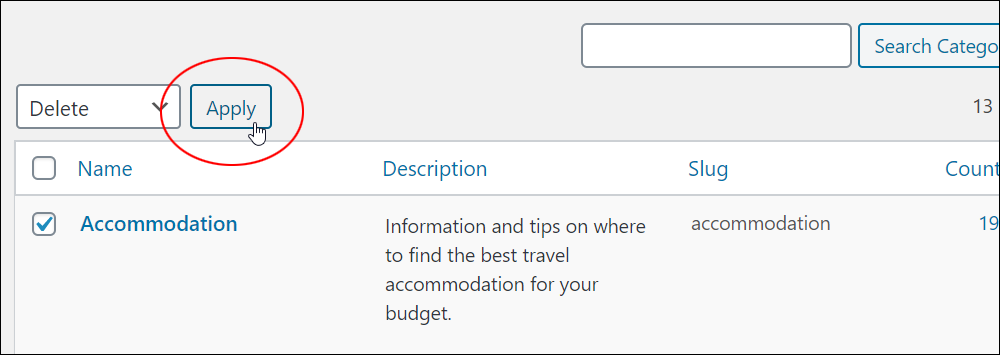
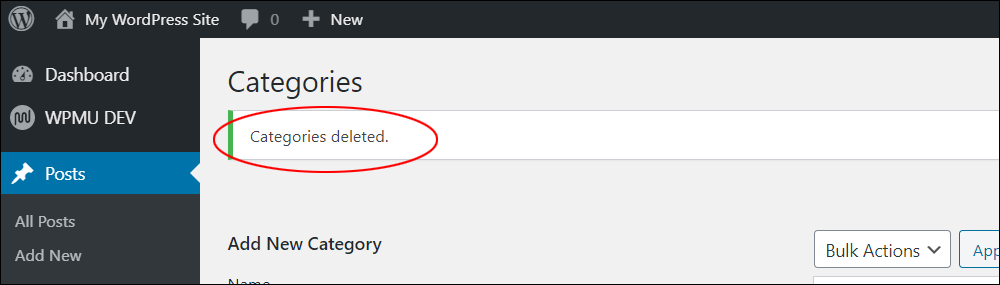
This will delete all selected post categories.
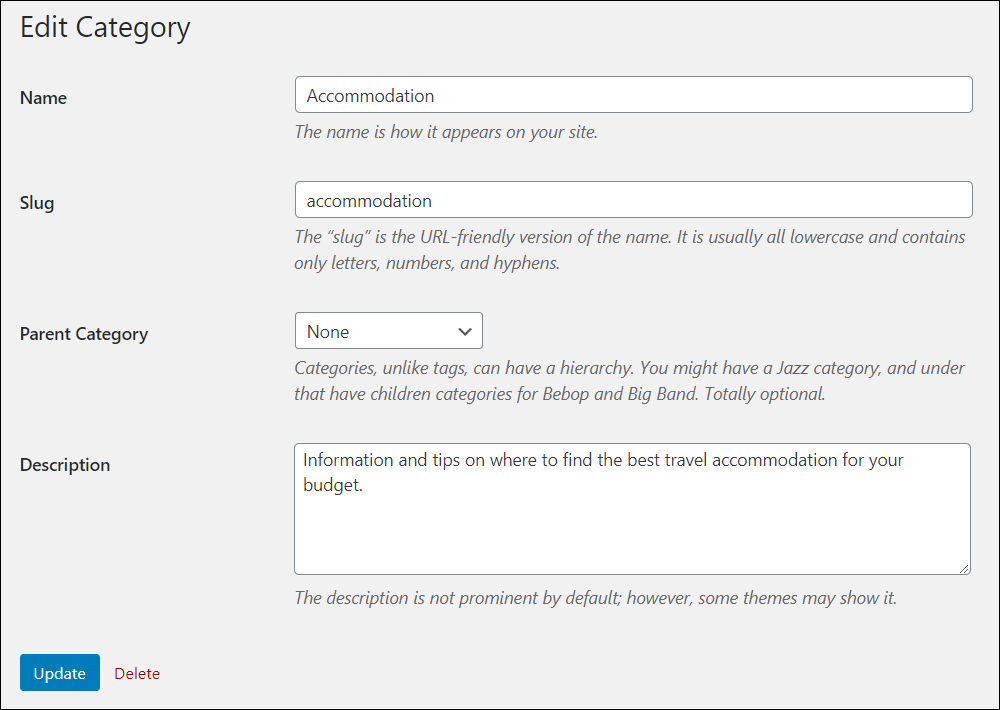
How To Edit Post Categories In WordPress
To edit a post category in WordPress:
In the ‘Categories’ screen, locate the category entry that needs editing.
Hover over the category title and a menu will display. Click the Edit link.
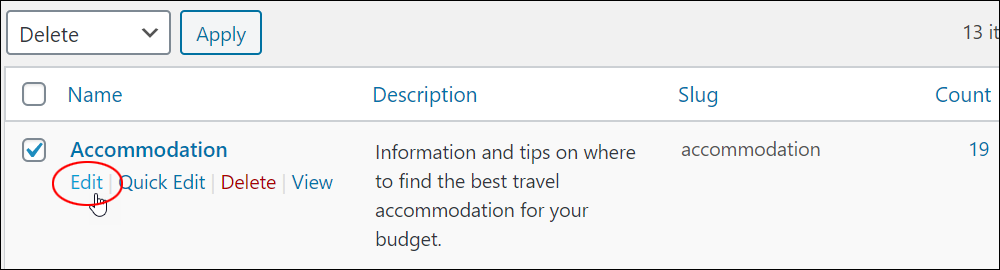
This brings up the Edit Category screen. Edit the category fields and click Update to save your changes.
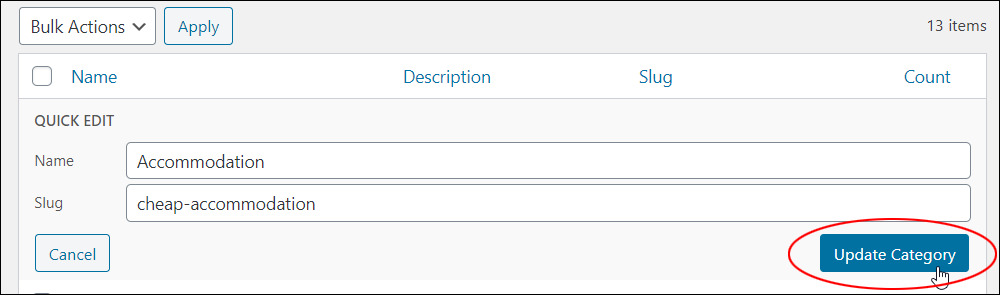
You can also edit your category’s name or slug using the Quick Edit option. Hover over the category title and click on Quick Edit.
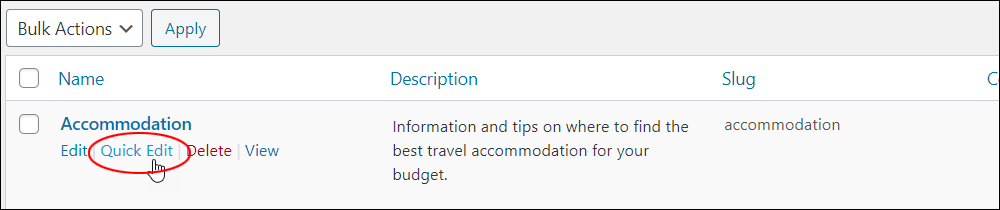
Make the necessary changes and click the Update Category button to save your updated details.
![]()
Editing the category slug will change the URL of all posts assigned to that category.
This can lead to “page not found” errors if visitors click on external site links pointing to your published posts.
For this reason, it’s best to avoid changing post category slugs once your site is established.
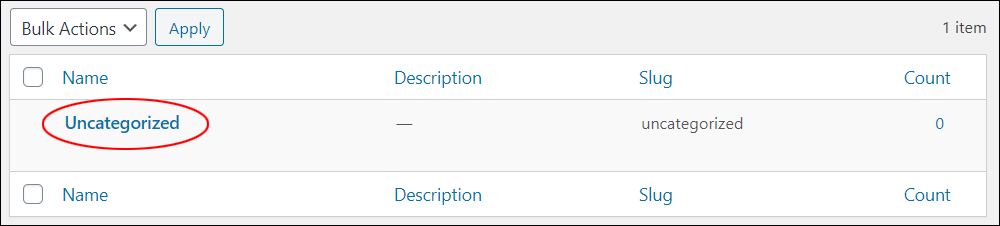
WordPress Post Categories – Uncategorized Category
All posts in WordPress must be assigned to a category. If you do not assign a post to a category, WordPress will automatically assign your post to a default category called “Uncategorized”.
![]()
The default category cannot be deleted.
Assigning posts to ‘Uncategorized’ creates unattractive post URLs that are not very effective for SEO.

Instead of publishing unassigned posts, you can optimize the “uncategorized” category for search engines and make the post URL more relevant to your site visitors.
Hover over the Uncategorized entry and click the ‘Quick Edit’ link.

Enter relevant keywords into the Category Name and Category Slug fields and click the Update Category button to apply your changes.
For example, if your site is related to travel-related, you could change the “Uncategorized” category to a general keyword like “Travel Tips” for unassigned posts to give these an extra SEO boost.

Now, all posts published without assigning a category will display with a URL that makes more sense to your site visitors and is more effective for SEO.

Note: Your WordPress Permalink settings (WordPress Dashboard Menu > Settings > Permalinks) affect how post URLs will display on your site.
WordPress Post Categories – Useful Information
Here are some other things you should know about using post categories in WordPress:
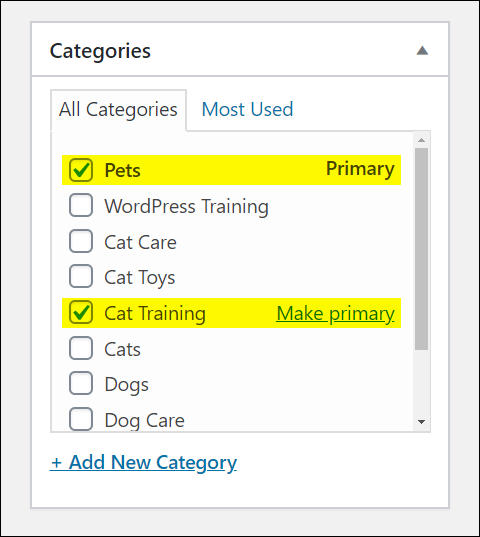
You Can Add Multiple Categories To WordPress Posts
Posts in WordPress must be published under one or more categories. WordPress allows you to assign multiple categories to your posts.
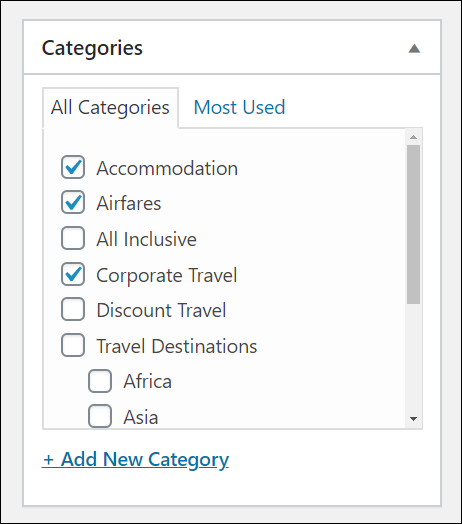
Depending on which SEO plugins you have installed on your site, you may be able to specify which of your selected post categories should be the primary category featured on your posts.
Themes Display Categories In WordPress Posts
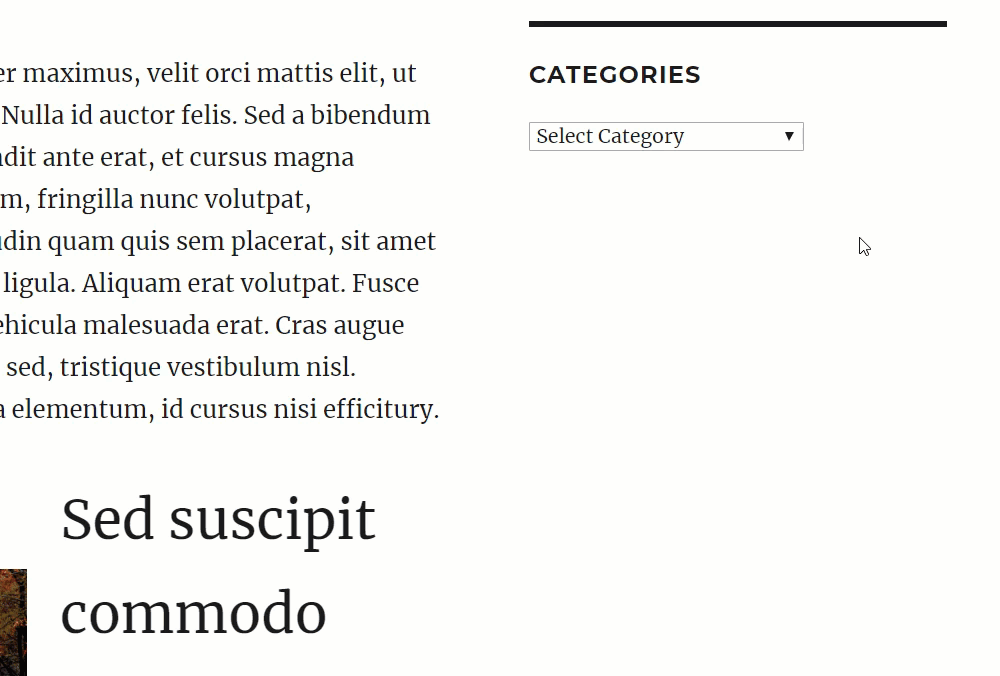
Most WordPress themes display a ‘categories’ section on your posts, making it easier for your site visitors to find other content published under those categories.
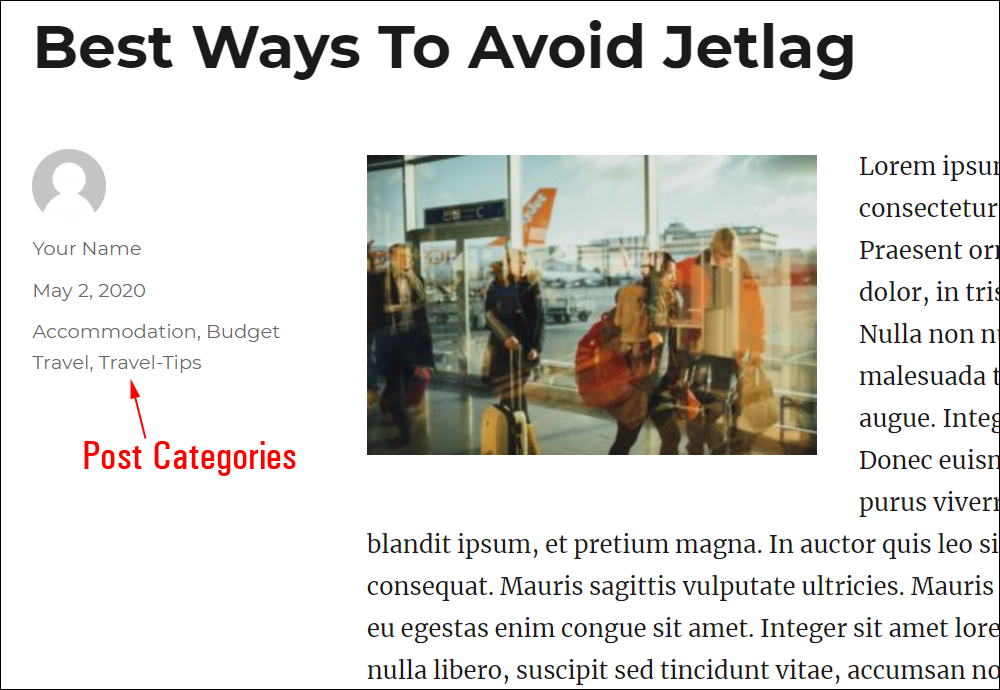
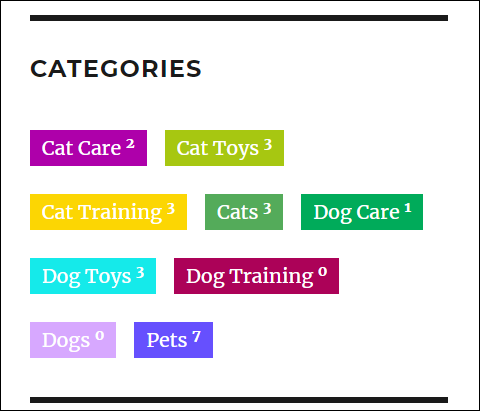
As well as displaying categories assigned to posts, you can display a list of categories on your site in a sidebar, header, or footer menu.
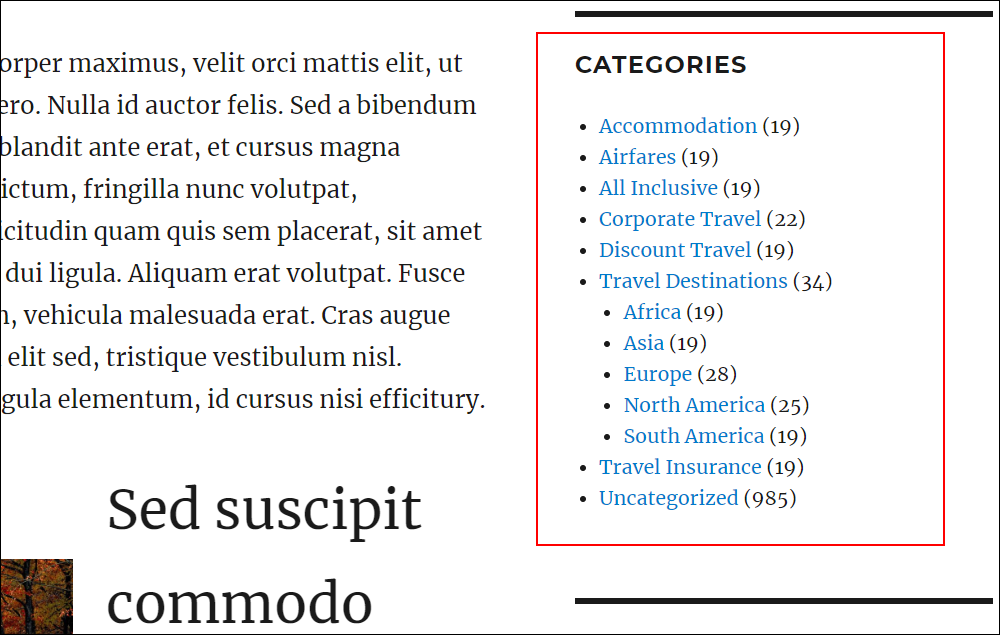
![]()
Depending on how many posts and categories you publish on your site, you could end up with a really long category list.
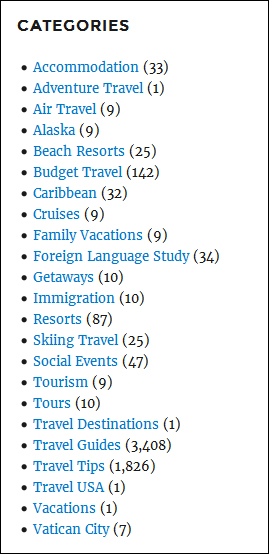
Widgets Display Post Categories In Sidebar Menus
If you have too many categories on your site, you can reduce the space of your Categories menu on your sidebar by listing categories using a drop-down menu (in your ‘Categories’ widget settings).
To learn more about adding, configuring, and using sidebar widgets in WordPress, see these tutorials:
Archive Pages Display All Posts Published Under The Same Category
To view all the posts you have assigned to a category, you can click on a category link on a post or select the category from a sidebar menu.

This will open an archive page displaying a list of all posts assigned to that category.
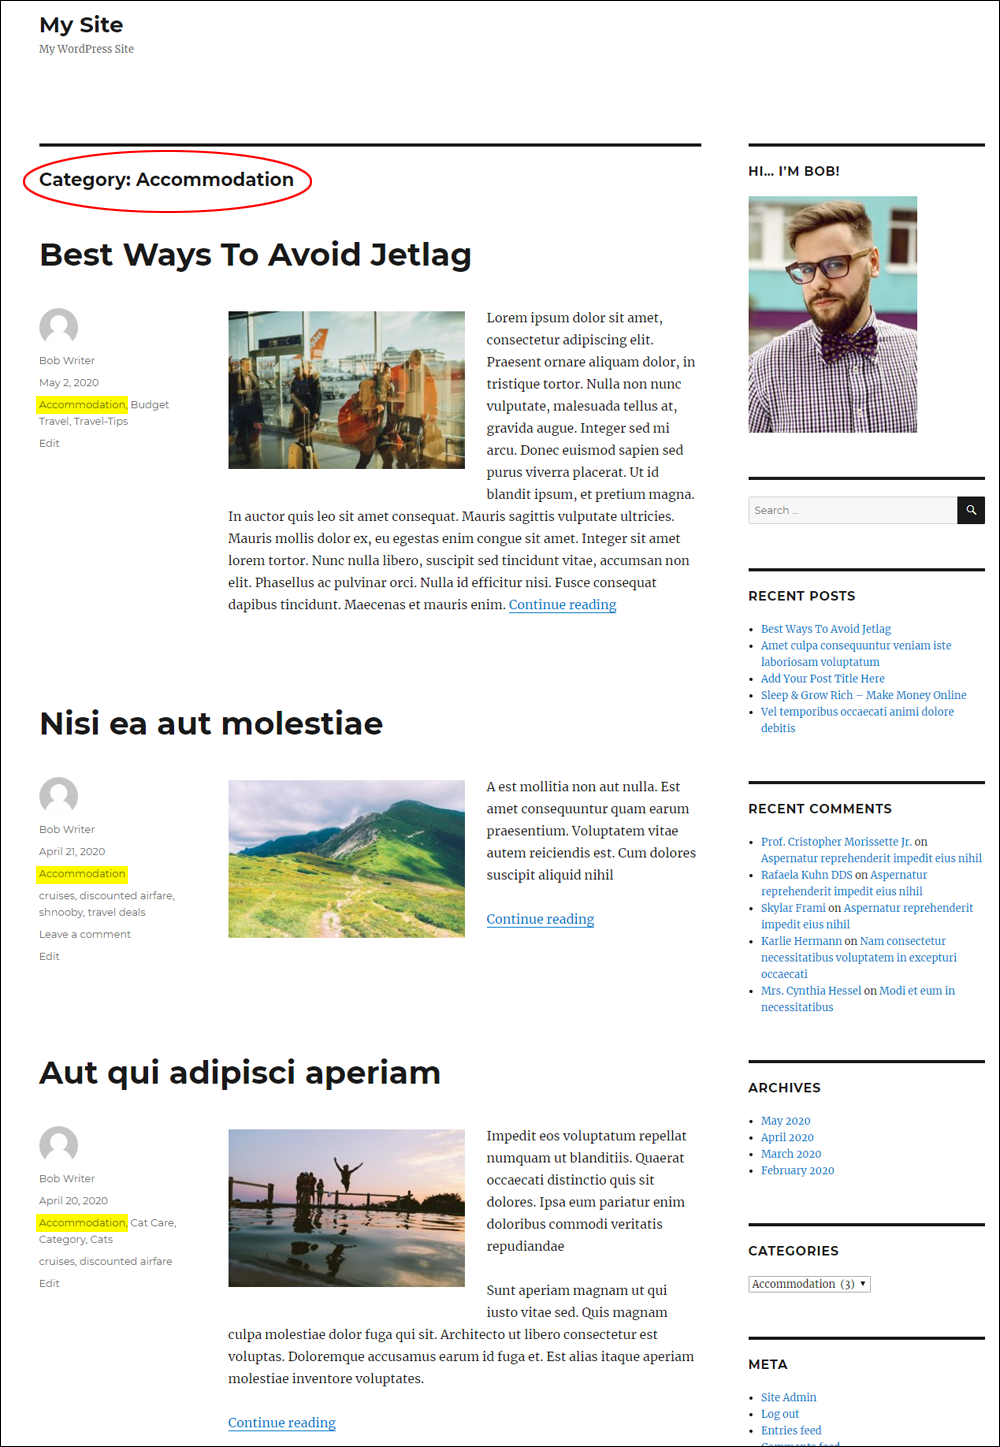
Note: Your WordPress Theme determines the layout and design of your Archive pages, posts, sidebar menus, etc.
WordPress Post Categories – Useful Tips And Additional Features
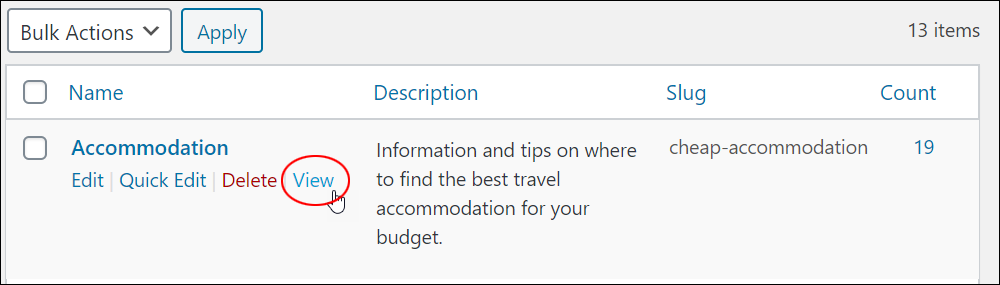
To view Category Archive pages from your WordPress dashboard:
Go to Post > Categories and scroll down the Category Table until you find the category you would like to view.
Hover over the category title and click the View link to open the Archive Page for that category.
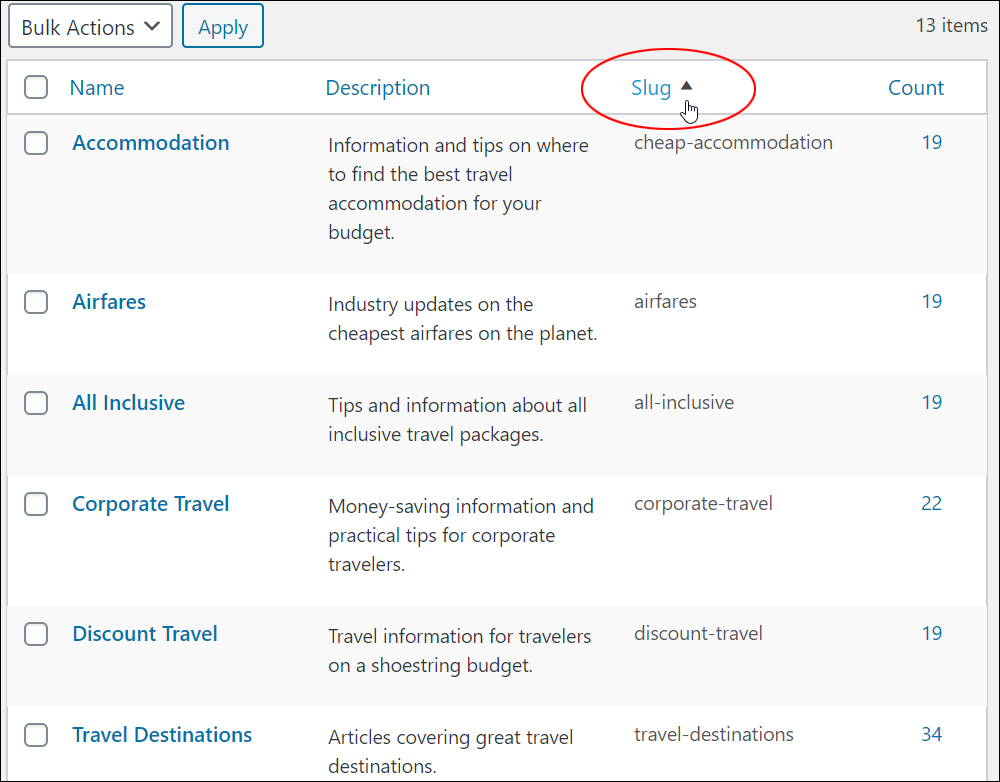
WordPress Post Categories – Sorting Categories
The Table of Categories lets you sort categories alphabetically (or in reverse alphabetical order).
To sort the table by category name, hover your mouse near the column title and click on the little black triangle icon next to the column title.
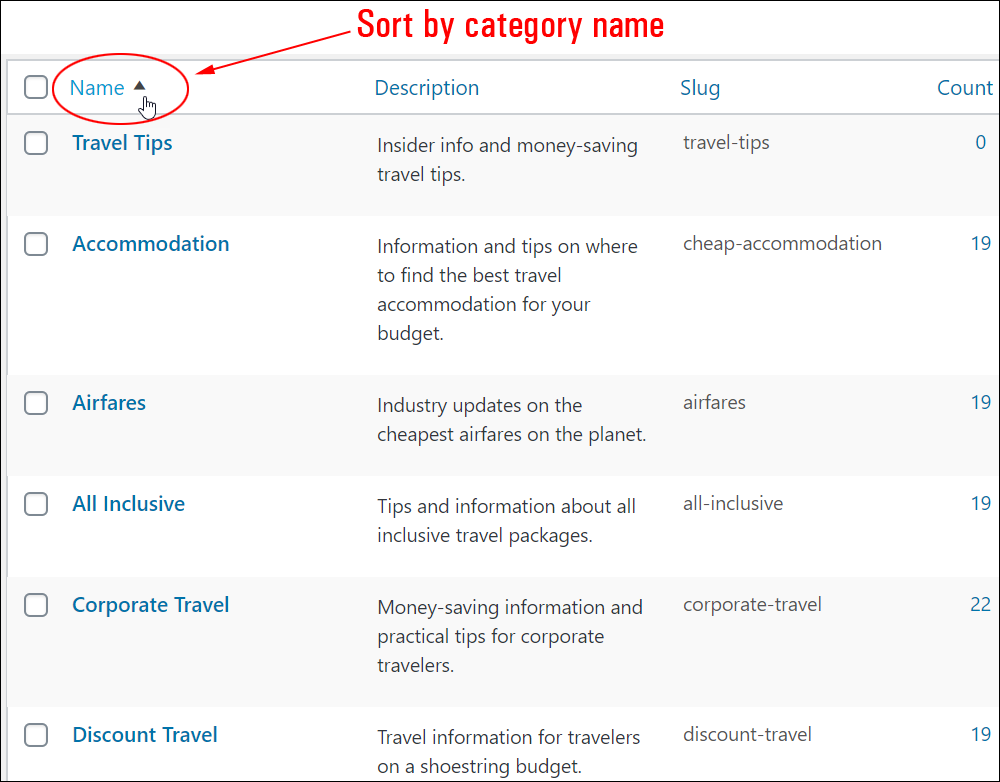
You can also sort categories using the other columns in the Category Table (e.g. Description, Slug, Count, etc.). Your categories will be sorted according to the column you’ve clicked on.
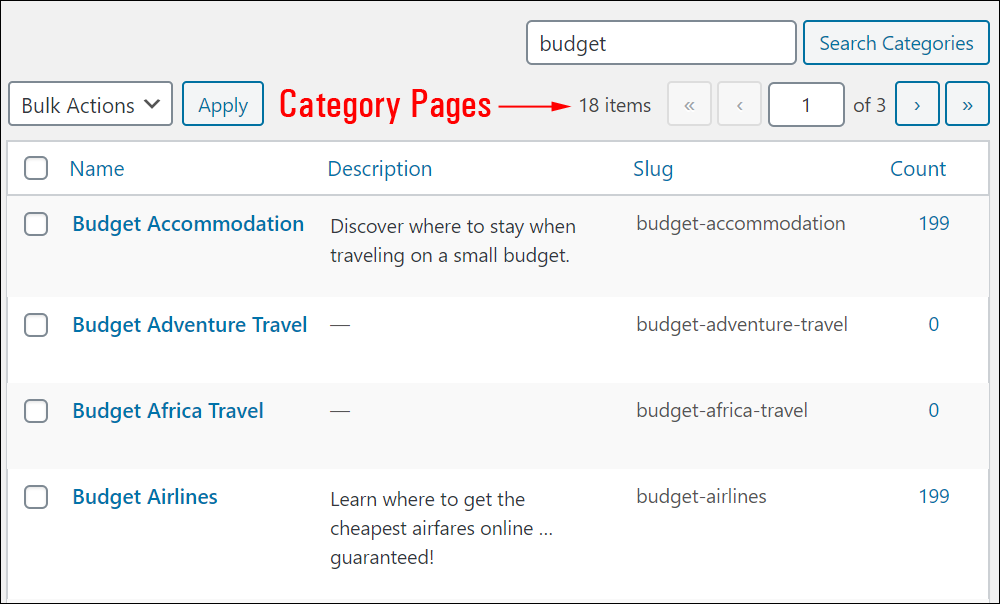
WordPress Post Categories – Searching Categories
WordPress has a couple of useful category search features if your site has many categories:
Search Categories Field
In the Table of Categories, enter a keyword into the search field and click on the Search Categories button to bring up a list of all categories with that keyword in the title.

Category Pages
If your site has many categories, WordPress splits the Table of Categories into several Category Pages that you can navigate through with pagination buttons.
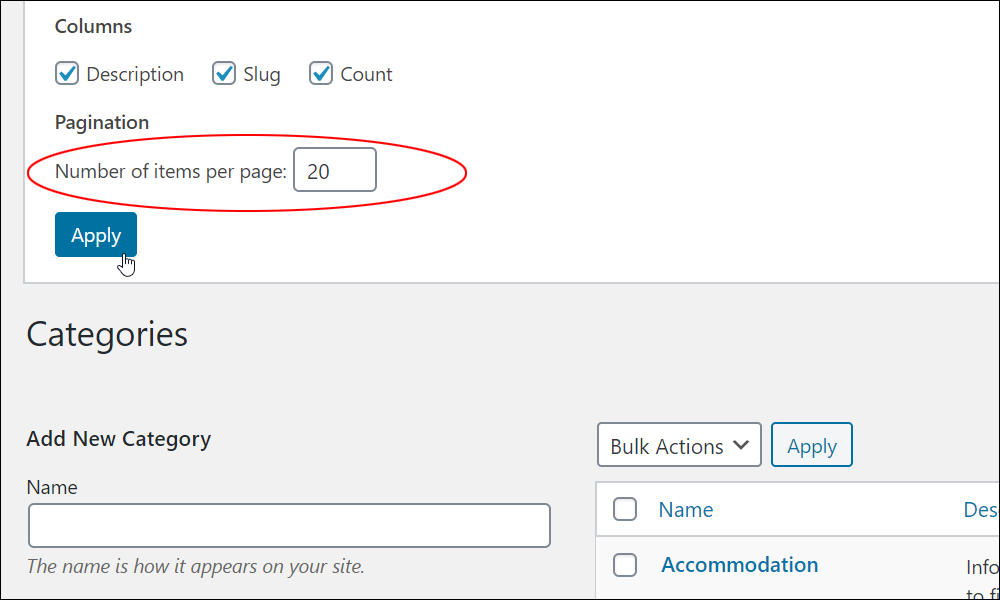
To specify how many categories you would like displayed per Category Page on your Table of Categories, click on the Screen Options tab at the top of your Categories screen.
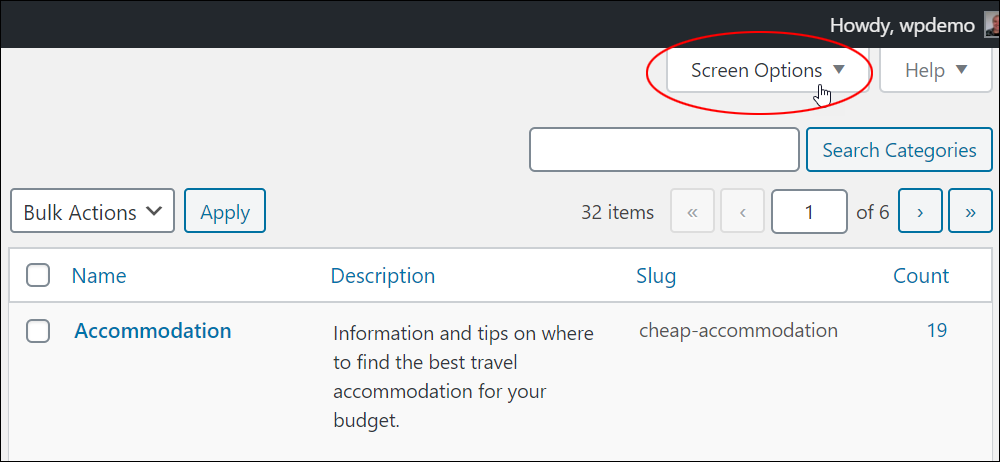
Enter the number of categories you would like to see displayed per page in the Table of Categories in the Categories > Pagination > Number of items per page: field and click Apply to update your settings.
Note: you can also hide some or all of the columns (e.g. Description, Slug, Count) by ticking/unticking their checkboxes.
To learn more about using the Screen Options Tab, see this tutorial: How To Use The WordPress Screen Options Tab
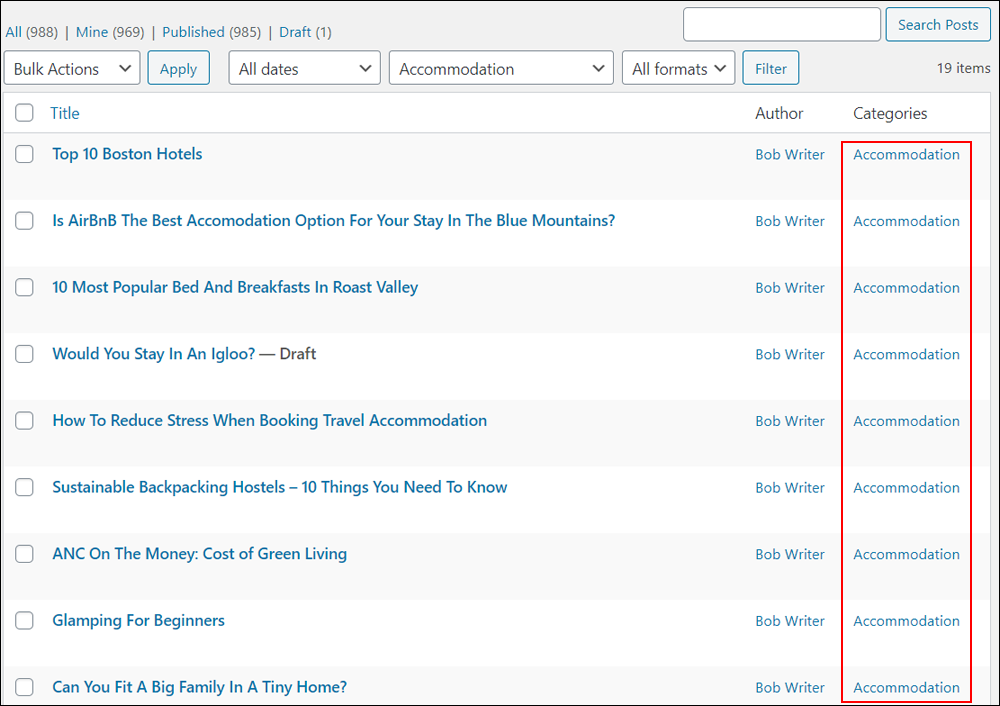
WordPress Post Categories – Grouping Features
In the Table of Categories, the Count column displays the number of posts assigned to each category. To view a list of all posts assigned to that category, click on the number next to a category in the ‘Count’ column.
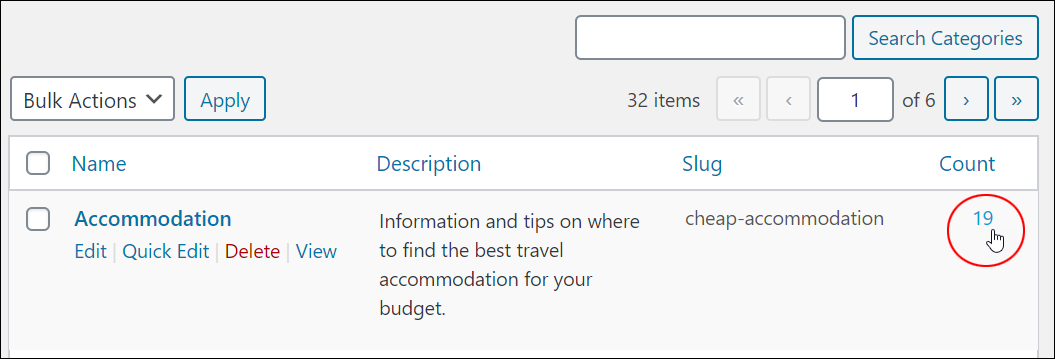
This will bring up a list of all the posts assigned to that category in your Table of Posts.
WordPress Post Categories – Tools
You can convert WordPress Categories into WordPress Tags using the Category to Tag Converter tool.
The link to this tool is found below your Table of Categories.
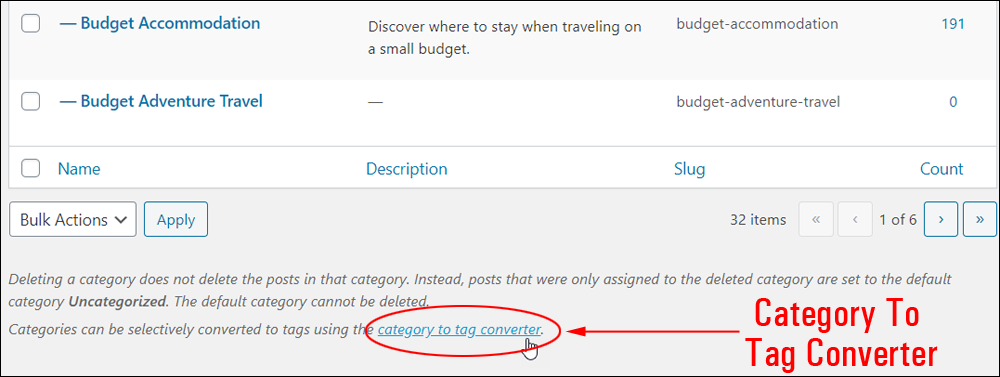
Clicking on the ‘category to tag converter’ link brings you to the Tools > Import screen.

To learn how to use WordPress tags effectively in your posts, see this tutorial: How To Use WordPress Post Tags
WordPress Post Category Plugins
There are many WordPress plugins available to help you better manage and enhance the usefulness of categories on your site.
For example, there are WordPress plugins available that allow you to do things with categories like:
- Add images and thumbnails to post categories
- Exclude categories from displaying in certain sections of your site
- Rearrange the order of your categories in tables, lists, and menus (i.e. create a custom list)
- Add additional fields to your Table of Categories (e.g. Category ID – see below)
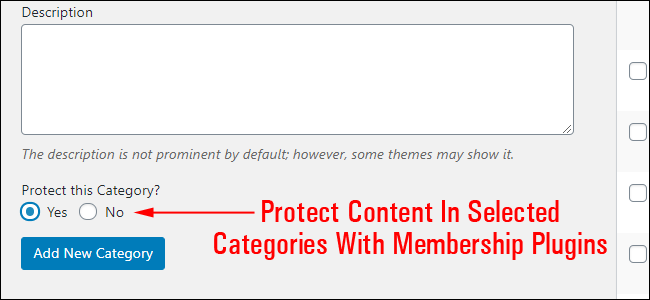
- Restrict access to content published under certain categories (this is useful if you plan to run a membership site).
Let’s take a quick look at some plugins that can help add additional features with useful functions to enhance your post categories:
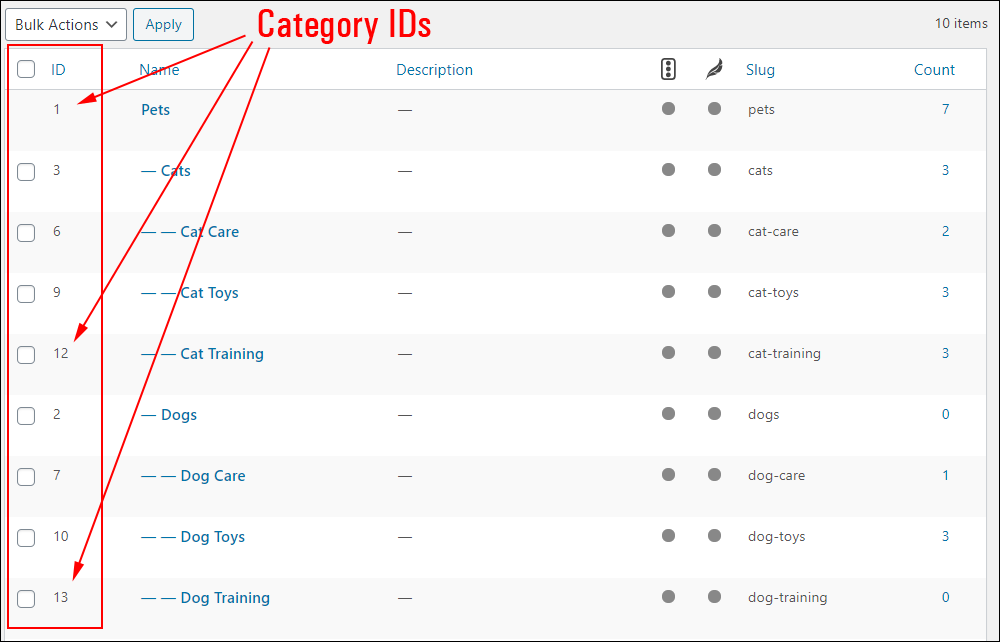
Catch IDs

Catch IDs adds an ID column to your Table of Categories. This makes it easier to view the specific ID of any category on your site.
Category IDs can be useful for things like excluding post categories from menus, displaying eCommerce products, pages, or ‘Add To Cart’ buttons for selected categories, etc.
Colorful Categories
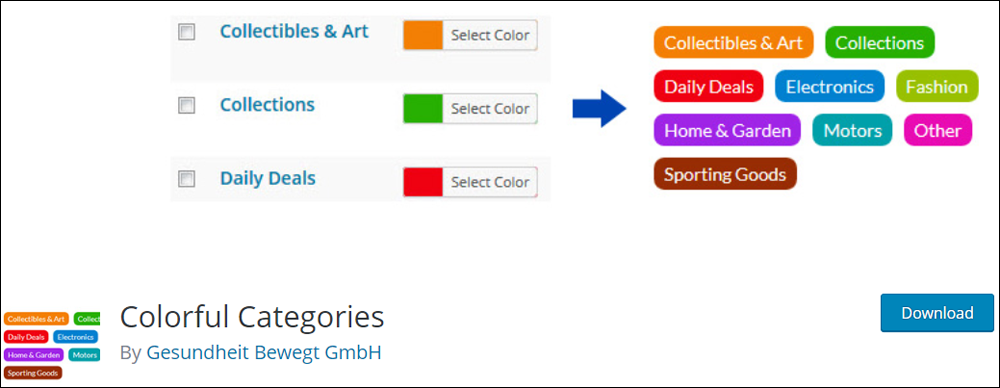
Colorful Categories is another plugin you can use to enhance the way categories display on your site.
This plugin lets you assign different colors to each of your categories.
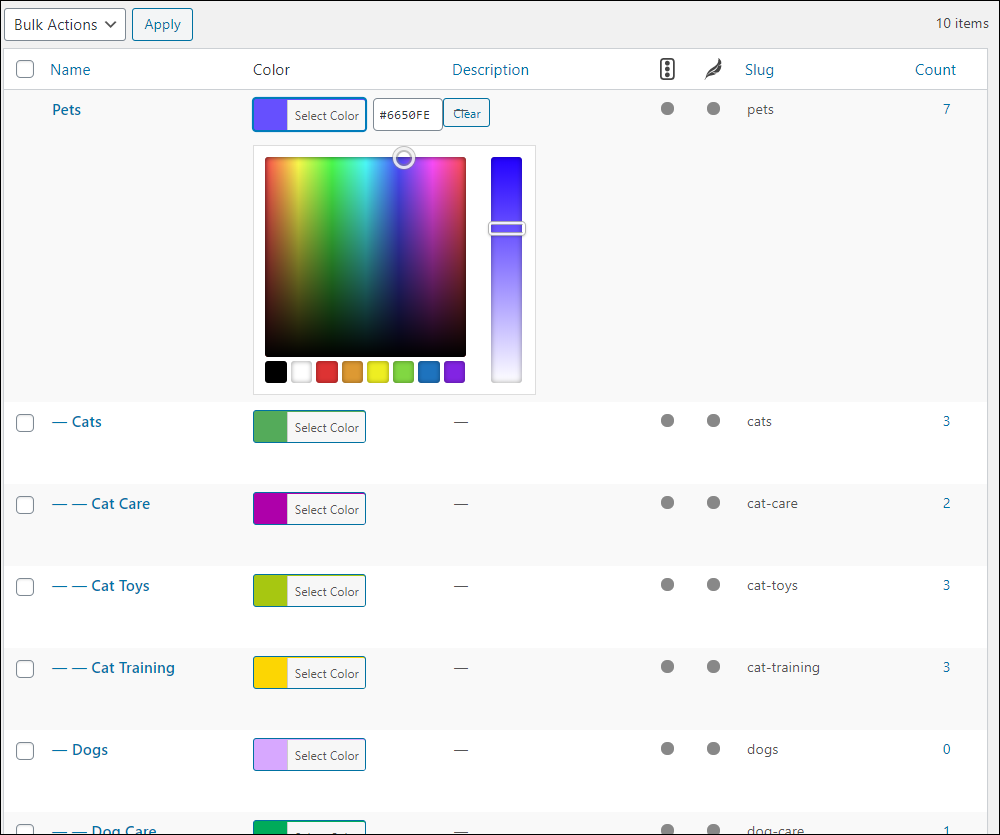
The plugin includes a widget for displaying a color-coded list of your post categories on your sidebar.
Step 5 – How To Use WordPress Post Categories Effectively
Here are some suggested tips to help you maximize the benefits of using post categories in your content to improve user experience and increase your site’s traffic from search engines:
Choose Keyword-Relevant Post Titles
As you plan new content for your site, try to include the main keyword of your post in your post title, preferably near the beginning. This helps to optimize the effectiveness of your posts and pages with users and search engines and can improve your sales conversions.
For example…
Let’s say you plan to write an article for an Adventure Travel company targeting the “Winter Camping” niche.
Your post could be titled “Winter Camping Tips – 7 Essential Tools For A Safer Winter Camping Adventure.
Publish Your Posts Under Relevant Categories
Now that you have optimized your post title, the next step is to assign that post to a relevant category — preferably one that is also optimized for the niche you are targeting.
If your Permalink settings have been configured to display categories in your post URLs (making your URLs more search-engine friendly), your post URL could look like this:

Note how many keywords in the above URL target the “adventure travel winter camping” niche.
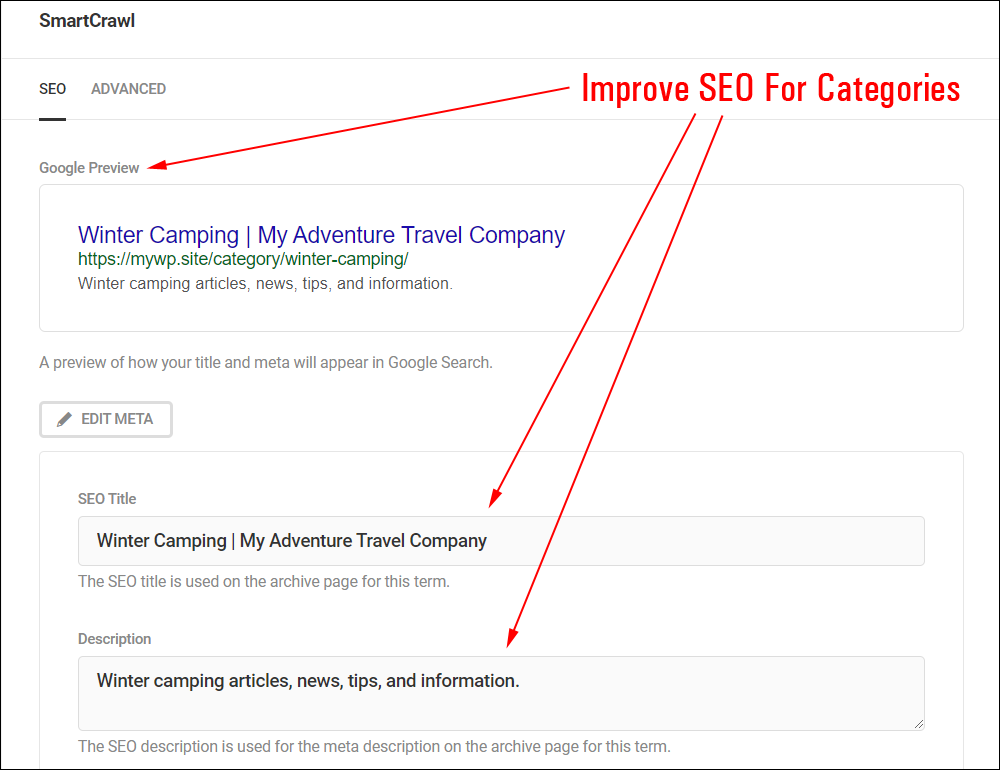
Use A WordPress SEO Plugin
An additional step you can take to maximize the SEO benefit of using post categories is to install an SEO plugin on your WordPress site that lets you configure metadata for each of your categories.
Publishing quality content targeted to your niche with optimized post titles, post URLs, and post categories will give you the best chance of improving your post visibility with your audience and search engines.
WordPress Categories – FAQs
Here are frequently asked questions about WordPress categories:
What are WordPress categories?
WordPress categories are a way to organize and group your posts into different topics or subjects. They help visitors navigate your site and find relevant content easily.
How do I create WordPress categories?
To create a WordPress category, go to your WordPress dashboard, navigate to Posts > Categories, enter the name, slug, and optional description for your category, and then click the “Add New Category” button.
Can I assign multiple categories to a single post?
Yes, you can assign multiple categories to a single post. This allows you to organize your content effectively and make it more discoverable to your audience. Some SEO plugins also allow you to specify a primary category.
Is it possible to nest categories in WordPress?
Yes, WordPress allows you to create a hierarchical structure for your categories by nesting them. This means you can have parent and child categories, which helps in creating a more organized and structured content hierarchy.
How do I add categories to my WordPress menu?
To add categories to your WordPress menu, go to Appearance > Menus in your WordPress dashboard. Then, select the categories you want to add from the left column and click “Add to Menu.” Arrange the categories as desired and click “Save Menu”.
Can I display posts from a specific category on a page?
Yes, you can display posts from a specific category on a page using WordPress’s built-in functionality or by using plugins. This allows you to showcase content based on specific topics or interests or visibility conditions that you set up.
***
Hopefully, this tutorial has given you a better understanding of the role and importance of setting up and managing your WordPress post categories correctly.
Follow the simple steps in this tutorial to use categories to help keep your site organized, easier to manage, easier for your site visitors to find what they are looking for, and easier for search engines to index your content.
***

Updated: April 22nd, 2024