
 This tutorial is part of our WordPress Configuration tutorial series. In this tutorial, you will learn how to set up webmaster accounts for improving your WordPress site SEO and search results.
***
How To Set Up Webmaster Accounts
You want online users to find your website. One of the most important steps of configuring a WordPress website or blog to drive traffic to your site is to set up webmaster accounts with search engines. Google, Bing, and other search engines provide tools that make it easier to find and rank your site pages.
What Is A Webmaster Account?
Search engines like Google and Bing provide website owners with useful tools for communicating and improving their search results. Basically, think of a webmaster account as Google’s (or Bing’s or another search engine’s) way of helping you to better help them understand what your site is all about and how to properly index and classify your web pages for search users.
Website owners can access these tools by registering and setting up an account and then adding and confirming ownership of their website(s).
Benefits Of Using Webmaster Accounts
Webmaster accounts allow you to set up a ‘feedback loop’ that will help you improve your website’s performance and hence improve the indexing of your webpages and your search results.
Setting up and registering your site(s) with webmaster accounts provide many benefits, including access to:
- Tools and information that allow you to run a healthy website efficiently
- Sitemap submissions and crawling and indexing activity on your site
- Real user data like search statistics
- Latest data about incoming links and internal links to your web properties
- Notification of crawl errors, malware, etc.
- Effective keyword targeting data
- Vital SEO insights
- And more.
In this tutorial, you will learn how to set up webmaster accounts that let you integrate information about your WordPress site with search engines like Google, Bing, and Yandex via the Yoast SEO plugin …

(Yoast SEO lets you integrate Webmaster Tools with WordPress)
To learn how to set up and configure the Yoast SEO plugin, see the tutorial below:
Google Search Console
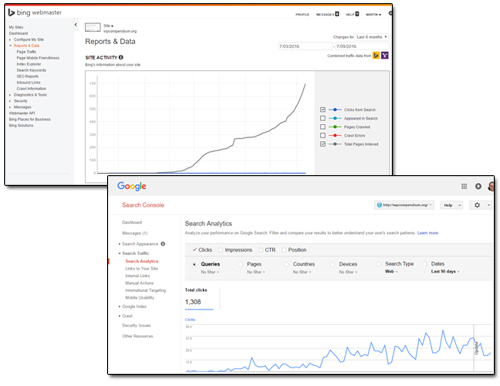
With Google’s Search Console (formerly called Webmaster Tools), once you verify your website, you are able to view a wealth of information, data, and insights about how Google sees your website and access tools that let you adjust and improve your results. Instead of employing ‘middle agents’ to help improve your website’s SEO, you have direct access to the source itself and can make important adjustments.
Google Search Console provides you with important information about how your site is indexed, such as a list of external and internal links to your site, the keywords users typed in to arrive on your site, keyword clickthrough rates, statistics, the last time the Googlebot crawled your homepage successfully, page errors, etc. You can also submit your site’s XML sitemap directly to Google in order to help Google index all of your websites pages. After submitting a new sitemap, you can view the status of the submission and see how many URLs have been indexed and view a detailed report on any errors detected by Google.
Google also provides essential diagnostic data about your website, including web crawl (mobile included) and content analysis data, which lets you know if you have errors that affect your site’s indexing results and SEO performance such as duplicate title tags, meta descriptions or pages with missing titles.
![]()
We recommend integrating your Google Analytics account details to your Google Search Console account for even better data insights and results (see ‘Google Search Console’ tutorial below).
If you are concerned about privacy issues, you may not want to allow Google and other analytical tools to access your data. If this is the case, see our tutorial on how to block search engines from accessing your WordPress site.
Register Your Website With Google Search Console
To register your website with Google Search Console and access your webmaster account tools, go to Google Search Console …
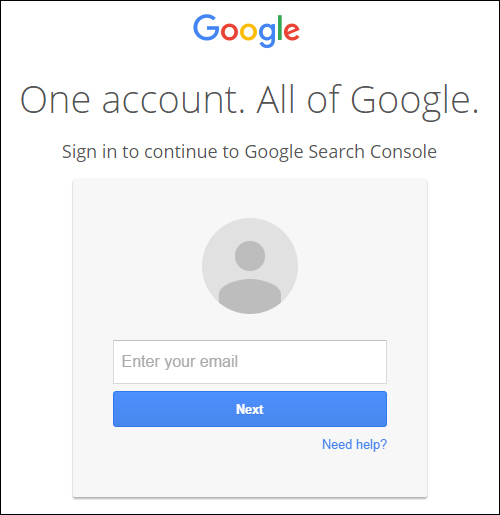
(Google Search Console Login Screen)
Log in with your Google Account details.
If you need help creating a Google account, see the tutorial below:
Once you are logged into Search Console, click on ‘Add A Property’ to add your website …

(Google Search Console)
Enter your website URL and click the ‘Add’ button …

(Add your site to Google Search Console)
You will be presented with a number of website verification methods. You can verify your website using any of the available methods.
If you plan to use the Yoast SEO plugin (which we recommend you do), then go to the ‘Alternate methods’ tab, click on HTML tag, and select and copy the meta tag Google generates for you to your clipboard …
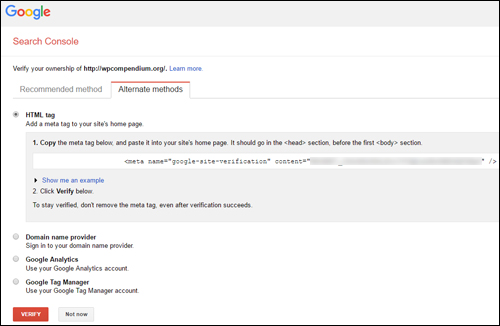
(Copy the website verification code to your clipboard)
If you have installed the Yoast SEO plugin, log into your WordPress administration area, go to Yoast SEO > Dashboard > Webmaster Tools and paste the verification code into the Google Search Console field, then click ‘Save Changes’ …

(Add Google Verification Code To Yoast SEO Webmaster Tools)
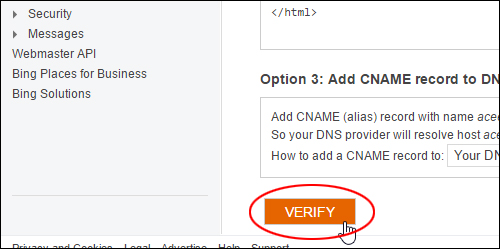
After pasting in the verification code, go back to the Google Search Console screen and click ‘Verify’ to verify and confirm …
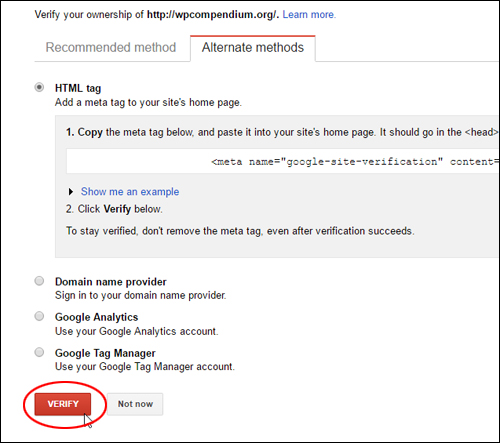
(Verify and confirm your website with Google)
After your site has been verified, you can access important information about how Google sees your website …

(Your site is now verified with Google)
Add Your XML Sitemap To Google Search Console
We recommend adding your XML sitemap file to Google Search Console.
To learn more about creating an XML sitemap, see the tutorial below:
To add your sitemap, go to Crawl > Sitemap and click on the ‘Add/Test Sitemap’ button …

(Add a new sitemap to Google)
Type or paste your sitemap URL into the ‘Add/Test Sitemap’ field and click ‘Submit’ …

(Submit your XML sitemap)
After your sitemap has been submitted, click on ‘Refresh the page’ …

(Sitemap submitted)
Google will now start crawling and indexing the URLs you have submitted.
After setting up your account with Google Search Console, you will have access to a range of useful information about your website and tools that will help you improve your site’s ranking and indexing …

(Google Search Console – Google Index)
To learn more about using Google Search Console, see the site’s help section below:

(Search Console Help Center)
Congratulations, you have setup your webmaster account with Google!
Bing Webmaster Tools
Bing provides a suite of reporting and diagnostic tools and information about your website to help you get more of your site indexed and ranked in the Bing search engine.
Create An Account With Bing Webmaster Tools
To create an account, go to Bing Webmaster Tools …

(Bing Webmaster Tools)
To create an account with Bing Webmaster Tools, you will need a Microsoft account (formerly known as a Windows Live ID).
![]()
If you have a Hotmail or Outlook.com account you likely already have a Microsoft account. If not, you can get an account for free here. Alternatively, just click the link Sign-Up with Microsoft account and create a Microsoft account as part of the Webmaster Tools sign-up process.
If you have not registered before, click on ‘Sign Up’ …

(Bing Webmaster Tools – Sign Up)
After you have set up your Microsoft account, sign in to access the Bing Webmaster Tools area …

(Log into Bing Webmaster Tools using your Microsoft account)
Register Your Website With Bing Webmaster Tools
To add your website(s) to Bing Webmaster Tools, enter your website URL into the My Sites > Add a Site field and click on the ‘Add’ button …

(Add your website URL to Bing Webmaster Tools)
Once your site has been added to Bing Webmaster Tools, you will be provided with an authentication code. Select this code and copy it to your clipboard …

(Bing verification code)
If you have installed the Yoast SEO plugin, log into your WordPress administration area, go to Yoast SEO > Dashboard > Webmaster Tools and paste the code into the Bing Webmaster Tools field, then click ‘Save Changes’ …

(Add Bing Verification Code To Yoast SEO Webmaster Tools)
After pasting in the authentication code, go back to the Bing Webmaster screen, scroll down to the bottom of the form and click ‘Verify’ to verify and confirm your site …
(Verify and confirm your website with Bing)
Once your site has been verified, you will have access to webmaster tools and information about how Bing sees your website …

(Once your site is verified Bing gives you access to tools and information about your website)
Add Your XML Sitemap To Bing Webmaster Tools
We recommend adding your XML sitemap file to Bing Webmaster Tools.
To learn more about creating an XML sitemap, see the tutorial below:
When adding a new website to Bing Webmaster Tools, you are given the opportunity to also add a sitemap while registering your site. Type or paste your sitemap URL into the ‘Add a sitemap’ field and click ‘Add’ …

(Add your sitemap)
To add a new sitemap to Bing, go to Dashboard > Configure My Site > Sitemaps, enter your sitemap URL and click on ‘Submit’ …

(Submit a new sitemap to Bing)
Bing bots will regularly crawl and index the URLs listed on your sitemap.
To learn more about using Bing Webmaster Tools, see the site’s help section below:

(Bing Webmaster Tools Help & How-To Center)
Congratulations, you have set up your webmaster account with Bing!
Yandex Webmaster
Yandex is a Russian multinational technology company specializing in Internet-related services and products. Yandex operates the largest search engine in Russia with about 60% market share in that country.
(Source: Wikipedia)

(Yandex.com)
Yandex.Webmaster is a service provided by Yandex.com that offers information on how your sites are indexed. You can use it to let Yandex know about new or deleted pages, make changes to how your site is indexed, and improve your site’s search ranking.
With Yandex.Webmaster, you have access to information such as:
- Which problems have come up during indexing
- Which pages have dropped in the search ranking
- Who is linking to pages on your site
- Which search queries lead users to your site
- How to protect your site from viruses
- How to make your site look better in search results
- And more …
In this section, we’ll show you how to register and set up an account with Yandex.Webmaster.
Create An Account With Yandex Webmaster
To create an account with Yandex.Webmaster, go to Webmaster.Yandex.com …

(Yandex.Webmaster)
Click on Log In …

(Yandex.Webmaster Log in)
If you haven’t set up an account yet, then click on the Register button to create a new account …

(Create an account with Yandex.Webmaster)
Complete the online registration form and confirm your mobile phone number, then click the ‘Register’ button …

(Yandex.Webmaster online registration form)
Register Your Website With Yandex Webmaster
After registration, you will be taken to the Webmaster > My sites screen. Click on the ‘+’ button to add your site …

(Add your site to Yandex Webmaster tools)
Enter your website URL into the Site address field and click on the ‘Add’ button …

(Add your website URL)
Once your site has been added to Yandex Webmaster Tools, you will be provided with a verification code. Select this code and copy it to your clipboard …

(Yandex Verification Code)
If you have installed the Yoast SEO plugin, log into your WordPress administration area, go to Yoast SEO > Dashboard > Webmaster Tools and paste the verification code into the Yandex Webmaster Tools field, then click ‘Save Changes’ …

(Add Yandex Verification Code To Yoast SEO Webmaster Tools)
After pasting in the verification code, go back to the Yandex Webmaster screen and click ‘Check’ to verify and confirm …

(Verify and confirm your website with Yandex)
Once your site has been verified, you will see your details listed in the ‘Access rights’ screen under ‘Users who manage site’ …

(Your site is now verified with Yandex)
After setting up your account with Yandex Webmaster, you will have access to a range of useful information about your website and tools that will help you improve your site’s ranking and indexing …

(Yandex Webmaster provides data, insights, and tools for your website)
Add Your XML Sitemap To Yandex Webmaster
We recommend adding your XML sitemap file to Yandex.
To learn more about creating an XML sitemap, see the tutorial below:
To add your sitemap, go to Indexing settings > Sitemap files, then type or paste your sitemap URL into the ‘Add Sitemap file’ field and click ‘Add’ …

(Add your sitemap file to Yandex)
Yandex bots crawl and index sitemap files every two weeks, so allow a few weeks for your site’s URLs to be crawled before you see results.
To learn more about using Yandex Webmaster Tools, see the site’s help section below:

(Yandex Webmaster Help Site)
![]()
If you use the Google Chrome browser to browse the Yandex Help site and find all of the tutorials written in Russian, you can use Google’s translation features to translate the content into your own language.
Congratulations, you have setup your webmaster account with Yandex!
Add Your WordPress RSS Feed To Google Search Console
We also recommend adding your WordPress RSS feed to Google’s Search Console (and the other search engines listed above). This will also help to index your content faster.
To learn more about the WordPress RSS feed, see the tutorial below:
To add your RSS feed, go to Crawl > Sitemap and click on the ‘Add/Test Sitemap’ button …
(Add a new feed to Google)
Type or paste your feed URL into the ‘Add/Test Sitemap’ field and click ‘Submit’ …
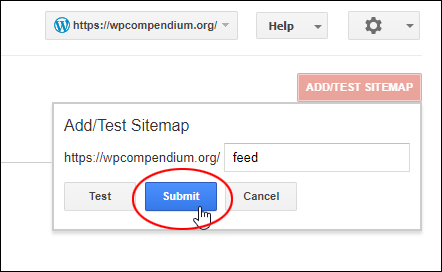
(Submit your WordPress RSS feed)
After your feed has been submitted, click on ‘Refresh the page’ …
(WordPress RSS feed submitted)
Your WordPress RSS feed is now added to Google’s search console. Google will now start crawling and indexing the URLs you have submitted.

(WordPress RSS feed added to Google Search Console)
![]()
Repeat the above process to add your WordPress RSS feed to Bing’s search consoles.
Congratulations! Now you know how to set up webmaster accounts and how to add XML sitemaps and RSS feeds to notify search engines about your content.

(Source: Pixabay)
***
"Learning WordPress has been a huge stumbling block for me. I've been looking for something that covers absolutely everything but doesn't cost an arm and a leg. Thank you so much ... you have just provided me with what I have been looking for! Truly appreciated!" - Tanya
***