
 This tutorial is part of our WordPress Management tutorial series. In this tutorial, you will learn how to reinstall your WordPress site.
![]()
This tutorial cannot help you reconfigure your site’s settings if you have not been performing regular data and file backups of your site, but it will show you how to perform a fresh new WordPress installation and how to re-import the settings and content of your last backup.
To learn more about creating regular WordPress backups, go here:
***
How To Reinstall Your WordPress Site
It’s important to know how to reinstall your WordPress site in the event that you cannot get your WordPress blog or website back by reimporting your MySQL data or by re-uploading your backup files.
Reinstalling Your WordPress Site: Step-By-Step Tutorial
How To Install WordPress On Your Domain
If your web hosting service offers cPanel with the Fantastico or Softaculous script installation program, then installing a WordPress site on your domain is a breeze.
If your hosting account does not offer cPanel or have Fantastico installed, you will need to either ask you host provider to install it on your server or install WordPress manually using FTP.
Creating Your WordPress Site Using cPanel And Fantastico
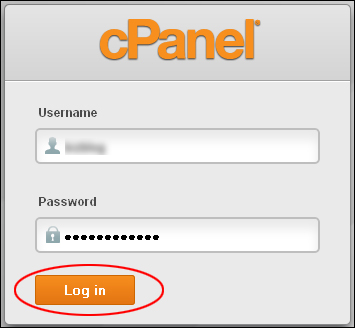
Log into your webhosting account …
If your webhosting account needs to be recreated from scratch, you may need to go into the ‘Email Accounts’ area in the ‘Mail’ section of your cPanel administration area first and set up your email addresses, aliases, forwarders, usernames, passwords, etc. again.

If you need help with this step, see this tutorial: How To Set Up Email For Your Domain Using cPanel
Click on the Fantastico icon in the ‘Software/Services’ section of your cPanel administration screen …

Select WordPress from the installation items menu, and choose ‘New Installation’ to set up a new blog on your domain …

Fill in the installation setup fields as explained below, then click on Install WordPress …

- Install in directory field:
-
- If installing site as the MAIN SITE on your domain address, then leave this field blank.
- If installing site as a business blog on an existing site, then enter a name for the subfolder where your blog will be installed (e.g. “blog” without the quote marks – your site will then be installed on domain http://yourdomain.com/blog )
- Administrator-username field: Choose a login username for your site’s administration area.
- Password field: Choose a password for your site’s administration area.
- AdminNickname field: Your nickname will appear as the author of all posts added to your site. Tip: Choose a nickname that contains a keyword related to your business. For example, if you own a Golf-related business, you may want to choose a nickname like “Golf Editor”, “Mike’s Golf Store”, “The Golfing Expert”, etc …
- Admin e-mail field: Enter your email address here.
- Site Name field: What you enter here will appear as the title of your site (e.g. “Mike’s Golf Store” or www.MikesGolfStore.com)
- Description field: What you enter here appears below the title of your site. Tip: Create a keyword-rich description that also makes sense to your site’s visitors (e.g. “Discounted Golf Equipment, Golfing Accessories And Gifts For Golfers”
- Click ‘Install WordPress’ when ready.
Complete the installation process by clicking the Finish installation button …

Choose ‘Send E-Mail’ to email a copy of your installation details to yourself. These details will include your site’s login and password details …

To view your new WordPress installation, click on Back to WordPress overview …

Click on Visit site …

Your new site will open in a new browser window …

Congratulations … your WordPress site has now been reinstalled!
![]()
Note: If you have installed a WordPress site using Fantastico and need to remove your WordPress installation, then log into the Fantastico application via cPanel, click WordPress under the “Blogs” menu, select the installation you want to remove and click remove. This will delete your files and database and allow you to perform a fresh installation …

The next step is to re-import your old WordPress site from your backup files. The backup contains your themes, plugins and custom files and folders.
You can re-import your old WordPress backup files automatically using plugins, or manually (see below).
Reimporting WordPress Backup Files Using cPanel
If your webhosting does not offer cPanel, see “Reimporting WordPress Backup Files Using FTP” below.
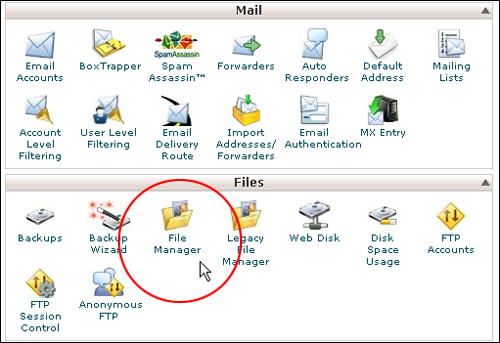
If you’re still logged into your hosting account, return to your hosting administration area. The screenshot below shows you how to get back to your main cPanel area from the “Fantastico” panel …

Open up File Manager …
Click on Upload …

Click the Browse button in the ‘Upload files’ screen …

Locate the compressed backup file you would like to reinstall on your hard drive and click Open …

Your file will begin uploading to your server automatically. This may take a few minutes depending on the size of your file …

Wait until the file completes uploading, then close the ‘Upload files’ screen and return to ‘File Manager’ …

Click the Reload button to refresh the ‘File Manager’ screen …

![]()
*** VERY IMPORTANT ***
In order for your new installation to work, you must not delete the new “wp-config.php” file.
If you re-import your old backup file without following the steps below, your old file’s “wp-config.php” will overwrite the new file and you will experience errors with your reinstalled site.
These next few steps are very important. The first thing we need to do is make a backup of the newly installed “wp-config.php” file. This file contains important settings and instructions for your site on how to access your new WordPress database.
If this file is deleted, you will not be able to login to your site. You will have to delete your WordPress installation and start all over again.
Select the wp-config.php file …

Click Download …

A pop-up screen will appear. Make sure it is set to ‘Save File’ and click Ok to continue …

Locate the WordPress backup folder in your hard drive and click Save to download your file …

Your new wp-config.php file is now safely backed up.
Return to ‘File Manager’ and select wp-config.php again …
With the wp-config.php file selected, click on Rename …

Rename the wp-config.php file to make the file name slightly different. In the example below, we have simply added an “-a” to the file name. Click Rename File to continue …

Now that you have safely backed up and renamed your wp-config.php file, you are ready to continue the process of reinstalling your old WordPress site files.
Select the compressed backup file you recently uploaded and click Extract …

When the ‘Extract’ pop-up window appears on your screen, click on Extract File(s) …

After all of your files have decompressed, a pop-up window will appear on your screen letting you know the process has been completed.
Click Close to close the ‘Extraction Results’ window …

Click on Reload to refresh the window …

The newly extracted files will replace your existing installation files, effectively restoring your old WordPress site.
All you need to do to complete this process now is delete the file called “wp-config.php” (from your old backup) and replace it with the “wp-config.php” file from your new WordPress installation, which you recently renamed to prevent it from being overwritten.
Select wp-config.php and click Delete …

Click Delete File(s) to confirm the deletion …

Select your renamed “wp-config” file (in the example below this file is called “wp-config-a.php”) and click on Rename …

Restore the original name of the file to “wp-config.php” and click Rename File to continue …

The last step in this process is to delete your old backup file, as you have now restored your site’s files and you don’t need to keep such a large file sitting on your server.
Select your old backup file and click Delete …

Your old WordPress files have now been fully restored.
![]()
Once you have reinstalled your old WordPress files, the next step is to restore your site’s previous settings and configurations by reinstalling your old WordPress MySQL database data, as explained in this tutorial.
Reimporting WordPress Backup Files Using FTP
If your web host does not offer cPanel, then you will need to re-import your WordPress backup files using FTP.
First, make sure that the compressed backup file containing all of the files you want to re-import have been extracted into a separate folder in your hard drive. This way, you will not be uploading unrelated files to your server …

![]()
*** VERY IMPORTANT STEP ***
Once you have extracted all of the files from your old backup file, delete the “wp-config.php” file from the folder.
You do not want to upload this file to your server, as it will overwrite the new “wp-config.php” which contains important data and settings about your new WordPress installation …

Your files are now ready for uploading to your server’s WordPress installation directory.
All files in this folder should be uploaded EXCEPT for the original compressed backup file …

Launch your FTP client and connect to your server:
(1) Locate and select all of your backup files (except for the original compressed file as noted above).
(2) Make sure you will be uploading files to the correct directory on your server containing your new WordPress installation.
(3) Upload files …

Your old WordPress files have now been fully restored.
![]()
Once you have reinstalled your old WordPress files, the next step is to restore your site’s previous settings and configurations by reinstalling your old WordPress MySQL database data, as explained in this tutorial.
Next Step:
Now that you know how to manually reinstall your WordPress site, then next step is to continue learning about WordPress site maintenance:
- Learn How To Automate Important Aspects Of The WordPress Maintenance Process
- Learn How To Manage Multiple WordPress Sites
- Learn How To Troubleshoot Common WordPress Errors
- Learn How To Put The Entire WordPress Maintenance WordPress Together (WordPress Maintenance Checklist)


***
"If you're new to WordPress, this can stand on its own as a training course and will stay with you as you progress from beginner to advanced and even guru status." - Bruce (Columbus, Ohio)