How To Set Up An Amazon S3 Account
 In this tutorial, you will learn about using Amazon S3 Services – an affordable, secure, and almost limitless cloud storage solution that lets you store and protect large amounts of data, including images, media files, and website backups.
Why Store Content Files In The Cloud?
If you use videos in your content, then you’ve probably already figured out that it’s better, cheaper, faster, and easier to upload and stream videos from a site like YouTube and embed these into your posts and pages than host and stream large media files yourself.
You can do the same thing with any media file … images, audios, downloadable documents, PDFs, etc.
WordPress has a built-in media library that lets you store images, videos, audios, downloadable documents, and PDFs, etc.
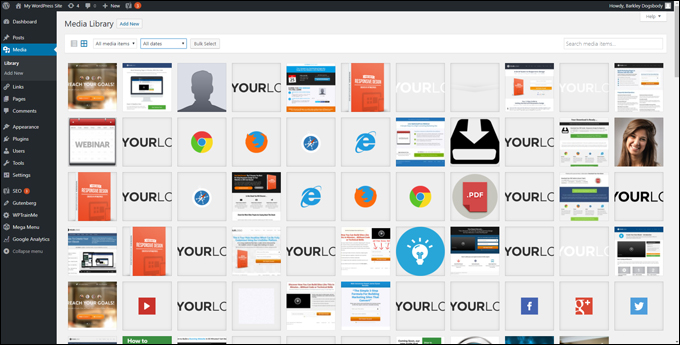
To learn more about using the WordPress Media Library, see this tutorial:
The WordPress media library is great and in some cases, you do need to upload and use images from the media library in your content. For example, if you are adding featured images to posts or pages, or adding product images to an e-commerce store powered by WooCommerce.
Files uploaded to the WordPress Media Library, however, are stored on your own server. Depending on your web hosting setup, media files can end up taking up excessive space on your server and cause issues with performance, exceeding your data or bandwidth allowance, etc.
Many companies now offer inexpensive cloud storage and hosting of files and documents, including Google Drive, DropBox, Amazon, and others.
What Is Amazon S3?
Amazon S3 is an affordable, secure, and reliable cloud storage solution service that can be used to store and retrieve any amount of data, at any time, from anywhere on the web.
Amazon S3 lets you share, distribute and download zip, PDF, audio, and video files, and stream videos on your WordPress site without consuming a large amount of bandwidth or straining your server’s resources.
Essentially, you’re using Amazon’s own servers to store as much information as you want (videos, audio files, images, large files, etc.) at very little cost (you’ll pay only a few dollars per month for large amounts of data use), making it an ideal solution to use with your WordPress site.
![]()
There are a number of benefits and advantages to using a service like Amazon S3 to add images and media (e.g. videos, audios, download files, etc.) to your content. Here’s why you should consider streaming your site’s images and media files from the cloud using a service like Amazon S3 instead of using the WordPress media library:
Let’s say, for example, that you have used the same image or video throughout your site and decide to change it. Instead of finding every instance of that image or video, you can just upload the new file to your Amazon S3 account and overwrite the old file. All instances of that file will now be updated.
Another benefit of storing content in the cloud is that uploading images, videos, and other large bandwidth-consuming files to an Amazon S3 account allows thousands of visitors to access your information without slowing down your site because the files are delivered from Amazon’s servers, not from your server.
Storing large files or a large number of files in the cloud and then streaming these in your content can improve your site’s performance and keep your web hosting costs down.

About Amazon S3
Amazon S3 is one of several applications or services that Amazon has in its stable of product offerings.
When you host images, videos, and other heavy bandwidth items like large downloadable files on normal hosting services, the more traffic you have visiting your site at the same time, the slower it loads in your visitors’ browser. If you have spikes in traffic, this extra load can even crash your site.
Imagine having a digital product launch and suddenly lots of customers try to download a number of large zip files hosted on your regular server. Your server could crash, support tickets would start piling up and what should be a very happy day would quickly turn into a nightmare.
If you host your images, videos, and other downloadable files on Amazon S3, your visitors will not experience your site slowing down, buffering, or crashing due to excessive bandwidth consumption. You could have 100, 1,000, or 10,000 people downloading your zip files simultaneously without any problems.
Hosting large files is just one benefit of using Amazon S3. Another benefit of using Amazon S3 is how much money you can save. Amazon S3 is an “online scalable (simple) storage service,” which means that it’s essentially a hard drive in cyberspace with unlimited storage – you only pay for what you use.
When Amazon launched S3 back in 2006 (2007 in Europe) they began by charging only 15 cents per gigabyte, and this price has been getting cheaper over time. Currently, it’s in the range of around 3 cents per Gb. This means better service and more savings for you.
Amazon S3 is a powerful tool and offers solutions to many of the biggest challenges we face when managing a digital presence, like site speed, security, and bandwidth cost. It’s a tool that every website owner should be able to use, without depending on technical experts.
The over-the-shoulder style video tutorials in this section will help you master how to use Amazon S3 quickly and easily.
![]()
You can sign up for a FREE Amazon S3 account, which allows you to experience the service without having to pay until you exceed the trial quota shown below …

How To Set Up An Amazon S3 Account
To set up an Amazon S3 account, go here: http://aws.amazon.com/s3
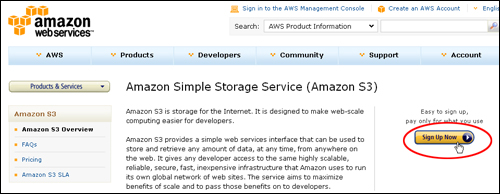
Visit the FAQ, Pricing, and Service Agreement sections before choosing to open up an account.

If this is your first time using an Amazon service, create a new account. Otherwise, you can sign in if you already have an existing Amazon account.

Once you’re logged in, go to Your Account section and click on Security Credentials.

Inside the Security Credentials section, click on Access Credentials.

In the “Access Credentials” section, you will find your Access Key ID code and Secret Access Key code. Click on “Show” to reveal your Secret Access Key code.
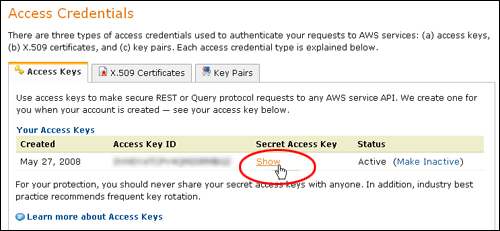
You need both your Access Key ID code and Secret Access Key code to use the Amazon S3 service.
Copy both of these codes to a plain text file – make sure there are no spaces at the end of the code strings, or you will experience errors using the service.

![]()
Important: Never share your codes with anyone!
Save these codes for now on your hard drive (tip: don’t make the file name or location obvious). You will need these codes in the next step.
Also, make sure you watch the “How To Set Up An Amazon S3 Account” video here before proceeding to the next step. It will show you how to create directories (called “buckets”) for storing your files and how to set permissions so that others can see, access, and download your files.

Please note that you do not have to enable permissions on your backup files if you are not sharing your files with others and/or want to keep these private.
How To Upload And Share Files On Amazon S3
Now that you have set up your amazon S3 account, follow the steps in the tutorial below to upload, edit and delete your files.
Using Amazon S3 From Your Browser
If you are not using Firefox, consider installing and using it to transfer files easily to your server and offsite storage locations. You can upload and edit content from your hard drive to your Amazon AWS S3 account directly from your web browser using browser extensions and addons like the one shown below.
Amazon S3 Firefox Organizer (S3Fox)
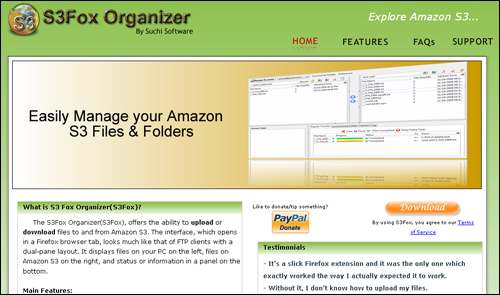
The Amazon S3 add-on for Firefox browsers (S3Fox) makes it easy and convenient to upload and delete files using the Amazon S3 service.
If you are not using the Firefox browser, download it here: Firefox Browser
Next, download the S3Fox add-on for Firefox here: S3Fox
To install the add-on:
- Click on the “Download” S3Fox button.
- You will have to restart your Firefox i.e., close all the windows and open it again.
- Then, you should see an option called “S3Fox Organizer” in “Tools” Menu. Click on that to start with. (or) You can open the drop box by clicking on the S3Fox icon on the status bar.
To configure S3Fox for Amazon S3 … Have your Amazon S3 Access Key ID and Secret Access Keycodes ready. Launch S3 Organizer. In your Firefox browser, select “Tools” > “S3 Organizer”.
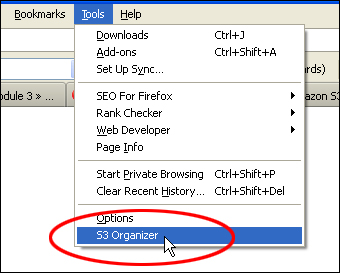
To set up your Amazon S3 account with S3 Organizer, click on Manage Accounts.

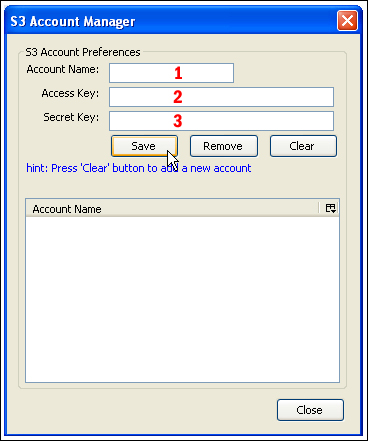
Enter an Account Name (1), your Access Key (2), and Secret Key (3) and click Save.
![]()
Note: If you experience an error when trying to set up your account details in the S3 Account Manager box, go back and check that you have not entered spaces after your key codes!
Once you’ve entered the correct information into the S3 Account Manager, you’ll be brought to your account. This is blank by default.
The left side of the S3 Organizer window displays your local hard drive folders, and the right window displays your Amazon S3 folders (called “buckets”).
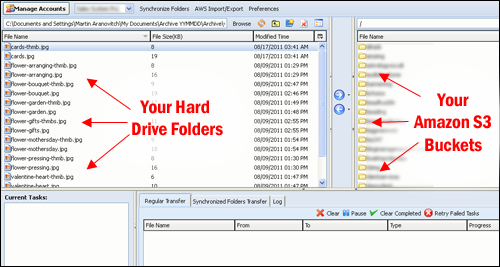
To create a bucket, either right-click with your mouse inside the amazon S3 window and select “Create Directory”.
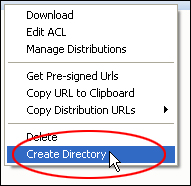
… or click on the “New Directory” button.

Choose a name for your new directory and click “ok” to create the folder.
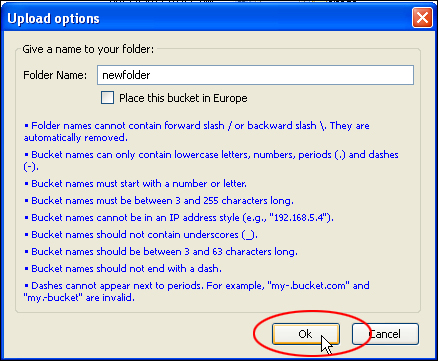
Anything created on the folder’s root level will be your buckets. Your files and folders will then be stored or organized inside your buckets.
To create a folder, simply double-click into your bucket and repeat the above step, then upload your images, videos, zip files, etc. to your folders by selecting the files you want to upload and clicking on the “upload” button.

By default, anything uploaded to your Amazon S3 account will not be accessible to the public. You must set file permissions for uploaded items to make these visible or accessible to others.
Using Amazon S3 Software Tools
If you don’t want to use a web browser tool like S3Fox to transfer files, then you will need to install a software tool or application like the one shown below to interface with your Amazon S3 account.
s3 Browser
S3 Browser is a freeware tool for Windows users. You can use this tool to access, upload, and share files from your Amazon S3 account.
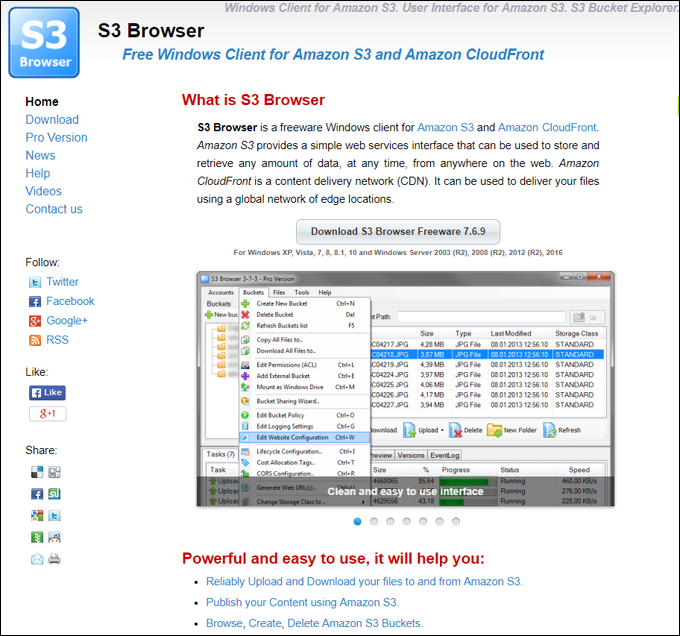
After downloading and installing the S3 Browser tool, you will need to add your S3 account details (see the previous section for details on how to set up an Amazon S3 account).
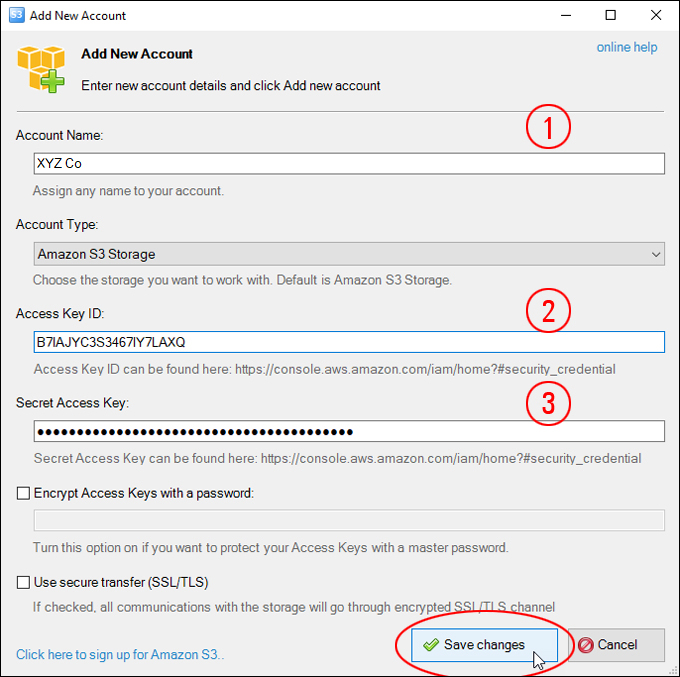
Click on ‘Add new account’ …
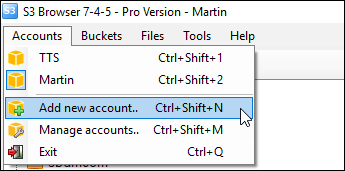
Enter your details:
- Account Name
- Access Key ID
- Secret Access Key
Click ‘Save changes’ to update your settings.
Once your account is set up, the S3 Browser interface lets you access your S3 account.
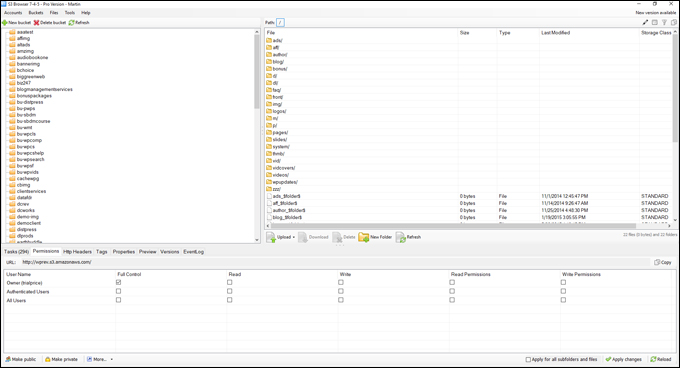
S3 Browser provides a simple interface where you can perform tasks like set up, delete, and edit ‘buckets’ and folders, configure permissions, upload, download, and delete files and folders, and a whole lot more.
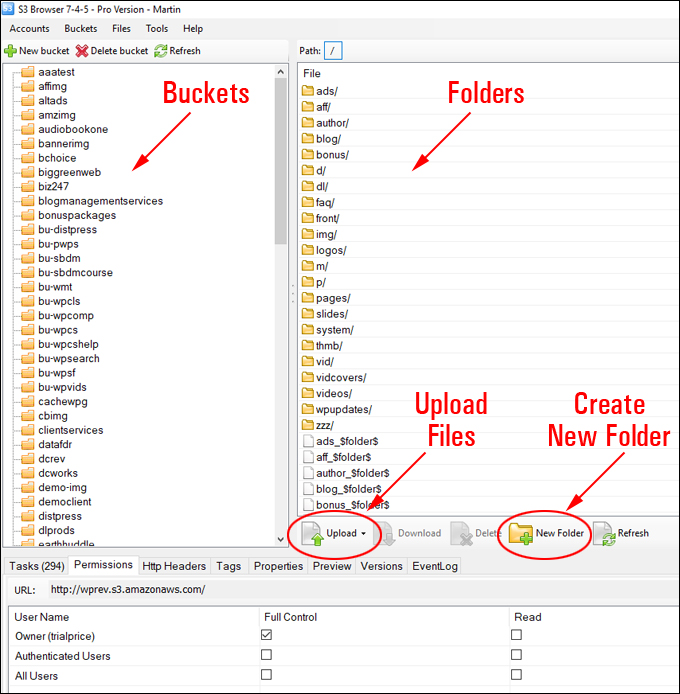
To upload files or folders, navigate to the bucket and folder you want to upload your files to (or create a new bucket or folder), then click on ‘Upload’ and select your option …
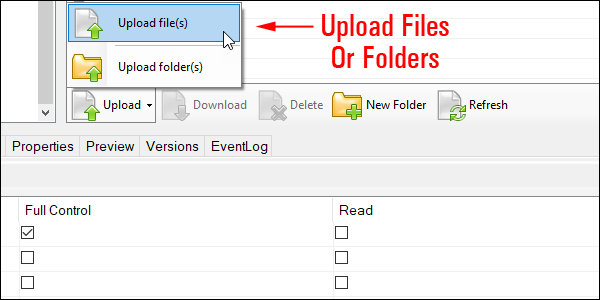
Locate and select the files (or folders) to upload and click ‘Open’.
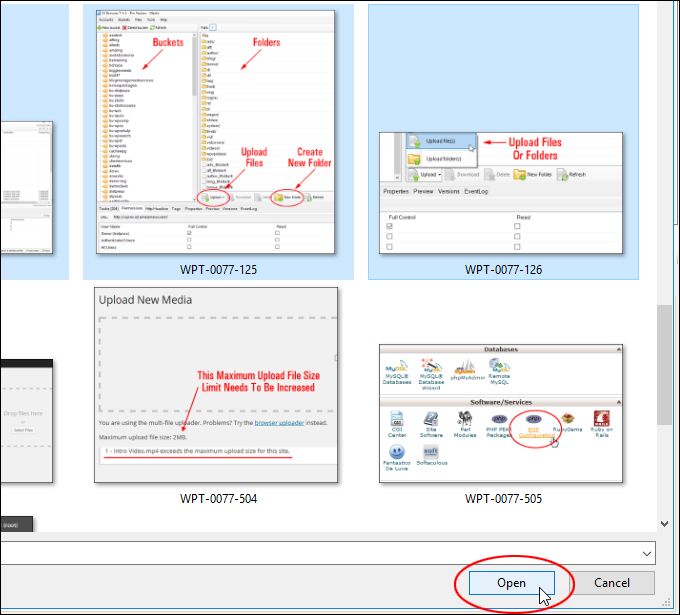
Your files will begin uploading to your S3 bucket on Amazon’s cloud server.

![]()
Consider upgrading to the PRO version of S3 Browser for additional features, including faster uploading of files to your S3 account.
Once your files have been uploaded to your account, you will need to set file permissions if you plan to allow other users to view or download your files.
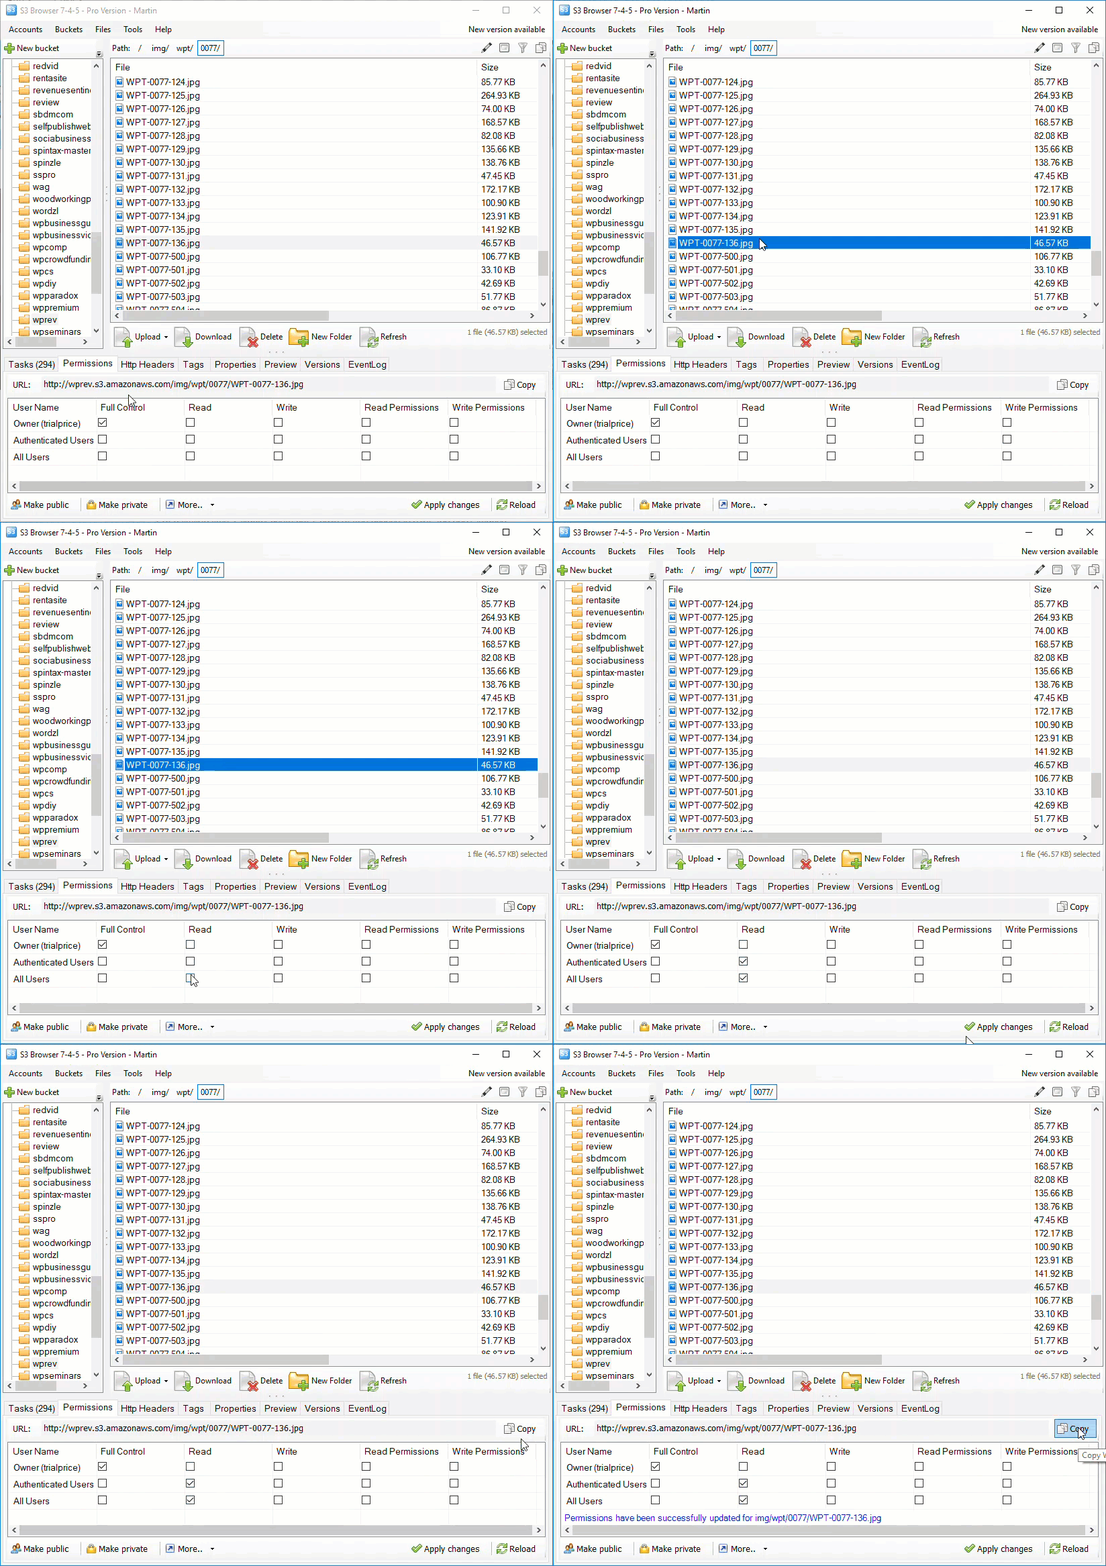
To set file permissions, select one or more files that you have uploaded.
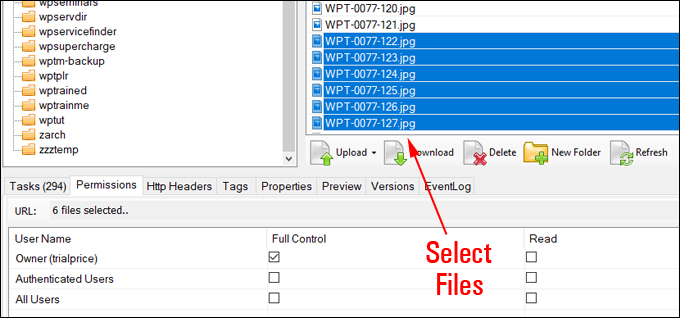
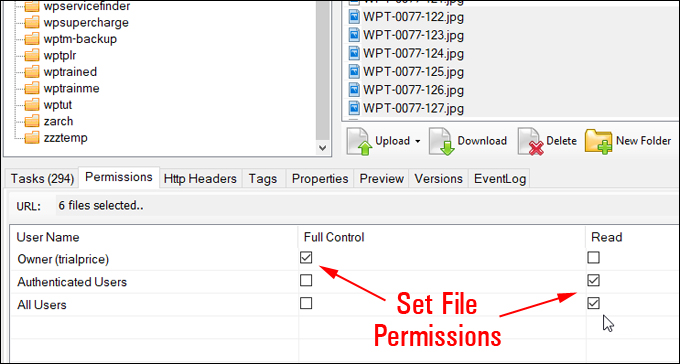
Tick the checkboxes shown in the screenshot below to configure basic access permissions for your files (i.e. display images or share files).
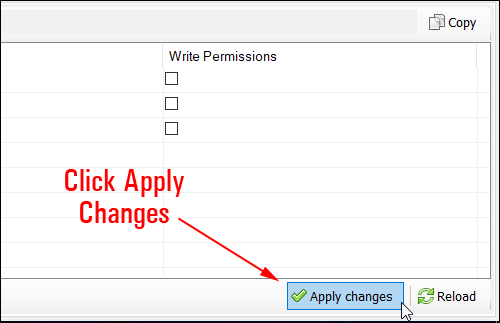
After setting file permissions, click the ‘Apply changes’ button to set file permissions.
To copy the URL(s) of your files to your clipboard, click on ‘Copy’.
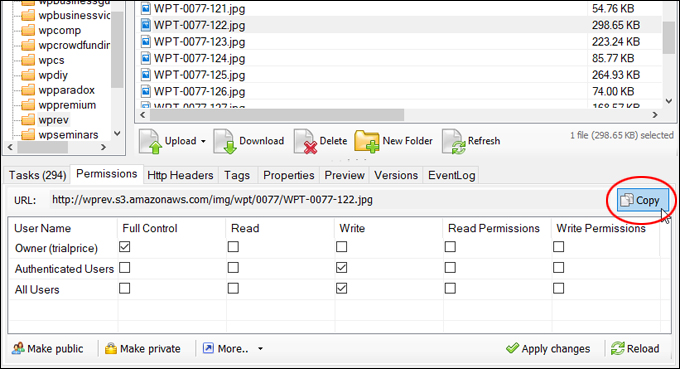
You can now paste the URL of your file wherever you need to use it.
For example, you can add the image to your posts or pages using the WordPress Add Media tool.
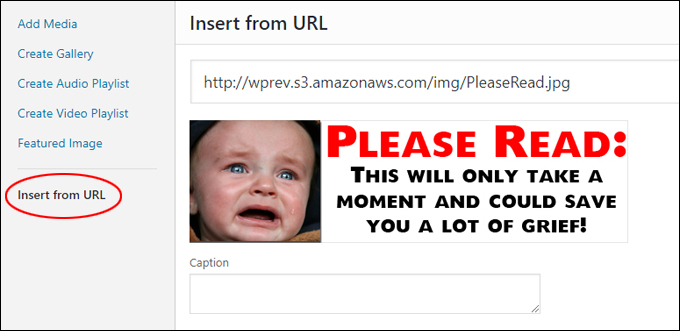
![]()
If you get an error (e.g. an image or video is not displaying), check that the file’s access permissions have been set by copying the URL and pasting it into your web browser.
If you get an error like the one shown below, your file’s access permissions have not been set.

Open up S3 Browser, locate the file and click on the ‘Permissions’ tab.
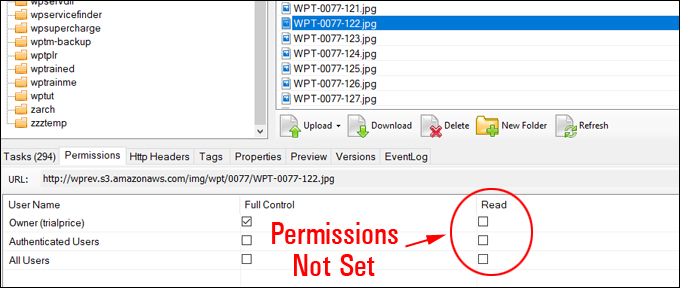
Make sure the permission checkboxes for your file are set as shown in the screenshot below.
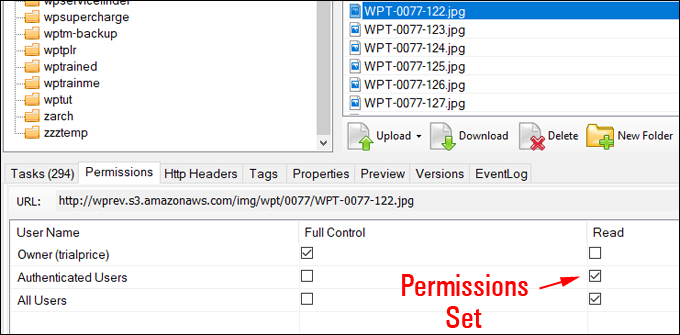
Of course, if you don’t want users to access your file(s), then leave permissions unchecked.
Here is a quick video showing you how to set general permissions for Amazon S3 files and copying the file’s URL to your clipboard.
For more help, information, and tutorials on using the S3 Browser tool, see their online help documentation and tutorials here:
Additional Amazon S3 Tools
In addition to the tools described above, here are some alternative tools and applications you can use to upload, transfer, and share files from your Amazon S3 account with users:
- Cloudberry Explorer – This is a freeware file manager for Amazon S3. Cloudberry Explorer provides a user interface to Amazon S3 accounts allowing accessing, moving and managing files, buckets, and vaults across your local and cloud storage.
- Bucket Explorer – This is a desktop application that provides users with an interface to explore & manage the data stored in their Amazon S3 Buckets.
- Cyberduck – This is a free 3rd party tool (User Interface) that connects your computer to your Amazon AWS account. Cyberduck is like an FTP client that works with PCs & Macs.
- S3Backup – This is another Windows desktop application that allows users to use the Amazon S3 service for remote backups and secure online file storage.
- Sync2S3 – Synchronizes your files with Amazon S3, providing you with a secure and affordable backup solution.
Congratulations! Now you know how to set up an Amazon S3 account to store your data offsite and how to use Amazon S3 to upload, store, and share your files online.
For video tutorials on how to use Amazon S3, go here:
***
"I have used the tutorials to teach all of my clients and it has probably never been so easy for everyone to learn WordPress ... Now I don't need to buy all these very expensive video courses that often don't deliver what they promise." - Stefan Wendt, Internet Marketing Success Group
***

