How To Use WordPress Autosave And Post Revisions
 In this tutorial, you will learn how to use the WordPress autosave and post revision feature.
Have you ever been in a situation where, after spending much time and effort composing or editing an article, something goes unexpectedly wrong, your computer suddenly crashes, and you find that you have lost all of your hard work because you forgot to click the ‘Save’ button at regular intervals?
If this ever happens while working on your website, don’t despair. WordPress comes with a powerful built-in content recovery feature that:
- Helps to prevent losing your work by automatically saving earlier versions of your posts and pages,
- Restores your post or page content if something unexpectedly causes your computer or web browser to crash while you’re working, and
- Lets you recover and restore an earlier version of your posts or pages if you changed the content and want to go back, even after saving.
Why You Need The WordPress Autosave & Post Revisions Feature
Typically, after editing and saving a post or page, you will see a confirmation message letting you know that your post or page has been saved and updated successfully.
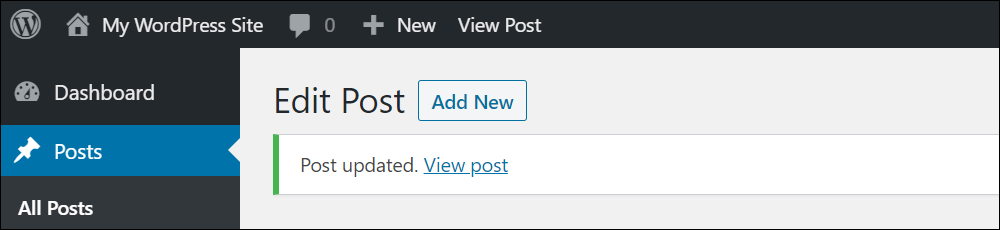
Sometimes, however, things can and will go wrong.
The WordPress autosave and post revisions function ensures that your content is periodically saved at regular intervals, so you can revert to an earlier version, or recover, and restore your content if something unexpected were to happen, such as:
- Your internet connection/wi-fi/modem temporarily goes down.
- Your web browser crashes or freezes.
- A power outage occurs.
- Internet “gremlins” temporarily prevent you from saving or publishing your work.
If this happens and you try to save your work, you may see a ‘WordPress Failure Notice’ on your screen.
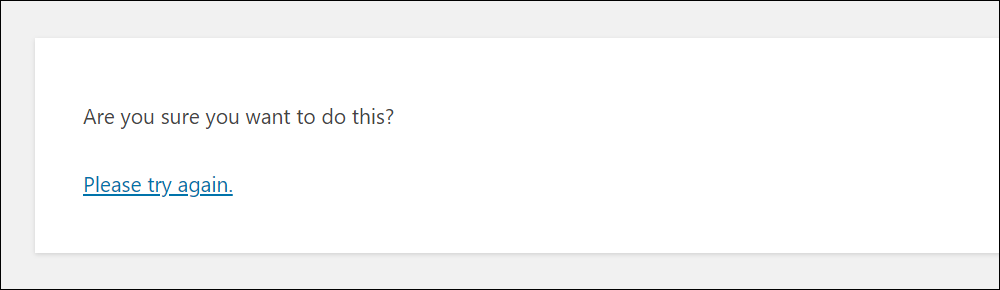
If you get the message Are you sure you want to do this? Please try again. and click on the link, the post or page you were working on should return to your screen, minus any recently made changes.
Alternatively, you could see a screen like the one below, depending on what you were doing…

This is where the built-in WordPress autosave feature comes in handy and can help to avert a disaster, or at least save you a great deal of grief and frustration.
WordPress Autosave
The autosave function is automatically enabled for all WordPress posts and pages but does not overwrite any content that you have already published or are working on.
Autosaves are stored in your WordPress database as a special kind of revision.
By default, WordPress automatically saves the current version of your posts to the database every sixty seconds. This time interval can be changed by modifying code in your wp-config.php file.
![]()
We recommend making a complete backup of your site’s files and database before making any changes to website files in your server.
If you need help or assistance changing the time interval of your site’s autosave function, please contact your web host.
***
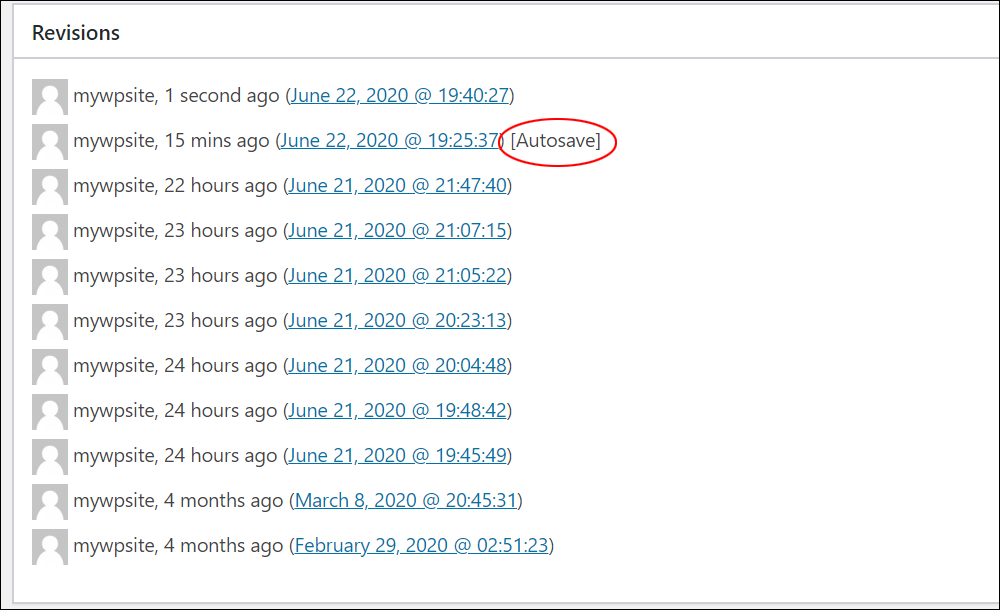
If you were working on your post for a while and something were to happen (e.g. your browser crashes or internet connection temporarily drops, you may see a There is an autosave of this post that is more recent than the version below‘ notice when you return to your post or page editing screen.

Click on the link to view the autosaved version of your post or page.

You will be taken to the Compare Revisions screen, where an autosaved version of your post or page can be recovered.
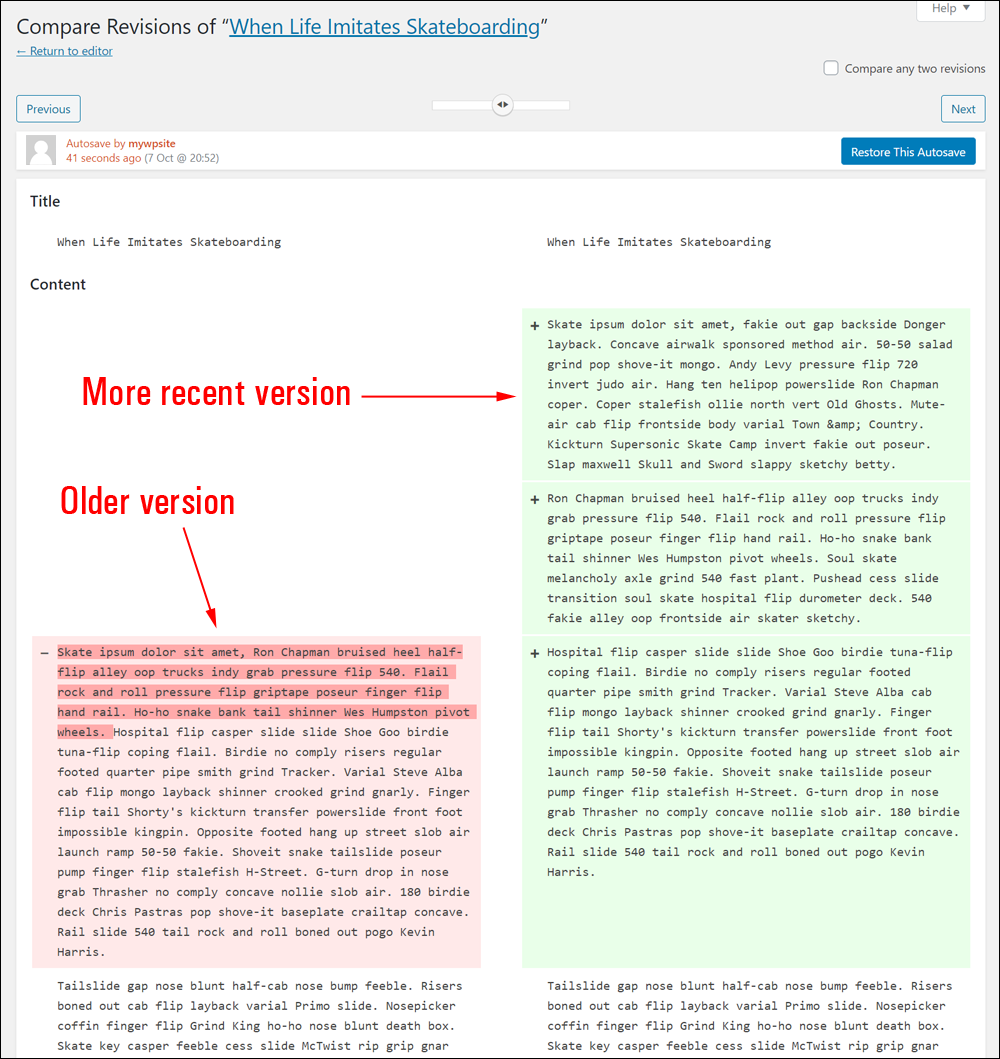
WordPress offers one-click content recovery and restoration. Click the Restore This Autosave button.
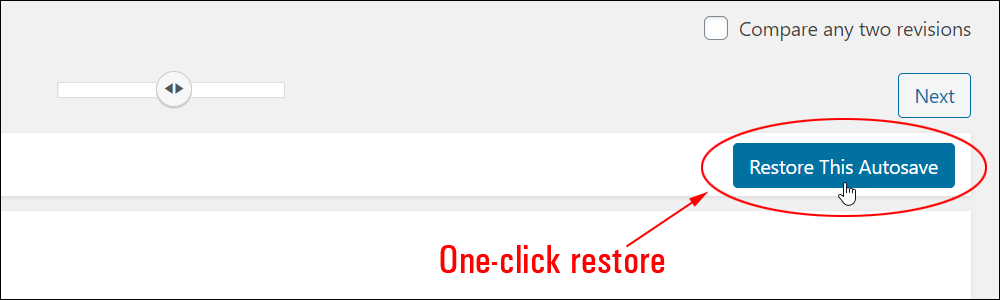
The autosaved content you were previously working on will be restored.

WordPress Autosave – Additional Information
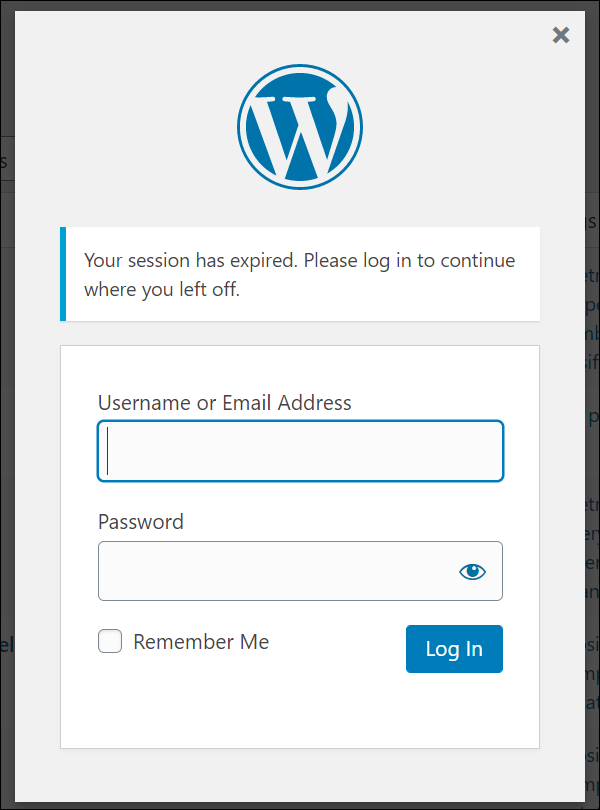
Content Recovery – Session Expired
Sometimes, your login session will simply expire while you are still working on your content. When this happens, a ‘Session expired’ message should pop-up on your browser.

If your login session expires and you get logged out of your site, WordPress remembers where you were, so when you log in again, you can continue working from where you left off.
WordPress autosave is also useful if you leave your site without saving your latest changes.

Content Recovery – Loss Of Internet Connection
As well as the Autosave function, WordPress also saves your latest revisions temporarily in your web browser.
For example, WordPress can help you recover content if you lose your internet connection …

It can also help you recover your content if you get a ‘Connection lost’ message like the one shown below:

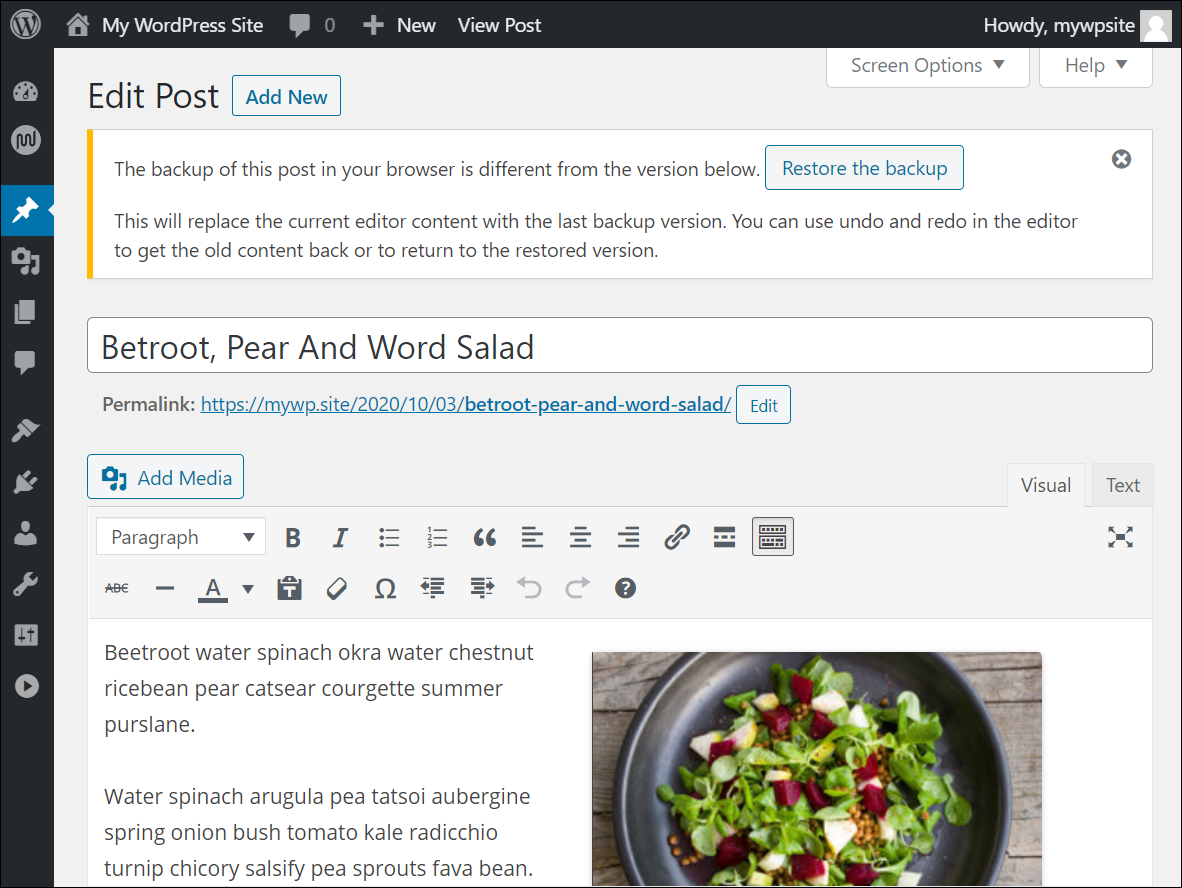
If you lose your internet connection while writing, your drafts are saved locally to your browser. When you return to edit, WordPress notifies you if there is a more recent draft, allowing you to restore the most recent version of your content.
This function is useful in case something happens between autosave intervals.
If the backup of the post that you are currently working on which has been saved in your web browser is different from the version displayed in your content editor, WordPress gives you the opportunity to restore your saved backup version.
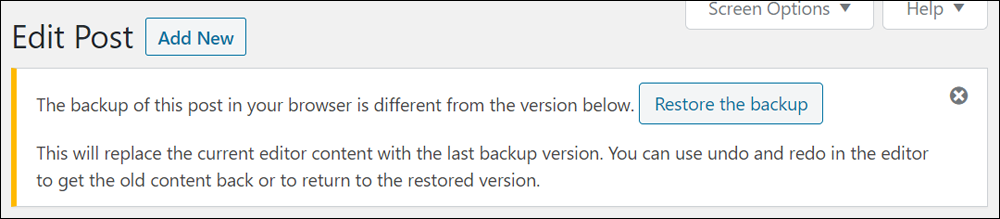
Click on the Restore the backup button.
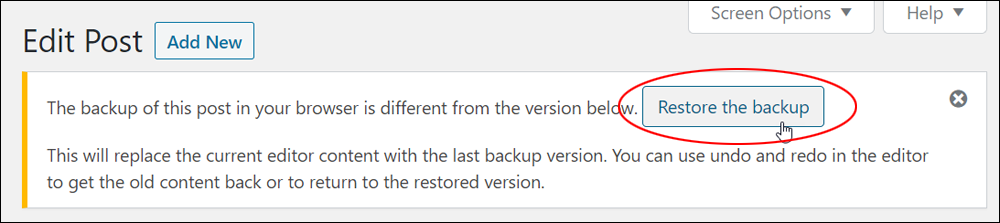
Your post content will be restored successfully. You can use undo and redo in your content editor to get the old content back or return to the restored version.
WordPress Post Revisions
WordPress introduced its Post Revisions feature in version 2.6. When you save a post or a page, WordPress automatically creates a revision of your post or page and stores it in your site’s database.
After version 3.6, WordPress made significant enhancements and improvements to this feature. The current WordPress revision system now includes an option in the Post/Page Publish box called Revisions. This automatically calculates and lets you know at a glance how many revisions you have made to your content.
It also lets you quickly and easily access the ‘Revisions’ screen by clicking on the Revision: Browse link (if using the WordPress Classic Editor.)
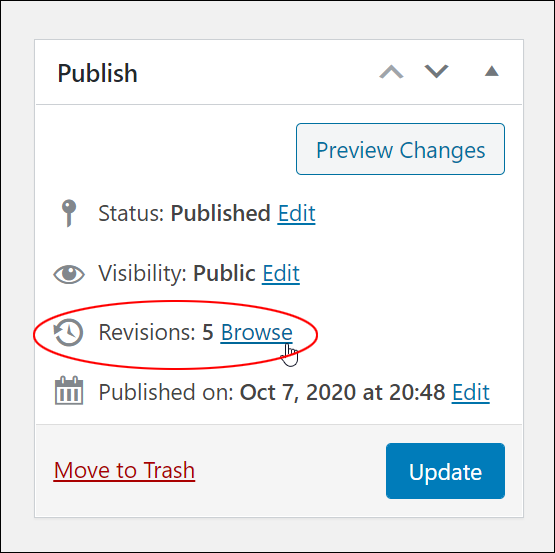
Note: In the WordPress Block Editor, the Revisions feature can be accessed in the Document sidebar.

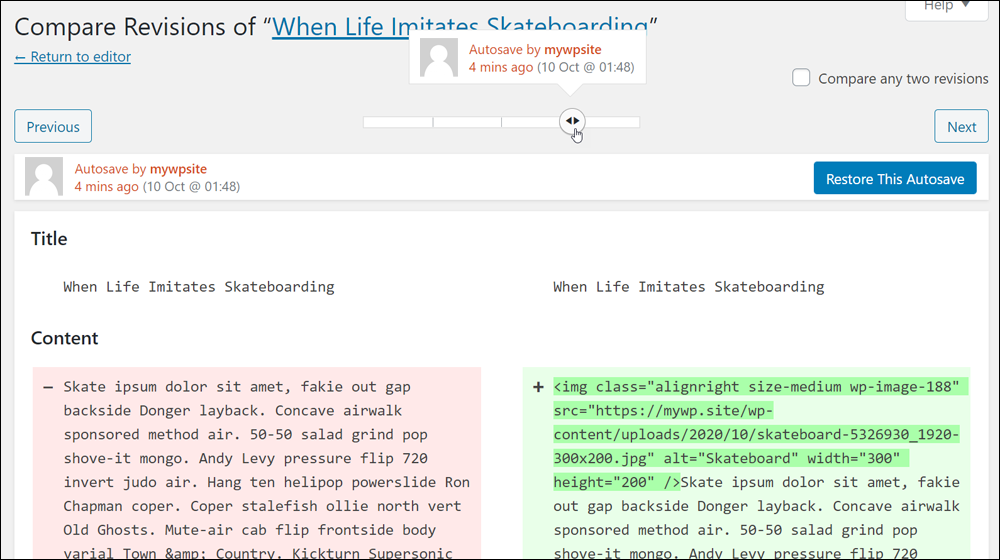
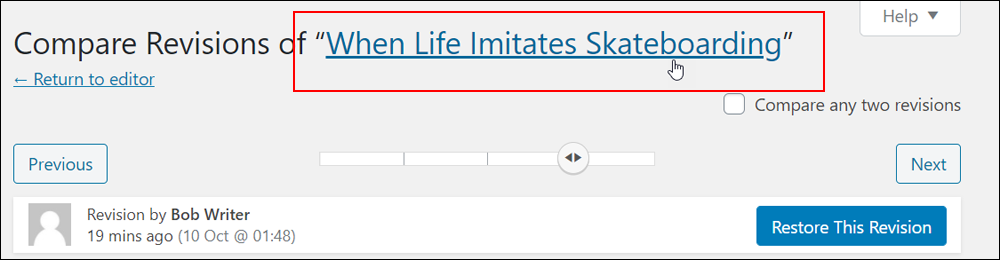
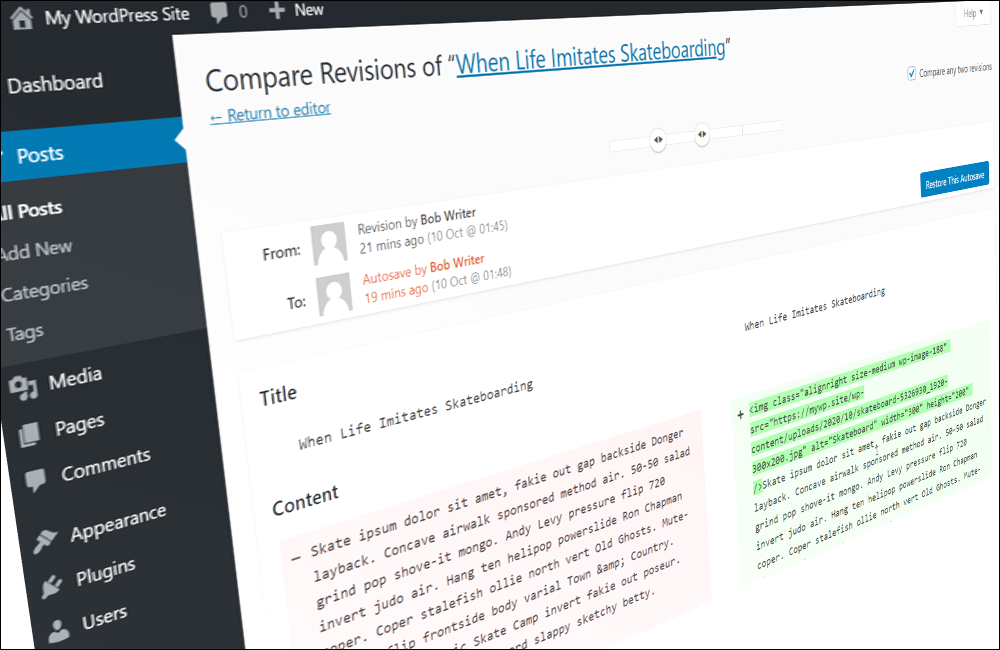
This brings up the Compare Revisions screen.
![]()
Note: This feature is identical for both Posts and Pages and works the same way in the WordPress Classic and Block Editors.
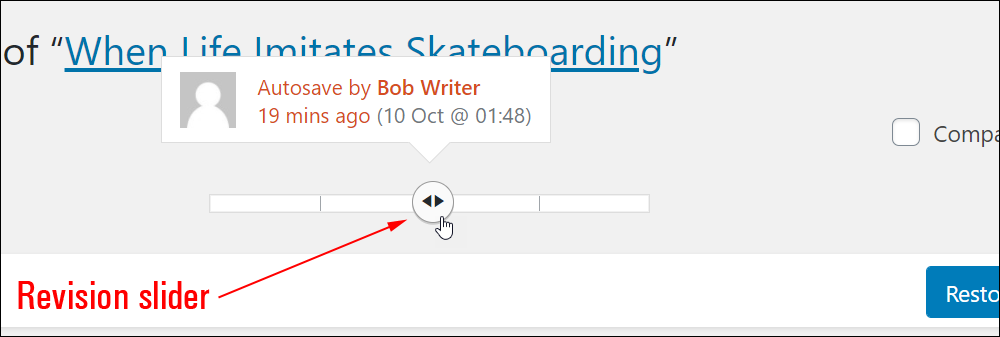
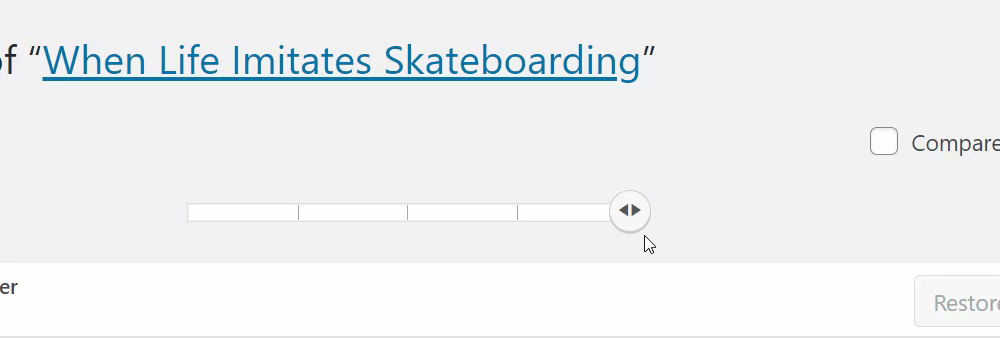
How To Compare Revisions – Revision Slider
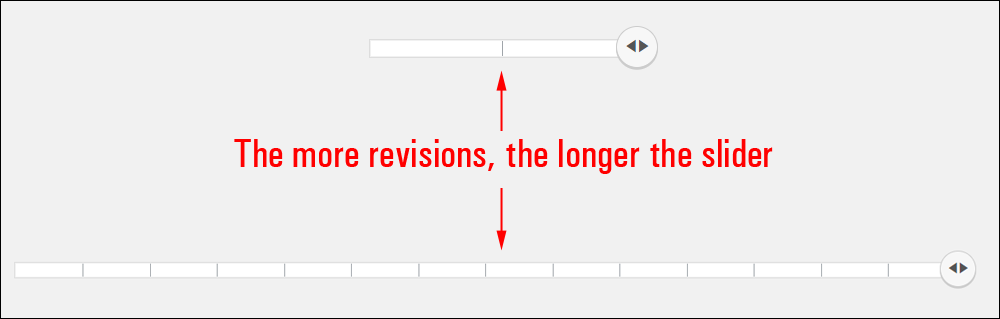
When you compare different post or page revisions, a Revision Slider allows you to move through your saved revisions. The more revisions you have saved, the more revision markers or segments will display on your screen and the longer your revision slider will be.
Your current revision displays on the far right-hand side of the slider.
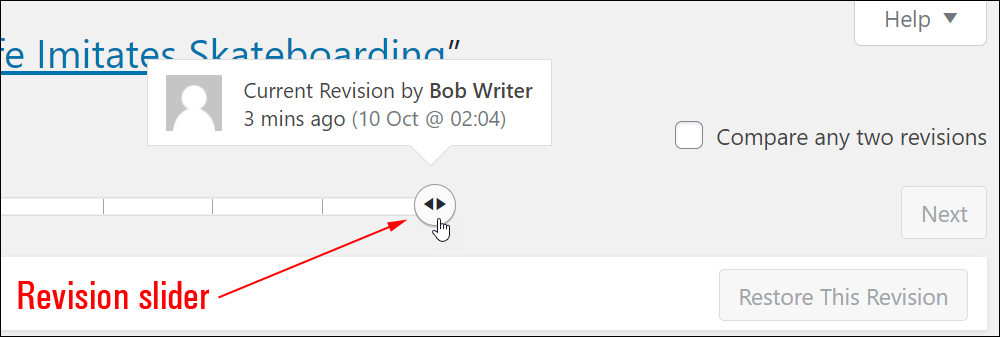
When you make changes to your content and update your posts or pages, your revisions appear in the revision slider marked in black, along with the save interval, time, and date of the revision.
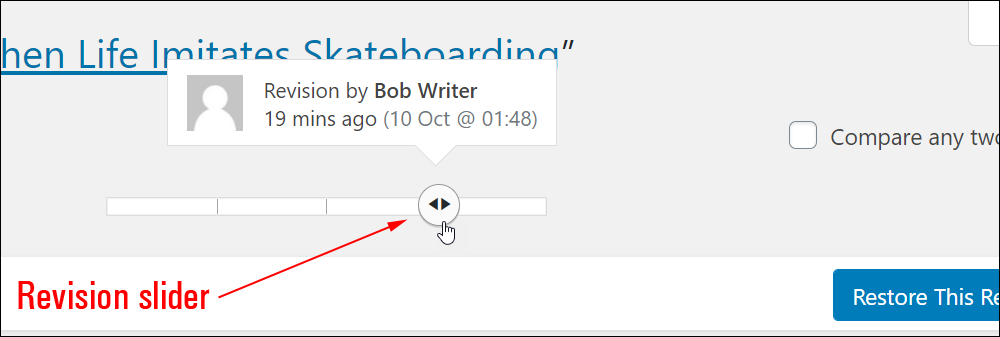
Revisions saved automatically by WordPress show up in the revision slider highlighted in red, along with the save interval, time, and date of the revision.
WordPress Revisions – How to Use The Revision Slider
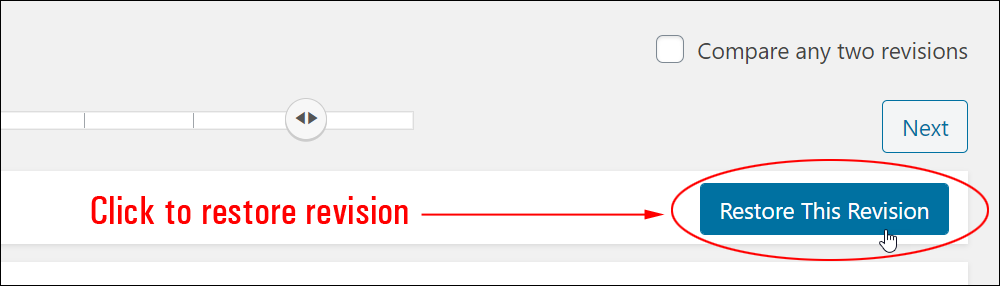
You can navigate between different revisions by either moving the slider to the left (older revision) or right (newer revision) or by clicking on one of its segments to go directly to that post or page revision.
There are also buttons you can use to navigate between revisions.
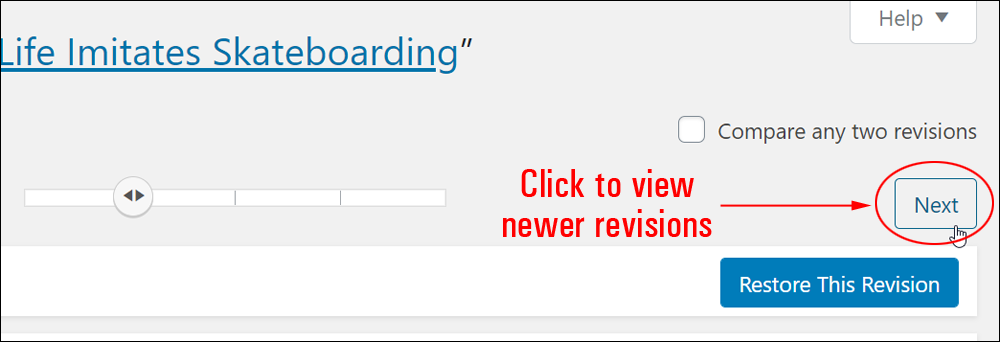
Click ‘Previous’ to go back and inspect older revisions.
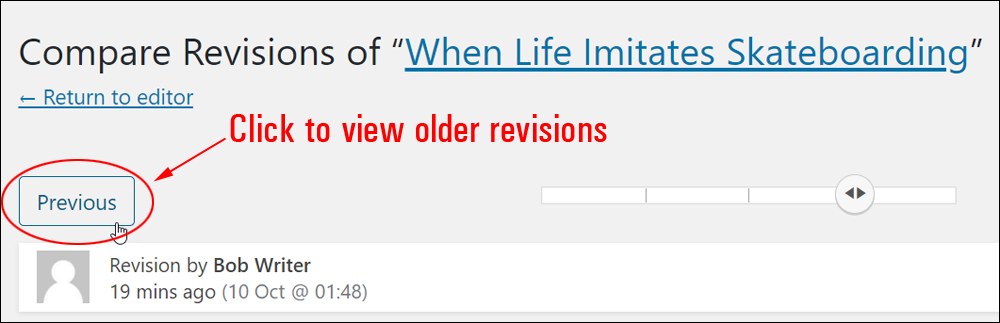
Click ‘Next’ to advance to newer revisions.
In addition to inspecting adjacent revisions, you can also select and compare any two revisions side by side.
To do this, tick the ‘Compare any two revisions’ checkbox.
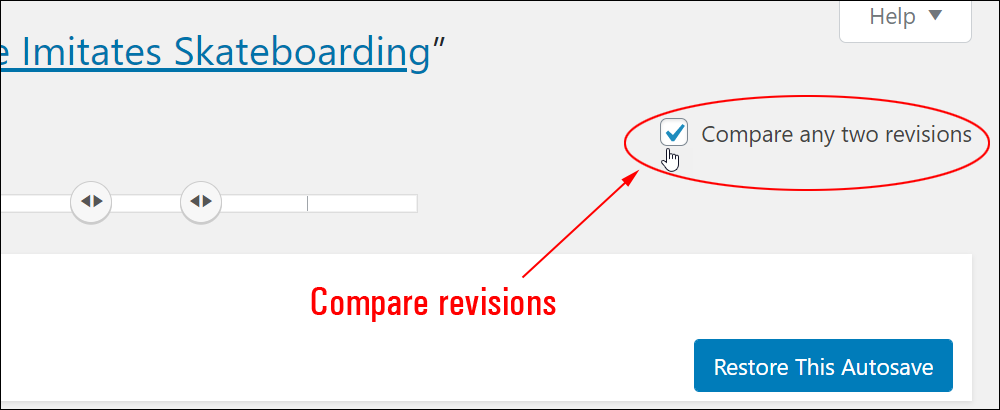
This lets you adjust two slider buttons independently and compare any two saved revisions.
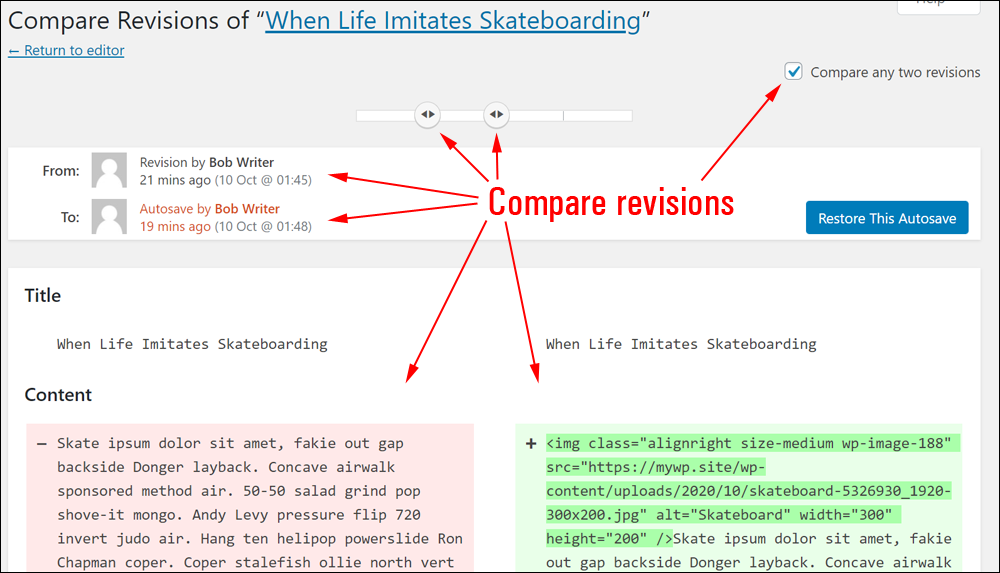
When you find the saved revision that you would like to restore, click the Restore This Revision button.
To cancel the operation and return to the current saved version of your post or page without restoring any revisions, click on the post or page title link.
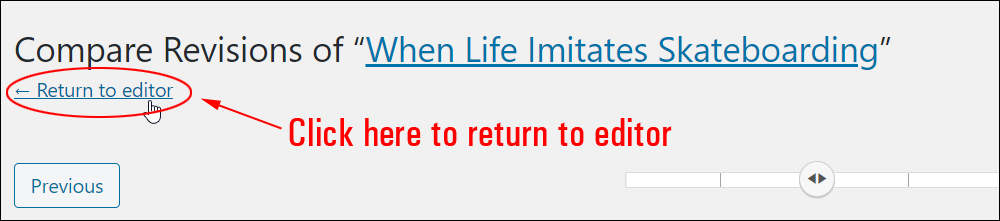
You can exit the Compare Revisions screen and return to the content editor without making any changes by clicking the Return to editor link.
WordPress Post Revisions – Additional Information
You can make changes to the WordPress revisions function, like changing the autosave interval (or even disabling the feature altogether), but this typically requires editing code in WordPress core installation files.
Contact your web host if you need any help making changes to WordPress autosave or post revisions.
Let’s focus now, on some areas of the WordPress post revisions feature that do not involve editing code.
Viewing The WordPress Post Revisions Box
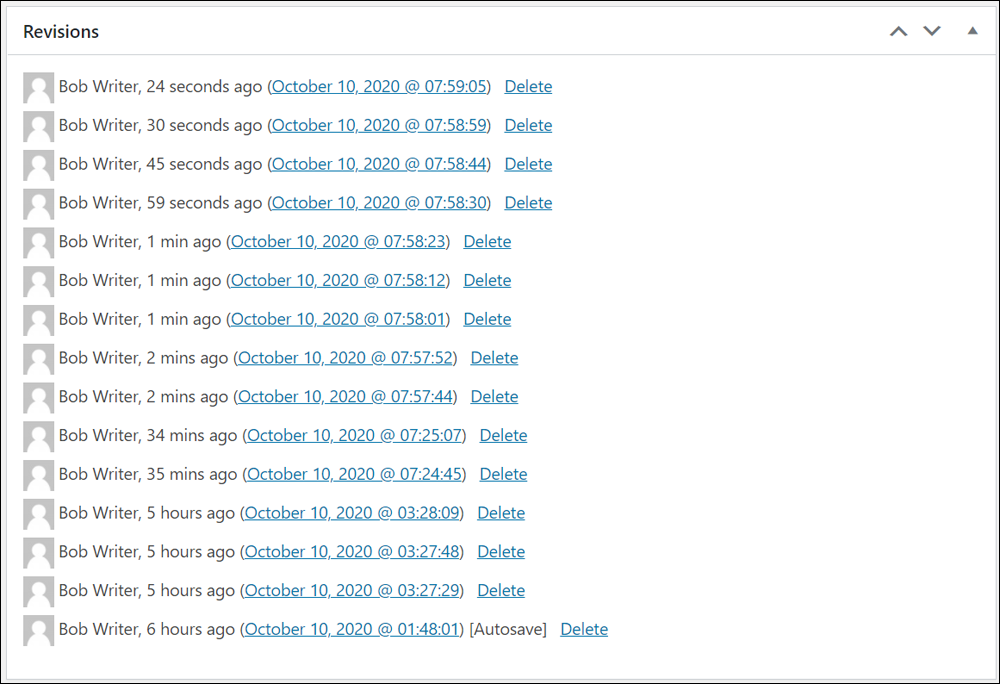
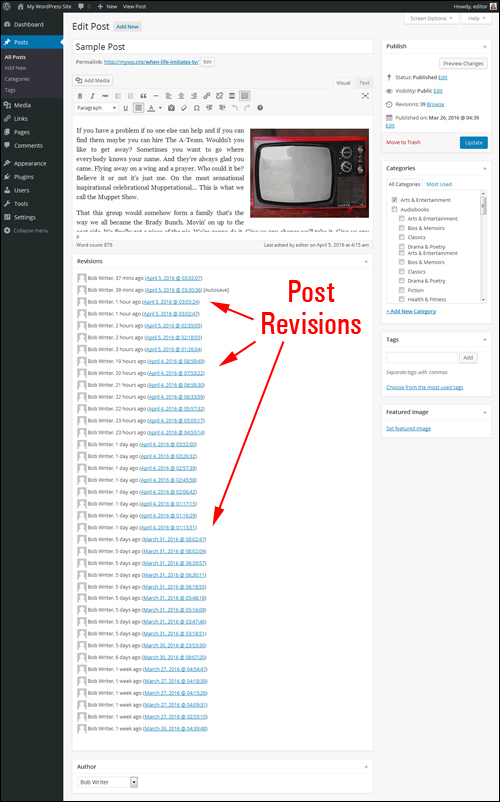
As soon as you create or edit and update (i.e. save) a post or page, WordPress begins to store content revisions in its database. These are displayed in a Revisions box below your post or page editor (if using the WordPress Classic Editor.)
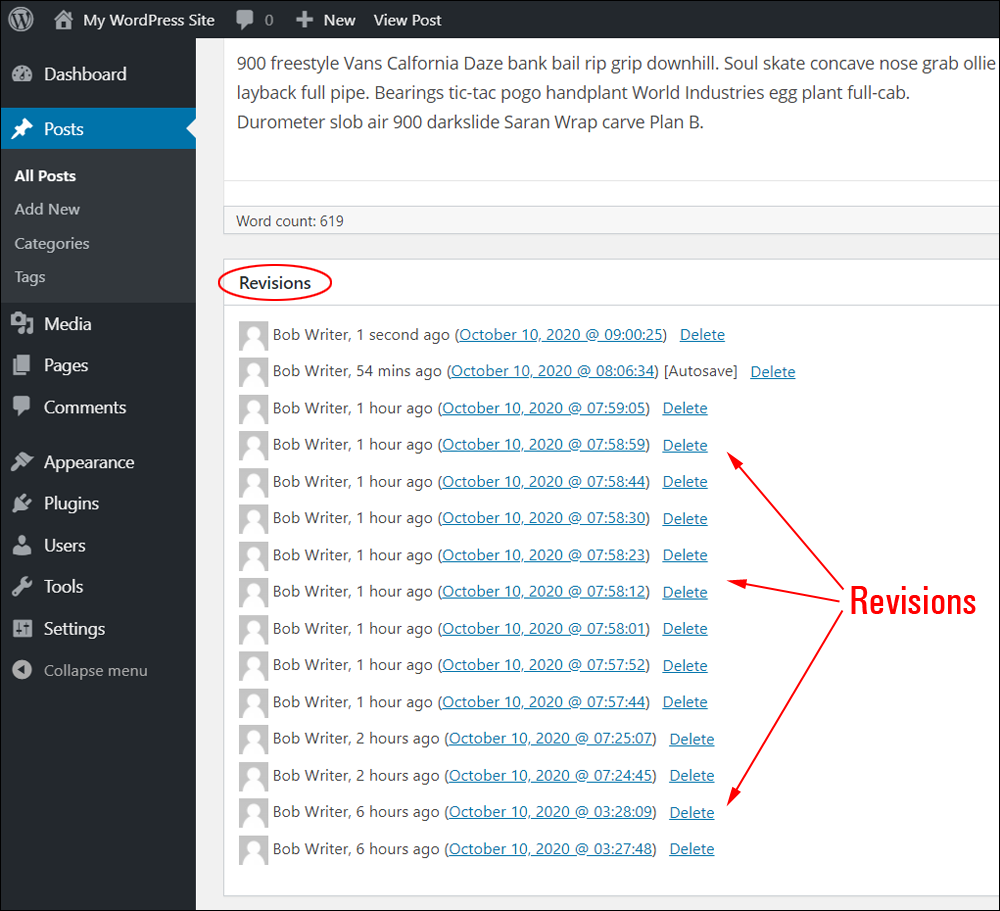
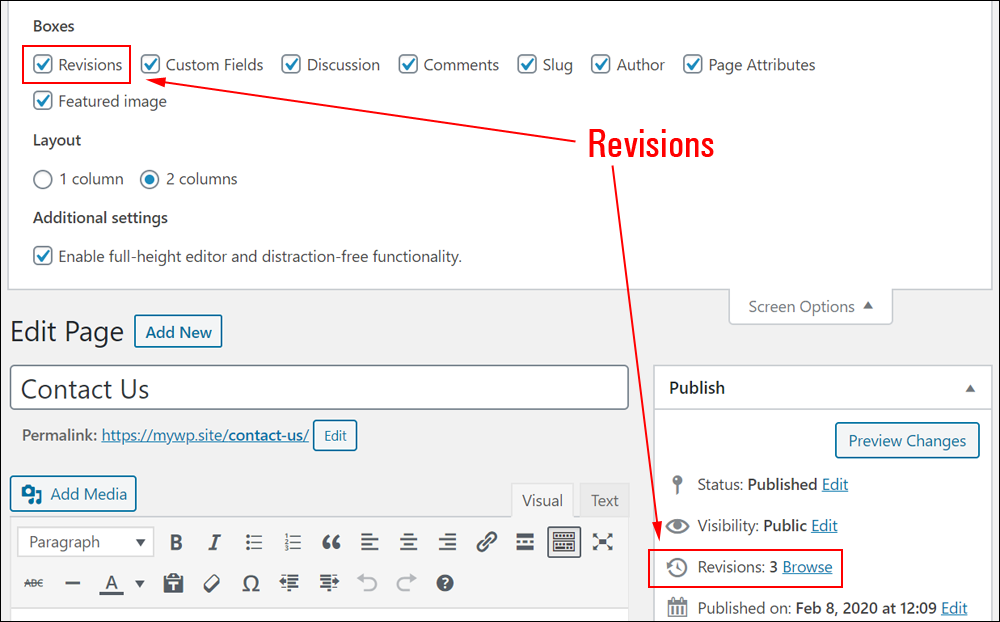
If you can’t see the Revisions box in the Post or Page editor screen} click on the Screen Options tab at the top right-hand corner of your screen.
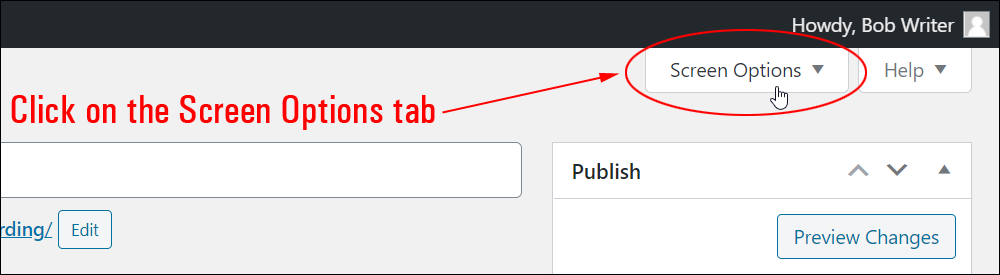
Enable the ‘Revisions’ checkbox in the Boxes section.
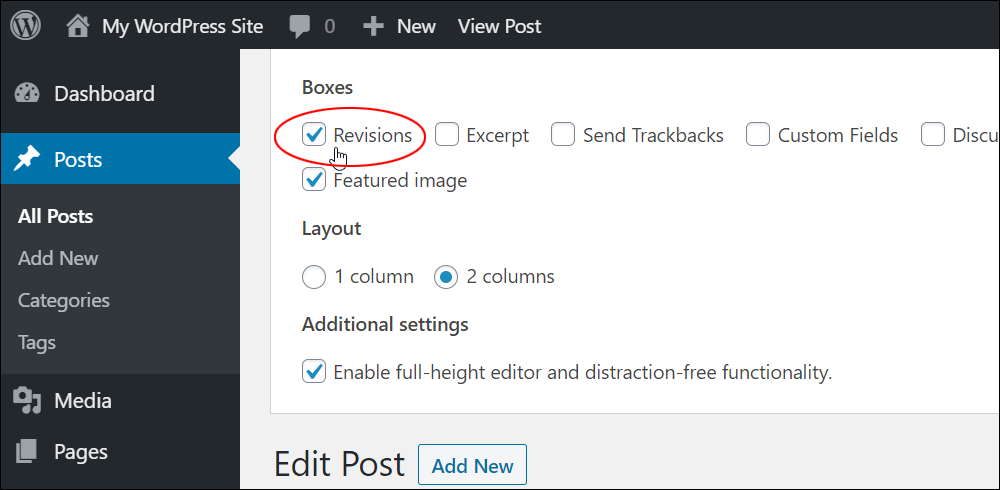
You should now see the Revisions box displayed below your content editor. Click any of the links to bring up the Compare Revisions screen with the saved information for the selected item.
![]()
As mentioned earlier, WordPress does not save any revisions until you actually save a change in your post or page. If this happens, you will not see the ‘Revisions’ module in the Boxes section of the Screen Options tab until you make changes to your post or page.
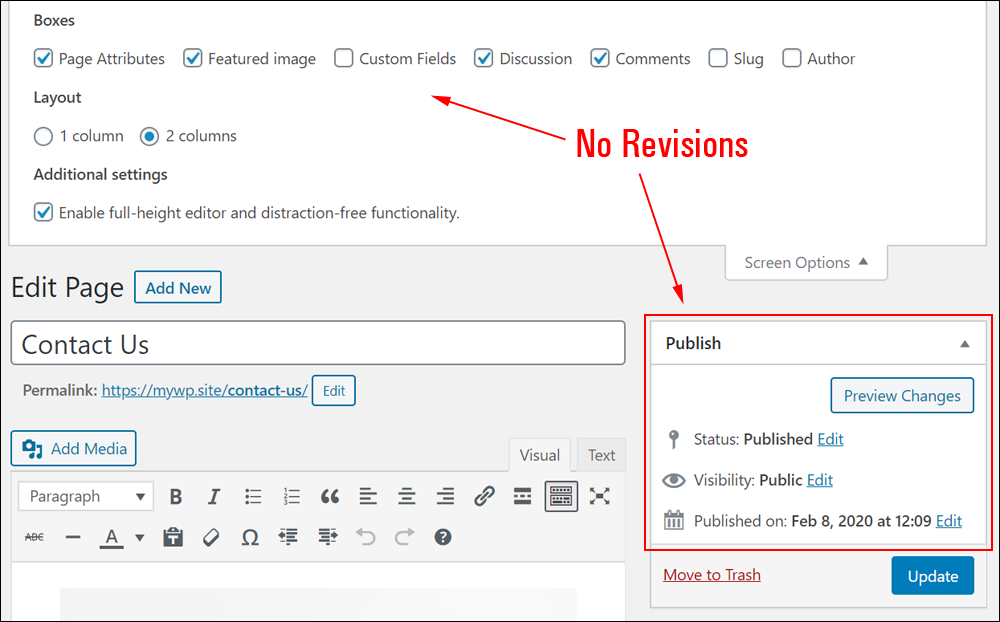
Once you have made changes to your content and saved these, the Revisions box should appear in the Boxes section of your Screen Options tab.
Please note, that some hosts disable the WordPress Post revisions to reduce the amount of data saved in your site’s database and free up hosting space.
The WordPress Revisions feature can be turned off by editing code in the WordPress wp-config file.
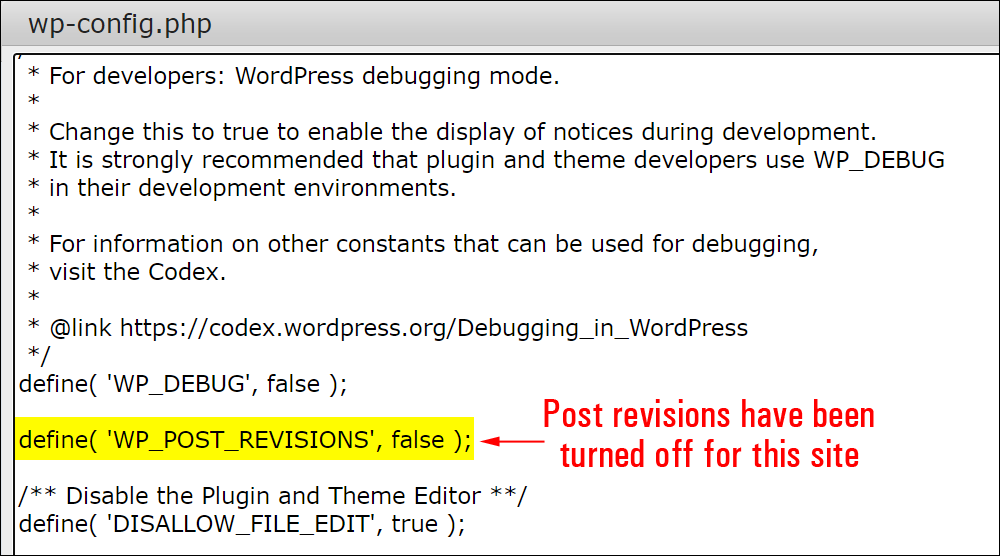
If you cannot see the Revisions feature on your site, your host may have turned it off.
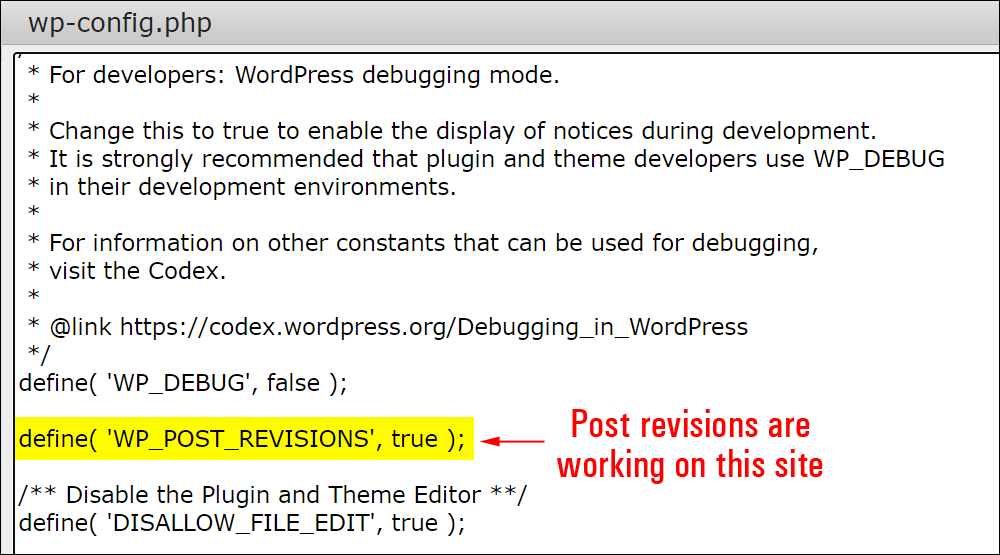
Post Revisions can be turned on by opening your wp-config.php file and changing the following line:
define( 'WP_POST_REVISION', false );
to
define( 'WP_POST_REVISION', true );
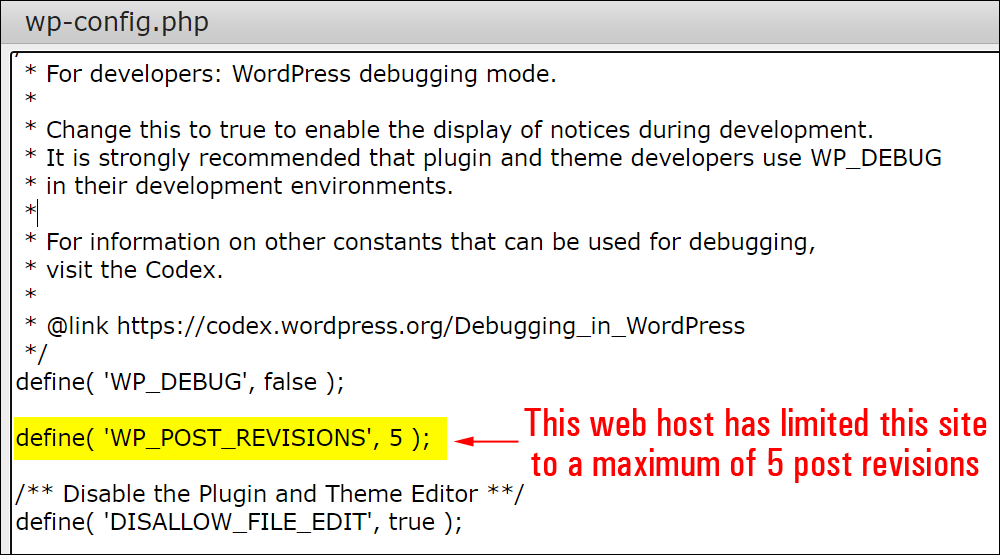
Additionally, some hosts may limit the maximum number of revisions your WordPress site can store in its database.
For example, in the screenshot below, the site has been limited to a maximum of 5 post revisions.
If you are uncomfortable editing code in your server files and need help, please contact your web host.
Managing Post Revisions Using Plugins
Having effective workflow features like WordPress autosave and automatic post revisions is no doubt a good thing and can make your content writing more productive and efficient.
If you write and edit a lot of content, however, the number of revisions can start to add up after a while. This can significantly bloat the size of your WordPress database, so it’s important to also be able to manage your revisions.
For example, if you have published 100 posts on your site and each post has an average of 15 revisions, your WordPress database could be storing an extra 1,500 copies of unnecessary data.
If your posts averages 100KB data, then with 1,500 revisions, the total database space wasted is about 150MB.
Fortunately, there are a number of free WordPress plugins that can help you manage your revisions and reduce the size of your database.
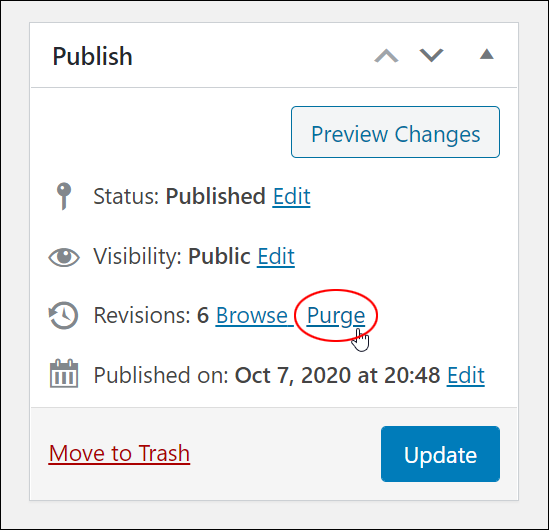
For example, you can install a free plugin like Simple Revisions Delete to help you keep a clean database by removing unnecessary posts revisions.
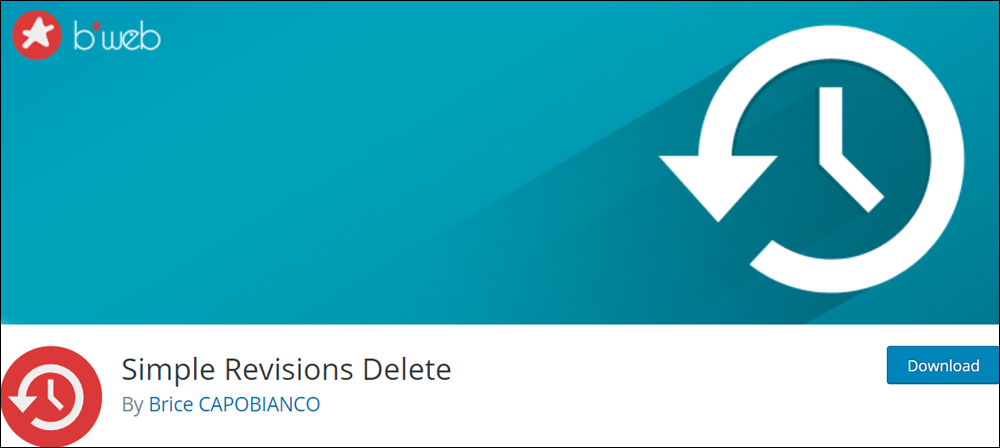
This lightweight and simple-to-use plugin lets you purge (delete) your posts revisions either individually or all at once.
Once the plugin has been installed and activated, for example, a ‘Purge’ link appears next to the Revisions section in your Publish box (and in other sections of your admin area) allowing you to safely delete revisions.
To learn more about WordPress plugins that will help you manage your post revisions, go here: WordPress Plugins For Managing WordPress Post Revisions
If you need help installing plugins on your site, see this tutorial: How To Install WordPress Plugins
Congratulations! Now you know how to use the WordPress Autosave and Revisions feature to recover and restore previously saved versions of your content.
***
"Wow! I never knew there's so much to learn about WordPress! I bought one of the WordPress for Dummies three years ago, such authors need to be on this course!" - Rich Law, Create A Blog Now
***
We are not affiliated, associated, sponsored, or endorsed by WordPress or its parent company Automattic. This site contains affiliate links to products. We may receive a commission for purchases made through these links.