Creating To-Do Lists In WordPress
 Time is always in short supply, especially when you run a fast-paced business or manage a team.
There is just so much work to do and things to remember. You have deadlines to meet, urgent tasks to complete, meetings to attend, fires to put out, deliveries to make, schedules to keep and so on. The amount of things that need to get done never stops.
Now … add the extra dimension of trying to promote and grow your business online and keeping your website or blog updated with new content and things can start to become unmanageable and chaotic.
Whether you run a business, website, blog, or manage a team, it’s important to be able to organize and prioritize your daily activities, monitor your progress and daily accomplishments, and, if necessary, assign tasks and responsibilities to other people effectively.
A ”tried and true” tool that can help you save time, create a sense of order and manageability, and allow you to regain control is to use “to-do” lists.
To-Do Lists – Benefits
A “to do” list helps you monitor your progress as you work to achieve your objectives. Your to-do list can be quite detailed and very specific, or serve as a reminder of what needs to be done today, tomorrow, this week, this month, etc.
Here are just a few of the benefits of using to do lists:
Clearer Thinking
Writing to-do lists means you won’t have to try and remember stuff or clutter your mind with details. Once tasks are jotted down on a to-do list, your mind is free to process information and you can focus on other important areas.
Be More Strategic
Creating and organizing to-do lists helps you view the larger picture and formulate a strategic plan to get everything completed on budget and on time.
Quickly Reorganize Or Reschedule
Using to-do lists help you better handle urgent situations. If an appointment suddenly gets cancelled at short notice or extra time becomes available when something gets completed sooner than expected, you can keep moving forward with little to minimal loss of focus.
Accountability
With no accountability there’s no commitment to getting things completed, and no motivation to take meaningful action. Lack of accountability can also let excuses creep in and take over your productivity.
Sense Of Accomplishment
Ticking items off to do lists gives you a sense of accomplishment and allows you to relax more, as you can objectively see (or show) that the workload is being completed and that things are moving forward.
As you can see, there are many benefits to using to-do lists, both in business and in your personal life. Creating a to-do list, prioritizing tasks and working in a systematic way increases productivity and efficiency in your business.
What about adding to do lists to your WordPress website?
In this step-by-step tutorial we are going to show you how to easily add a to-do list to a WordPress site to improve business efficiency and productivity using a great little WordPress plugin called Cleverness To-Do List.
Cleverness To Do List
Download URL
http://wordpress.org/plugins/cleverness-to-do-list/
Plugin Description
This plugin provides users with a to do list feature.
Features
Note: the plugin features listed below will be discussed in more detail in the tutorial section.
You can configure Cleverness To Do List to have private to do lists for each user, to have all users share a to-do list, or to have a master list with individual completion of items.
The shared to-do list option has a variety of settings available. You can assign to-do items to a specific user (this includes emailing new to do items to the user) and optionally to have those items only seen by that user. You can also assign different permission levels to different users based on user roles. There are also settings available to display deadline and progress fields. Category support is included as well as front-end administration.
A new menu item is added to the backend to manage your list and the to do list is also displayed on a dashboard widget.
A sidebar widget is available as well as short code to display the to do list items on your site. There are 2 shortcodes for front-end list administration. Management of categories is accessed via the back-end admin section.
If you plan to run a multi-author blog you can use the plugin to create custom to-do lists for your post planners if you also download a copy of the developer’s premium plugin, Post Planner.
Plugin Installation
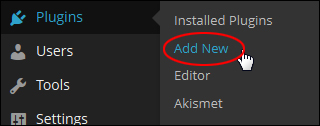
In your site’s admin section, scroll down the menu and click on Plugins > Add New …
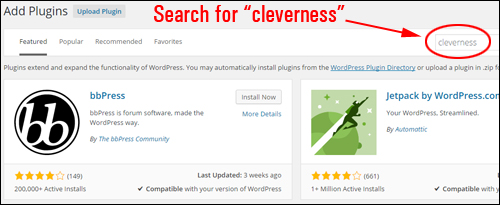
In the Install Plugins screen, type in “cleverness” into the search field and click Enter …
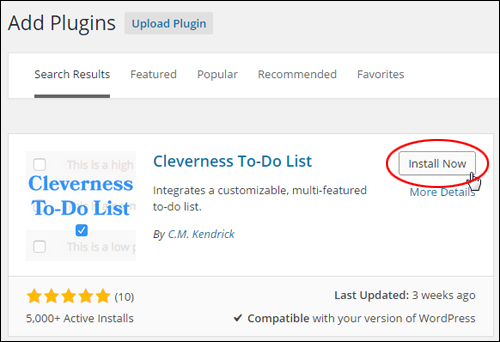
Locate the Cleverness To-Do List entry in the Search Results section and click Install Now …
Activate the plugin after installing it …
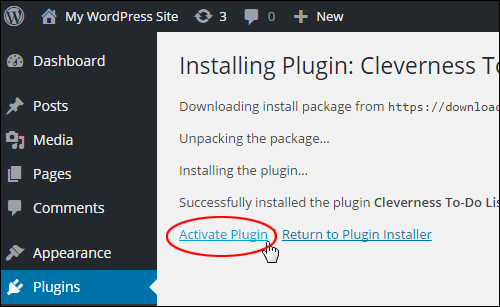
Note: You can also activate this plugin from the Plugins screen …

Once you have activated the plugin, click on Settings …

Note: You can also get to the plugin’s settings section by choosing To-Do List > Settings from your admin menu …

This brings you to the plugin ‘Settings’ page …

Let’s configure the plugin …
How To Set Up The Plugin
The “To-Do List” plugin ‘Settings’ area is divided into 4 sections:
- To-Do List Settings – This area is where you specify the plugin’s main settings.
- Advanced Settings – The options in this area let you customize your to-do lists, assign to-do items to other users and perform database maintenance tasks.
- User Permissions – Here you can set up user permissions and capabilities for Group and Master List types.
- Import/Export – In this section you can export and import your to-do plugin and list data settings.
Let’s now configure each of these tabs.
To-Do List Settings
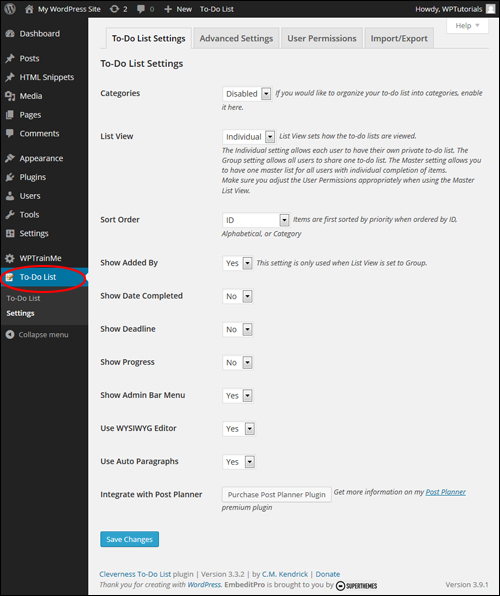
Categories
Choose ‘Enabled’ to organize your list into categories, otherwise leave this option set to ‘Disabled’.
Note: When you enable this option, a ‘Categories’ item is added to the To-Do List plugin menu …
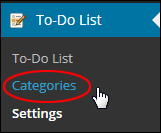
This allows you to add categories that you can then use to organize your to-do lists (see ‘Plugin Usage’ section further below for more details) …
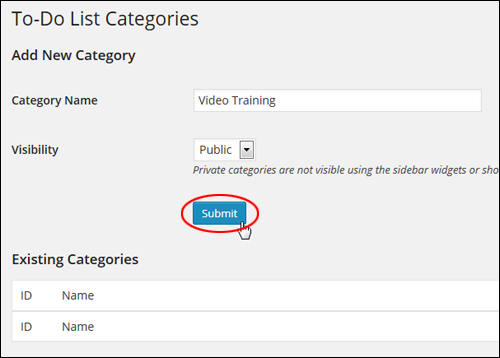
You can create ‘public’ and ‘private’ categories for your lists.
Private categories will not be visible using sidebar widgets or shortcodes (only when ‘Sort Order’ is set to ‘Category’)
List View
List View allows you to choose how lists will be viewed. You can choose from 3 kinds of to do list views:
- Individual – Selecting this option allows users to create and manage their own private to-do list.
- Group – Use this option if you want all users to be able to share one to-do list.
- Master – Choose this option to create a master list for all users, where users have their own individual items to complete. If you select the ‘Master’ list view, make sure that you configure the User Permissions appropriately in the ‘User Permissions’ tab (see further below).
Sort Order
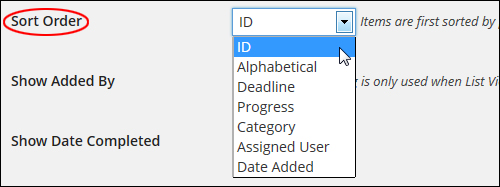
‘Sort Order’ lets you specify how your to-do list items will be sorted.
If you choose Alphabetical, Category or ID options, items will be sorted first by priority.
Show Added By
If enabled (‘Yes’), you can display which of your members has added an item to your to-do list.
Note: This setting only works when ‘List View’ is set to ‘Group’.
Show Date Completed
Enabling this option displays completion dates for to-do tasks.
Show Deadline
Enabling this option lets you specify deadlines for your to-do items …
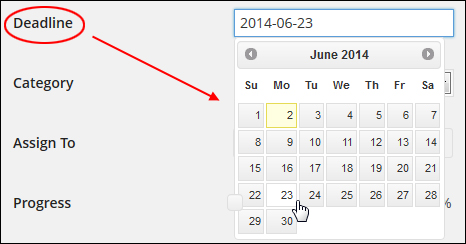
Show Progress
Enabling this option lets you specify task progress indicators for your to-do items …

Show Admin Bar Menu
Enabling this option displays the ‘To-Do List’ menu in your WordPress Admin bar …

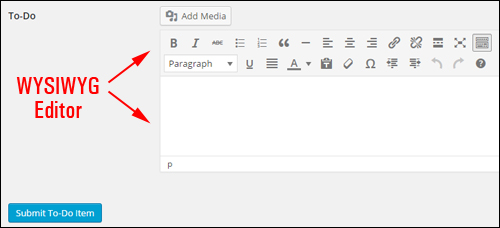
Use WYSIWYG Editor
This option lets you add and edit items on your to-do list using the WordPress WYSIWYG Editor …
Use Auto Paragraphs
Enable this option (‘Yes’) to display content in to-do list items using paragraphs.
Integrate with Post Planner
If you plan to run a collaborative website or blog, you can integrate the Cleverness To Do List plugin with a plugin called WordPress Post Planner, from the same developer that helps to make the task of managing a multi-author WordPress site easier …
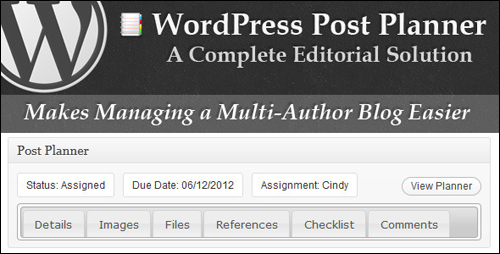
To learn more this handy plugin, visit this site: WordPress Post Planner
After you have configured your plugin options in this section, remember to click the ‘Save Changes’ button to update your settings …

Advanced Settings
Once you have configured the general settings, click on the ‘Advanced Settings’ tab to continue …

This brings you to the ‘Advanced Settings’ screen …
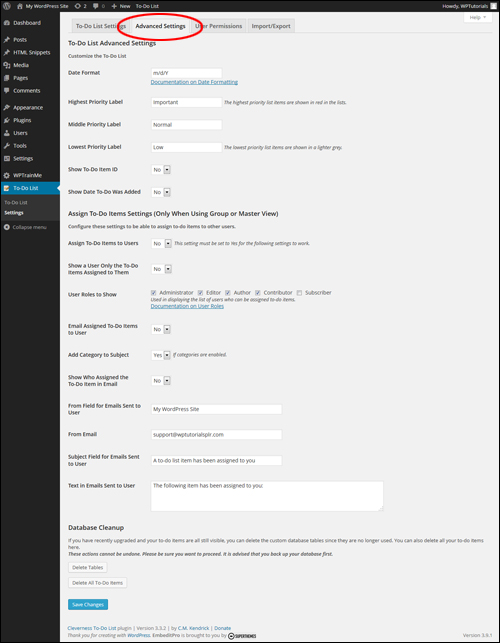
In this screen you can customize your To-Do lists, assign to-do tasks to users and carry out plugin database maintenance tasks.
Let’s go through how to configure the plugin’s ‘Advanced Settings’ section …
To-Do List Advanced Settings > Customize The To-Do List
In this section you can customize your To Do List …
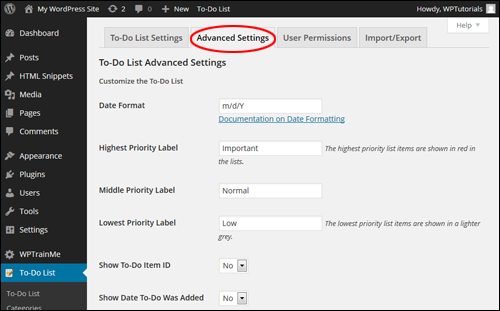
The following settings can be configured in this section:
Date Format
In this section you can specify how to display dates on your to-do list (e.g. month/day/year, day/month/year, etc.)
Note: To learn more about formatting dates in WordPress, visit the date section of the WordPress Codex below:
WordPress Codex – Formatting Date And Time
Priority Labels
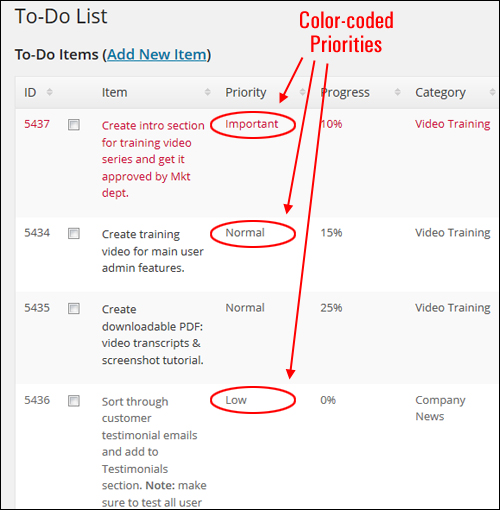
This section lets you customize your labels for important, middle (normal) and low priority items …

Items prioritized as “important” are colour-coded in red in the lists and lowest priority items display in a lighter shade of grey …
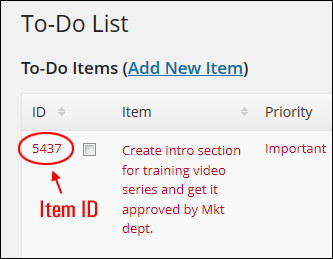
Show To-Do Item ID
Enabling this option will show item IDs on your list …
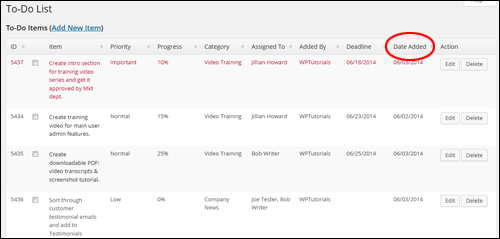
Show Date To-Do Was Added
Enabling this option (‘Yes’) displays the date your items table was added …
To-Do List Advanced Settings > Assign To-Do Items Settings
If you have selected either ‘Group’ or ‘Master’ View for your to-do list, you can configure the settings in this area and assign items to other users …
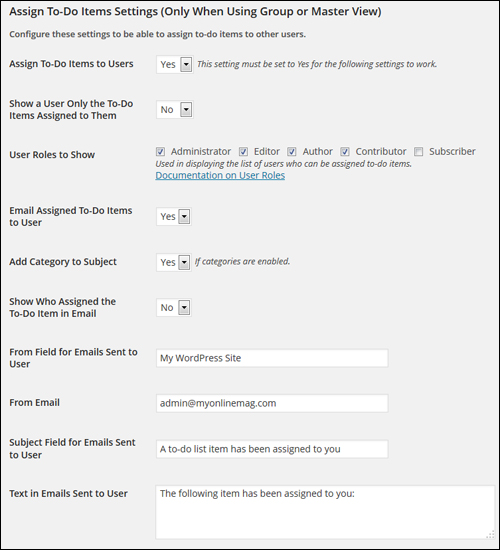
You can configure the following settings in this area:
Assign To-Do Items to Users
Enable this option (‘Yes’) to assign to-do items to other users …
Note: This set this option to ‘Yes’ for the settings below it to work.
Show a User Only the To-Do Items Assigned to Them
Enable this option (‘Yes’) to display tasks only to users who have been specifically assigned those items. Leave this option disabled to display items to all users.
User Roles to Show
Checking the boxes in this section (Administrator, Editor, Author, Contributor, Subscriber) displays the type of users that can be assigned items. Leave the checkbox unticked for any roles that you do not want to assign to-do items.
Email Assigned To-Do Items to User
When you enable this option, WordPress will automatically send an email to users with their assigned to-do items …
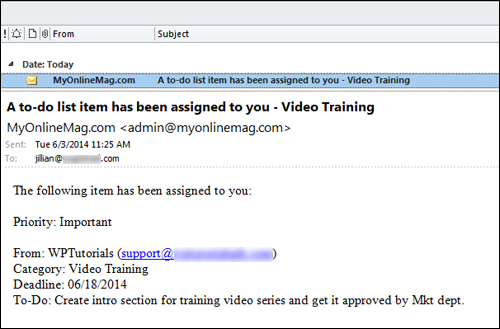
Leave this option disabled (‘No’) if you don’t want emails sent out to users.
Note: If you disable this option, skip the other items in this section.
Add Category to Subject
If categories are enabled in your plugin settings and you have selected ‘Yes’ for this option, the to-do category will display on the subject of your emails …
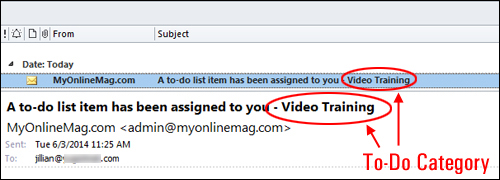
Leave this option disabled (‘No’) if you don’t want to display to-do categories in the subject of your emails.
Leave this option disabled (‘No’) if you don’t want categories to appear the email subject.
Show Who Assigned the To-Do Item in Email
Enabling this option (‘Yes’) displays the user who assigned the to-do item in the email. This is a useful option if you have a number of project managers assigning to-do items to users …

From Field for Emails Sent to User
Use this field to customize the “From” field when sending out email notifications. Enter the name of your company, your domain, your name, or anything you like in this field …

From Email
Type in the email address that you would like to display as the “sent from” address …

Subject Field for Emails Sent to User
Enter a subject field for the email that will be distributed automatically to users whenever new items have been added in your to-do list …

Text in Emails Sent to User
In this field, type the body of the email message that will be sent out automatically to users when a new item has been assigned to your to-do list.

To-Do List Advanced Settings > Database Cleanup
This section lets you carry out database maintenance tasks related to plugin data directly from your plugin settings area itself without the need to log into your server …

This function is useful if, for example, you see that old todo items are still showing up on your site.
You can perform the following tasks:
- Delete Tables – Remove any custom database tables that you no longer use.
- Delete All To-Do Items – Delete all to-do items.
![]()
Any actions that you perform on your database from this screen cannot be undone. If you are sure that you want to carry out database operations in this section, then make sure to backup your database first.
If you don’t want to perform your own backups, then get professional assistance services, or use WordPress backup plugins. You can read about a great WordPress backup plugin that we recommend using to completely automate your site backups here:
User Permissions
This section lets you configure user permissions and capabilities for Group and Master List types …

![]()
If you have selected Individual List, the only configurable option that applies in this section is the View To-Do List permission …
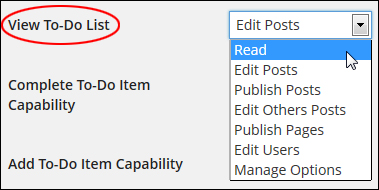
If you plan to set up user permissions and capabilities for Group and Master List types, select the highest level capabilities that you would like users to have access to for each option …
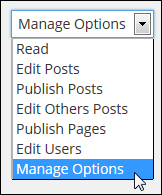
By default, general capabilities for each user role are set up as follows:
- Subscribers: Read
- Contributors: Edit Posts
- Authors: Publish Posts
- Editors: Edit Others Posts
- Administrators: Manage Options
Note: When using the Master list type non-administrators should only be allowed to view and complete items, otherwise they will be able to edit the Master list itself.
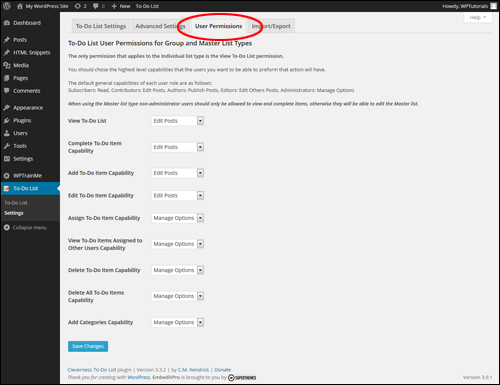
Let’s now review the settings in the User Permissions tab:
View To-Do List
Here you can permit the chosen capability to view items in the dashboard widget and on the To-Do List page under the ‘Tools’ section.
Complete To-Do Item Capability
This enables the selected capability to mark to-do items as completed or not completed.
Add To-Do Item Capability
Here you can enable the chosen capability to add new items.
Edit To-Do Item Capability
This option enables the chosen capability to edit existing to-do items.
Assign To-Do Item Capability
This option permits the chosen capability to delegate to-do items to individual users.
View All Assigned Tasks Capability
This option allows the chosen capability to view all tasks even if “Show Each User Only Their Assigned Tasks” is set to ‘Yes’.
Delete To-Do Item Capability
Here you can allow the selected capability to delete individual to-do items.
Delete All To-Do Items Capability
This setting enables the selected capability to purge all the completed to-do items.
Add Categories Capability
This setting enables the chosen capability to add new categories.
Import/Export
Being able to import and export to-do list data can be very useful. For example, you may need to copy over data from an existing to-do list to another website, or export the data for backup or archiving purposes.
To access this function, click on the ‘Import/Export’ tab in your plugin settings section …

Use this section to import or export your list and plugin settings …
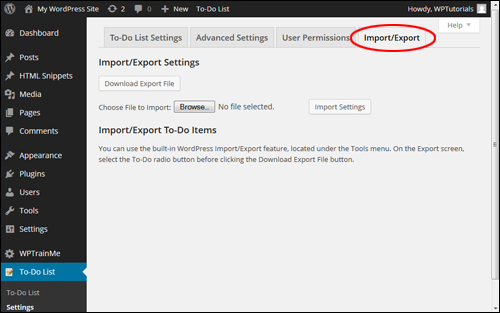
Exporting To-Do List Data
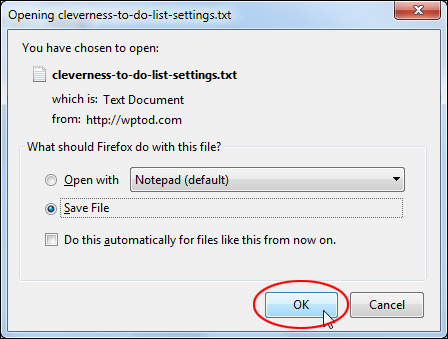
To export and download your list data settings click on the ‘Download Export File’ …

This opens up a window allowing you to view or download the data in a plain text file (e.g. Notepad) to a storage device (e.g. your hard drive) …
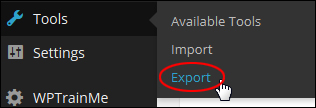
As well as exporting to-do list data from the ‘Import/Export’ section, you can also export data by going to your WordPress dashboard menu and selecting Tools > Export …
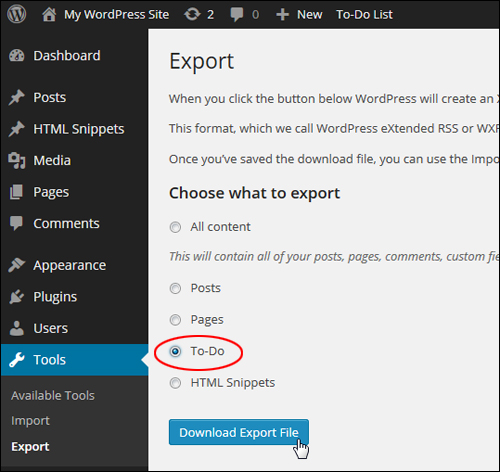
You can include to-do list data in an export file (in XML format), either by checking ‘All content’ (includes everything – pages, posts, etc…), or just select ‘To-Do’ from the ‘Choose what to export’ section and click on the ‘Download Export File’ button to save your file to your hard drive…
Importing To-Do List Data
Importing a list data file is easy. Just click on the ‘Browse’ button next to the ‘Choose File to Import’ field …

Locate the previously saved to-do list data file and click ‘Open’ …
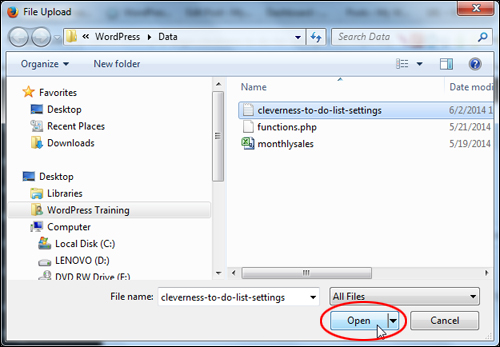
After your data file has been uploaded in your settings area, click on ‘Import Settings’ …

Your file data will be imported.
After configuring all plugin settings, you can start creating and editing to do lists.
How To Use Cleverness To-Do List
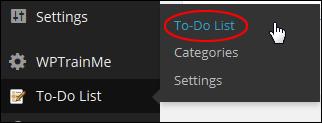
To create a new to do list, go to your WordPress dashboard menu and select To-Do List > To-Do List …
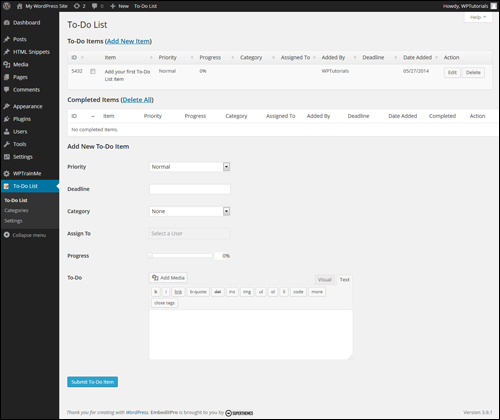
This brings up the ‘To-Do List’ page …
How To Add New To-Do Items
There are several ways to add new to-do items to your list.
For example, you can add new to-do items from your WP admin bar …

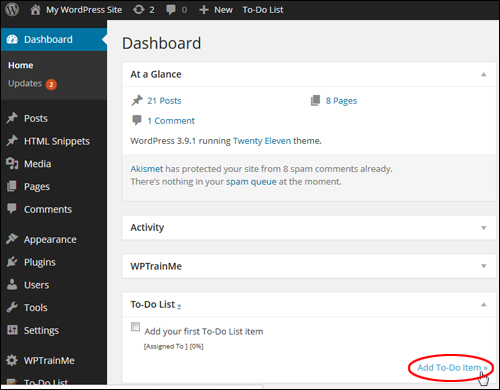
You can also add new items to your to-do list inside your Dashboard by clicking on the ‘Add To-Do item’ link …
You can click on the ‘Add New Item’ link in the ‘To-Do Items’ section (note: only use this option if your To-Do list contains many items, since the link is only going to take you to the “Add New To-Do Item” section at the bottom of the screen) …

The above methods will take you to the ‘Add New To-Do Item’ area.
Depending on how you have configured the plugin settings, you may or may not see certain options displayed when adding new items to your to-do list.
Set up the options you have enabled for your to-do items, add appropriate information into the relevant fields and click on the ‘Submit To-Do Item’ button to add the new to-do item …
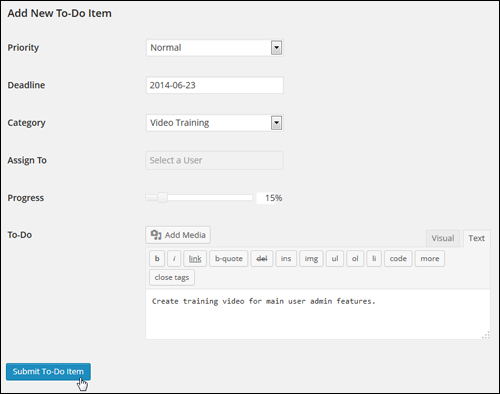
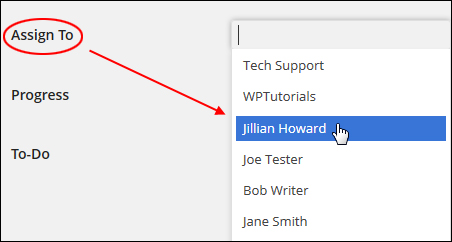
Note: If you have selected a list type that lets you assign responsibilities over items to specific users, select a user from the drop-down list and assign them the item …
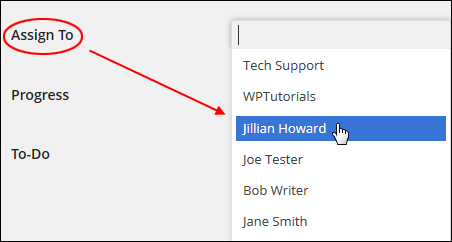
You can also make multiple users responsible for the same item (click on ‘x’ to delete a user) …

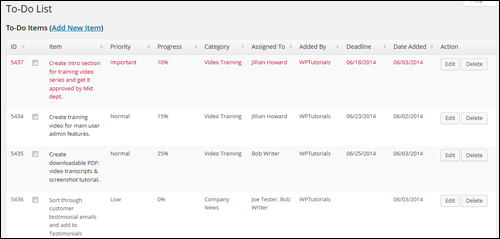
After you have added an item, it will be listed as an entry in the ‘To-Do List’ table …

Repeat the above process to continue adding items to your to-do list …
Edit And Delete Items From Your List
To edit or delete an item, click on the ‘Edit’ or ‘Delete’ buttons next to items under the ‘Action’ column …

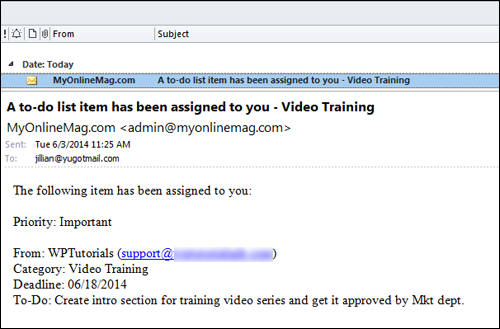
Depending on how you have set up the plugin (discussed earlier), users assigned to tasks may also receive an email notification in their inboxes …
After creating your to-do list, users can view the list when logged into their dashboard …
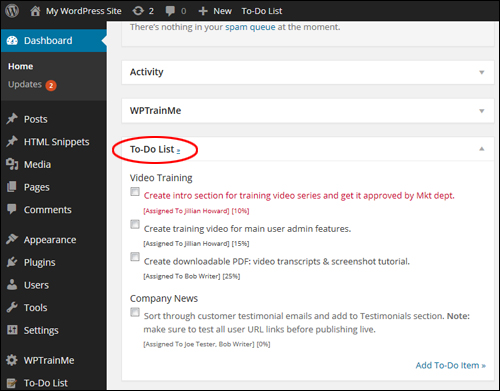
When the user assigned with completing an item clicks on the item check box …
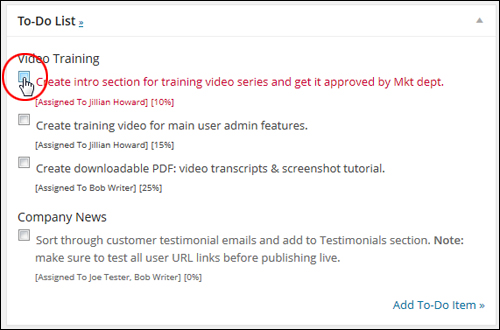
… the item is removed from the “To-Do” list …
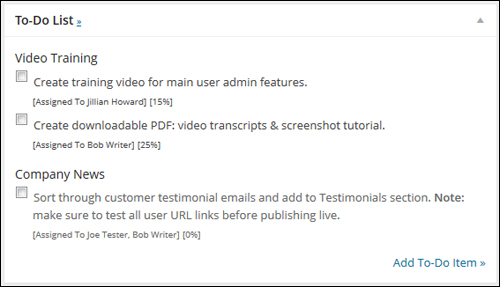
And displays in the ‘Completed Items’ section located in the main screen of the ‘To-Do List’ plugin …

Additional Plugin Information
The Cleverness To-Do List plugin offers added functionality that lets you display a to-do list on your WordPress site using widgets, and insert a list into content inside a post or page using shortcodes.
Using The Cleverness Plugin Widget
To add a to-do list to your site using widgets, go to the ‘Widgets’ page (Appearance > Widgets) and drag the ‘To-Do List’ widget to the menu location where you would like the to-do list to display …

Configure the settings in the widget and click ’Save’ …
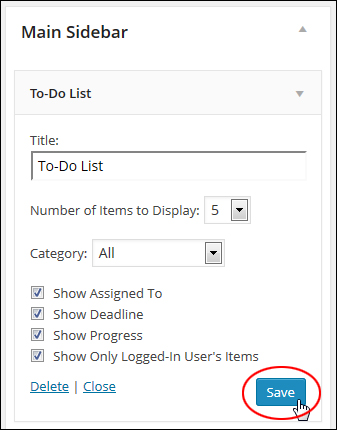
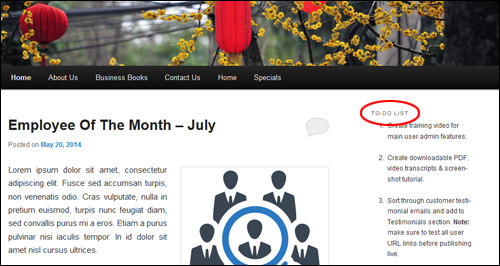
Your list will now display where you have added the widget (e.g. the sidebar menu, footer, etc.)
To learn more about using widgets in WordPress, see the tutorial below:
Plugin Shortcodes
The Cleverness To-Do List plugin also lets you add lists and checklists to your site by placing short codes into your content.
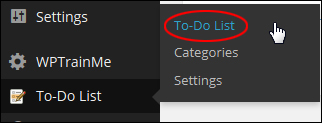
To access the documentation on using shortcodes, click on To-Do List > To-Do List from your WordPress admin menu …
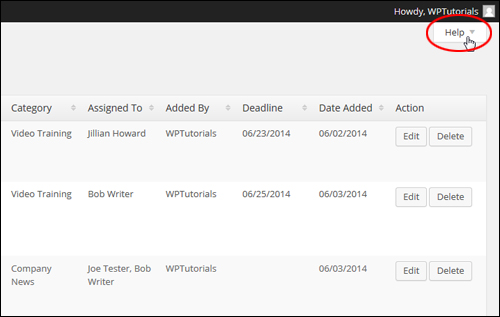
Click on the ‘Help’ tab on the corner of your screen …
Click on the ‘Shortcodes’ tab to access the Shortcode Documentation …
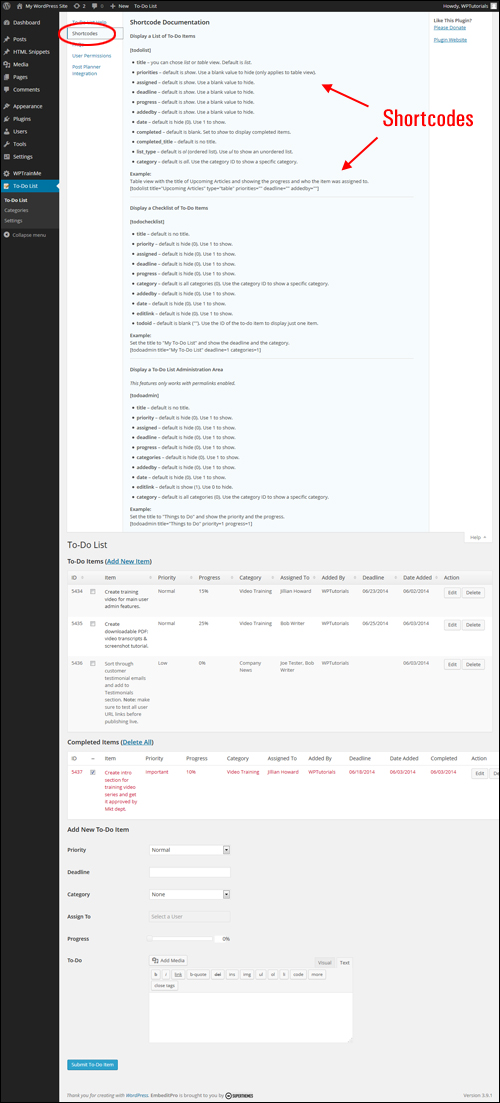
The documentation section explains various ways to configure and use short codes for displaying lists and checklists on your pages and posts.
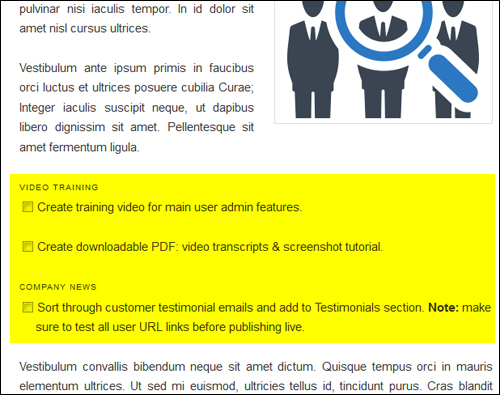
Once you know what information you would like to display on your site, create or edit a new or existing post or page and either type or paste the short code inside the content editor …
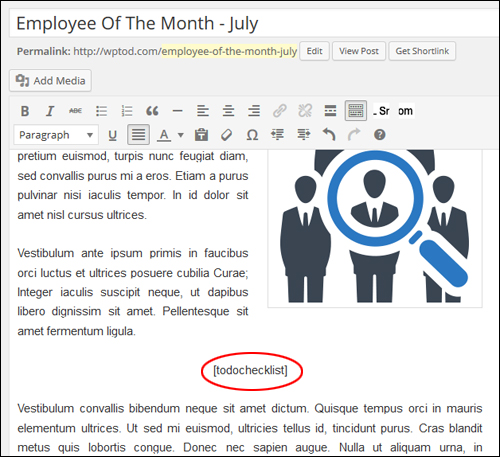
After publishing your post or page, you should see the list displayed exactly where you entered the shortcode …
To learn more about this plugin, visit this site:
Congratulations! Now you can add to-do lists in WordPress.
***
"Your training is the best in the world! It is simple, yet detailed, direct, understandable, memorable, and complete." Andrea Adams, FinancialJourney.org
***


