 If your website includes links to other websites, it’s quite probable that at some point and as more content is added, some of your links will point to pages that have been moved or deleted, or to websites that no longer exist.
These ‘broken’ links can affect your visitors’ experience, your business, your reputation, and your website’s SEO. It’s important, therefore, to have a system in place for detecting, repairing, and managing broken links on your WordPress site.
How To Detect And Fix Broken Links In WordPress
The WordPress built-in linking tool automatically checks when you add hyperlinks to your content and detects broken links. If you add a broken link (e.g. add a space in the URL), WordPress will let you know, allowing you to fix the link before publishing it to your site …

(WordPress automatically detects broken links. Source: WordPress 4.6 Features)
Although WordPress can automatically detect if you type in a broken link, it can’t detect whether a correctly entered link leads to a ‘not found’ page error or a destination page that can’t be accessed (e.g. server down or website deleted).
The Importance Of Avoiding Broken Links On Your Website
When you have no control over someone else’s website, it’s hard to keep track of what is going on with links pointing from your site to external websites.
For example, let’s take a look at some common scenarios …
Destination Page Has Moved
Let’s suppose you add a link to a page on another company’s website containing information about a product, service, reference, policies, etc.
The company then decides to re-organize its content and moves this information to a different section of its website.
Now, when visitors click on the link, they end up in an error page, or a page containing something different than they were expecting to see …
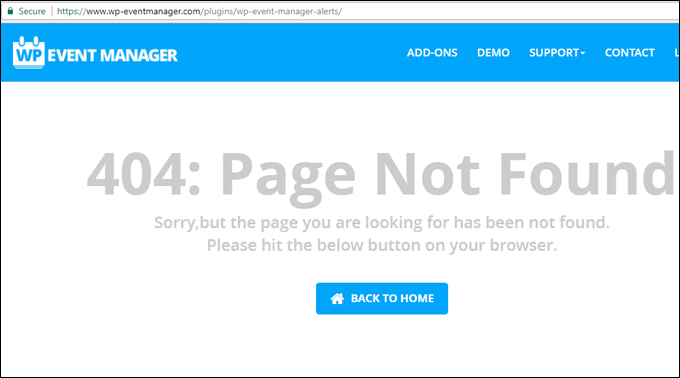
(This page has been moved elsewhere, leading to a ‘page not found’ error!)
Most companies won’t notify you when they’ve made internal changes to their websites, so it’s up to you to notice errors and fix this to avoid giving your visitors a bad user experience …
(Linking to external sites can be tricky because they can make changes to their website any time they choose without informing you!)
Destination Site No Longer Exists
Let’s say that you run an e-commerce store, or affiliate review site promoting products hosted on other websites …

(Do you review other people’s products on your site?)
In this example, when you click on the destination URL of the product shown above …

(Do you know if all of your links are pointing to working websites?)
The site cannot be reached. The server could be temporarily down or the product vendor has gone out of business and their website has been permanently deleted …

(This site can’t be reached!)
Over time, you will probably add a number of links from your content to many external websites and this will only multiply the problem. The more external links you add from your site, the greater the likelihood of having broken links on your site, or links pointing to pages with errors or non-existent pages …

(The more links you add from your site to external sites, the more ‘dead’ links you will probably have)
Can you imagine what sending people to pages or sites that don’t exist can do to your business?
Normally, there is no way of knowing what is happening on all the websites that you link to and do not control. Dead links (i.e. ‘broken hyperlinks’) are annoying to visitors and can have a negative impact on your online business and your reputation.
Having broken links can affect your site in many ways:
- You can frustrate and even lose customers and visitors.
- You can lose sales if potential customers can’t find what they are looking for.
- You can lose money if you are placing advertising banners on others sites that link to missing pages.
- You can damage your reputation online if there are too many broken links on your site. This gives visitors the impression that you don’t maintain or care for your website, and have no regard for visitors having a positive user experience.
- It can have a negative impact on your website’s ranking with search engines.
As more content is added to your site, the greater the chances are that some of the hyperlinks in your posts and pages will end up broken and lead visitors to pages that are no longer valid or even present in your site.
Broken links can be caused by a number of internal and external site factors, including:
- Failure to maintain proper navigation links between the pages on your site
- Moving content around your site
- Renaming or deleting your web pages
- Typing in URL addresses incorrectly when creating links
- Replicating pages containing broken links across your site or other sites
- Domain names expiring
- External websites get sold, relocated, or deleted
- External pages get removed or relocated
- and more.
![]()
When a visitor tries to access a page on your site that doesn’t exist, WordPress will automatically display something called a 404 error page. Broken links will lead to an increase in “Page Not Found” errors and other unsuccessful responses.
To learn how to customize your WordPress 404 error page, see the tutorial below:
How To Find And Repair Broken Links In WordPress
Making sure that all links on your site are working correctly is important for both your visitors and for search engines. Clicking on links that don’t work creates a bad experience for users, and search engines penalize sites that have too many broken links.
Unless you have a single-page website, however, it is almost impossible to manually check that all of the links on your site are working correctly all of the time. Fortunately, there are plugins that can do this job for you automatically.
In this tutorial, you will learn how to find and fix broken links using a free WordPress plugin called Broken Link Checker.
Broken Link Checker

(Broken Link Checker WP link management plugin)
Plugin URL
https://wpcompendium.info/plugins/wpmudevfree/
Plugin Description
Broken Link Checker is an essential WordPress maintenance plugin that will monitor your site for broken links and notify you if any links errors are detected.
Some of the plugin’s features include:
- Monitoring links in your posts, pages, comments, links and even custom fields.
- Detecting links that don’t work, missing images and redirects.
- Notifying you via the Dashboard or by email.
- Making broken links display differently in posts (optional).
- Preventing search engines from following broken links (optional).
- Ability to search and filter links by URL, anchor text and so on.
- Editing links directly from the plugin’s page, without having to manually update each post.
- Highly configurable.
Plugin Installation
Go to your WordPress navigation menu and choose Plugins > Add New …

(WP Plugins Menu – Add New)
In the ‘Add Plugins’ screen, type in “broken link checker” into the keyword search field …

(Add Plugins – search for ‘Broken Link Checker’)
Locate the plugin in the search results section and click Install Now …

(Install Broken Link Checker)
After your plugin has been installed, make sure you activate it …

(Activate the plugin)
You can also activate your plugin in the ‘Plugins’ screen …

(Plugins Screen – Activate Broken Link Checker)
After your plugin has been activated, click on Settings …

(Broken Link Checker – Settings)
You can also get to the plugin’s settings screen by selecting Settings > Link Checker from your dashboard menu …

(Settings Menu > Link Checker)
This takes you to the ‘Broken Link Checker Options’ page …

(Broken Link Checker Options Screen)
Plugin Configuration
The “Broken Link Checker Options” page is broken into several tabs. Let’s go through each of these tabs and configure the plugin settings …
Broken Link Checker > General

(Broken Link Checker > General Tab)
Unless you have a particular need to change the plugin’s default settings, just leave all the options on this tab as they are:
Status
There is nothing to configure in this section. The plugin provides an update of the number of broken links found with a link to more information, lets you know about its status (i.e. whether it is currently checking your site from broken links or not.), and notifies you about the number of unique URLs it has detected in your links …

(General Settings – Status)
If you want to see the debug info used by the plugin when checking your links (you’ll need this information if requesting plugin support), then click on the “Show debug info” link under “Status” …

(Status – Show debug info)
Check each link
Enter a frequency period (in hours) for the plugin to check your site for broken links into the “Every XX hours” field …

(General Settings – Check each link)
The plugin will then check existing links on your site every “XX” hours as per your settings. Any new links that you add to your site will be checked immediately for validation.
Email Notifications
Leave the default settings to receive email notifications about newly detected broken links. If multiple authors contribute content to your site, then you may also want to check the option to “Send authors e-mail notifications about broken links in their posts” …

(General Settings – Email notifications)
Notification e-mail address
If you want the plugin to send broken link notification emails to an email address other than the one you have specified in the WordPress General Settings section (e.g. to notify your webmaster or a site manager), then enter the email address into the field in this section …

(General settings – Notification email address)
Link tweaks
This section lets you specify whether the plugin should highlight broken or removed links on your pages with custom formatting (e.g. display broken links with a strikethrough, or in a different color), and also if you want search engines to stop following your broken links (tip: don’t enable this option if you plan to fix your links) …

(General settings – Link tweaks)
To apply custom formatting to your links, click on the Edit CSS link, then edit the CSS code in the section that will open up below the option …

(Edit CSS)
![]()
To customize the format of your links, you will need to have some basic knowledge of editing CSS (Cascading Style Sheets).
If you want to learn basic CSS, then visit the sites below:
The screenshot below shows an example of how a broken link using the default “strikethrough” style setting displays to site visitors …

(Broken Links)
Suggestions
If you leave this option enabled, the plugin will suggest alternatives to broken links …

(General Settings – Suggestions)
These suggestions can be useful when editing broken links (see ‘Plugin Usage’ section below) …

(Edit Link – Suggestions)
If you don’t want Broken Link Checker to suggest alternative URLs then disable the checkbox in the Suggestions section.
Warnings
If you leave this option enabled, the plugin show minor problems as ‘warnings’ instead of ‘broken’ links …

(General settings – Warnings)
Click Save Changes when finished to update your plugin settings …

(Save changes to update your settings)
Broken Link Checker Options > Look For Links In

(Broken Link Checker > ‘Look For Links In’ Tab)
This section specifies which areas of your site the plugin will check for broken links.
You can enable the plugin to check these areas of your site by ticking the checkboxes in the “Look for links in” section: Blogroll items (links), comments, custom fields (can be customized), pages and posts.
Furthermore, you can specify that the plugin check only posts that have been assigned certain statuses (e.g. published, scheduled, draft, pending or private) in the “Post statuses” section of the tab.
Click Save Changes when finished to update your plugin settings …

(Remember to save your changes)
Broken Link Checker Options > Which Links To Check

(Broken Link Checker Options > ‘Which Links To Check’ Settings)
In this tab, you can enable the type of links that Broken Link Checker will analyze in the “Link Types” section, and add words to the “Exclusion List” section (one per line) to prevent the plugin from searching URLs containing the words you specify.
Once again, remember to save your settings if making any changes to this section.
Broken Link Checker Options > Protocols & APIs

(Broken Link Checker Options > ‘Protocols & APIs’ Settings)
In the Protocols & APIs tab, you can specify which methods the plugin should use to check links on your site.
The “Basic HTTP” option, which is enabled by default, is the same as typing in the URLs into an internet browser.
If your site uses any of the services listed in this section extensively (e.g. you have loads of YouTube videos on your site), then consider selecting additional methods to check links, otherwise, just leave this tab as is.
Broken Link Checker Options > Advanced

(Broken Link Checker Options > ‘Advanced’ Tab)
The options in the Advanced tab allow you to configure and finetune a number of important plugin parameters.
These parameters include:
Timeout – This is the length of time the plugin will attempt to verify whether a link is valid or not before declaring it “broken”.
Link Monitor – Specify when to run the plugin by enabling/disabling checkboxes for either “Run continuously while the Dashboard is open”, “Run hourly in the background”, both or none.
Show the dashboard widget for – Select which types of users can see the plugin information in the dashboard (see screenshot below for example) …

(Dashboard – Broken Links Widget)
To learn about assigning and managing user roles, see the tutorial below:
Max. Execution Time – Specify how long the plugin should run for when executing background checks before stopping.
Server load limit – Link checking will be suspended if the average server load rises above the number specified here. Leave this field blank to disable load limiting.
Forced recheck – If you click the “Re-check all pages” button, the plugin will empty its link database and recheck the entire site from scratch …

(Broken Link Checker Options – Forced Recheck)
If you make any changes to the plugin settings remember to click on the Save Changes button to update your plugin settings …

(Save your changes)
Your plugin is now configured.
Plugin Usage
Once installed and configured, the plugin will begin scanning through your posts, pages, blogroll and other content looking for links.
You can monitor the progress of link scans by going to Settings > Link Checker …
(Settings Menu > Link Checker)
Depending on the size of your site this process (called parsing) can take from a few minutes up to an hour or more …

(Broken Link Checker continually checks your site for broken links)
When parsing is complete, the plugin will start checking each link to make sure they are working. Again, how long this process takes depends on the size and number of links on your site.
To view and manage any broken links found on your site, select Tools > Broken Links in your WP admin area …

(Tools > Broken Links)
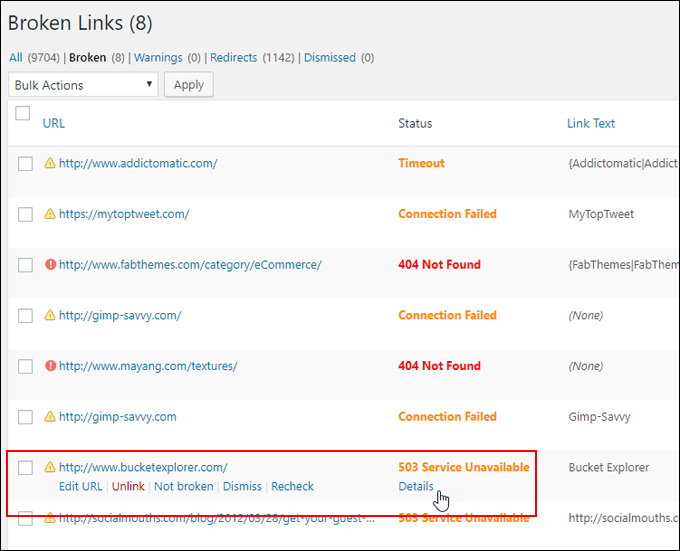
This brings you to the “Broken Links” screen, which displays a list of all the broken links found on your site and allows you to manage these …

(Broken Links Screen)
If Broken Link Checker detects that all links are working fine, you will see a “No broken links found” message when you visit this page …

(No broken links found)
If the plugin detects any broken links, it will display the number of broken links found …

(Broken links found)
It will also notify this in your dashboard (if you have enabled the correct user permission settings) …
(Dashboard – Broken Link Checker Widget)
You will also receive an email notification (if you have configured the plugin settings to receive emails) …

(Broken Links – Notification email)
Clicking on the link at the bottom of the email takes you to the “Broken Links” screen on your WordPress site (you may have to log in) …

(Click email link to view all broken links)
Managing Links In The Broken Links Screen
The main menu at the top of the “Broken Links” screen lets you view a list of different link categories:
- Broken
- Warnings
- Redirects
- Dismissed
- All
Let’s go through each of these menu options:
Broken

(Broken Links – Broken menu)
This table contains a list of all the broken links detected on your site …

(List of broken links)
You can manage your broken links individually or in bulk.
Managing Broken Links Individually
Hover your mouse over any link listed in the URL column, and a menu will appear with a number of link functions that you can perform:

(Broken link management options)
Edit URL
Locate the link you want to edit …

(Select the link to edit)
Hover over the link and click Edit URL to make changes to your link …

(Edit URL)
This expands the item, allowing you to edit the link’s anchor text and URL …

(Edit your link URL or accept suggested alternative)
Note: If the link is present in more than one place (e.g. both in a post and in the blogroll), all occurrences of that URL will be changed.
Click Update when done, or Cancel to discard your changes.
Unlink
Click Unlink to remove the link from all posts …

(Unlink removes links from your posts)
The plugin will go through your site and unlink all instances of the URL immediately.
Note: Unlinking removes the link but leaves the link text intact.
Not Broken
Click Not broken to remove the link from the list of broken links and mark the URL as valid …

(Not broken)
Not broken lets you manually mark a ‘broken’ link as working. This is useful if you know it was incorrectly detected as broken due to a network glitch or a bug. The marked link will still be checked periodically, but the plugin won’t consider it broken unless it gets a new result.
Dismiss
Click Dismiss to hide the link. Broken Link Checker will not report it again unless its status changes …

(Dismiss)
Recheck
Click Recheck to check if the status of your link has changed …

(Recheck)
Broken Link Checker will immediately begin checking the link and return the latest status result …

(Link status is being rechecked)
Managing Broken Links In Bulk
You can perform the same functions used on individual links in bulk, plus some additional ones like rechecking links and fixing redirects by selecting multiple links from the table and choosing one of the Bulk Actions drop-down menu options …

(Broken Links – Bulk Actions menu)
In addition to the URL column, the Broken Links section table also displays information like Status, Link Text, and Source.
The Status and Link Text columns let you see more information about the status of your links, images, etc …

(Link Status)
Click on a link in the Status or Link Text columns…

(Click to view Status Details)
And the link entry expands to show detailed information about the link, including how often the link has failed the validity tests, how long the link has been broken for, and a whole lot more …

(Status details)
Warnings
The ‘Warnings’ page lists temporary problems or false positives. Warnings that persist for a long time will usually be reclassified as broken links …

(Warnings)
Redirects
This section of the Broken Links screen lists all your link redirects …

(Redirected Links)
You can view the redirected URLs under the Redirect URL column (see ‘Additional Plugin Information’ section further below to learn how to display the Redirect URL column on your screen) …

(View Redirect URLs)
As well as viewing a list of redirected links and link status information, you can also perform a number of link operations by hovering your mouse over their title and choosing one of the link menu options (Edit URL, Unlink, Dismiss) …

(Redirected Links – Options menu)
Dismissed
This section displays a list of all the links you have previously dismissed (i.e. links that the plugin will not report on unless or until the status of the link changes) …

(Dismissed menu)
In the Dismissed Links section you can perform various link operations such as Edit URL, Unlink (remove link from all posts), specify the link as Not broken, and Undismiss your links …

(Dismissed Links – Menu options)
All

(All menu)
This section displays a list of all links found on your site …

(View all links)
Hover over a link to perform link operations (Edit URL, Unlink, Not broken, Recheck) …

(Link options)
You can also perform regular post operations such as Edit, Trash, and View posts containing the link in the Source column …

(Source column options)
Additional Plugin Information
Here are some additional tips on using the Broken Link Checker plugin:
Protect Users From Malware
If destination links point to sites containing malware, the plugin will mark the link as broken …
(503 Service Unavailable)
This protects users from clicking through to sites affected by malware from your site …
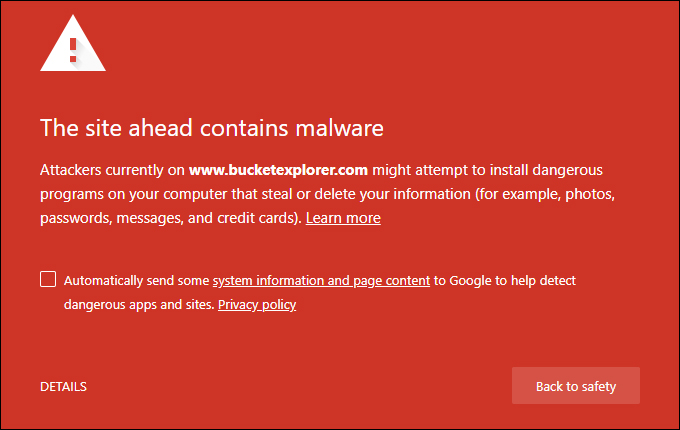
(‘Site contains malware’ warning)
The plugin will automatically restore the broken link to normal once the site owner fixes the problem (i.e. removes malware from their site).
Go To Broken Links
Navigate directly to the ‘Broken Links’ screen from your ‘Broken Links Options’ page by clicking on the Go to Broken Links button in the top right-hand section of your admin screen …

(Go to Broken Links)
Screen Options Tab
You can also hide or display columns for the plugin screens and set additional screen settings when viewing your broken links by clicking on the Screen Options tab in the top right-hand section of your admin screen …

(Screen Options tab)
Here you can enable or disable Table columns, set the number of links to show per page, and set miscellaneous settings for your links, such as highlighting links that have been broken for ‘X’ number of days, and color-coding different status codes for easier visual recognition …

(Screen Options)
As you can see, Broken Link Checker is a comprehensive and useful plugin to install on your WordPress site.
For more information about this plugin, visit the plugin’s website:
![]()
Some web hosting companies will not allow you to install a plugin like Broken Link Checker on your WordPress site, as it can cause a high load on their servers or create an unnatural number of MySQL queries. if you experience any problems using this plugin, check with your host.
Congratulations! Now you know how to find and repair broken links in WordPress and how to set up a plugin that will automatically scan your site and continuously check for broken links.

(Source: Pixabay)
***
"Your training is the best in the world! It is simple, yet detailed, direct, understandable, memorable, and complete." Andrea Adams, FinancialJourney.org
***