How To Use WordPress Gravatars

No doubt, you are probably already familiar with avatars.
An avatar is an icon, or representation of a user in a shared virtual reality such as a forum, chat, website, or any other form of online community where the user(s) wish to distinguish themselves from other users.
(Source: WordPress Codex)
Using avatars (profile images) is now standard across sites that encourage user interactivity, such as social media networks like Facebook, Twitter, YouTube, etc., and many online forums and directories.

If you visit other WordPress sites and blogs, you will see that these sites often display user avatars in their post comments and online discussions.

You may have noticed that some comments in blog posts display user profile images (i.e. avatars) and some don’t.
Typically, comments without user images display a greyed out silhouette or some other generic icon.

In this tutorial, you will learn:
- What Gravatars are and how they work,
- How to set up avatars in WordPress,
- How to display avatars for users commenting on your posts instead of generic icons.
What Is A Gravatar?
If WordPress detects comments from users on your posts and cannot find a profile image associated with that user, it automatically assigns a generic icon image to the comment or entry.

The same thing will happen to you if you post a comment on someone else’s WordPress site unless you set up a special kind of WordPress avatar, called a Gravatar.

Gravatar is short for Globally Recognized Avatar.
Avatars are usually an image that users upload to every site they register with. A Gravatar allows you to use one avatar on every WordPress site you post comments on.
Unlike standard avatars then, Gravatars follow you around the web and automatically appear whenever you post a comment on a WordPress site.
Gravatar.com was acquired in 2007 by Automattic, the company behind WordPress. As a result, Gravatars are now integrated into WordPress and millions of gravatar images are served billions of times per day across the web.
Gravatars are also supported by many technology platforms.
How Does A Gravatar Work?
You need to set up a Gravatar before you can use it on WordPress sites.
Once you have set up your Gravatar account (see instructions below), the service will match your WordPress user profile information to the email address in your account. It will then use this to display your custom Gravatar image with your user profile, comments, post entries, discussions, and (optionally) everywhere else across the WordPress universe.

If a visitor has not set up a Gravatar account, the default avatar set by the WordPress site administrator will display next to their comments and entries (this is explained further below).

Typically, the default avatar image that is most commonly used is called the “Mystery Person”.

If you post comments on other WordPress sites and don’t want your entries to display a default or generic icon, the easiest thing to do is set up a gravatar of your own.
Benefits Of Using Gravatars
A Gravatar is basically an avatar that is hosted on a single server and is called up by encrypting the users’ email address using a special algorithm.
Instead of displaying one avatar on a forum that you frequently visit and displaying another avatar on a blog that you are a registered member of (in other words, creating different avatars for every site you have an account with), a Gravatar allows you to display the same avatar on every site you visit.
Enabling Gravatars on your WordPress site also simplifies the process for everyone involved:
Benefits for Site Administrators
- Gravatars require very little effort to manage.
- There is no need to maintain additional plugins.
- Gravatars are visually portable across the web. You don’t need to manage user accounts or edit user images to allow post commenters to use Gravatars on your site.
Benefits For WordPress Users
- Having a Gravatar account saves users from having to register and upload a new avatar on every site they join.
- Users can update their Gravatar across multiple sites by simply uploading a single image inside their account.
How To Add A Gravatar
To start using Gravatars, you will first need to create an account (it’s FREE) here: http://www.gravatar.com

Since Gravatar is part of WordPress, you can also log in with your WordPress.com account details if you have one set up.

If you don’t have a WordPress.com account, you can easily register and set one up on the site.

![]()
If you have several email addresses, you can set up multiple Gravatars associated with each email address.

Once you have verified and set up your account, follow the instructions to set up your profile, and select the email address and image you want to associate with your Gravatar.
You will need to upload an image.

Gravatar automatically resizes large images and has a 10MB file size limit.

After uploading your image, crop and save it.

Next, select a rating for your Gravatar:
- G – Select this option for images that are suitable for display on all websites with any audience type.
- PG – Select this option if your Gravatar image contains rude gestures, provocatively dressed individuals, lesser swear words, or mild violence.
- R – Select this option if your Gravatar image contains harsh profanity, intense violence, nudity, or hard drug use.
- X – Select this option if your Gravatar image contains hardcore sexual imagery or extremely disturbing violence.

Select the email address you want to associate with your Gravatar. As mentioned earlier, you can add multiple addresses to your Gravatar accont.
Click the ‘Use for selected addresses’ button to complete the process and set up your Gravatar.

You can access and edit/manage your own account settings at any time by clicking on the ‘My Gravatars’ menu link.

You can also edit your profile further by associating your Gravatar with an email, website, location, and a brief bio description.

After you have finished editing your details and setting up your account, your Gravatar will be integrated with your WordPress account and begin following you around the web.
It will display in your post and blog comments, forums, etc.

Your Gravatar will also display inside your WordPress dashboard, in your user profile…

And whenever you log into your site.

How To Manage Gravatar Settings in WordPress
Although WordPress sites automatically integrate with Gravatars, you can manage settings like:
- Whether Avatars (aka, Gravatars) display on your site or not.
- Which kind of Gravatars can display (using the Avatar rating filter).
To manage how Gravatars are used on your site, log into your WordPress admin area and go to the Settings > Discussion screen.

Scroll down the screen to the Avatars section.
You will be presented with several options:
- Avatar Display: Toggle Gravatars on and off for your site.
- Maximum Rating: When users create a profile on Gravatar, they are given the opportunity to rate their Gravatar image (i.e. G, PG, R, X) based on appropriateness. This section lets you choose the maximum rating you will allow to display on your site.
- Default Avatar: WordPress allows you to select what type of image you would like to display when users do not have a Gravatar account. Selecting one of the generated icons gives users a default avatar without requiring them to have a Gravatar account. Generated icons link the email of the commenter to an auto-generated image. Every time the user posts a comment on your site, they will be assigned the same image.

Remember to click the Save Changes button when finished to save your new settings.

Using Gravatars – Additional Tips
By default, WordPress displays Gravatars using a fixed size. To change the default WordPress Gravatar image size, you will need to edit code in your template files.
Contact us if you need help customizing your Gravatar image size.
Also, there are many WordPress plugins you can use to extend the functionality of Gravatars. You can search for Gravatar-related plugins inside your WordPress admin area (Plugins > Add Plugins).

You can use plugins to:
- Add custom Gravatar images from your WordPress Media Library
- Add pop-up information boxes with additional details and information about the user (called a Gravatar Hovercard) when visitors hover over the Gravatar image.
- Host Gravatars on your own server.
- Disable Gravatars in certain instances.
- Cache Gravatar images to speed up page loading.
- And more.
Gravatar Hovercards
A Gravatar Hovercard allows your profile information to be made visible to others. This makes it easier for users to find your blog or access your identity on services like Twitter, Facebook, or Linkedin.
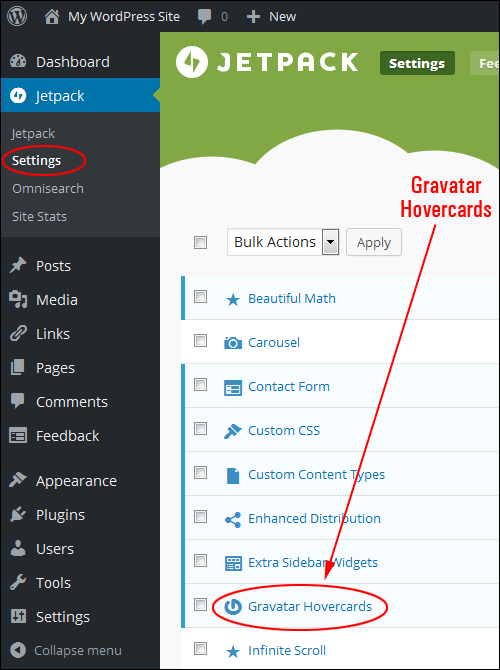
A Gravatar Hovercard is typically a feature of WordPress.com (the hosted version of WordPress). You can add Gravatar Hovercards to your self-hosted WordPress site by installing the Jetpack plugin.

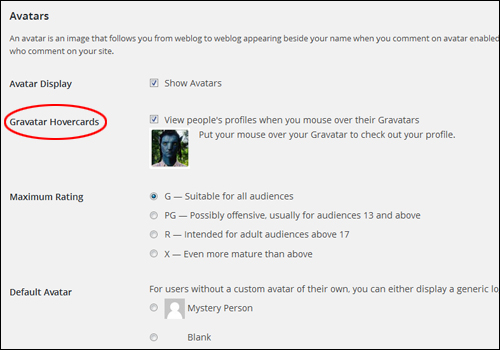
Once Jetpack is installed on your site and the Gravatar Hovercards feature is activated, a new entry will appear on your Discussion Settings > Avatars section.
This allows you to display user profiles when someone hovers over a Gravatar image.

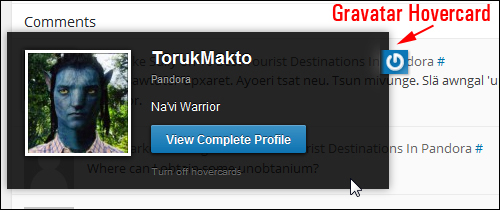
If you activate the Hovercards feature, then whenever visitors hover over your Gravatar…

Your Gravatar Hovercard will pop up, allowing users to click through to your profile and learn a little more about you.

Add A Custom Gravatar To WordPress
You can replace the default user gravatar on your site for users that don’t have a gravatar set up.
To learn how to add a custom gravatar to WordPress, see this tutorial: How To Add A Custom Gravatar To WordPress

Congratulations! Now you know what Gravatars are and how to set them up and use them in WordPress to display your avatar in your posts, comments, discussions, and more.
Gravatar logo source: simpleicons.org. Avatar movie references used for illustrative purposes only. All copyright belongs to their respective owners.
***
"I am beyond impressed with what you have put together. I can tell that you put a ton of hard work into building what you have. You have the absolute best content on WordPress I have ever seen!" - Robert T. Jillie
***
We are not affiliated, associated, sponsored, or endorsed by WordPress or its parent company Automattic. This site contains affiliate links to products. We may receive a commission for purchases made through these links.