How To Create A Post In WordPress – Pt. 2
In Part 1 of this tutorial on how to create a new post in WordPress, we covered the following:
- Types Of Content You Can Publish In WordPress
- WordPress Post Features
In Part 2, you will learn how to create an effective post using the basic WordPress features and functions discussed in Part 1 of this tutorial.
To review Part 1, go here: How To Create A Post In WordPress – Part 1
![]()
This tutorial shows you how to create a post using the WordPress Classic Editor.
We also have a tutorial that shows you how to create posts using the new WordPress Block Editor.
***
A Post Is More Than The Sum Of Its Parts
WordPress is an easy-to-use, powerful, and flexible content management system (CMS) and online publishing platform. The more you understand and learn how to use all of its features and functions, the more effective your posts will be, and the more effectively you will use your site as a tool to promote your website and grow your business online.
Although creating a post in WordPress is easy enough as you will see shortly, as discussed in Part 1 of this tutorial, to create a truly effective post that will generate the kind of results you would expect (e.g. more traffic, better user engagement, higher conversions, etc.), requires understanding, coordinating, and employing various features and functions throughout the content creation and publishing process.
To save time, here is the flowchart of the WordPress Post creation process again, as shown in Part 1 of this tutorial:
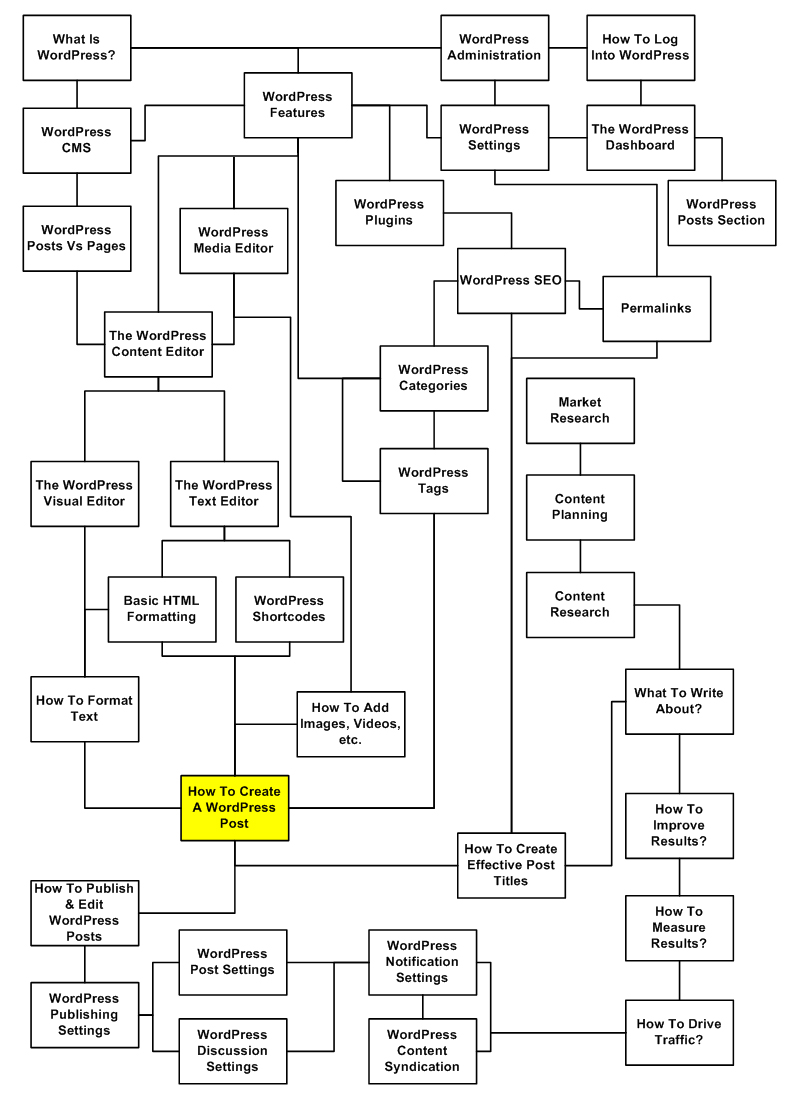
Creating an effective post, then, requires more than just typing in some words, formatting text, adding images or other media, and hitting the publish button. It requires a combination of various processes, such as:
- Content Planning – This process involves developing a content strategy, knowing what to write about, researching content topics and ideas, creating and presenting an outline, developing a publishing schedule, etc.
- Content Creation – This process involves figuring out who will write or create your content, assigning and managing the work, editing, proofing, etc.
- WordPress: Configuring Site Settings – Before you can create a post, your site should be hosted with a reliable web server, designed to improve your conversions across all devices and web browsers (e.g. using a modern and fully responsive WordPress theme), set up correctly and optimally configured for things like SEO, image optimization, fast loading pages, measuring statistics, tracking results, etc.
- WordPress: Understanding Main Features – When it’s time to publish content, you don’t want to waste time trying to figure how to use your site. Knowing basic things like how to log in and navigate around your dashboard and understanding what the main features of WordPress do is covered in our other tutorials.
- WordPress: Using Post Features – Knowing what to do with your content, which features of the content and Post editor will enhance its effectiveness, and which buttons to press and in what sequence to get it published is the focus of this tutorial. This process, however, doesn’t exist in a vacuum. It is dependent on all the other processes discussed here.
- Online Marketing – You should have processes in place to promote, track, measure, manage, and improve the results of your published posts. Otherwise, all the time, effort, and money you put into creating posts could be a waste of energy and resources.

As stated above, the focus of this tutorial is to show you how to use the WordPress Post features to get content published on your site.
Now that we’ve touched briefly on the “big picture,” let’s go through some useful guidelines for creating and posting effective content on your site.
Guidelines For Creating Effective Post Content
We recommend reviewing and applying the guidelines below when creating web content. These will help you create effective posts:
Who You Are Writing For?
Think about your target audience and make your content all about them.
Also, make sure to put all necessary measures and precautions in place to protect your site, the privacy of your readers, and anyone you plan to post or comment about.
Add Value With Quality Content
Avoid taking shortcuts with your content. Don’t fall for SEO strategies that deliver filler content or publish articles that are thin on substance. Whatever you publish on your site should enhance your reader’s experience and add value to their lives.
Also, make sure you have thoroughly researched your topic, any facts you plan to use to support your arguments, and your competition. Make sure you “know your stuff.”
An excellent way to focus your writing on your content is to compose your initial draft using a plain text editor. Remove distractions like images, text formatting, etc. and focus on getting the words of your message or communication right first. When you are happy with what you have written, copy and paste it into the WordPress editor, then format, style, and embellish it as required to create a great article that users will want to read, engage with, and share with others.
Practice Accessibility
Think about users with learning difficulties, disabilities, or impairments who may struggle to navigate your site or read your content.
Become familiar with web standards for accessibility and make sure that whoever creates your content complies with accessibility standards.
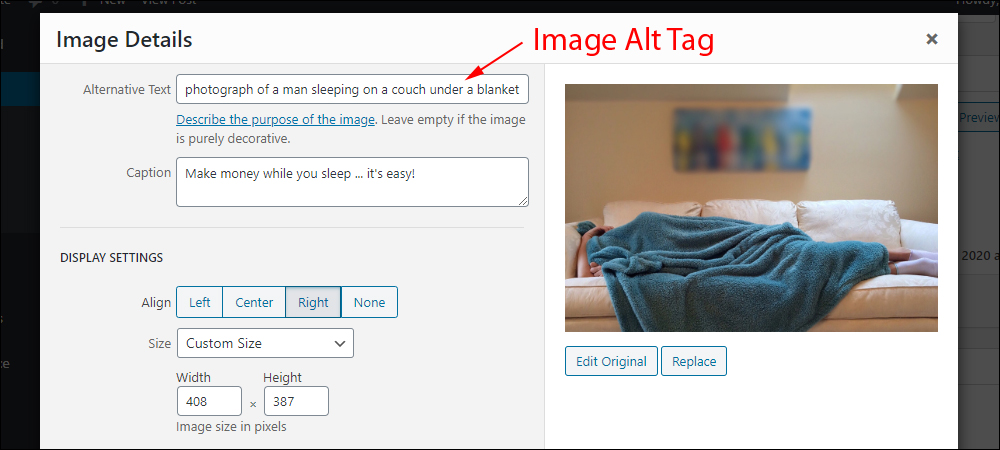
Examples of making your content more accessible include making sure to use descriptive ALT tags in your images, using legible typography and high-contrasting colors, and even presenting content in different formats (e.g. audio files of your posts created using text-to-speech technology).
Use Paragraphs
Avoid long, run-on sentences.
Break up your content into short paragraphs to make it more readable.
![]()
WordPress automatically detects double-spacing between paragraphs and inserts paragraph tags (<p>) into your text.
Use Headings
If you plan to write a long post or a complex, serious article, consider using HTML heading tags to break up your post sections.
Headings are set using tags like h1, h2, h3, h4, and so on. You can also insert headings by highlighting content in your post and selecting one of the heading options from the “Format Style” drop-down menu in your WordPress Content Editor.
- For a basic non-techie guide on using HTML to format your content, see this tutorial: HTML Guide for Beginners
- To learn how to use the WordPress Visual Editor, see this tutorial: How To Use WordPress Classic Editor
- To learn how to use the WordPress Block Editor (Gutenberg), see this tutorial: How To Use WordPress Block Editor
Learn To Use Basic HTML Tags To Format Text
You don’t need to know how to code to create richly formatted content. You can easily format content using the menu buttons in the WordPress Visual Content Editor.
Having some basic HTML knowledge, however, will give you control over areas like proofing, editing, and styling elements in your content, such as styled boxes, columned text, tables, headings, nested layouts, etc.
For a basic guide on using HTML to format your content, see this tutorial: HTML Guide for Beginners
Spell Check And Proof Everything
Check your spelling and proof your post before publishing live content on your site.
There are a number of spell-check tools, browser add-ons, and WordPress plugins available to help you do this (e.g. Grammarly).
Think Before You Publish
Once your content goes live, it can be viewed by other people, shared on social media, and picked up by search engines. This makes it harder to make your content “unseen” or to take back something you shouldn’t have said.
So, take the time to plan and think about what you are writing. Read, re-read, edit, and review everything before you hit the publish button.
Make Use Of Commenting
Comments allow your site visitors to engage with your site, give you valuable feedback, and share ideas and suggestions.
You have complete control over what gets posted on your site and you can edit or delete any negative comments posted by visitors. You can also disable commenting on your site or on a post-by-post basis.
Make use of the WordPress commenting feature and make sure to let visitors know that they can contact you via your contact form too.
Don’t Worry About Web Design
How your site looks is important but it’s not essential to getting your message or point across.
WordPress Themes let you grow your readership starting with a basic site design. You can change your web design templates later with a few clicks of your mouse without losing any of your valuable content.
As mentioned earlier, focus on publishing quality content. Great content will attract and keep your readers engaged even if your web design is not great. Get to know your audience and their needs first using tools like commenting, heat maps, and analytics, then adapt your web design to fit your audience’s needs.
With WordPress, you can easily do this. WordPress lets you customize and change anything and everything, including the entire look and feel of its design, page layout, etc. using themes.
Use Media
Adding images and videos to your content helps make your posts and pages more attractive and interesting. They can also help your readers engage better with your content.
See the tutorials below to learn how to add media like images and embed videos into your posts and pages.
If using the WordPress Classic Editor:
- How To Use The WordPress Media Library
- Using Images In WordPress
- How To Add An Image Gallery In WordPress
- How To Add And Format Images In WordPress
- How To Add Videos In WordPress
- How To Add Audio Files In WordPress
- How To Use Featured Images
- How To Edit Images In The WordPress Media Library
- Where To Find Free & Royalty-Free Images For Your Content
If using the WordPress Block Editor (Gutenberg):
- WordPress Block Editor – Image Block
- WordPress Block Editor – Media & Text Block
- WordPress Block Editor – Audio Block
- WordPress Block Editor – Gallery Block
- WordPress Block Editor – Video Block
Publish Content Regularly
When it comes to publishing content, consistency is the key.
Create a regular content publishing schedule and stick to it.
We have created an entire email training series designed to help you come up with endless content ideas for your site, blog, or newsletter. You can subscribe to it below:
Next Step …
Now that we have gone over some useful guidelines for posting content on your site, let’s go through different ways to save posts in WordPress.
Saving Posts In WordPress – Your Options
Autosave
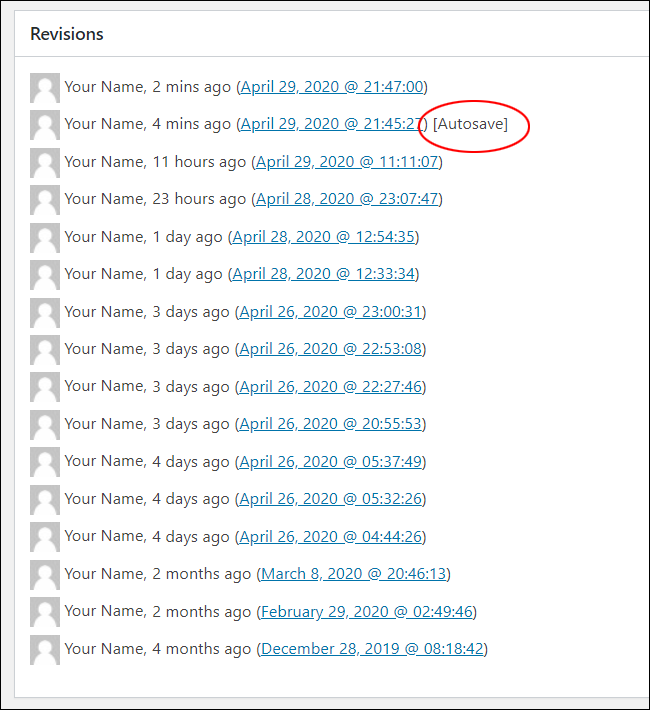
WordPress has a built-in function that autosaves your content at regular intervals.
![]()
This feature helps to prevent you from losing your work should something unexpectedly go wrong, like a power outage causing your computer to shut down or lose internet connection, or if you accidentally close your web browser in the middle of your work session.
WordPress automatically records the date and time of your post when the post is first autosaved.
Learn more about the WordPress autosave feature here: WordPress Autosave And Post Revisions
Save Post As Draft
Until your post is published, your post content will not be visible to your site visitors. Instead, the post will be saved in Draft status (or Pending Review) until you publish it.

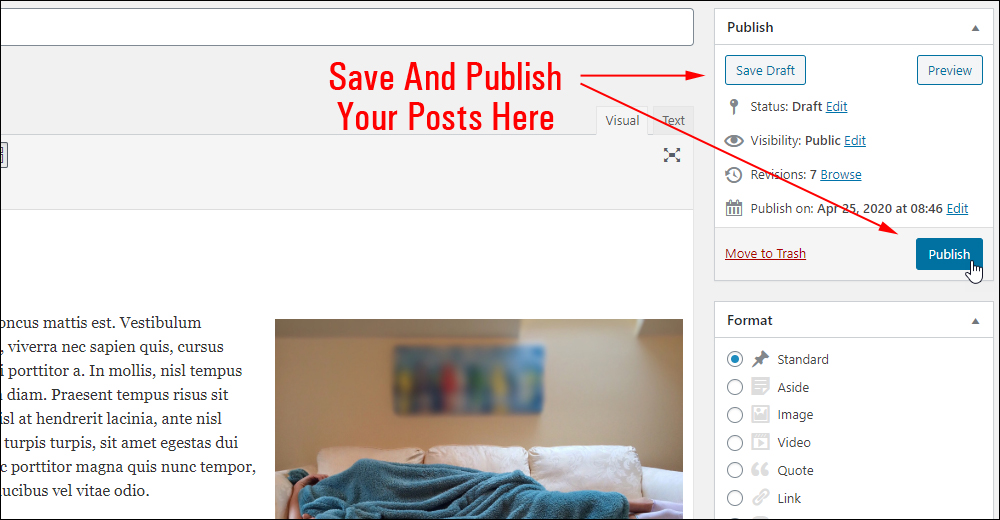
The ‘Publish’ section lets you save your posts as a draft or publish it live. Depending on which of these options you choose, you will either see a Save or Publish button displayed.
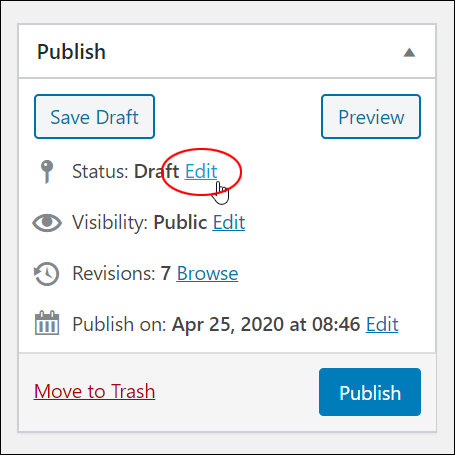
To save your post as a Draft, go to the Publish > Status section of your Post screen and click on Edit.
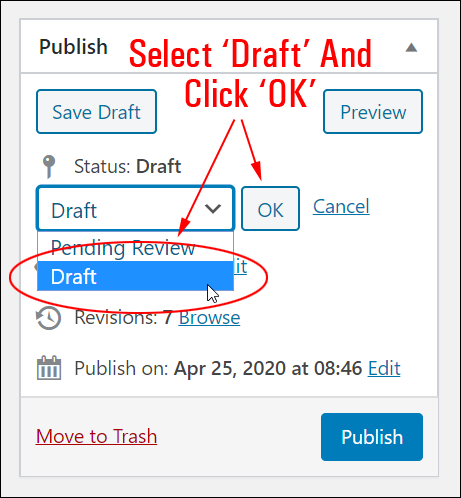
Select Draft from the ‘Status’ drop-down menu and click OK.
With ‘Draft’ selected in the “Status:” field, click on Save Draft.
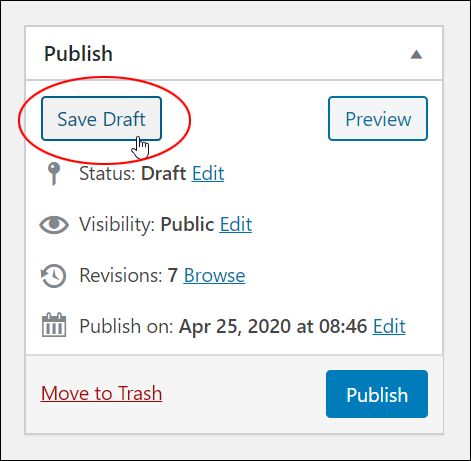
Your post will be saved as a draft post. Right-click on Preview post to preview your saved content in a separate window.

‘Preview Mode’ lets you see what your post will look like when published. (Note: Until you publish your post, this content will not be made visible to your site visitors).

![]()
You can also preview your post in a new browser window without saving or publishing it first by clicking the Preview button in the ‘Publish’ section.
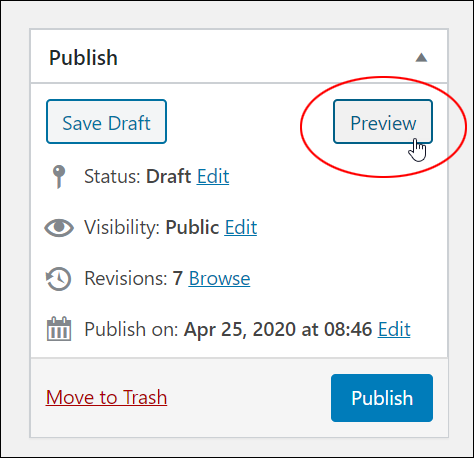
Once you are ready to publish your post, click the Publish button.
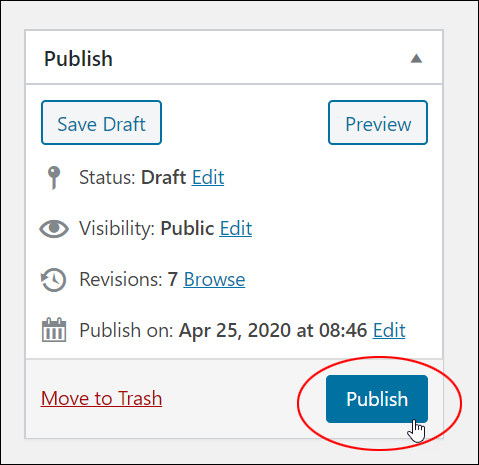
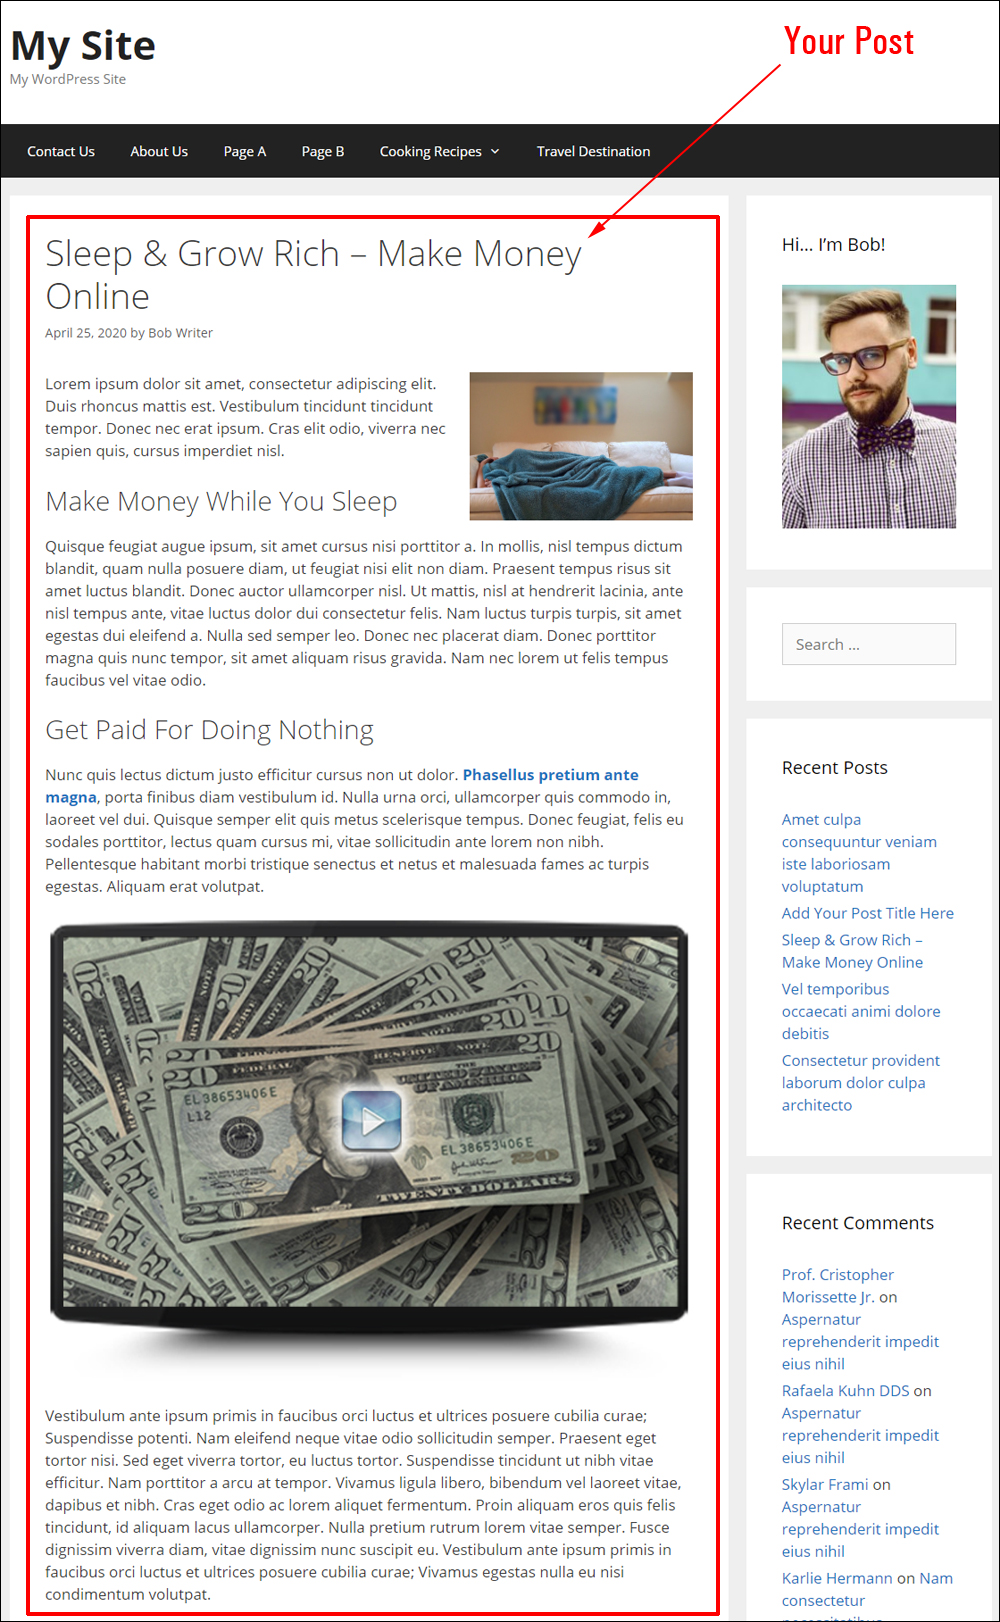
After publishing your post, right-click the View Post link to open it in a new window.

Your post should now be visible to your site visitors. The post can also be accessed and linked to via its unique web address (URL).

After publishing, preview and review your post to make sure that all of the content has been added and formatted correctly.
If you need to make any changes to your post content, go back and edit your post, then republish.
Note: You can also change your published date and time by editing the settings in the “Published on:” section, clicking the OK button, and then clicking the Update button to save your new settings.
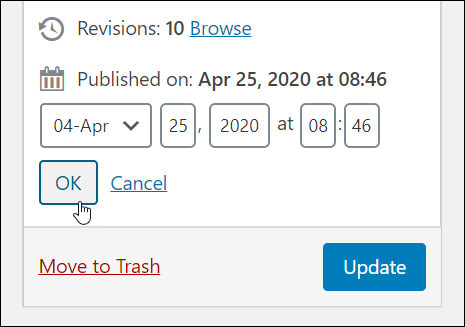
To learn how to edit your post, see this tutorial: How To Edit Posts In WordPress
Note: After publishing, the button will change from ‘Publish’ to ‘Update’.
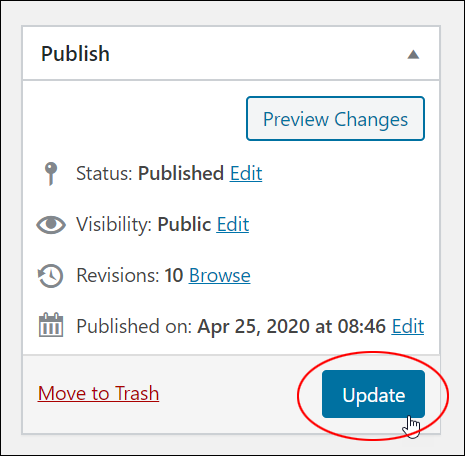
![]()
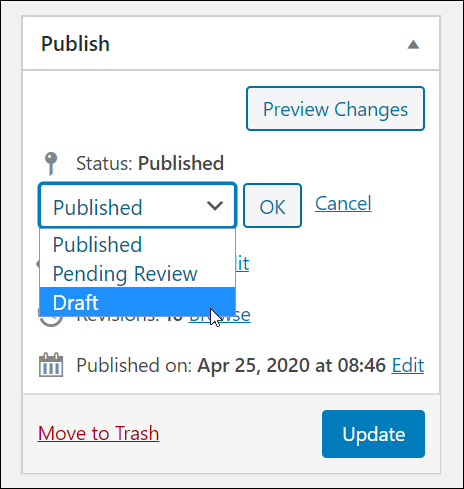
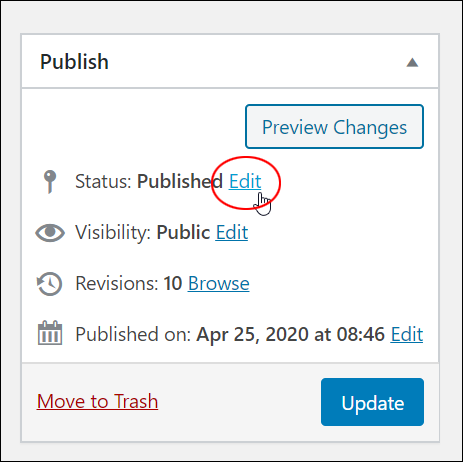
You can revert your post status from ‘Published’ to ‘Draft’ or ‘Pending Review’ by clicking on the Edit link next to the Status field and selecting another option from the drop-down menu.
To resave a published post as a ‘draft’ post, go to the Publish > Status section of your post screen and click on Edit.
Choose Draft from the Status drop-down menu and click OK.

With ‘Draft’ displayed in the Status field, click on the Save Draft button.

Your post will revert to ‘draft’ status and no longer be visible on your site.
![]()
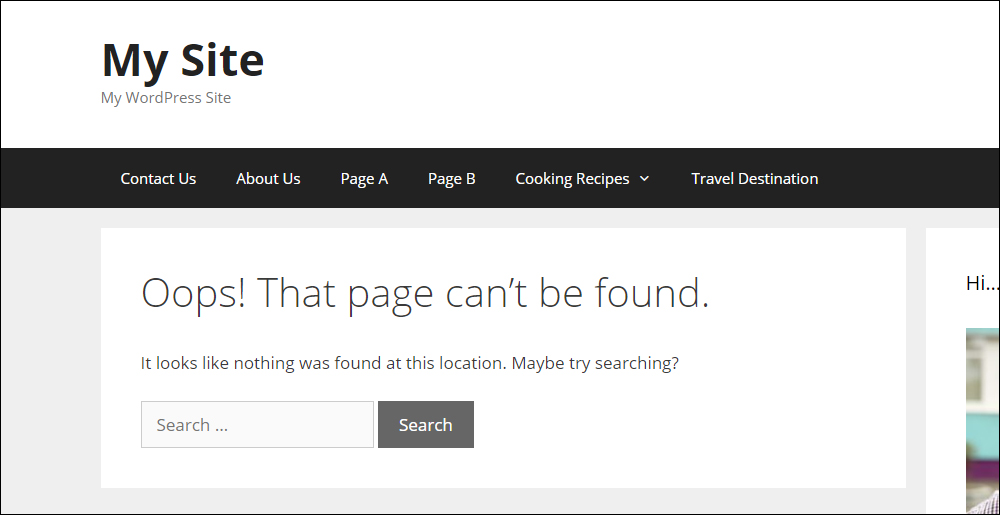
Note: If someone attempts to visit the web address of a post that was previously published, they will see a “page not found” error message (this is called a ‘404’ or ‘Not Found’ error page).
Next Step …
Now that you know how to create, save, and publish a post in WordPress, let’s review the steps involved in the post creation process.
Creating A New Post In WordPress – Quick Recap Of Steps Involved
As mentioned in Part 1 of this tutorial, with WordPress, publishing your content is as easy as 1-2-3:
- Think …
- Write …
- Publish!
After deciding what topic you plan to post, the next step is to write your content (or get it written for you), and publish it online.
WordPress makes publishing content easy. We recommend following the steps below to publish an SEO optimized post that will get your content indexed quickly by search engines:
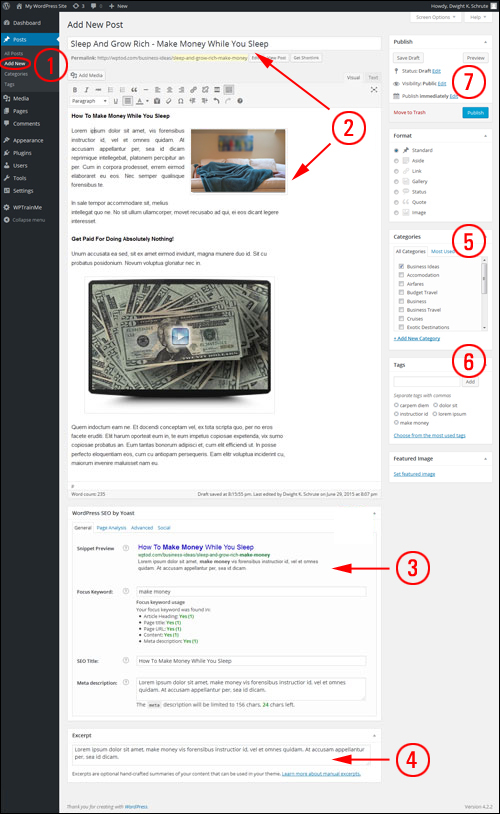
- In your WordPress dashboard menu, select Posts > Add New to bring up the ‘Add New Post’ screen.
- Add your post content (post title & body content). Make sure that your site’s Permalinks have already been set up and configured. Modify the Post Slug if required.
- If you have an SEO plugin installed (recommended), type in the search engine optimization metatags and content into the SEO fields. This will only take an extra minute or two, but it will help your content rank better in search engines.
- Add a Post Excerpt into the ‘Excerpt’ section.
- Select a Post Category.
- Add Post Tags (tip: use the keywords you have entered into the SEO section).
- Publish your post.
Congratulations! Now you know how to create and publish a new post in WordPress! To learn how to edit or delete your post in WordPress, see this tutorial: How To Edit And Delete A Post In WordPress – Part 1
***
"I love the way your email series "Infinite Web Content Creation Training Series" is documented and presented. It is very absorbing and captivating. The links and tutorials are interesting and educational. This has motivated me to rewrite my content following the concepts I am learning from the email series." - Mani Raju, www.fortuneinewaste.com
We are not affiliated, associated, sponsored, or endorsed by WordPress or its parent company Automattic. This site contains affiliate links to products. We may receive a commission for purchases made through these links.