 As you read this, billions of data transactions are taking place online. New content is constantly being published on news, social media networks, and websites, and some of that information is related to topics you are interested in.
Is there a free and simple way to find out what is happening in your niche or industry so that you are not wasting a huge amount of time doing research? Yes, there is, and it’s called …
Google Alerts

(You can monitor the web for new content with Google Alerts)
Google Alerts lets you monitor the web for interesting content.
Google Alerts is not only only a great tool for helping you manage your reputation online, but also for gathering news about people, brands, companies, and any other subject you are following.
With Google Alerts, you just subscribe to a keyword or topic and you’re done. Whenever Google’s bots (Googlebot) index a new web page, press release, blog post, news update, a video, tweet, or any other indexable content related to the topic you’ve subscribed to, it will automatically send you an email or RSS update.
Setting Up Google Alerts – A Simple Step-By-Step Tutorial
Let’s go over the simple steps required to start using Google Alerts:
Step 1 – Log Into Your Google Account
If you don’t have a Google account, create one. A Google account lets you access many free services with just one username and password. If you use Gmail, post videos to YouTube, run a pay-per-click advertising campaign with Adwords or own a GooglePlus page, then you should already have a Google account.

(Log into your Google Account to set up your Google alerts)
![]()
You can still set up Google Alerts without accessing your Google Account, but this will give you fewer options (e.g. you can only receive email alerts, not alerts via RSS).
Once you have logged into your Google Account, access the Google Alerts tool by entering the following URL into your browser:
Step 2 – Set Up Your Alerts
You can set up an alert for any topic, business name, person, brand or website address you would like to receive updates about. This service lets you track brands, employees, competitors, celebrities, influencers, investors, etc. There are no limits to how many alerts you can set up.

(Google Alerts lets you set up as many alerts as you like)
Step 3 – Set Your Preferences
Google Alerts lets you specify the keyword(s) you want alerts sent for, how often alerts should be sent out (as it happens, once a day, once a week), sources (e.g. automatic, news, blogs, web, videos, discussions, etc.), language, region, how many (all results, only the best results), and how to receive alerts (via email or RSS feed) …

(Google alert preferences)
To narrow the source of your alerts, just select an option from the drop-down menu …

(Google alert sources)
You can also specify the delivery time of your alerts in your settings, and whether these should be sent in a single email …

(Google alert settings)
All of these settings can be changed anytime you like.
You will begin receiving alerts as set in your preferences …

(Google alerts – email alert)
Note that at the bottom of your email notification, you are given various options, including:
- See more results
- Edit the alert
- Unsubscribe (stop receiving the alert)
- View all your alerts
- Receive the alert as RSS feed
How To Set Up Google Alerts While Browsing Google News
You can easily set up Google Alerts while browsing the web. Here’s how:
Go to Google News and type in your search term …

(Enter a search term in Google News)
Scroll down to the bottom of the page and click on ‘Create Alert’ …

(Google News – Create Alert)
This brings you to the Google Alerts screen. Enter your email address and click on ‘Create Alert’ …

(Google Alerts screen)
If you elect to receive alerts via email, you will be asked to verify your Google Alert request …
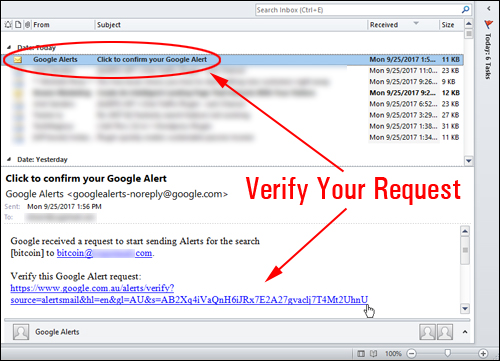
(Verify your Google Alert request)
After confirming your request, your Google Alert will be set up and you will begin to receive alert notifications via email.
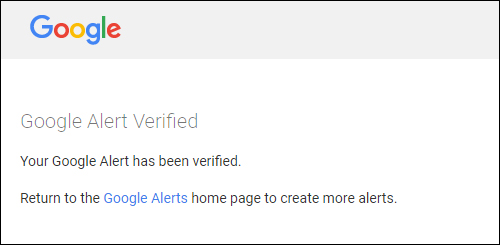
(Your Google Alert has been successfully verified)
You can return to the Google Alerts home page and create as many alerts as you want.
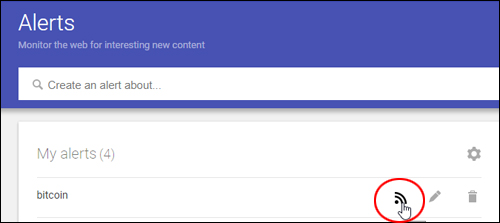
How To Delete Google Alerts
You can delete any alerts you no longer want to receive …

(Google alert settings)
You can also stop receiving alerts by clicking on the ‘Unsubscribe’ link at the bottom of your emails …
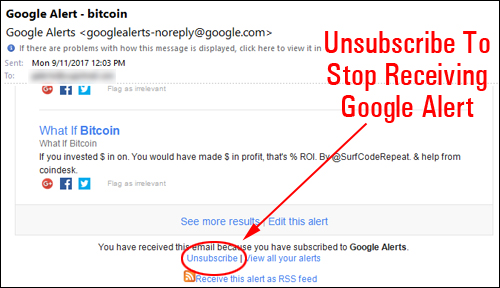
(Click the Unsubscribe link at the bottom of the email)
Confirm that you want to unsubscribe from your Google Alert …
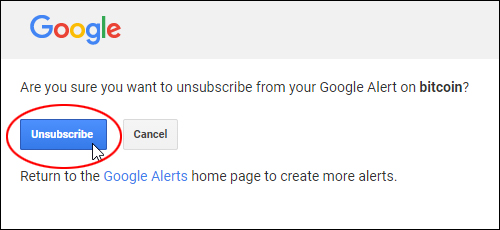
(Click unsubscribe to stop receiving Google Alerts)
Your Google Alert will be cancelled …
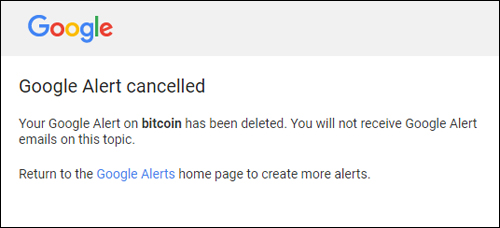
(Google Alert cancelled)
You will no longer receive alert emails on the topic from Google after unsubscribing.
![]()
If you want alerts to be sent via email, you can configure rules in your email program to automatically redirect all alerts to one or more email folders. This helps keep your alerts organized and easier to track and sort through.
If your alerts are sent out via RSS feed, you can use a feed reader to access the information on your smart phone or mobile device.
Once you have set up alerts, you can monitor information about keywords, businesses, competitors, etc., or start creating content for your business blog in your chosen topic.
How To Display News Items From Google Alerts On Your Site
You can repost news items directly from Google Alerts on your WordPress your website as blog posts or as a ‘widgetized’ item on your sidebar.
Let’s take a look at both methods:
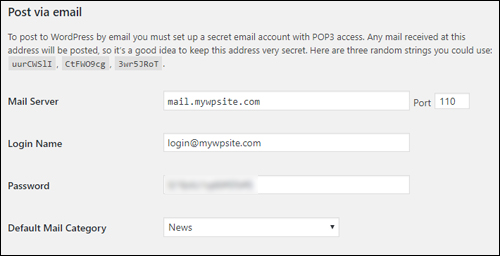
Publish Google Alerts News Items As A Blog Post
To republish news items from Google Alerts as a blog post, do the following:
Set up your site to post by email …
(Post to WordPress by email)
If you need help with this step, see this tutorial:
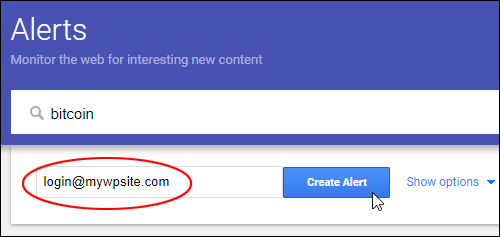
Next, create an Alert to send to the email address you have set up …
(Create Alert and send to email)
Alerts will now be posted to your blog, or come in as ‘drafts’ that you can review and publish.
Publish Google Alerts News Items On Your Sidebar
To display news items from Google Alerts as a as a ‘widgetized’ item on your sidebar, all you need to do is set up to receive your alerts as an RSS feed as described earlier …
(Receive alerts as an RSS feed)
Next, copy the RSS feed link to your clipboard …
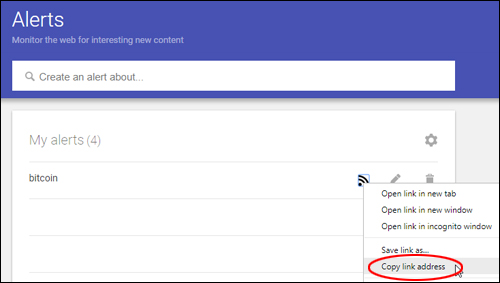
(Copy RSS link address)
And add the RSS feed to an RSS widget as described in this tutorial:
Your alert will display as a ‘widgetized’ item on your sidebar and the feed will update regularly as Google sources new items …
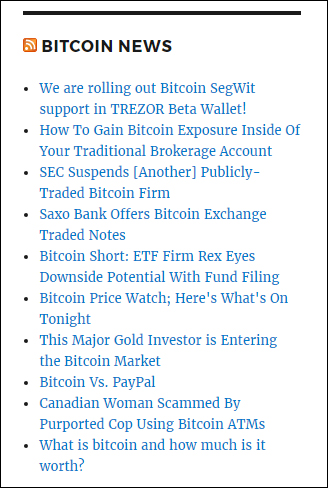
(RSS Widget with Google Alert feed)
Hopefully, you have found this tutorial useful. To learn more about using social media monitoring tools to monitor social signals, see this article: 29 Social Media Measurement Tools For WordPress Users

***
"If you're new to WordPress, this can stand on its own as a training course and will stay with you as you progress from beginner to advanced and even guru status." - Bruce (Columbus, Ohio)
***