 WordPress introduced a new content editor in version 5.0.
To learn how to use the new content editor with the Media Library, go here: WordPress Gutenberg: The Ultimate Guide For Non-Technical WordPress Users
***
In WordPress, you can upload, store, and display a variety of file types (media) into your site’s content.
The most common file types are images, videos, and audio files, but you can also use other file types such as PDF document files, spreadsheet files, code samples, etc.
Typically, you will upload and add media into your content when creating or editing a post or page.
Adding media to the WordPress Media Library allows you to upload photos and create image galleries using an interface that makes uploading files and placing them into your posts and pages very easy.
Additionally, you can create image galleries very quickly with drag and drop reordering, inline caption editing, and simplified controls for layout, among other things.

In this tutorial you are going to learn how to use the WordPress Media Library feature.
![]()
Note: Some media settings such as specifying the size of thumbnail images and options for the location and structure of the media upload directory (where your media files are stored) are controlled in your WordPress Media Settings.
How To Use The WordPress Media Library: Tutorial
You can upload and store various types of media files in your WordPress Media Library …

File Types Supported By WordPress
For security reasons, WordPress supports only certain types of files.
These include:
Images
- .jpg
- .png
- .gif
- .ico
Video
- .mp4, .m4v (MPEG-4)
- .mov (QuickTime)
- .wmv (Windows Media Video)
- .avi
- .mpg
- .ogv (Ogg)
- .3gp (3GPP)
- .3g2 (3GPP2)
Audio
- .mp3
- .m4a
- ogg
- .wav
Documents
- .pdf (Portable Document Format; Adobe Acrobat)
- .doc, .docx (Microsoft Word Document)
- .ppt, .pptx, .pps, .ppsx (Microsoft PowerPoint Presentation)
- .odt (OpenDocument Text Document)
- .xls, .xlsx (Microsoft Excel Document)
- .psd (Adobe Photoshop Document)
![]()
Some web hosts may not allow you to upload some of the file types listed above (and/or upload large files). Check with your host if you experience issues uploading files to your WordPress site.
How To Upload Media Files To WordPress
You can upload media files to your site without creating a post or page first. This allows you to upload files to use with posts and pages later and/or get a web link for a particular file that you can share.
To view all the media files in your WordPress site’s Media Library, go to your navigation menu and click on Media > Library…

This brings up the Media Library screen …

A table listing all of your media files will display in the Media Library screen. In a later section of this tutorial, we will cover all the features available in this section.
If you have not added any files to your Media Library, you will see an empty Media table …

How To Add Media Files To Your WordPress Media Library
To add media files to your WordPress site’s Media Library, go to your navigation menu and click on Media > Add New…

You can also add new media files by clicking on the Add New button in your Media Library screen …

A new screen called ‘Upload New Media’ opens up containing the WordPress Media Uploader functions …

There are three options you can use to upload media files to your site:
1) Drag-And-Drop: You can add multiple files to your Media Library by selecting a group of files and dragging them into the Drop files here area surrounded by the dashed border.
2) Select Files: This opens a window that lets you select a folder in your hard drive and upload files from your computer.
3) You can also use the Browser Uploader if you experience any problems using the multi-file uploader …

![]()
Note: the maximum upload size for your media files is determined by your web hosting account settings. In the example screenshot above, the Maximum upload file size is showing as 64MB (MegaBytes). Your screen may show a different maximum limit.
If you are experiencing problems uploading media files to your WordPress site, your limit size may be set too low. You could use an image editing application to resize the image, but it’s best to ask your web hosting company to increase your file upload settings or see the tutorial below:
Let’s go through each of the file upload methods now …
Drop files here – Drag-and-Drop method
The drag-and-drop method is useful if you want to upload multiple media files located in the same source folder. However, you can also use it to upload a single image.
Make sure that both the Upload New Media screen and the folder containing your image files are open and visible on your screen (you may have to resize their windows on your browser to see both of them at once).
Next select a single image, or multiple images by holding down the Shift or the CTRL button, then drag your selected files from your media folder into the blue dotted area of the Upload New Media screen (in the Drop files here section) and release your mouse …

If you have selected multiple files, these will begin uploading …

Once your files have been uploaded, they will display in your Media Library …

Select Files Method
This method allows you to search for the location of your media files (e.g. in your hard drive), then upload one or multiple media files.
- Click on Select Files in the Media Uploader and locate the folder containing your media files, then …
- Select one or more files to upload and click Open in the File Upload window …

Selecting the file(s) you want to upload and clicking Open activates a progress bar on the Upload New Media screen …

You can also use this method to upload different media file types (e.g. audio and video files) from different folder locations on your hard drive.
Selected files are placed in a queue waiting to be uploaded …

Using The Browser Uploader Method
If you experience any problems uploading your files using the previous methods, then try using the browser uploader instead.
After clicking on the browser uploader link, a new screen appears. Click the Browser button, then locate the file you want to upload and click on the Upload button to import your file …

Click on Switch to the multi-file uploader to exit the browse uploader and return to the multi-file uploader …

Attaching Media Files To Posts And Pages
Typically, there are two ways to upload media to WordPress:
- You can upload media into a Post or Page while creating or editing your Post or Page,
- You can upload media that is not related to a Post or Page yet.
If a media file is uploaded within the edit screen of a post or page, it will automatically be attached to that post or page.
If a media file is uploaded via the Media Library, then the file(s) will be unattached. The file(s) may become attached to a post or page when added into a post or page later, but you can also attach unattached media items directly inside the Media Library feature …
For example, here is a screenshot of an image that was uploaded via the Media Library and that is currently unattached to any page or post …

Clicking on the Uploaded to > Attach link associated with an unattached media file brings up a screen that allows you to associate the file with a page or post …

Search for, or select a page or post from the list displayed in the Find Posts or Pages window and click the Select button …

Your image will now be attached to your selected post or page and will show up as part of that post’s or page’s image gallery …

![]()
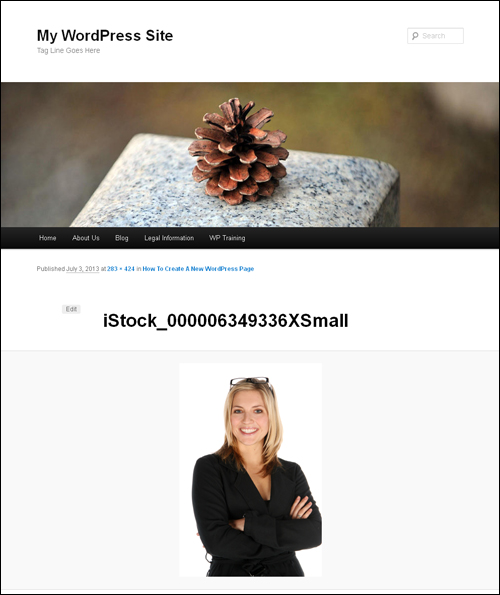
Media items are also “Posts” in their own right and can be displayed as such.
- If the parent post of an attached media item is deleted, the media item will become attached to the deleted post’s parent if it exists.
- If no parent post exists, the media item will become unattached and available for re-attachment to another post or page.
Editing Media Files In The WordPress Media Library
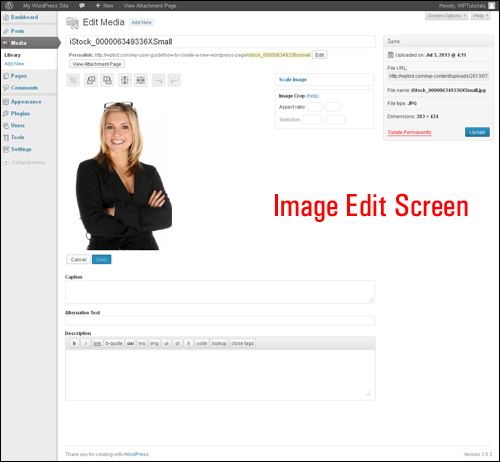
Once a media item is uploaded to the WordPress Media Library, it can be edited.
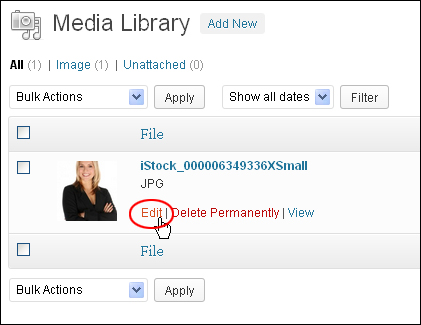
You can edit the item by hovering your mouse over it and clicking on the ‘Edit’ link…

You can also edit the media item by clicking on its file name and thumbnail image …

![]()
Uploaded media such as Videos, Audios, PDF documents, etc… allow you to edit features such as your File Title, Caption and Description …

Image files, on the other hand, offer far greater editing options than other media types …

To learn how to edit images in the WordPress Media Library, see the tutorial below:
Deleting Media Files From The WordPress Media Library
To permanently delete an item from the Media Library, hover your mouse over the item you want to delete and click on the ‘Delete Permanently’ link …
 Your media item will be permanently deleted …

See the Filtering Options section further below for instructions on how to delete multiple media files.
Viewing Items Uploaded To The WordPress Media Library
You can view items you have uploaded to the WordPress Media Library by hovering your mouse over the item and clicking on the ‘View’ link …
 The item will be displayed as a separate post …

Additional Information – Table Of Media
Media Library items are displayed in a table, with all of your media items listed by row, and the newest uploaded item listed first …
 The Table of Media contains the following columns:
[ ] – Check the box to select a media item. Selected items can be processed by a Bulk Action.
Thumbnail – A thumbnail image of the media item is displayed in this column.
File – This column displays the name of the media file (Note: this is not the same as the filename of the uploaded media) …

The file’s media type (e.g TXT, PNG, JPG, PDF) is displayed below the file’s name …

Author – This column lists the user who uploaded the media item, or the file’s assigned author. Note: Files can be assigned a different author than the user who uploaded the file. See this tutorial for details on how to change authors for media files.
Uploaded to – This column displays whether a media file is unattached, or the Post or Page the file is attached to and the date of that Post or Page. Click on the title of the Post or Page to view that Post or Page in an edit Screen. If a media file is unattached, an “Attach” link will appear allowing the media file to be attached to selected Posts or Pages.
Comment Bubble – This column displays the number of comments a media file has received …
Date – This column displays the time or date the media file was uploaded.

Sortable Columns
The column headings in the Table of Media can be clicked to sort media items in ascending or descending order.
Hover over the column title (e.g. File), and the up arrow or down arrow will display. Click the heading to change the sort order of your media files …

Media Library Page Navigation
The number of Media items uploaded to your Media Library is displayed in the Table of Media, as well as the number of pages (if there is more than one page of media uploaded).
You can use the navigation arrows to skip to the first or last page, or to move backward or forward one page at a time. Also, you can enter a page number in the box showing the current page number to go directly to that page …

You can also specify the number of media items to display per page (see next section below).
Media Library Screen Options
The Screen Options allow you to choose which columns are displayed, or not displayed, in the Table of Media.
Click the Screen Options tab in the top right-hand corner of your Media Library screen …

A list of columns is displayed with a check-box next to each column. Check the box for each column that you want to see displayed in the Table of Media, or uncheck the box to hide that column.
You can also specify the number of Media items to display per page in the Table of Media. Remember to click the ‘Apply’ button when finished to apply your new settings …

Click the ‘Screen Options’ tab to close the Screen Options box.
Search Media
Above the Table, to the right, is a search box where you can enter one or more search terms and click the ‘Search Media’ button to search and display all the media files that include your search terms …

Your search results are displayed in the Table of Media …
 Click All in the Media Library menu to reset your page and display all media files in the Table of Media …

Filtering Options
At the top of the Media Library screen are menu links such as All, Images, Audio, Video, Unattached, etc. that allow you to display only media files of that type in the Table of Media when the link is clicked …

Below these links are the Bulk Actions drop-down menu, Apply button, Show all dates drop-down menu and the Filter button …

Bulk Actions Drop-Down Menu – You can perform Bulk Actions on one or more media files selected in the Table of Media. Currently, the only Bulk Action allowed for media files is to permanently delete all selected files.
To use the Bulk Actions filter, (1) select the checkbox(es) for all media files you want to delete. Do this by ticking each box individually, or click on the column header checkbox to select all media files (unchecking the header or footer title bar checkbox will cause all entries in the table to be unchecked), then (2) select Delete Permanently from the Bulk Actions drop-down menu,and (3) click the Apply button …

Show all Dates – This drop-down allows you to select which media files are displayed in the Table of Media by date. By default, “Show all dates” is selected and all of your media files are displayed.
To filter media files by upload date, (1) select one of the available dates from the Show all dates drop-down menu, and (2) click on the Filter button to apply the filter selection …

WordPress Media Plugins
If you plan to use media frequently, there are a number of plugins you can add to your WordPress site to enhance your Media Library functionality and help you better manage and organize your uploaded media, like the one below.
Media Library Assistant
(Media Library Assistant Plugin)
The Media Library Assistant plugin provides several enhancements for managing the WordPress Media Library, including shortcodes, templates, and integrations with other plugins and media formats.
Go here for more information:
MEDIA LIBRARY PLUS
(Media Library Plus WordPress Plugin)
Media Library Plus enhances the functionality of the WordPress Media Library by allowing you to add and build new folders and sub folders to label and organize your media folders and perform operations on these folders and their contents, and provides you with a better way to manage image and video folders when creating WordPress image galleries and albums.
Go here for more info:
For additional plugins that will extend the functionality of your WordPress site and add new media management features, see the training module below:
Congratulations! Now you know how to use the WordPress Media Library.
***
"This is AMAZING! I had learnt about how to use WordPress previously, but this covers absolutely everything and more!! Incredible value! Thank you!" - Monique, Warrior Forum


