 Sitemaps are an easy way for webmasters to inform search engines about pages on their sites that are available for crawling.
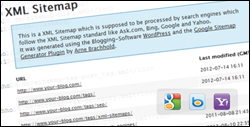
In its simplest form, a sitemap is an XML file that lists URLs for a site along with additional metadata about each URL (when it was last updated, how often it usually changes, and how important it is, relative to other URLs in the site) so that search engines can crawl the site more intelligently.
Web crawlers usually discover pages from links within the site and from other sites. Sitemaps supplement this data to allow crawlers that support sitemaps to pick up all URLs in the sitemap and learn about those URLs using the associated metadata.
![]()
Note: Using the sitemap protocol does not guarantee that web pages will be included in search engines, but it provides hints for web crawlers which helps them do a better job of crawling your site.
Also, it’s important not to confuse an XML Sitemap with an HTML Site Map.
An XML sitemap is similar to an HTML site map in that it creates pages that link to other pages on your site. An HTML site map, however, is mostly intended to help your visitors find content on your site more easily (i.e. it’s designed for human navigation), while an XML sitemap is purely intended for search engines to find and index your pages.
In this tutorial, you will learn how to create and configure an XML sitemap using a Free XML sitemap generator plugin for WordPress called Google XML Sitemap Generator.
Google XML Sitemap Generator
![]()
Note: If you have already configured an XML Sitemap for your site using another plugin like Yoast SEO, you can skip this tutorial.
Google XML Sitemap Generator

Plugin URL
https://wordpress.org/plugins/google-sitemap-generator/
Plugin Description
The Google XML Sitemap Generator plugin generates an XML-Sitemap compliant sitemap of your WordPress site. This format is supported by all of the major search engines, including Google, Yahoo!, Bing and Ask.com.
With such a sitemap, it’s much easier for the crawlers to see the complete structure of your site and retrieve it more efficiently. The plugin supports all kinds of WordPress generated pages as well as custom URLs. Additionally, it notifies all major search engines every time you create a post about the new content.
Plugin Installation
Log into your WP-admin area, scroll down the sidebar menu and click on Plugins > Add New …

Select the Install Plugins > Search tab, then type in “google xml sitemaps” into the search field and click on the Search Plugins button …

Locate the plugin in the search results area and click Install Now …

Note: If you are not sure which plugin to select, make sure it’s the plugin developed by Arne Brachhold …

Once your plugin has been installed, make sure you activate it …

Plugin Configuration
After your plugin has been installed and activated, it’s time to configure it.
In your WP-admin sidebar menu, click on Settings > XML-Sitemap …

This brings you to the XML Sitemap Generator plugin settings configuration page …

When you first install the plugin, a message will inform you that your sitemap has not been generated yet, and gives you a link to click that will build your sitemap for the first time …

We recommend not clicking on this link until you have configured all other plugin settings and have already added some initial content to your site (see explanation notes further below).
Result Of The Last Build …
Once your sitemap has been built, you will get a message showing you the result of the sitemap build process …

This section lets you know when your sitemap was last built and whether or not the search engines were notified successfully.
If you change something on your server or your site and need to rebuild your sitemap manually, click on the rebuild the sitemap hyperlink …

Note: Sometimes the plugin will prompt you to rebuild the sitemap manually. See the ‘Additional Plugin Information’ section at the end of this tutorial if you get an error message as a result of missing sitemap files or wrong permission settings.
Basic Options
This section lets you configure the plugin’s Basic settings …

We recommend configuring this section as shown below:
Sitemap files
- Write a normal XML file (your filename) – Tick this checkbox. The plugin will then automatically create and upload this file to your server (see “Additional Plugin Information” section at the end of this tutorial if you experience any problems).
- Write a gzipped file (your filename +.gz) – Tick this checkbox. The plugin will then automatically create and upload this file to your server (see “Additional Plugin Information” section at the end of this tutorial if you experience any problems).
Building mode
- Rebuild sitemap if you change the content of your blog – Tick this checkbox if you want the plugin to rebuild your sitemap automatically every time your content is updated.
- Enable manual sitemap building via GET Request – This will allow you to refresh your sitemap if you are using an external tool to write into the WordPress database without using the WordPress API. Leave this checkbox unticked unless you have a reason to enable this option, or you know what you are doing.
Update notification
![]()
Only do this after all other plugin settings have been configured.
(See explanation below)
- Notify Google – Tick this checkbox to automatically notify Google when new content is added to your site.
- Notify Bing – Tick this checkbox to automatically notify Bing when new content is added to your site.
- Notify Ask.com – Tick this checkbox to automatically notify Ask.com when new content is added to your site.
We recommend leaving the “Notify …” check boxes above unchecked until you have verified that your sitemap has been set up correctly. This also prevents the plugin from notifying the search engines excessively about your site when all you are doing at this stage is adjusting settings and configurations for this plugin. Search engines usually treat excessive ‘pinging’ of the same site or pages as suspicious behavior, or an attempt to “SPAM” the search engines. Once your sitemap is set up correctly, come back and activate each of these “Notify …” options.
- Add sitemap URL to the virtual robots.txt file – Leave this unchecked if you have uploaded a robots.txt file to your server. If you have not uploaded a robots.txt file, then check this box.
To learn how to create a robots.txt file, see the tutorial below:
Advanced Options
We recommend leaving the default plugin settings for this section.
Below is an explanation of the ‘Advanced Options’ settings (source: Google Sitemaps FAQ):
- Limit the number of posts – If you have problems with the maximum execution time or memory limit you can limit the number of posts which will be included in the sitemap. Newer posts are included first so your sitemap will stay up-to-date.
- Increase the memory limit – Building the sitemap needs a lot of memory. If the memory size is limited via configuration and the script can’t finish the sitemap, you can try to increase this limit by entering a higher value. The values are in megabytes so you can start with “2M” for smaller sites and raise the number until it works. However, it could be that you don’t have the permission to change this value so if it still doesn’t work and you already tried a very high value like 16M, you will need to contact your web hosting company and ask them to raise it for you.
- Increase the maximum execution time – Like the memory, the maximum execution time can also be limited. If the script doesn’t finish, try to set the time limit to “0” which means unlimited or a high value like “30” seconds.
- Include a XSLT stylesheet – Since version 3.05b, the plugin ships a default XSLT stylesheet which makes your XML sitemap human readable. You can specify your own by entering a full or relative URL. Please note that the XSLT stylesheet must be on the same server for security reasons.
- Enable MySQL standard mode – Per default, the plugin uses a separate MySQL connection to query the post data in a very effective, memory-saving way. If this doesn’t work on your hosting configuration you can enable the MySQL Standard mode which uses much more memory but should always work.
- Build the sitemap in a background process – If your blog contains a large number of posts you may experience a delay after editing or saving a new post or page since it needs some time to generate the sitemap. If you activate this option, your sitemap will be built in the background using wp-cron which will avoid the delay. Your sitemap will be generated a few seconds after you’ve hit the save button so the sitemap status at the administration panel won’t show the changes immediately.
Additional Pages
Unless you are adding pages that are located outside of your WordPress blog installation in your XML Sitemap, leave this section as is.
If you have files or URLs that you would like to include in your sitemap which have not been added automatically (i.e. files that lie outside of your WordPress installation in another directory), then click on the ‘Add new page’ link at the bottom of this section …

A new section will display above the link, with fields for inputting the new page details. Refer to the instructions in this section if you need help with this step …

Post Priority
This section lets you specify the method used by the plugin to calculate the priority of each post …

We recommend selecting the ‘Do not use automatic priority calculation‘ option. Checking any other option in this section will make the search engines prioritize the importance of your posts based on the number of comments posted on your site.
If your site is new, or not heavily dominated by social interactivity, then there is little point in prioritizing the importance of your posts based on the weight of ‘comments’ left on your site.
Location Of Your Sitemap File
This section lets you specify the method used by the plugin to detect your sitemap …
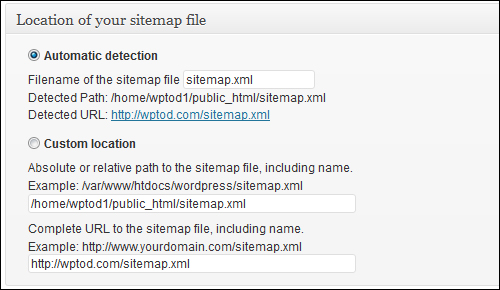
We recommend choosing ‘Automatic detection‘ if your sitemap was created by the plugin.
Verify that “sitemap.xml” is displayed in the ‘Filename of the sitemap file‘ field and that the plugin has detected and is displaying the correct path to your sitemap.
Note: If you move your sitemap to a different location, or you have a different sitemap you want the plugin to write to, then choose ‘Custom location’ and enter the location of your sitemap in the fields below the radio button for this option.
Sitemap Content
Your sitemap should include every page of your site that you would like search engines to index.
This section of the plugin settings lets you specify which areas of your site should be added by the plugin to your sitemap …
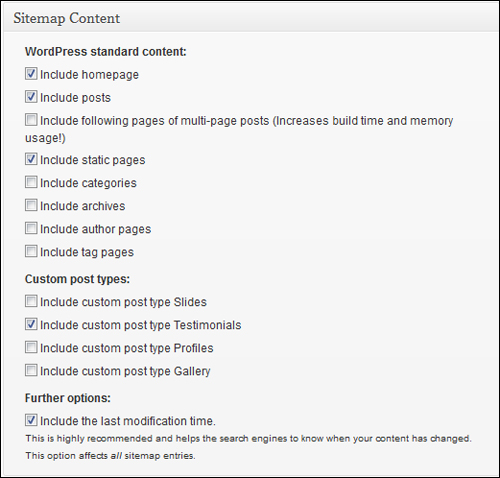
WordPress standard content:
Check the box next to each type of content that you would like to include in your sitemap.
We recommend including your homepage, posts and static pages in your sitemap.
Custom post types:
If there are any custom post types on your site that you would like to include in your sitemap, select these in this section.
Note: Depending on what other applications you have installed on your site, you may or may not see custom options displayed in this section.
Further options:
Check the box next to ‘Include the last modification time.‘
Leave the default settings for the remaining items in this section.
Excluded Items Section
This section lets you select items that you would like to exclude from your sitemap …
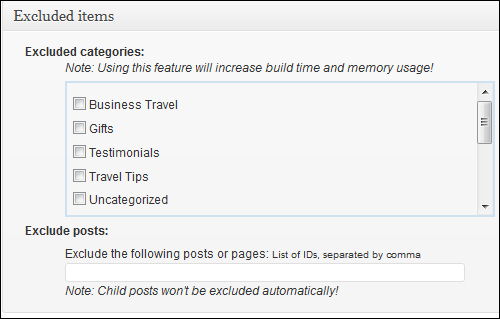
- Excluded categories: If you do not want certain categories to be added to your sitemap, then check the category boxes to be excluded, otherwise, leave this section as is …
- Exclude posts – Here you can enter the IDs of posts or pages which you do not want to include in your sitemap. Separate multiple IDs with a comma.

Note: Adding post or page IDs to the ‘Exclude posts:’ section does not automatically exclude ‘child’ pages from your sitemap. Child pages are pages that are nested inside other pages …

To learn how to find the IDs of your posts and pages, see the tutorial below:
Change Frequencies
This section lets you specify how often the content in your pages is likely to change. This helps search engines calculate how often their crawlers (spiders) should revisit your site to index new content on your site …

Set the frequency for each of the options in this section to match how often you expect content to change on your site …

Note: The settings you choose for each item in this section depend on how frequently new content gets added to your site. For example, if new posts are being added to your site every day, then select ‘daily’ for posts. If new posts are being added weekly, then select ‘weekly’ for posts.
There’s no point asking search engines to come crawling your pages if there is nothing new for them to find when they get there. Asking Google to come check your site more often won’t push your site up higher in the search engine results.
Priorities
This section lets you specify which elements of your sitemap should have a higher priority over others …
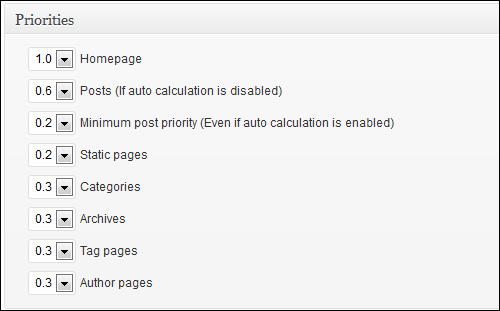
Leave the default plugin settings for this section, or specify a different priority value for each item depending on your preferences. ‘1.0’ is the highest priority value, and ‘0.0’ is the lowest …

Click Update options when finished …

As mentioned earlier in this tutorial, it’s best to wait until you have configured all of the above plugin settings, before building your sitemap for the first time.
If you have already created your sitemap, then click ‘rebuild the sitemap’ to update your sitemap with your new settings …
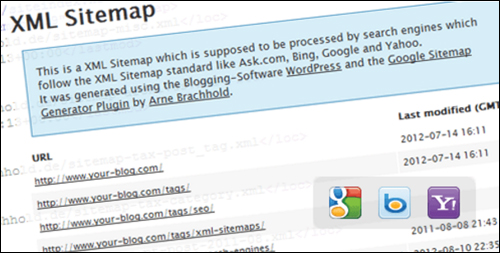
Once your sitemap has been rebuilt, verify your XML sitemap.
You can do this using a number of methods. Here are just some:
Scroll down to the Location of your sitemap file section and click on the link displaying your sitemap’s URL (or right-click on the link and select ‘Open Link in New Tab’ to stay inside your WP admin area) …

You can type in your XML sitemap’s URL into your browser (e.g. http://www.yoursite.com/sitemap.xml) …

If you have set up an HTML site map as per our tutorials, then you can view your sitemap by clicking on the “XML sitemap” link at the bottom of the page …

Once you have verified that your sitemap has been set up correctly, go back to Settings > XML-Sitemap and check each of the ‘Notify …‘ options in the ‘Basic Options > Update notification:’ section …

Click Update options button to re-save your settings. You will not need to rebuild your sitemap again this time, as the plugin will now automatically do this and notify the search engines the next time a post is published on your site …
If you want to restore the plugin’s default settings, then click on the Reset options button instead …

The Google XML Sitemap Generator plugin is now configured.
![]()
After configuring the Google XML Sitemap Generator plugin, the next step is to add your sitemap to your webmaster accounts …

To learn how to set up your webmaster accounts and add sitemaps to search engines, see the tutorial below:
Plugin Usage
There is no further action required from you after configuring this plugin. The Google XML Sitemap Generator plugin will now automatically rebuild your sitemap and notify search engines whenever new content is added to your site.
Additional Plugin Information
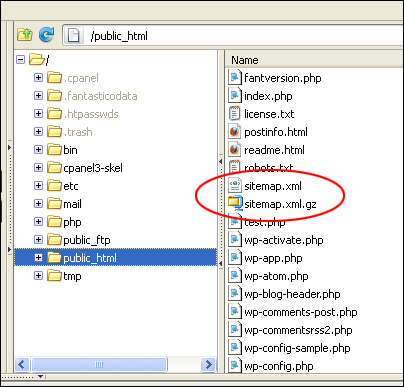
In order for the Google XML Sitemap Generator plugin to work correctly, the plugin requires two sitemap files to exist and be ‘writeable’ in your WordPress installation server directory:
- sitemap.xml
- sitemap.xml.gz
Normally, the plugin will create and automatically upload these files to your server when you first build your sitemap …

If you experience problems and the plugin is prevented from uploading these files to your server automatically (e.g. due to your server configuration), then you will need to manually upload and configure these sitemap files into the root directory of your WordPress installation.
![]()
To make things easier, we’ve created these files for you to download.
After downloading the zipped file containing both sitemap files, extract the contents to your hard drive, then upload both files to your WordPress installation root directory, using either FTP or cPanel …
Next, you will need to set permissions for both of the uploaded files.
Right click on sitemap.xml and scroll down to Properties …
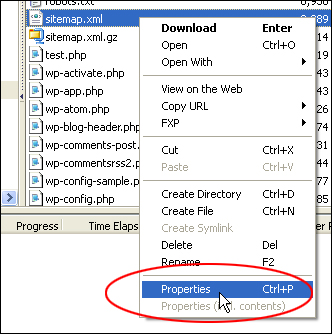
Set File Permissions to 755 and click OK to save. (Note: If you get an error message when configuring the plugin, try changing permissions to 777) …

To learn how to configure server file permissions, see the tutorial below:
Troubleshooting
If You Get Error Messages When Trying To Rebuild the Sitemap
If your sitemap rebuild fails, the cause will most likely be that permissions for those files have not been set correctly, or because these files are missing from your server.
If this happens, or if you ever need to create the blank sitemap files that the plugin needs to work correctly, then do the following:
Log into your web hosting account using cPanel …

Go to File Manager …

Make sure that you are in the main WordPress installation directory (you should see two sub-directories in the root directory of your WordPress installation: one called ‘wp-admin’ and another one called wp-content’) …

Click New File …

In the entry field, type sitemap.xml and click Create New File …

Repeat this process for the second sitemap file.
Type in sitemap.xml.gz in the entry field and click Create New File …

These two sitemap files should now be listed in your server folder …

Once you have created the two sitemap files above, select each of the files and click on Change Permissions to modify (CHMOD) the permission settings for these files …

Try setting permissions to “644” or “666” initially. Depending on your server configuration, if these values don’t work, you might want to try setting permissions as “755” or “777” …

Now go back to your plugin settings page and perform the rebuild manually …
If everything has been set up correctly, you will see a message like the one shown in the screenshot below …
If you need help with this plugin (e.g. troubleshooting errors), visit the plugin developer’s help and support page below:
***
"I was absolutely amazed at the scope and breadth of these tutorials! The most in-depth training I have ever received on any subject!" - Myke O'Neill, DailyGreenPost.com
***