
This tutorial is part of our WordPress configuration tutorial series, where we show you how to set up and configure your WordPress site or blog with no coding skills required.
***
After configuring your site’s Reading Settings, the next step is to configure your WordPress Discussion Settings.
One of the many things that make WordPress such a powerful content publishing and management tool is its ability to allow visitors and other users (including other website owners) to easily engage with your content.
The WordPress Discussion Settings allow you to control how visitors and other users engage with your content. You can control settings such as comments, pingbacks (pingbacks notify the author of an article if you link to their article on your site) and trackbacks (trackbacks notify another author that you wrote something related to what they had written on their blog, even if you don’t have an explicit link to their article on your site).
Pingbacks and trackbacks allow WordPress sites to interconnect. You can think of pingbacks and trackbacks as the equivalents of
According to WordPress,
“You can think of pingbacks and trackbacks as the equivalents of acknowledgements and references at the end of an academic paper, or a chapter in a textbook.”
(Source: WordPress.com)
Additionally, you can also control settings for the way your site sends you email notifications and decide if your site should display Avatars and their ratings.
In this step-by-step tutorial, you will learn how to configure your WordPress Discussion Settings.
Configuring WordPress Discussion Settings – Step-By-Step Tutorial
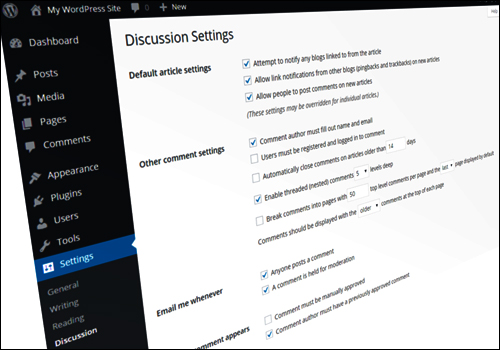
Choose Settings > Discussion in the navigation menu …

(Settings – Discussion)
This loads the ‘Discussion Settings’ page in your web browser …

(WordPress Discussion Settings)
![]()
This tutorial uses the default WordPress installation settings to configure your discussion settings. We recommend configuring your discussion settings and options to suit your own needs.
If you would like to encourage interaction on your site and allow visitors and users to post comments and initiate discussions or provide reciprocal acknowledgements to other websites using pingbacks and trackbacks, then enable these settings.
If you want to prevent people from leaving comments or disable notifications being sent from your site to other sites and vice-versa, then configure the settings in this section to suit your own needs.
Keep in mind the following:
- You can override the default article settings specified in this section for each individual post published on your site.
- If you want to encourage visitors commenting on your site, you can configure WordPress anti-spam plugins to help control “comment spam”.
![]()
If you want to set up your WordPress site quickly, then follow these steps:
- Complete the tutorial below to learn more about each of the options in the Discussion Settings section.
- Leave the default discussion settings as they are for now and continue configuring your site as per the tutorials in this module.
- Monitor your site for a while to observe and track what happens as your online presence expands, then come back to this section later and adjust the settings to suit your preferences.
Discussion Settings
The notes below have been adapted from the official WordPress Codex.
The WordPress Discussion Settings section allows you to configure settings and options related to comments and discussions on your posts. Site administrators can opt to allow comments to be left on posts, enable pingbacks and trackbacks and decide what constitutes comment spam.
The WordPress Discussion Settings screen also lets you control the criteria for receiving email notifications about certain events taking place on your site.
Default article settings
There are three options available in the ‘Default article settings’ section …

(Default article settings)
These options allow you to specify the default settings for all new posts or pages and can be overridden for individual articles.
Attempt to notify any blogs linked to from the article
This setting determines if your site or blog will send out pings and trackbacks to other blogs when you publish new posts. WordPress can send out a ping to another site or article you have linked to in your post. Your mention of their site or article will show up in the comment section of their site if the other site allows pingbacks. This notification occurs when you publish your article to the internet.
Note: An article with many hyperlinks to other sites can slow the posting process as WordPress has to contact all of the sites before the post is published.
Allow link notifications from other blogs (pingbacks and trackbacks)
This setting determines if your blog will accept pings and trackbacks from other blogs. WordPress can accept or decline pings from other sites which may reference your site or an article on your site. If this box is checked, pingbacks and trackbacks will appear in the comments section of your posts.
Allow people to post comments on new articles
This option allows you to enable or disable comments by default. Checking this box allows visitors to comment on your posts. This setting can be overridden for individual articles.
Uncheck this setting to prevent visitors from posting comments on your posts.
![]()
You can also control commenting by making a post private and requiring visitors to enter a password before a comment is allowed.
To learn more about making posts private and protecting content in WordPress, see the tutorial below:
Other comment settings

(Other comment settings)
Comment author must fill out name and e-mail
If you enable this option, anyone leaving a comment will be forced to leave a name and email address. If you uncheck this option, visitors can leave anonymous comments on your site.
This option can help to prevent or reduce comment spam on your site as it forces spammers to take additional steps to post comments on your site. Although WordPress does not verify the commenter’s name and e-mail address prior to the comment being submitted, most legitimate commenters are more than willing to fill out their name and e-mail address.
Users must be registered and logged in to comment
This option prevents unregistered users from posting comments on your site. If this box is checked, only logged in users will be allowed to leave comments. If you leave the box unchecked, any visitor can leave a comment.
Automatically close comments on articles older than [X] days
This setting gives you the option to close comments on posts that are “X” days old. For example, if you want to accept comments on new posts for 30 days only, then check the box and type “30” into the text field. After the number of days you have entered in this field has passed (e.g. 30 days), WordPress will automatically flag posts so that no more comments are accepted.
Enable threaded (nested) comments [X] levels deep
Checking this option allows visitors to reply to other inline/nested comments. Enabling this option can allow for better discussions and responses.
To enable threaded comments, check this box, then select the number of levels deep (maximum of 10 levels) that you will allow for nested comments from the drop down menu. We recommend using a maximum of 3 levels deep only, as choosing more levels than this may cause issues with your theme layouts.
Notes:
- Enabling this setting only applies to new comments since existing comments don’t have any threading dates. However, disabling this setting applies to all comments.
- Themes need to be specially coded to display threaded comments correctly.
Break comments into pages with [X] top level comments per page and the [last/first] page displayed by default. Comments should be displayed with the [older/newer] comments at the top of each page
This option allows you to display comments in a paginated format with the specified number of comments per page. You can also order pages to display from “first to last” or “last to first”, and to specify whether the oldest or newest comment displays first within each page.
If your posts or pages attract a lot of comments, you may want to split the comments into multiple pages. You can choose how many top level comments (nested comments are not counted and will not be split between two pages) to show for each page. You can also choose which page to show by default when a visitor first views the comments.
Email me whenever

(Email me whenever)
These settings control when authors and administrators receive notification that either a new comment has been made on your site or that a comment has been held for moderation.
Anyone posts a comment
If this box is checked, every comment posted on your site will generate an email to the author of that post. If your posts attract frequent comments, you may want to disable this option to avoid receiving too many notification emails.
A comment is held for moderation
If this box is checked, WordPress will hold comments for moderation and send you a notification email. The notification is sent to the e-mail address specified in the Administration > Settings > General Screen. This option is useful if your site has multiple authors and each author is given the authorization to allow or decline comments, as it allows the owner of the site to review what comments are being allowed or denied.
Before a comment appears

(Before a comment appears)
These settings provide a tighter degree of control over when and how comments are posted.
An administrator must always approve the comment
Selecting this option forces comments to be approved by an administrator or user with the proper authorization to approve comments, even if the comments appear to be spam. If this option is enabled, all comments will go into moderation and they will need to be approved by an administrator before appearing on the site.
Comment author must have a previously approved comment
If this box is checked, comments will only be posted if the email address of the author of the comment matches the address of a previously approved comment. If email addresses do not match, then the new comment will be held for moderation. If this option is enabled visitors that have had a past comment approved on your site will have their comments approved automatically and only comments from new visitors will go into moderation.
Note: You can blacklist comments from specific email addresses using the Local Spam Words Text Box to force comments to be held for moderation regardless of whitelist status (see below).
Comment Moderation

(Comment Moderation)
The Comment Moderation section lets you specify options to help you deal with Comment Spam.
Hold a comment in the queue if it contains [X] or more links (A common characteristic of comment spam is a large number of hyperlinks.)
A lot of spam comments include a large number of hyperlinks. Enter a number in this box to tell WordPress how many links you will allow to be posted in a comment before the comment is held for moderation. The default setting is “2” but you can make this higher or lower. If you set this to “0”, all comments will be held in moderation, which would be the same as checking An administrator must always approve the comment in the previous option settings.
When a comment contains any of these words in its content, name, URL, e-mail, or IP, it will be held in the moderation queue. One word or IP per line. It will match inside words, so “press” will match “WordPress”
The large text box in this section lets you enter your own list of “spam” words and characters to be filtered in any comments posted on your site. Type in one series of characters, word, or phrase per line. If one of those lines match something anywhere in the comment’s content, name, URL, e-mail, or IP, the comment will be held in the moderation queue. For example, adding the work “go” into a line in this box will hold any comments containing words like “Google”, “God” and “go” in the moderation queue. Essentially, if the letter “g” is followed by the letter “o” anywhere in the comment, it will be flagged as a match.
Note: A better option than entering an extensive list of spam words and phrases, is to use an AntiSpam plugin.
Comment Blacklist

(Discussion Settings – Comment Blacklist settings section)
When a comment contains any of these words in its content, name, URL, e-mail, or IP, it will be marked as spam. One word or IP per line. It will match inside words, so “press” will match “WordPress”.
This text box behaves in the same way as the “When a comment contains any of these words…” option above, the difference being that any comments containing the words you enter in the Comment Blacklist area will be deleted without warning. Exercise caution with this option, as genuine comments could end up being deleted.
Avatars

(WordPress Discussion Settings – Avatars settings)
This section allows you to enable the display of avatars for visitors who post comments on your blog. An avatar is an image (usually a picture of you) that follows you from blog to blog and displays next to your name when you comment on avatar-enabled sites. An avatar is an important part of your online representation of yourself, and can show up in places where you leave comments or forum posts.
![]()
WordPress uses Gravatars — short for Globally Recognized Avatars — as the default for pictures that show up next to comments. Some plugins may override this …

(WordPress Gravatar)
To learn more about setting up and using Gravatars in WordPress, see the tutorial below:
Avatar display
This section lets you turn avatars on or off for your site …

(WordPress Discussion Settings – Avatar Display settings section)
Show Avatars
Leaving the checkbox enabled displays comment author avatars along with the comments. Unchecking the box suppresses avatar display in comments.
Maximum Rating
The Maximum Rating setting is only used when a comment author’s Gravatar is displayed. To limit the maturity level of an avatar, specify the ‘highest’ level or rating of gravatar that you will allow to display on your site …

(WordPress Discussion Settings – Maximum Rating settings section)
- G — Suitable for all audiences
- PG — Possibly offensive, usually for audiences 13 and above
- R — Intended for adult audiences above 17
- X — Even more mature than above
Note: Gravatar ratings are set by users on their gravatar.com account.
To learn more about setting up and using Gravatars in WordPress, see the tutorial below:
Default Avatar
This option allows you to specify a generic or generated avatar for users without their own custom avatar …
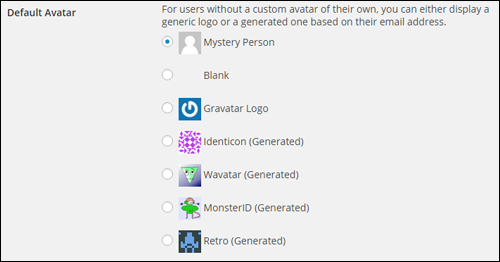
(Discussion Settings – Default Avatar settings)
You can pick a generic logo or a computer generated Avatar for users that don’t have their own custom avatar. If a user comments on your site but they don’t have an avatar or an email address associated with a Gravatar, then this is the avatar that will be displayed for the user’s interactions with your site.
Remember to click Save Changes when finished to save your settings …

(Save changes to update your settings)
Discussion Settings – Additional Notes
As mentioned earlier in this tutorial, some Discussion Settings options can be overwritten on an individual post. The Discussion meta box is used to turn the discussion options on/off for the post …

(WordPress Post Discussion Settings)
The Discussion meta box includes checkboxes for the following options:
- Allow comments on this post
- Allow trackbacks and pingbacks on this post
You can set the defaults for these checkboxes in the Discussion Settings area.
If you can’t see the Discussion meta box displayed in your posts screen, then click on the ‘Screen Options’ tab at the top of your Post editor screen and make sure that the checkbox next to the “Discussion” item is enabled …

(Turn on/off Discussion settings on your Post editor)
Note: If you are editing a previously published post, any comments made on the post will display below the Discussion meta box …

To learn how to edit your posts in WordPress, see the tutorial below:
To learn how to manage comments in WordPress, see the tutorial below:
Congratulations! Now you know how to configure your WordPress Discussion Settings. The next step is to configure your WordPress Media Settings.
Next Step: Configure Your WordPress Site: Media Settings
***
"This is an awesome training series. I have a pretty good understanding of WordPress already, but this is helping me to move somewhere from intermediate to advanced user!" - Kim Lednum
***