 This tutorial is part of our tutorial series on WordPress Security. In this tutorial, you will learn how to install, configure, and use the BulletProof Security plugin for WordPress.
***
WordPress Security Plugin – BulletProof Security
BulletProof Security

(BulletProof Security – WordPress Plugin)
Plugin URL
https://wordpress.org/extend/plugins/bulletproof-security
Plugin Description
BulletProof Security is designed to be a fast, simple and one-click security plugin that adds .htaccess website security protection for your WordPress site.
Some of the main features of this plugin include:
- Activate .htaccess website security and .htaccess website ‘under maintenance’ modes from within your WordPress Dashboard – No FTP or Web Hosting Control Panel access required.
- One-click security solution that creates, copies, renames, moves or writes to the provided BulletProof Security .htaccess master files.
- Protects both your root website folder and wp-admin folder with .htaccess website security protection, as well as providing additional website security protection.
- Protects your WordPress site against XSS, RFI, CRLF, CSRF, Base64, Code Injection and SQL Injection hacking attempts.
- Performs one-click essential operations (like create, copy, rename, move, write, etc.) to protect files such as wp-config.php, bb-config.php, php.ini, php5.ini, install.php and readme.html with .htaccess security protection.
- Allows you to activate .htaccess website security and .htaccess website “under maintenance modes” from within your WordPress Dashboard with no FTP required.
- Protects both your root website folder and wp-admin folder.
- One-click Website Maintenance Mode (HTTP 503) for the front and back end. Maintenance Mode also allows you to create and activate your custom “Under Maintenance” web page using various templates provided.
- Performs additional website security checks (e.g: DB errors off, file and folder permissions check, System Info: PHP, MySQL, OS, Server, Memory Usage, etc.)
- Automatic .htaccess file updating on upgrade installation and new .htaccess security filters automatically added during the upgrade.
- Security Status Page – Displays website security status information.
Best of all, you don’t need to know or understand anything about .htaccess website security files in order to use the BulletProof Security plugin. The plugin provides “AutoMagic” buttons that let you set everything up with nothing to configure or set up.
![]()
BulletProof Security also has a PRO version that offers significant additional security features, including:
- 1-Click Setup Wizard: Fast, Simple, One-Click Installation
- AutoRestore: Automatic File Restore
- Quarantine: Automatic File Quarantine
- Real-time File Monitor: Email & Dashboard Alerts
- Plugin Firewall (True IP Firewall): Protects the WP Plugins Folder, IP Address Updated in Real Time
- Uploads Anti-Exploit Guard (UAEG): Protects the WP Uploads Folder
- Login Security & Monitoring: Advanced Login Security & Monitoring
- JTC Anti-Spam / Anti-Hacker: Hacker Protection, Spammer Protection, DoS/DDoS Attack Protection, Brute Force Login Attack Protection, User-Friendly CAPTCHA
- .htaccess Website Security: Firewalls
- Custom php.ini Website Security
- F-Lock – Read Only File Locking
- Security Logging
- HTTP Error Logging
- PHP Error Logging
- Email Alerts
- Versatile Set of Pro-Tools
- and more …
To learn more about the PRO features of this plugin, visit the site below:
![]()
Remember to back up all files and data on your site before installing and configuring this plugin, as the plugin performs a number of modifications to important files on your site.
If you need help setting up this plugin, please ask a professional WordPress service provider for assistance.
To learn how to perform WordPress file and data backups, see the tutorials in the module below:
Plugin Installation
From your WordPress administration area, select Plugins > Add New …

Select the Install Plugins > Search tab, then type in “bulletproof” into the search field and click on the Search Plugins button …

Activate plugin after uploading, or locate the plugin in the search results area and click Install Now …

Activate the plugin after installing it …

When the BulletProof Security plugin is first activated, a warning message displays at the top of your admin screen …

See the ‘Plugin Configuration’ section below to learn how to complete the steps indicated in the warning message and configure your .htaccess file in security mode.
Once the plugin has been activated, click on Settings …

You can also access the plugin’s settings and options area by selecting BPS Security from your WP dashboard menu …

Plugin Configuration
The BulletProof Security configuration and settings area is divided into the following sections:
- htaccess Core
- Login Security
- Security Log
- Maintenance Mode
- System Info
Note: We’ll go over each of these sections briefly below, as the developers of BulletProof Security plugin already provide video tutorials on their site covering installation and setup, and a users forum where you can get help, support and further instructions on using some of the plugin’s more advanced features.
htaccess Core
Select ‘BPS Security > htaccess Core‘ from your WP-admin menu …

This section allows you to configure .htaccess file security options for your site …

Basically, BulletProof Security will take your default .htaccess file, which looks like this …

And modify the information by automatically adding security commands and instructions to your files like this …

This section includes a number of tabs …

We strongly recommend clicking on the ‘Read Me’ buttons before performing any kind of operation with this plugin …

The plugin modifies important files on your site and the ‘Read Me’ sections contain important information and additional instructions for getting help …

Security Modes Tab
If you have already backed up your site, then use the recommended options for your installation and click on ‘Create secure.htaccess file’ in the ‘Security Modes’ tab …

A message will pop up letting you know that clicking the ‘OK’ button will create the secure.htaccess file for your site, but it will not activate the file (this will be done in the next step below).
Click ‘OK’ to proceed …

Your security root master .htaccess file will be created …

![]()
We recommend making a backup of your WordPress .htaccess file at this point, especially if you have made any prior modifications to your .htaccess file. As .htaccess is a file located on your server, making backups of your WordPress database won’t back this file up (because it’s not in your database).
To backup your htaccess file, you will need to FTP into your server and download the file to your hard drive.
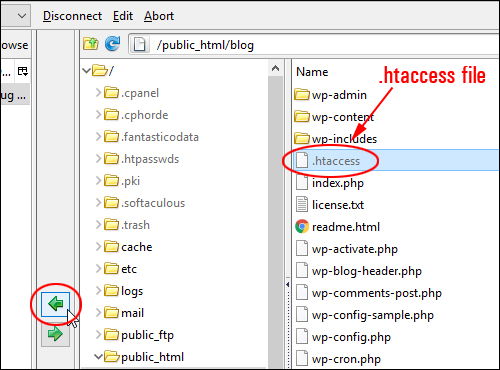
(Backup your .htaccess file)
The next step is to activate BulletProof mode for your root folder by selecting the ‘Root Folder BulletProof Mode’ radio button in the ‘Activate Security Modes’ section and clicking the ‘Activate’ button …

A message will appear asking you to confirm if you have created the master .htaccess files using the ‘AutoMagic’ buttons, and if you have taken steps to back up your existing .htaccess files (this is especially important if you have made any custom modifications to your .htaccess file). The message will also remind you that you will overwrite your existing root .htaccess file by clicking the OK button.
Click ‘OK’ to proceed or ‘Cancel’ to abort …

A message will display on your screen confirming that your site’s root folder protection has been successfully activated, and reminding you that if you have root folder security activated, you will also need to activate wp-admin folder security protection …

To activate wp-admin folder security protection, scroll down the ‘Activate Security Modes’ screen until you come to the ‘Activate Website wp-admin Folder .htaccess Security Mode’ section, then select the ‘wp-admin Folder BulletProof Mode’ radio button and click the ‘Activate’ button …

A message will display on your screen confirming that BulletProff Security wp-admin Folder Protection has been activated and that your wp-admin folder is now protected …

The other security options in the ‘Activate Security Modes’ section are automatically set up when you activate the plugin itself:
Activate Deny All htaccess Folder Protection For The BPS Master htaccess Folder
Activating BulletProof Mode for Deny All htaccess Folder Protection copies and renames the deny-all.htaccess file located in the /plugins/bulletproof-security/admin/htaccess/ folder and renames it to just .htaccess. The Deny All htaccess file blocks everyone, except for you, from accessing and viewing the BPS Master htaccess files.
Activate Deny All htaccess Folder Protection For The BPS Backup Folder
Activating BulletProof Mode for Deny All BPS Backup Folder Protection copies and renames the deny-all.htaccess file located in the /bulletproof-security/admin/htaccess/ folder to the BPS Backup folder /wp-content/bps-backup and renames it to just .htaccess. The Deny All htaccess file blocks everyone, except for you, from accessing and viewing your backed up htaccess files.
If your server does not allow these options to be automatically created and activated, then you will need to manually activate these yourself by selecting the radio buttons and clicking ‘Activate’ …

Security Status
After configuring the plugin’s .htaccess file security modes, click on the Security Status tab to view your security and protection status …

This section shows the status of your activated BulletProof Security .htaccess files, file and folder permissions, additional security measures that the plugin has implemented on your site (you can reset and recheck these), and general security file check results.
We recommend going through the accompanying ‘Read Me’ notes for each of these sections for more information on what the data means and further instructions.
Backup & Restore Tab
Use this section to create and restore backups of your .htaccess files …

The first time you install the plugin, you may see warnings in this section about your .htaccess files …

Select the ‘Backup .htaccess Files’ radio button and click ‘Backup Files’ …

BulletProof Security will create backups of your .htaccess files and notify you that these files now exist and have been backed up successfully …

You can also use this section to restore your last .htaccess file backups.
Notes:
- The backup can be restored should the .htaccess file become corrupted as a result of a hacking attempt.
- In cases where you install a plugin that writes to your htaccess files you will want to perform another backup of your htaccess files. Each time you perform a backup you are overwriting older backed up htaccess files.
htaccess File Editor Tab
This section lets you lock/unlock files for editing and modify the content of your htaccess files without having to access these via FTP or your webhosting control panel …

Notes:
- The File Editor is designed to open all of your .htaccess files simultaneously and allow you to copy and paste from one window (file) to another window (file), but you can only save your edits for one file at a time. Whichever file you currently have opened (the tab that you are currently viewing) when you click the ‘Update File’ button is the file that will be updated / saved.
- Keeping the .htaccess file locked prevents anyone writing to it. Unlocking it lets you edit the code directly. You can edit the files directly through the plugin edit interface in this section.
Custom Code Tab
This section lets you add custom code to your .htaccess files …

![]()
Important: Before adding any custom codes to your .htaccess files, please go through the ‘Read Me’ notes, watch the video tutorials and visit the BulletProof Security Forum. If you don’t know what you are doing, then ask a professional to help you, as entering the wrong information in this section could crash your site!
Help & FAQ Tab
This section provides links to help and resources …

The other tabs in this section are used for providing plugin users with additional information and marketing-related information.
Login Security
To access the plugin’s ‘Login Security’ section, select ‘BPS Security > Login Security‘ from your WP-admin menu …

This section lets you configure settings that will help to protect your WordPress site from brute-force attacks …

You can specify the maximum number of login attempts, lockout times, set alerts and notifications and configure a number of additional login security and monitoring options in this section.
If you make any changes to the settings in this section, remember to click on the ‘Save Options’ buttons and the ‘Submit’ button when finished to update and save your new settings …

For more information on protecting your WordPress site from brute-force attacks, see the tutorial below:
Security Log
To access the plugin’s ‘Security Log’ section, select ‘BPS Security > Security Log‘ from your WP-admin menu …

This section lets you view logs of all blocked attempts by hackers, spammers, scrapers, bots, etc., specify settings for sending email alerts, add exceptions, and set the maximum database size for keeping and purging stored log data …

Notes:
- Beware of using the Security Log error logging feature as the error log will continually fill up and create a very large file, which can cause your server to crash. We recommend using this feature only to diagnose security issues.
- View the ‘Help & FAQ’ tab and click on the ‘Read Me’ buttons for additional information related to this section of the plugin.
- Remember to click on the ‘Save Options’ buttons if you make any changes to the settings in this section, and click on the ‘Update File’ button at the bottom of the screen when finished to update and save your new settings.
Maintenance Mode
BulletProof Security views “maintenance mode” web pages as part of WordPress security, as these can be compromised by hackers and give access to the WP-admin area if not properly secured.
For this reason, BulletProof Security incorporates a complete Maintenance Mode feature within the plugin itself.
To access the plugin’s ‘Maintenance Mode’ section, select ‘BPS Security > Maintenance Mode‘ from your WP-admin menu …

The BulletProof Maintenance Mode feature:
- Includes various background and center images (text box image),
- Allows you to embed image files and YouTube videos,
- Offers ‘FrontEnd’ Maintenance Mode, ‘BackEnd’ Maintenance Mode or both FrontEnd & BackEnd Maintenance Modes,
- Is fast and simple to use so that you can switch in and out of Maintenance mode quickly and easily.

For instructions on how to set up a maintenance mode page using the BulletProof Maintenance Mode feature, see ‘Plugin Usage’ section below.
System Info
To access the plugin’s ‘System Info’ section, select ‘BPS Security > System Info‘ from your WP-admin menu …

This section provides detailed information about your system, SQL database, and PHP server, and lets you check your website headers …

Note: System info data can be used to analyze security risks.
Plugin Usage
Once the BulletProof Security plugin has been installed and configured, there is really nothing else to do as far as securing and protecting your site is concerned. The plugin will block attempts by hackers and notify you of these as specified in the plugin settings and options.
One of the features of this plugin that is worth learning how to use is the BulletProof Maintenance Mode feature.
Maintenance Mode
To set ‘Maintenance Mode’ for your website on and off, select ‘BPS Security > Maintenance Mode‘ from your WP-admin menu …
If you want to display a countdown timer letting your visitors know how long your site is going to be down for, then tick the ‘Enable Countdown Timer’ checkbox, and specify a maintenance mode duration (in minutes), in the ‘Maintenance Mode Time’ and ‘Header Retry-After’ fields as shown in the screenshot below …

You can also choose a color for your countdown timer from the ‘Countdown Timer text Color’ drop-down menu …

Next, decide whether you want to enable FrontEnd maintenance, BackEnd maintenance, or both FrontEnd and BackEnd maintenance modes …

- FrontEnd Maintenance Mode means that your website Maintenance Mode page displays to website visitors instead of your website.
- BackEnd Maintenance Mode refers to allowing access to the WordPress Administration area (back-end).
![]()
Important: If you plan to enable BackEnd maintenance mode for your site, you must enter your IP address into the ‘Maintenance Mode IP Address Whitelist Text Box’, or you will be locked out of your own site!
***
Below the FrontEnd/BackEnd activation options, is the editor section where you can add the Maintenance Mode “message” that you want your visitors to see when maintenance mode is activated.

You can add text, images, styling options and even videos to your Maintenance Mode Text Box. For more details, make sure to click on the link to the plugin’s ‘Maintenance Mode Guide’ …

You can add background and center images, or a background color to your Maintenance Mode message box …

BulletProof Maintenance Mode lets you select your background and box image options from drop-down menus …

Background image files/options and center images (text box image) are independent of each other, so you can mix and match different background images with different center images (text box image), and even different countdown timer colors …

After selecting your Maintenance Mode page design options, the next step is to specify some additional options …

By selecting/deselecting the checkboxes, you can decide whether or not to:
- Display your visitor’s IP address
- Display Admin/Login Link (this allows the administrator to log in from the home page)
- Display a dashboard reminder notice when your site is in Maintenance Mode.
Below are some examples of dashboard reminder notices.
When FrontEnd Maintenance Mode only is turned “on”, this reminder notice displays …

In the example below, both FrontEnd and BackEnd Maintenance Modes are turned “on” …

- Send email reminders when Maintenance Mode countdown timers have completed. This is useful for reminding you, your webmaster, or a staff member assigned to managing your site to turn off Maintenance Mode and reactivate your site to visitors …

After configuring all of the Maintenance Mode options, click on the ‘Save Options’ button …

You will be asked to confirm. Click ‘OK’ to proceed …

A confirmation message informing you that your Maintenance Mode form has been created successfully will display on your screen …

You can now preview your form by clicking on the ‘Preview’ button …

Your form will open up in a new browser window …

Repeat the save and preview process to configure your form options until you are happy with the design for your Maintenance Mode page …

Once you are happy with your choices, click on the ‘Turn On’ button to activate this feature and put your site in Maintenance Mode …

A message will display informing you that Maintenance Mode has been turned on for your site …

Log out of your site and check how your Maintenance Mode page looks …

The plugin remembers your settings, so you can turn Maintenance Mode on or off anytime you like simply by clicking on the ‘Turn On’ and ‘Turn Off’ buttons …

Remember to turn Maintenance Mode “off” to make your site visible again to visitors …

![]()
BulletProof security offers a convenient way to put your WordPress site into maintenance mode by integrating the Maintenance Mode feature with its Security application.
If you find the BulletProof Maintenance Mode options limited, however, there are other options.
To learn more about putting your WordPress site into Maintenance Mode, see the tutorial below:
Uninstalling BulletProof Security
When you configured the BulletProof Security plugin as shown in earlier steps above, you will remember that the plugin modified important .htaccess files on your site.
If you decide to remove the BulletProof Security plugin from your site, you must first restore these files to their original default before deactivating and deleting the plugin.
To restore your original .htaccess files, select ‘BPS Security > htaccess Core‘ from your WP-admin menu …
Scroll down to the ‘Activate Security Modes’ section, then select the ‘Default Mode WP Default htaccess file’ radio button and click ‘Activate’ …

The plugin will restore the original htaccess file for your site …

You are not quite done yet … just one more step!
Next, select ‘Delete wp-admin htaccess File’ radio button and click on ‘Activate’ …

You should now see messages displayed at the top of your screen informing you that your site is no longer protected by BulletProof Security …

You can now safely deactivate and/or remove the BulletProof Security plugin from your site.
Congratulations! Now you know how to protect and secure your WordPress site with the BulletProof Security plugin.
For more details, go here}:

(Source: BulletProof Security Website)
***
"This is AMAZING! I had learnt about how to use WordPress previously, but this covers absolutely everything and more!! Incredible value! Thank you!" - Monique, Warrior Forum
***