How To Create Email Accounts In cPanel
 This tutorial is part of our WordPress installation tutorial series, where we show you how to install a WordPress site or blog on your own domain name with no coding skills required.
***
In this tutorial, you will learn how to set up an email account for your domain name (e.g. yourname@yourdomain.com), and how to forward emails from your domain name to another email address.
You will need to have a domain name and webhosting account with cPanel already set up for this tutorial.
![]()
If you need help in this area, see the following tutorials:
- How to register a domain name
- How to set up webhosting for your WordPress site
- Subdomains, addon domains, and parked domains
In addition to the detailed step-by-step tutorials in the WordPress installation training module, we also recommend watching the video tutorials listed in the WordPress Installation Video Tutorials section.
![]()
As you work through this tutorial, keep in mind that cPanel may look different than the screenshots below depending on the version, theme, and your webhosting environment. All features, however, should work as described below.
Log into your cPanel account …

Go to the Mail section and click on “Email Accounts” …

The Email Accounts window opens up in your browser. From here you will be able to manage all of your email account functions for your domain.

To create a new email associated with your domain, enter the following information into the Email Accounts fields as shown below:
- Email: Enter only the prefix here (i.e. the part before the “@”) – e.g. “info“, “support“, “sales“, “bob“, “mary_smith“, etc.
- Password: Enter your password here.
- Password (again): Confirm your password.
- Strength: Enter a “Very Strong” password here for security reasons.
- Mailbox Quota: Depend on your hosting setup, you may be able to increase the allocated size of your mailbox.
Click Save when finished to create your new email account.

As mentioned above, you should aim to create a very strong password to any prevent security issues with your email. cPanel offers a Password Generator feature (see “4” in the above screenshot). We recommend using this feature to create secure passwords.

![]()
If you’re looking for an online password generator, check out these video tutorials: Using Password Managers
Once your email account has been created, it will be listed under the Account @ Domain section.

The Domain @ Account section provides access to information about your email account and a number of email management functions, including:
- Your email address(es): This area will list all of the email addresses you set up for your domain. Emails listed in this section can be set up as separate POP3 email accounts in your email client (e.g. MS Outlook), or forwarded to other email addresses (see tutorial section below on “How To Set Up Email Forwarding In cPanel”)
- Change Password feature: Change your email password here.
- Change Quota: Increase or decrease your allotted mailbox space (depending on your server and account settings).
- Delete: Click Delete to delete any email addresses you no longer need or use.
- More: This section lets you access additional functions associated with your email address (e.g. webmail).
You can add as many email addresses to your domain name as your webhosting account will allow you to use (e.g. 1, 5, 15, unlimited, etc.). We recommend adding email prefixes for your staff and departments, e.g. “info“, “support“, “sales“, “bob“, “mary_smith“, etc.

Business Tip: Even if you are just a one-person operation (e.g. a work-from-home blogger), we recommend setting up emails for all of the separate departments you can envision your business expanding to later. Doing this at the early stages of your business can be useful later on. For example, forwarding emails coming to a particular email address you have already established throughout your site, business cards, stationery, etc … (e.g. info@, sales@, support@, etc.) to a staff member or outsourced service provider.
When you are done creating email addresses, click ‘Home’ at the top of the screen to return to the main cPanel admin section.

How To Set Up Email Forwarding In cPanel
If you would like to have emails from any of the email accounts you have created forwarded to an existing email address (either yours or someone else’s), then here’s how to do it.
In the Mail section of your cPanel admin area, click on Forwarders.

Click Add Forwarders to set up an email forwarding account.

Enter the prefix of the email you want to forward in Address to Forward: (1) and the destination email address in the Forward to email address: field (2). Click the Add Forwarder button when finished to save your settings.

All email sent to this address will now be forwarded to the destination email address you have specified in your Forwarder account.

- If you no longer need emails to be forwarded to another email address, you can cancel any accounts you have set up by going back into the ‘Forwarders’ section and clicking the Delete link associated with the email account you no longer want forwarding to be applied to.
- In addition to forwarding individual mail accounts, you can also forward all email from one domain to another using the Domain Forwarder feature in this section. You can also access the Default Address page if you want all emails sent to any unspecified email addresses on your domain to be sent to a particular destination, or to a “black hole”.

![]()
Here’s a useful tip for setting up email addresses …
Tip: Use Department Contact Email Addresses
Imagine that your business employs someone to run your digital marketing. For this example, let’s call this person Natasha and give her a business email address (e.g. natasha@yourbusiness.com).
In the course of doing her job, Natasha purchases many plugins, tools and services, and sets up accounts online on behalf of your business using her email address.

One day, Natasha decides to leave your business.
What happens to all the accounts that have been set up using her email address now she is no longer part of your business?
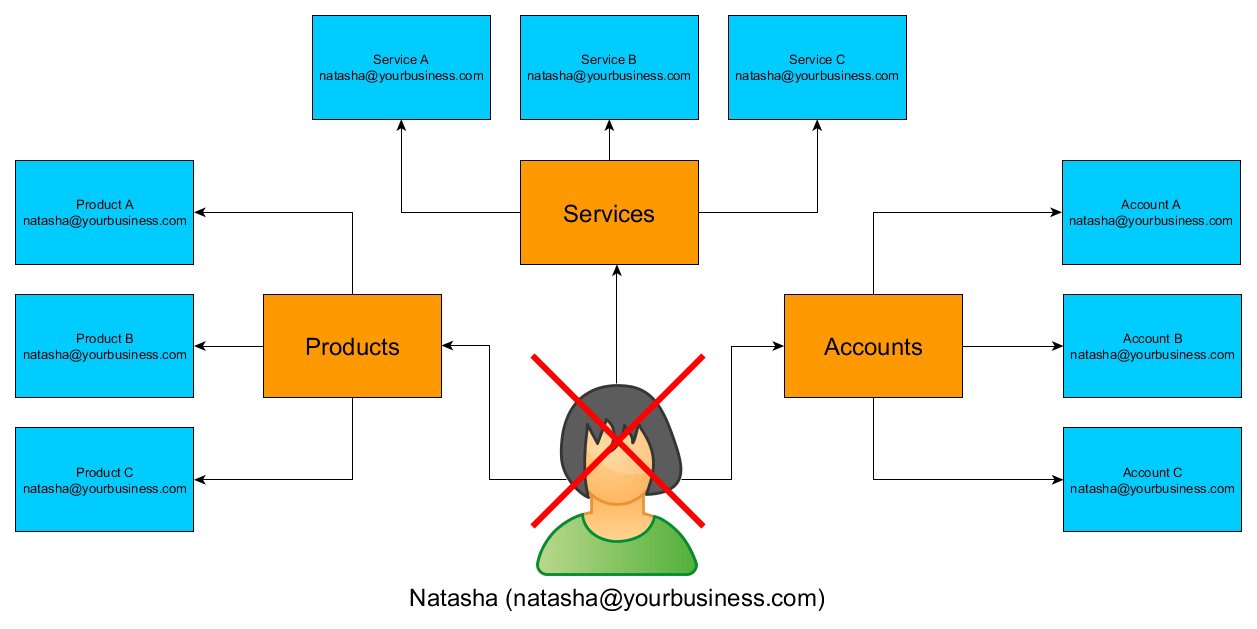
Here’s how to prevent this from happening:
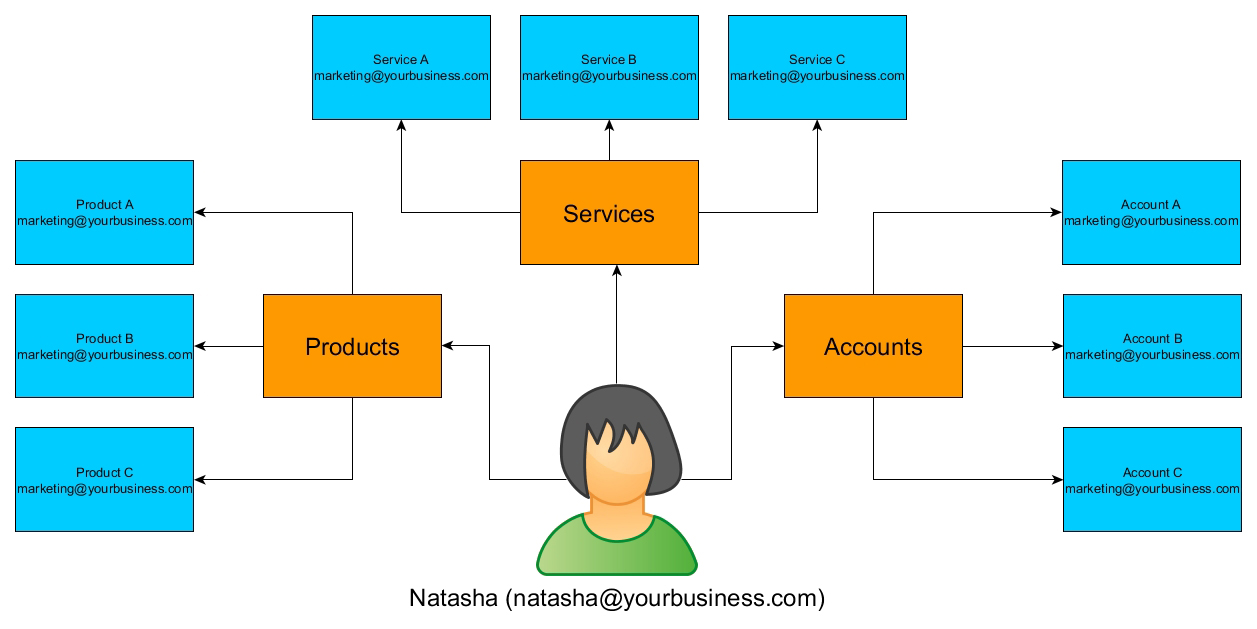
First, set up email addresses for your ‘departments’.
For example:
- marketing@yourbusiness.com
- accounts@yourbusiness.com
- operations@yourbusiness.com
- support@yourbusiness.com
- customercare@yourbusiness.com
- etc.
Next, set up email forwarding accounts for each of these departments, so that emails sent to these addresses will be forwarded to staff and team members responsible for working in these roles.
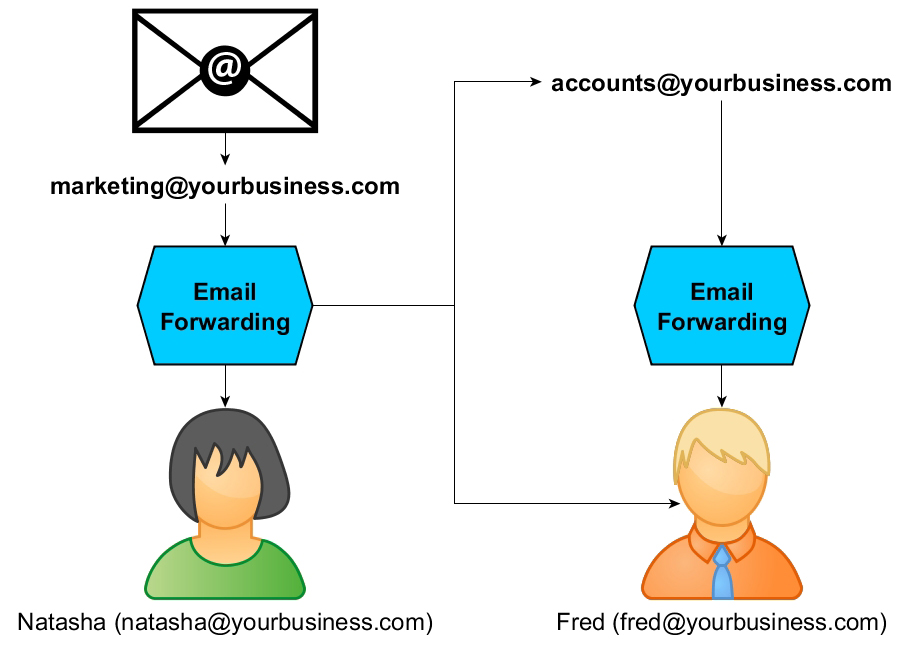
So, in our example, emails sent to marketing@yourbusiness.com would be forwarded to natasha@yourbusiness.com.

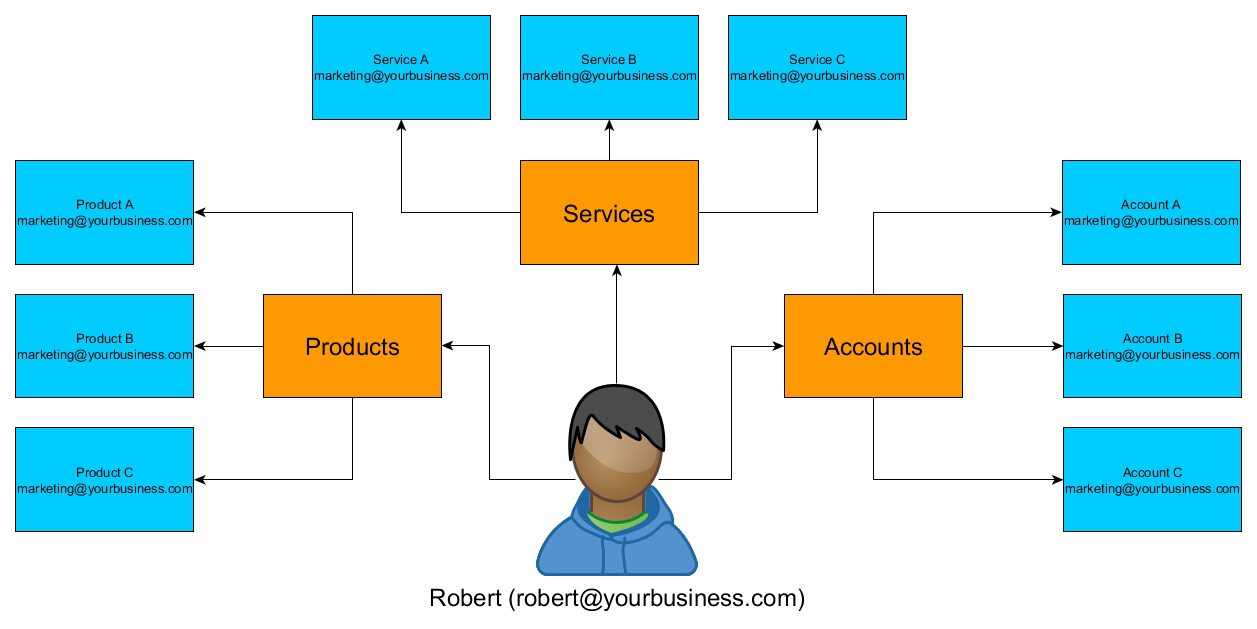
You would then instruct Natasha to make purchases and set up accounts on behalf of the business using the marketing@yourbusiness.com email address instead of her email address.
This way, if Natasha decides to leave your business, you can just change your email forwarding address to the person who takes over her role without having to search everywhere for obsolete email addresses you will need to replace as the contact email.
Another benefit of setting things up this way, is that you can include other email addresses in your email forwarding setup. For example, you may also want your accounts department to be notified of all purchases made by staff members (i.e. include accounts@yourbusiness.com or your account manager’s email) …
If you set up email addresses for departments and use these emails to make purchases or set up accounts online, then you’ll never have to worry about updating contact records if a staff or team member leaves.
Hosting your WordPress site on a server with cPanel installed lets you easily set up emails and email forwarding and puts you in control of your digital processes.
Congratulations! Now you know how to set up an email address using cPanel.

(Source: Pixabay)
Select one of the options below to continue …
Learn Where To Install WordPress
I Already Have A Google Account
Back To WordPress Installation Tutorials Index
***
"This is AMAZING! I had learnt about how to use WordPress previously, but this covers absolutely everything and more!! Incredible value! Thank you!" - Monique, Warrior Forum
***