 This tutorial is part of our WordPress installation and WordPress management step-by-step tutorials, where we show you how to install and manage your WordPress website or blog with no coding skills required.
***
If you own a website, it’s inevitable that at some stage you will need to transfer files from your computer to your server. This includes uploading or downloading images, media files (e.g. videos and audios), PDF documents, zipped files, even WordPress themes or plugins.
In this tutorial, we show you how to transfer data between your computer and your server.
![]()
In addition to the written step-by-step tutorials in the WordPress installation module, we also suggest watching the videos listed in our WordPress Installation Video Tutorials section.
***
How To Transfer Data Between Your Computer And Your Web Server
This section covers 3 methods for transferring data between your computer and your web server:
- How to set up a Browser-based FTP client,
- How to set up a Desktop FTP client,
- How to use cPanel’s File Manager to upload and download files between your computer and your web server.
![]()
We recommend doing a backup of your WordPress site (files and data) before modifying any files. If you don’t want to back up your site manually, then get professional support services, or use WordPress backup plugins.
Learn about a great WordPress backup plugin that can automate your backup process here:
FTP (File Transfer Protocol)
This section explains how to set up both a browser-based FTP application to transfer files between your computer and your server using an internet browser interface and a desktop-based FTP application to transfer files directly from your computer or laptop.
Data Transfer Using A Browser-Based FTP Client
If you use the Firefox Web browser, you can use the FireFTP browser add-on.
FireFTP is an excellent free browser-based FTP client that allows you to transfer files from your hard drive to your hosting server using the Firefox web browser interface. You will need to install Firefox to use this add-on.
Setting Up FireFTP – Step-By-Step Tutorial
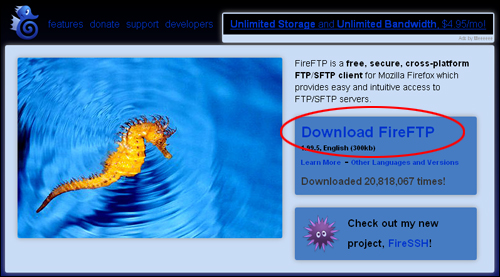
Download the FireFTP add-on for Firefox browsers here: FireFTP
(FireFTP Firefox FTP add-on)
FireFTP will automatically be added to the functionality of your Firefox browser.
To launch FireFTP, open your Firefox browser and select Tools > Web Developer > FireFTP …
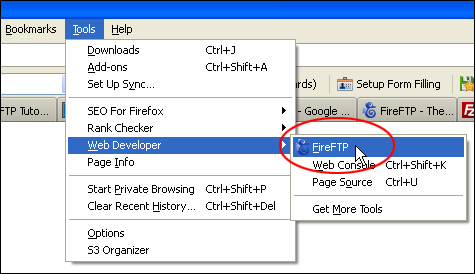
(Launching FireFox)
The application interface will open inside your browser …
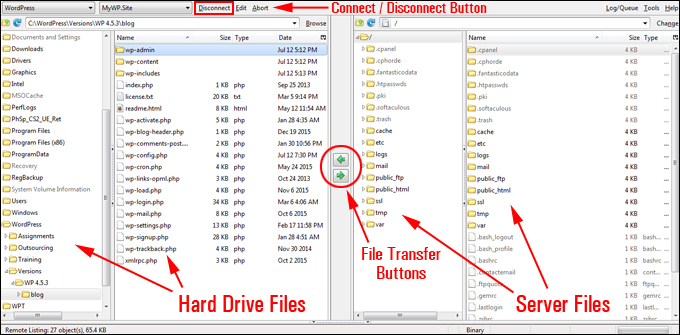
(FireFTP Panel)
Your computer files are shown on the left side of the FireFTP interface. After you connect to your server, the remote host computer folders show up on the right side of the FireFTP window. You can perform all your file transfer operations within this screen.
If this is your first time using the application, you will need to set up an account in FireFTP to be able to log into your server and start transferring files.
Make sure you have following information readily available:
- Web server login and password for your domain.
- FTP address for your domain (e.g. ftp.mydomain.com)
If you don’t have the above details, you’ll need to get them from your hosting provider. These are normally provided to you by your host when you set up your web hosting account.
Click ‘Create an account’ …

(Creating an account in FireFTP)
Fill in the account name, category, host address, login and password …
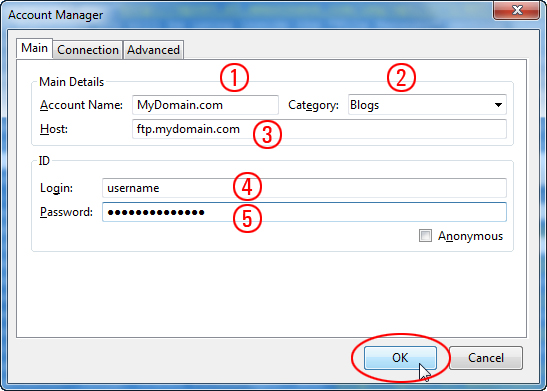
(FireFTP – Account Manager)
(1) Account Name: You can name your account anything you like, as this is for your personal reference only. We recommend using your domain name as the account name, especially if you host multiple domain names on your server.
(2) You can specify a category for your domain. This feature is useful if you manage a large number of domains and need to keep them organized by category.
(3) Host: Enter your host address here (e.g. ftp.mydomain.com)
(4) Login: Enter your FTP login username in this field.
(5) Password: Enter your FTP password here.
After you have entered all of your details in the Account Manager window, click ‘Ok’ to create your account and save your login settings.
To check that you have set up your account correctly, connect to your server by clicking on the ‘Connect’ button …

(Connecting to your server)
If you are already connected, the button will say Disconnect. Click on ‘Disconnect’ when you’re done transferring files to close the connection with your server …

(Disconnecting from your server)
To upload files from your computer to your server, make sure that you are connected to your remote host computer, then navigate through the folders in your remote host location until you find the destination folder you would like to upload your computer files into.
To drill down into your server’s folders, either select the folder on the folder directories views section to reveal the contents of that folder, or double click on a folder inside the folder contents view section …
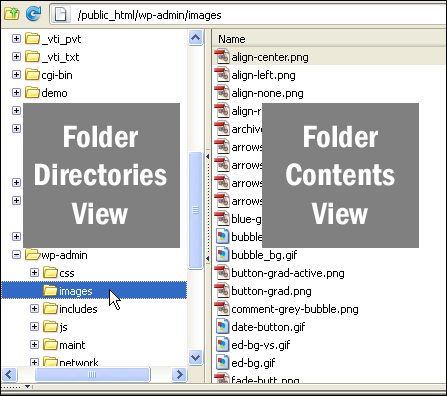
(Viewing folders and files on your server)
![]()
Many servers commonly place all content files associated with your website inside a folder called “public_html” which resides at the root directory level of your server …
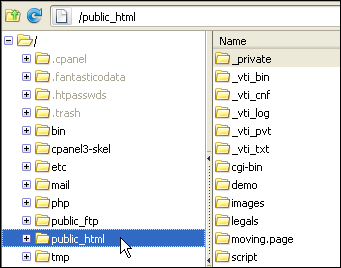
(public_html folder)
Locate the file(s) you want to upload. To select one or more files use either the Shift key (selects a group of adjacent files), or hold down the Control key and select files you want to upload by clicking on each file individually.
Click the ‘Upload’ button to begin transferring files from your computer to your server …
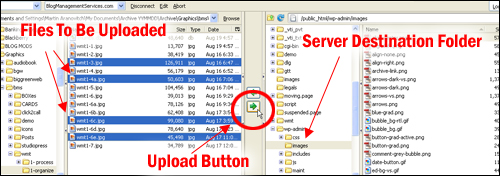
(Uploading files to your server)
If your file was uploaded successfully, you will see it displayed on the right-hand side of the window (in the server destination folder).
![]()
Sometimes, files will not upload if you have exceeded your server space quota on the host site. If you experience difficulty uploading files, this may be the reason.
If you need additional assistance using FireFTP, go here:
To learn how to make files writable on your server using FTP, see this tutorial:
Setting Up A Desktop FTP Client – How To FTP Files To Your Server Using Filezilla
Filezilla is a popular free FTP application. It is open source software distributed free of charge under the terms of the GNU General Public License.
You can download Filezilla for free here: http://filezilla-project.org/
![]()
Make sure you download the client version of Filezilla, not the server version …
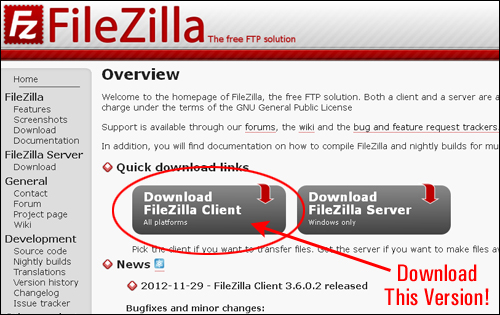
(Filezilla – Free FTP software)
Transferring files using a desktop FTP application like Filezilla is similar to using a browser-based FTP client or other commercial desktop FTP applications (see previous section) …
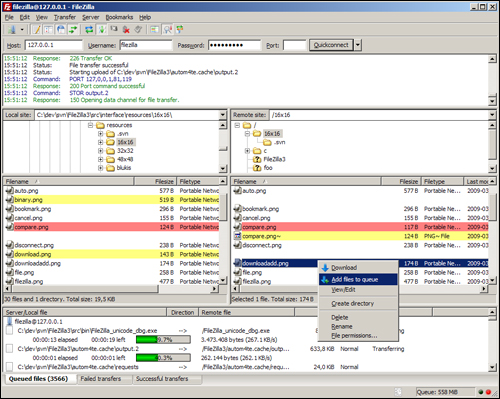
(Filezilla interface)
![]()
We recommend watching the video tutorials below to learn how to use Filezilla:
File Transfer Using cPanel
cPanel is a server administration program that offers an alternative to FTP for uploading files to your web server.
If you are not hosting your site on a server that uses cPanel, we recommend that you consider doing so.
For help on choosing a webhosting provider, see this tutorial:
Here are some reasons why you may want to use cPanel to upload and download files to your server and local computer instead of using FTP:
- Sometimes it can be faster to upload/download files using cPanel than using FTP.
- cPanel makes it easy to upload zipped files and then extract all of the files to a directory inside your server.
- cPanel makes it easy to zip and download compressed files to your computer.
- If you experience difficulties uploading files using FTP (e.g. connection keeps interrupting), you can try doing it through cPanel.file
Transferring Data using cPanel’s File Manager: Step-By-Step Tutorial
In this tutorial, you will learn about cPanel’s File Manager feature for uploading files from your computer or external hard drive to your web server. We’ll also go through a step-by-step example on how to upload and extract a zipped file.
Log into cPanel …
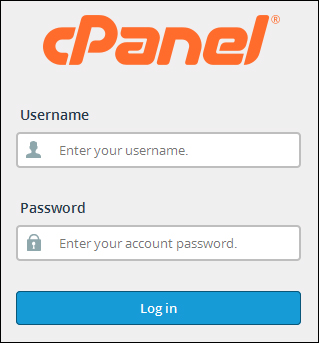
(cPanel login)
File Manager is located in the ‘Files’ panel of your cPanel administration screen. Click on the File Manager icon …
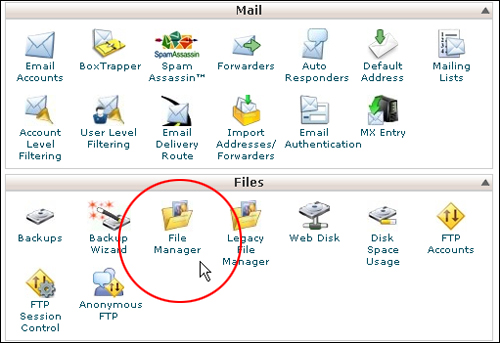
(cPanel: Files – File Manager)
Your server files will be visible inside the ‘File Manager’ section …
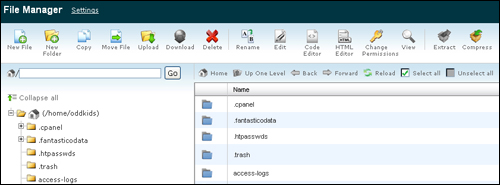
(File Manager screen)
Some of the main functions you will be using inside File Manager when performing your WordPress site maintenance and updates are:
Move File – allows you to select files and move them into another directory. This feature is useful when performing manual WordPress updates.
Upload – allows you to upload files directly to your server. This feature is useful when performing manual WordPress updates, restoring blog data, or reinstalling WordPress.
Download – allows you to download files from your server to your local machine. This feature is useful when performing manual WordPress backups.
Delete – allows you to delete selected folders and files on your server.
Extract – allows you to unzip files inside your server directories. This feature is useful when performing manual WordPress updates, restoring blog data, or reinstalling a WordPress site.
Compress – allows you to zip (compress) folders inside your server directories. This feature is useful when performing WordPress updates, restoring blog files, or reinstalling WordPress.
Directory Navigation Menu Buttons – Useful navigation functions inside the File Manager area include Up One Level, Reload, Select All, and Unselect All.
Using File Manager To Upload And Extract Zipped Files
In this example, we’ll show you how to upload and extract a zipped plugin file to your server.
First, make sure that you have your zipped file ready for upload …
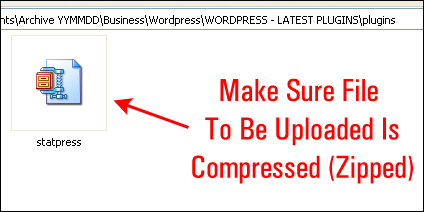
(Zipped file ready to be uploaded to server)
Next, log into cPanel and open up the File Manager panel …
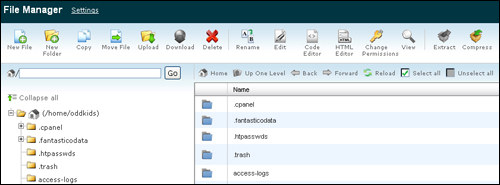
(cPanel – File Manager)
You can drill down folder hierarchies to access nested folders and files by double-clicking on the upper directory folders …
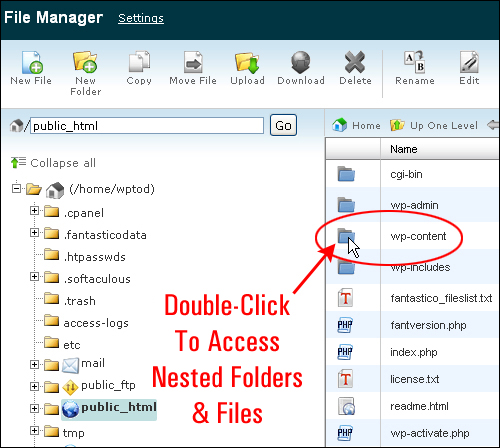
(Double-click folders to access nested folders and files)
Locate the folder on your server where you will be uploading your file into and click Upload. In the screenshot below, we will be uploading a zipped plugin file into the plugins folder section of your WordPress installation …
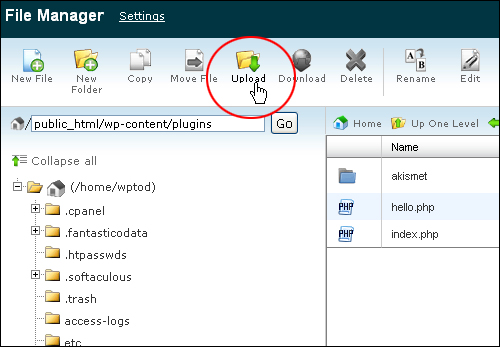
(File manager – Upload button)
A new screen called ‘Upload files’ will open up in your web browser. Click the ‘Browse’ button as shown below to locate and select the zipped file you prepared earlier …
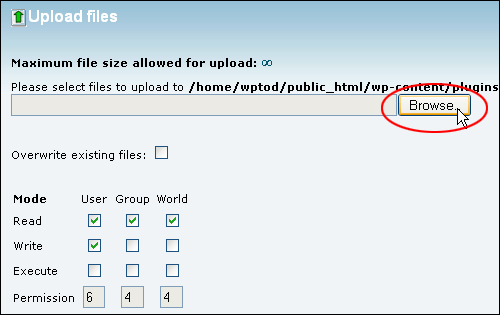
(Upload files – Browse files)
Select your file and click ‘Open’ to begin uploading the file to your server …
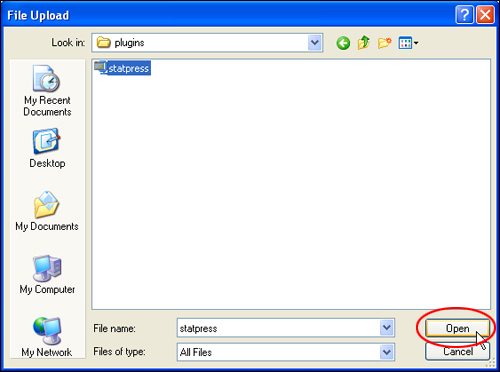
(Upload your file to your server)
Wait until your file has finished uploading, then close the ‘Upload files’ screen to return to the main ‘File Manager’ screen …

(Wait until your files have uploaded …)
Click on ‘Reload’ to refresh the screen …

(File manager – Reload button)
After your zipped file has been uploaded [1], click on the ‘Extract’ button to decompress (unzip) your file [2] …
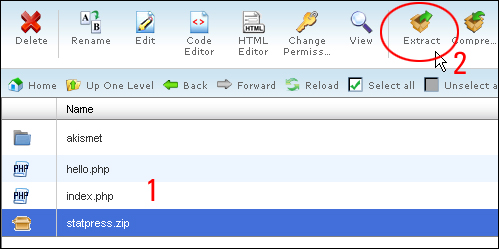
(File Manager – extracting zipped files)
A pop-up window will appear asking you to confirm the location where your files will be extracted to. Click Extract File(s) to continue …
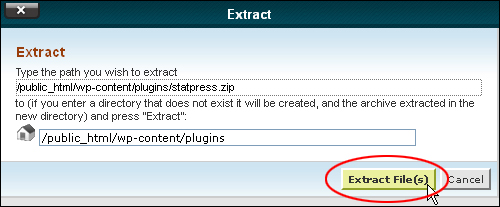
(Extracting your files)
The ‘Extraction Results’ window appears after all of your files have finished extracting. Click Close to return to the File Manager screen …
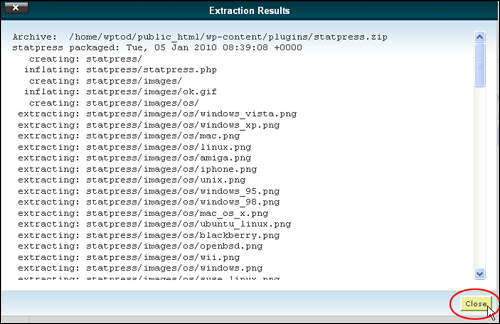
(Extraction Results window)
Click Reload to refresh your screen …
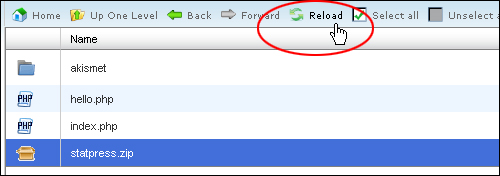 Your newly uploaded zip file will be extracted to your server …
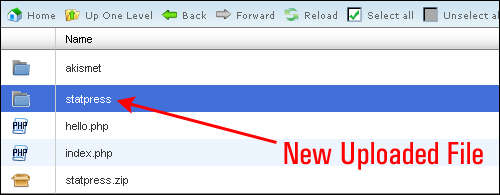
(Your newly uploaded file – extracted and ready for use!)
You can delete the original zip file from your server to save space and keep your folder free of unnecessary clutter …
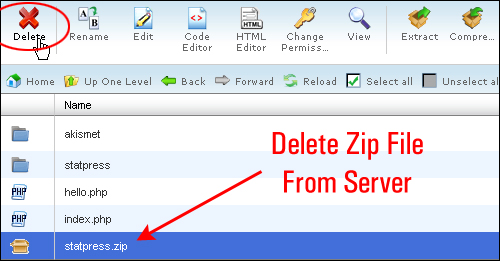
(Delete zip file from your server to save space)
The above method for uploading files to your server is useful. Large files that normally take a long time to upload via FTP can upload in seconds or just a few minutes when transferred using cPanel’s File Manager.
You can also use this method if you ever experience problems using the auto update features of WordPress (e.g. auto updating plugins) described below.
WordPress Auto Updates
WordPress has a built-in feature that automatically transfers data like new software updates, plugins and themes from the main WordPress repository (WordPress.org) to the WordPress installation files in your server. It also automatically uploads, extracts and places all data directly into the correct folders inside your web server and database.
The ability to perform updates directly inside your WordPress dashboard is extremely convenient, but it may not always work in your particular server environment. Even WordPress acknowledges this. As stated in the official WordPress documentation …
“If the one-click upgrade doesn’t work for you, don’t panic, just try a manual update.”
(Source: WordPress Codex – Updating WordPress)
As you will learn in other tutorials, the WordPress auto updating feature is useful for transferring files from your server when:
- Updating WordPress via the dashboard
- Uploading and installing WordPress plugins
- Updating WordPress plugins
- Uploading and installing WordPress themes
- Updating WordPress themes
Additional Tutorials
If you run into issues configuring file permission settings on your server, please complete the tutorial below:
Congratulations! Now you know three different methods to transfer files from your computer to your server:
- Transferring files using a web browser based add-on like FireFTP.
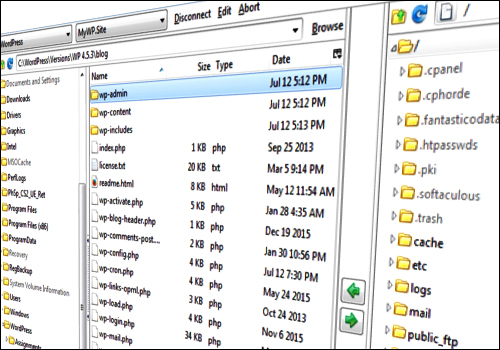
- Transferring files using a desktop FTP application like Filezilla.
- Transferring files to your server using cPanel’s File Manager.
***
"I love the way your email series "Infinite Web Content Creation Training Series" is documented and presented. It is very absorbing and captivating. The links and tutorials are interesting and educational. This has motivated me to rewrite my content following the concepts I am learning from the email series." - Mani Raju, www.fortuneinewaste.com
***

