 This tutorial is part of our WordPress Management tutorial series. In this tutorial, you will learn how to update your WordPress installation manually using FTP.
***
How To Update WordPress Manually Using FTP
Some web hosting environments or configuration settings can create problems for the WordPress auto-update feature.
If you cannot use the WordPress Auto Update feature, you can upgrade WordPress manually using FTP.
![]()
Note: We recommend using this method to upgrade your WordPress version if you do not host your WordPress site on a server with cPanel.
Updating WordPress Manually (FTP) – Step By Step Tutorials
WordPress automatically notifies you inside your administration area when a new update is available …

(WordPress Update Available)
You can also check which version of WordPress you are using and what the latest version of WordPress is from your WordPress dashboard …

(WordPress Update Required)
Downloading The Latest WordPress Version
Download the latest WordPress installation upgrade files. This can be done either by visiting WordPress.org and clicking on the “Download” tab …

(Download The Latest WordPress Version From WordPress.org)
… or from within your WordPress administration dashboard by clicking on the ‘Update to X.X‘ button …

… and choosing the download option …

(Download WordPress Files For Manual Installation)
![]()
Always backup your WordPress site, including your database and files before updating WordPress. This way you will be able to restore your site if anything goes wrong!
Learn about a great WordPress backup plugin that can fully automate your site backups here:
![]()
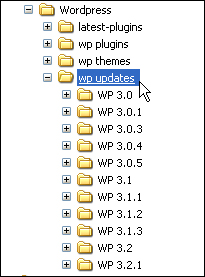
Organization Tip: We recommend creating a folder for your WordPress downloads (e.g. wp updates), and a new folder inside that one for each new version you download (e.g. “WP 4.5.3”). This will help you stay organized in case you ever need to revert to a previous version of WordPress.
To learn more about creating an organized system for performing WordPress maintenance, see the tutorial below:
Save your downloaded WordPress zip file to your hard drive:
After the zip file containing the updated WordPress files has finished downloading, extract (unzip) the file …

Open the unzipped folder and delete the ‘wp-content’ folder inside …

![]()
Deleting the ‘wp-content’ folder ensures that your plugin or theme settings won’t be overwritten during the update process.
After deleting the “wp-content” folder from the file, compress (zip) the folder again …

The latest version of WordPress is now ready to be uploaded to your site.

To upload your WordPress files using FTP, use the uncompressed modified version of the upgrade file you have downloaded into your WordPress downloads folder.
Note: This method takes a little longer than the cPanel method (explained in a separate tutorial) because each file needs to be uploaded individually to your server. In the cPanel method, you upload just one zip file containing all of the upgrade files and then extract the file directly inside the server, replacing the old version files.
Uploading WordPress Files Manually Using FTP
Launch your FTP application, and locate the folder containing your WordPress upgrade files …
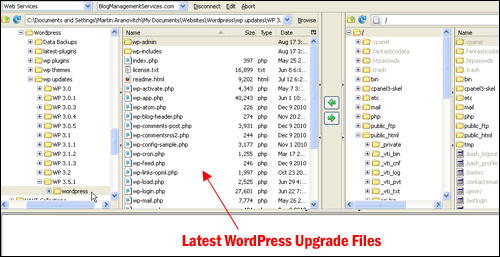
Make sure you have also selected the correct destination folder in your server to upload your files to. Your files need to be uploaded into the directory where your existing WordPress installation is located (i.e. the root directory or a subfolder) …

Also, make sure that you select the ‘Auto’ method of transfer or its equivalent in your FTP software before you begin transferring files …

Select all the files in your WordPress upgrade folder and click the “upload” button to begin uploading files to your server …
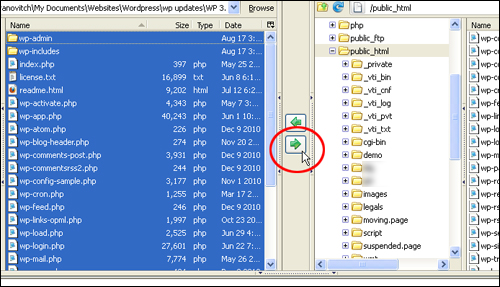
A dialog box will pop up asking you to confirm that you want to overwrite existing files in the destination folder. Select ‘Overwrite All’ to continue …

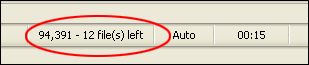
Your files will be uploaded from your hard drive to your server, replacing the existing files in your destination folder …
After all of your files have uploaded, log out of your FTP application and log back into your WordPress admin area …
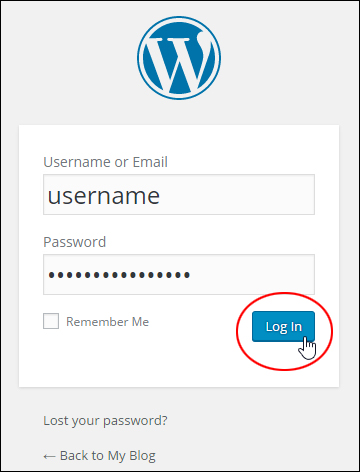
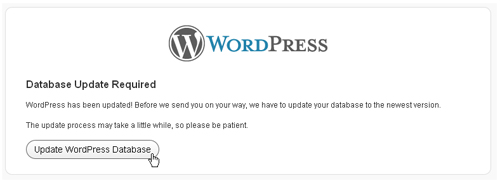
![]()
You may be greeted by a message informing you that a Database update is required. If this message pops up on your screen, click on the Update WordPress Database button to update your WordPress database …
You will be notified if the update is successful with another message window. Click on ‘Continue’ to proceed …

You will be taken to your WordPress dashboard …

(Your Site’s Current WordPress Version)
Your WordPress upgrade installation has been successfully completed.
Congratulations! Now you know how to update your WordPress installation manually using FTP.
See Also …
- How To Update WordPress Automatically From Your WordPress Dashboard
- How To Update WordPress Manually Using cPanel
Next Step:
Now that you know how to update and maintain your WordPress installation software, the next step is to learn how to update and manage your WordPress plugins.
To learn more about updating and managing your WordPress plugins, see the tutorial below:

(Source: Shutterstock)
***
"I am beyond impressed with what you have put together. I can tell that you put a ton of hard work into building what you have. You have the absolute best content on WordPress I have ever seen!" - Robert T. Jillie
***