 This tutorial is part of our WordPress Management tutorial series. In this step-by-step tutorial, you will learn how to install WordPress plugins manually.
To learn how to install your plugins automatically using the WordPress built-in update feature, see the tutorial below:
***
How To Install WordPress Plugins Manually
If you cannot install plugins automatically (or don’t want to install plugins automatically), then complete the step-by-step tutorial below to learn how to install WordPress plugins manually.
How To Install WordPress Plugins Manually – Step-By-Step Tutorial
To install a WordPress plugin manually, make sure that the plugin has been downloaded to your computer or storage device.
For example, if you are installing a plugin from the WordPress Plugin Directory …

Find the plugin you want to install and click on the plugin’s “Download” button …

Save your plugin to your computer hard drive or storage device …

We recommend keeping all of your WordPress files (versions, plugins, themes, etc…) organized in a “WordPress” folder on your hard drive …

To learn more about creating an organized system for performing WordPress maintenance, see the tutorial below:
Once your plugin has been downloaded to your computer, unzip (extract) the file …

After downloading and extracting the plugin, you should have two plugin files … an unzipped file (1) and the original compressed file that you downloaded (2) …

We will now show you two methods you can use to upload WordPress plugin files manually to your server:
- How to upload the uncompressed (unzipped) folder to your server’s WordPress plugins directory using FTP
- How to upload the compressed (zipped) folder to your server’s WordPress plugins directory using cPanel File Manager
Let’s go through both methods now …
Method 1 – Uploading Your Plugin Files Via FTP
Launch your FTP client (if you need help with FTP, see this tutorial) …

Locate the folder on your hard drive containing the extracted (unzipped) plugin folder (1).
Next, drill down through the folders in your server directory window until you come to the ‘plugins’ folder (2). Typically, the path to the ‘plugins’ folder in most WordPress installations is either “/public_html/wp-content/plugins” (if WordPress is installed in the root or main directory), or “/public_html/subfolder/wp-content/plugins” (if WordPress is installed in a subfolder, e.g. “blog”)
Click the upload button (3) to begin transferring the plugin files from your computer to your server.
Note: Make sure that you select the ‘Auto’ method of transfer or its equivalent in your FTP software before you begin transferring files (unless you have been specifically instructed by the plugin developer to upload files using a different mode) …

After your files have uploaded to your server, you should see the new plugin displayed inside the wp-content > plugins folder directory …

After all of your files have been uploaded, close your FTP application and log into your WordPress administration area …

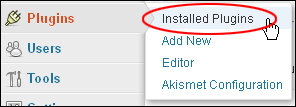
Navigate to your ‘Plugins’ screen by clicking on Plugins > Installed Plugins …
 If you were previously logged in, refresh the page to view the results of your installation. If you have performed your plugin installation successfully, you will see the new plugin displayed in the Plugins list …

Click Activate to begin using your new plugin.
Your plugin installation has been successfully completed.
Repeat the above process to install new plugins.
Method 2 – Using cPanel File Manager To Upload And Extract Zipped Files
Uploading plugins using the cPanel method can be a lot faster than using the FTP method show earlier.
To upload and extract a zipped plugin file to your server using cPanel’s File Manager, first, make sure that you have your zipped file ready for upload …

Next, log into cPanel and open up the File Manager panel …

You can drill down folder hierarchies by double-clicking on the upper directory folders …

Locate the folder on your server where you will be uploading your file into and click Upload. In the screenshot below, we will be uploading your zipped plugin file into the ‘plugins’ folder section of your WordPress installation …

A new screen called Upload files will open on your browser. Click the Browse button as shown below to locate and select the zipped file you prepared earlier …

Select the file and click Open to begin uploading the file to your server …

Wait until your file has finished uploading, then close the Upload files screen to return to the main File Manager screen …

Click on Reload to refresh the screen …

Your zipped file has been uploaded (1). Click on Extract to decompress (unzip) your file (2) …

A pop-up window will appear asking you to confirm the location where your files will be extracted to. Click Extract File(s) to continue …

The Extraction Results window appears when all of your files have finished being extracted. Click Close to return to the File Manager screen …

Click Reload to refresh your screen …

Your new plugin file is now uploaded to your server …

![]()
Note: If you are updating existing plugins, all files from the previous plugin version will be overwritten after the new files have been extracted.
Delete the original zip file from your server to save space and keep your folder free of unnecessary clutter …

Log out of your cPanel admin area if you have finished updating your plugins.
Log into your WordPress admin area …

Navigate to your ‘Plugins’ screen by clicking on Plugins > Installed Plugins …

If you were previously logged in, refresh the page to view the results of your installation. If you have performed your plugin installation successfully, you will see the new plugin displayed in the Plugins list …

Click Activate to begin using your new plugin. Your plugin installation has been successfully completed.
Repeat the above process to install new plugins.
Congratulations! Now you know how to install WordPress plugins manually.
Additional WordPress Plugin Management Tutorials
In addition to the above, see all the following tutorials:
To learn how to use and install WordPress plugins from your WordPress dashboard, see the tutorial below:
To learn how to update and delete WordPress plugins automatically from your WordPress dashboard, see the tutorial below:
To learn how to update and delete WordPress plugins automatically from your WordPress dashboard, see the tutorial below:
![]()
We recommend completing all of the above tutorials before continuing to the next section.
Next Step:
After learning how to upgrade and manage your WordPress plugins, the next step is to learn how to manage your WordPress themes.
To learn how to set up an offsite data backup storage system, see the tutorial below:

(Source: Pixabay)
***
"I was absolutely amazed at the scope and breadth of these tutorials! The most in-depth training I have ever received on any subject!" - Myke O'Neill, DailyGreenPost.com
***

