
Wouldn’t it be great if after adding a new post to your WordPress website or blog, the following took place … just from your page address:
- Potential visitors could easily understand what your page is about,
- Google would find your pages faster,
- Every content item on your site would have its own unique ID, making things easier to manage.
Well, this is what permalinks let you do!
How To Set Up And Use WordPress Permalinks
Permalinks – Definition
Permalinks are the permanent URLs to your individual posts, categories and other taxonomies (a way to organize things together) like archives.
A permalink is the URL that people and search engines will use to link to your posts or sections of your site or the links you send in emails pointing to content items on your website. Some people also refer to permalinks as “pretty” URLs.
Permalinks make the web address pointing to each post on your site permanent, hence a permalink.
Permalinks – Why Use Them?
As you have probably heard by now, WordPress is one of the best Content Management Systems available when it comes to publishing search engines optimized content.
WordPress is not only well optimized straight out of the box, but the SEO aspect can be easily enhanced using SEO plugins.
If you are looking to optimize the SEO aspect of your website, then you should not ignore the importance of its URLs. Google places considerable weight on the structure of your site’s URLs when indexing pages.
Permalinks are used to make the links on your site into “search engine friendly” URLs. Permalinks can also improve the usability, aesthetics, and forward-compatibility of your links.
Now … let’s turn our attention to the reason why you may need to use permalinks in WordPress.
By default, a WordPress installation uses a non-search engine friendly URL-naming structure for your posts that looks like this …
 The above link structure is used by WordPress to find data inside your database. It does not mean much to anyone, and it doesn’t help your website with on-site search engine optimization.
As you can see from the image below, many WordPress users are still using default settings when publishing their content …

Although Google is still indexing the above sites, the owners of these sites are potentially missing out on extra SEO benefits.
To get the best SEO benefit from using WordPress and improve your site’s rankings, you should configure your permalinks structure to make it more search engine-friendly by displaying relevant keywords in your URL, instead of meaningless characters.
WordPress allows you to create a custom URL structure for your published and archived posts, so your content can easily go from this …

To something with an SEO-friendly URL like this …

In this step-by-step tutorial, you will learn how to set up your WordPress permalinks to display posts with search engine-friendly URLs instead of the out-of-the-box linking structure and help every new post you publish automatically get better indexing results in Google.
Configuring WordPress Permalinks
From your WP admin menu, click on Settings > Permalinks …

This brings up the Permalink Settings screen …

As mentioned earlier, by default WordPress web URLs use characters like question marks and numbers to create unique Post Ids and URLs. We want to create search engine friendly URLs instead for our posts. To do this, we will need to specify a different Permalink structure than the default.
Permalinks - Common Settings
In the Common Settings section, select Custom Structure, then add one or more ‘tags’ (see below) to create SEO-friendly URLs …

(Set up your permalink settings to create search engine-friendly URLs)
If you use the custom permalink structure shown in the example above, your URL would look something like this:
http://www.mytravelsite.com/cruise-deals/how-to-save-money-on-cruise-travel
Instead of this …
http://www.mytravelsite.com/?p=3861

(Using post name permalinks helps visitors and search engines understand what the post is about)
WordPress Permalink Tags
“Pretty” URLs, or search engine-friendly URLs, are created by adding one or more ‘tags’ in the Custom Structure field:
- %year% – The year your post is published, four digits (e.g. ‘2011’)
- %monthnum% – The month the post gets published (e.g. ‘02’)
- %day% – Day of the month (e.g. ‘26’)
- %hour% – Hour of the day (e.g. ‘12’)
- %minute% – Minute of the hour (e.g. ‘31’)
- %second% – The exact second your post gets published (e.g. ‘47’)
- %post_id% – The unique ID # of your post (e.g. ‘6808’)
- %postname% – A correctly formatted version of your post title. For example, if your post title is ”It Ain’t Worth Doin’ No More!”, the postname tag will convert this into “it-aint-worth-doin-no-more” (all characters converted to lower case and exclamation symbols removed) in the URL. Tip: You can always edit the URL wording in the post slug field on the Add/Edit Post/Page screens.
- %category% – A correctly formatted version of the category name. Nested sub-categories appear as nested directories in the URI (Uniform Resource Identifier – the string of characters used in the URL). Tip: You can edit this text in the category slug field in the New/Edit Category screens.
- %author% – A sanitized version of the author name.
Note: When using multiple tags, separate each tag using a ‘/’ (forward slash), or hyphen.
For a quick setup, choose the Custom Structure option, and enter the code below into the ‘Custom Structure’ field …

Or, use one of the following structures:

![]()
Tip: If you want search engine friendly URLs for your posts, but don’t want to use a custom permalink structure using tags, then choose Common Settings > Post name instead …

Choosing ‘Post name’ is the same as adding the /%postname%/ tag in the ‘Custom Structure’ option.
Permalinks – Optional Settings

If you need to set up custom permalinks for your category and tag archive pages here is where you would do this.
This changes the ‘base’ tag or category URLs using the following syntax:
- domain.com/category_base/category_name
- domain.com/tag_base/tag_name
For example, using “travel” as your category base will make your category links display as ‘http://domain.com/travel/uncategorized/’.
So, if you enter the following in your permalinks Optional > Category base settings section …
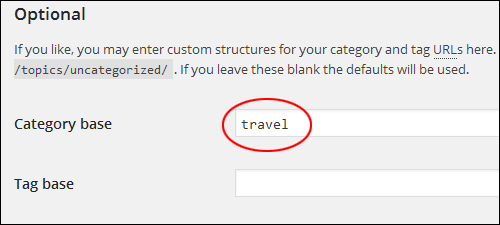
Your ‘category archives’ page URL will change from looking like this …
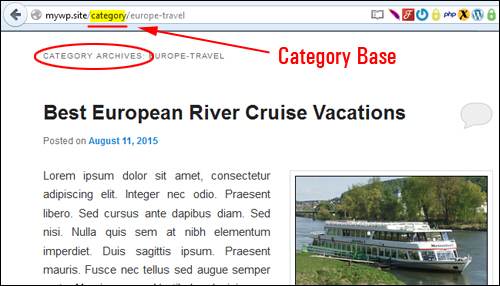
To something like this …

If you leave the optional settings fields blank the defaults will be used.
Remember to save any changes after you are done …

Permalinks – Useful Tips
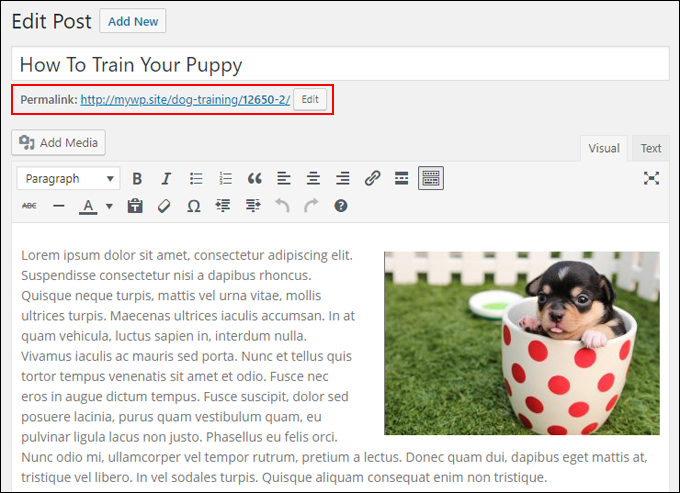
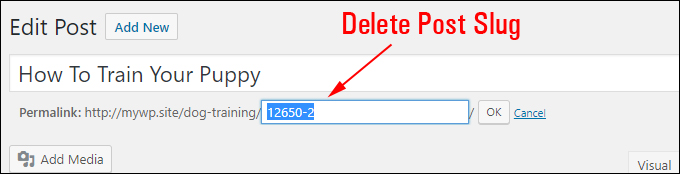
Sometimes, when you are creating a new post and haven’t given the content a post title yet, the WordPress Autosave feature will save your draft with an assigned numerical permalink (see the example URL in the screenshot below) …

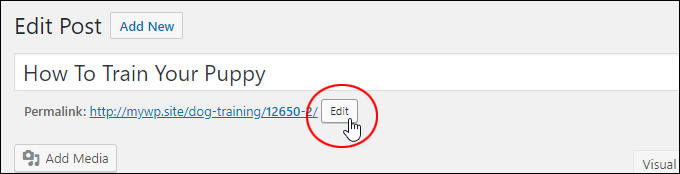
To fix this and give the post its proper permalink, go to ‘Edit Post’ …
Click on the ‘Edit’ button in the post slug section …
Select all content in the post slug field and delete it …
Click ‘OK’ …
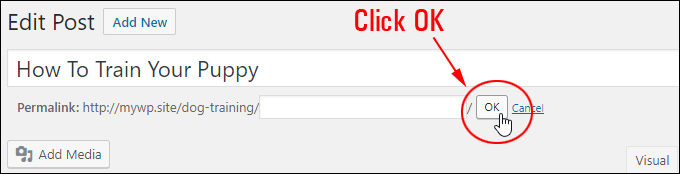
The post slug entry will be replaced with the correct permalink based on your post title …
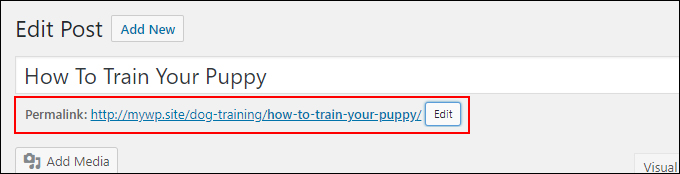
Here is a quick recap of the process …
Remember to update your post to save the changes …
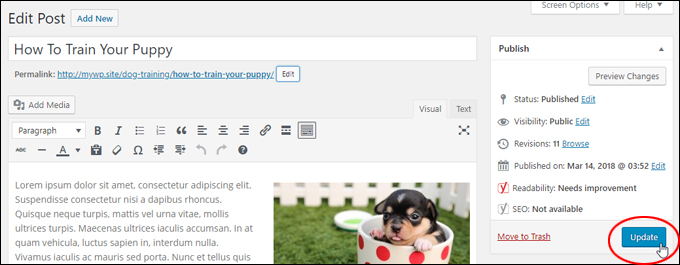
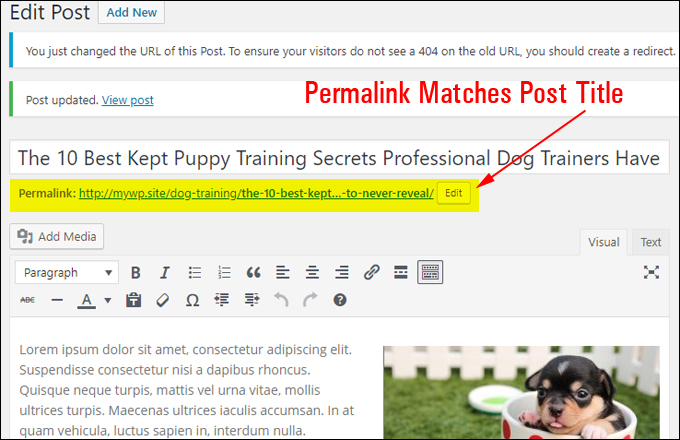
Your permalink should now reflect the new post title …
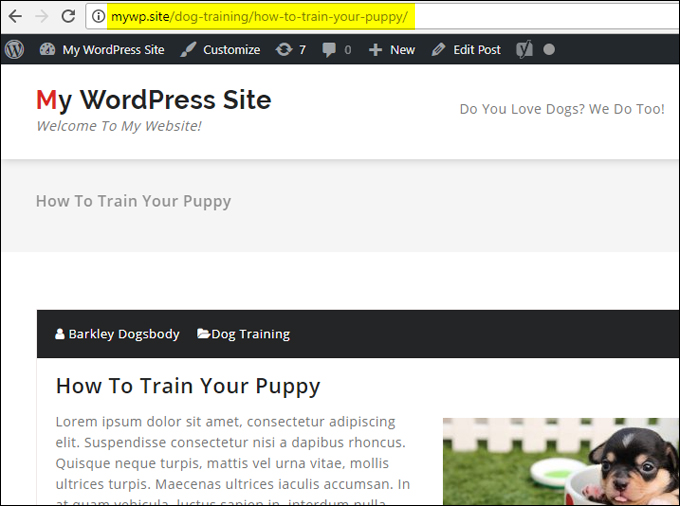
Note also that when you change the URL of a published post, you should also create a redirect link …
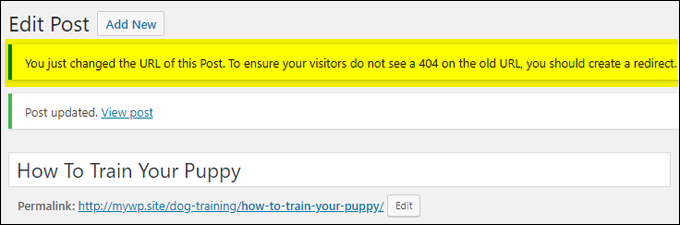
If you change your post title at a later date (e.g. you think of a more compelling post title or use a headline generator tool to help you come up with some killer post titles), remember to fix the permalink to match the new post title and add a redirection to the new post URL …
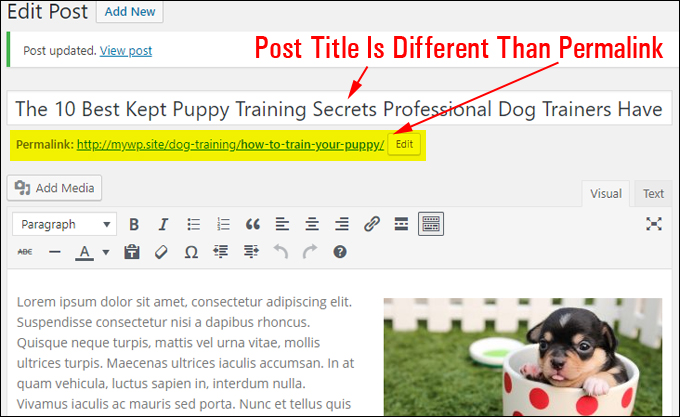
Make sure that your permalinks match the titles of your posts and pages to help site visitors find what they are looking for and ensure that search engines will better index your content …
Permalinks – Additional Info
Use Descriptive Categories
To get the maximum SEO benefit out of using Permalinks, remember to set up your WordPress Categories correctly. If you do not have any categories set up, adding a category tag to your permalink forces WordPress to use the default category (uncategorized).
According to WordPress SEO expert Joost de Valk, here are some points to consider if you are wondering whether you should add categories to your permalink structure or not:
- If your domain is short and your category name is short and descriptive (e.g. adds a relevant keyword or keyword phrase to your URL), you may want to use categories in your permalink.
- If your post slug (the part of your URL that identifies your post) is too long, it can make your post URL harder to share and decrease the SEO benefit.
- If you are going to post content under multiple categories, then it’s recommended that you do not use the category tag in your permalink structure.
Despite being the subject of intense debate in WordPress SEO circles, when it comes to adding category vs no category there is no ”better” permalink structure to use. Use a permalink structure that you think will suit your site best. Your web address should be short enough to be attractive and long enough to be descriptive.
We cover WordPress categories in other articles.
Avoid Setting Up URL Structures That Date Your Content
Another useful tip from Joost de Valk is that unless your website provides news or time-specific information, or you have a special reason to date your site’s content, it’s best to avoid selecting date-based permalinks when configuring your blog’s URLs.

(Avoid setting up permalinks that date your posts)
Although setting up permalinks that time-stamp your posts may be considered better that using no permalinks at all from an SEO perspective, people are less likely to click on posts that are several years old, even if the content is relevant to the answers they are searching for.
What If My Blog Already Has Lots Of Published Content?
Normally, your permalinks should be configured when you perform a new WordPress installation. This should be part of your website planning process.
![]()
If your website or blog is already established or your site already has many posts indexed in the search engines and you would like to change the permalink structure, make sure that this is absolutely something that needs to be done, as doing so can create issues and errors.
Use 301 Redirects
As you’ve seen earlier, many WordPress site owners (or whoever set up their site) seem to be completely unaware of the search-friendly URLs feature of WordPress.
Maybe when you started, your site used the default WordPress permalinks and now you want to optimize your site better for search engines. Maybe your website was configured to display post dates in your URLs and now all of your content is perceived as being out-of-date and you want to delete the date portion in the permalinks.
To edit your permalinks without impacting your site’s SEO or existing rankings in a negative way you will need to add ‘301 redirects’ to point all links that were set up using the previous URL structure to web URLs that use the new structure.
Search engines interpret a code ‘301’ as a link that has been permanently moved. 301 redirection is the most effective and search engine friendly way to redirect users to new site destinations and avoid running into ”page not found” errors if following an old link.
To create an effective syntax change and avoid damaging your rankings, sending visitors to error pages, etc. you will need to set up your redirection system before changing the permalink structure of your site.
You can WordPress site or blog using redirection plugins like Simple 301 Redirects, or Redirection, or use the services of a professional to help you set up and redirect your permalinks correctly to avoid any issues and troubleshoot any errors.

(Set up a 301 redirection system for your changed permalinks using a WP redirection plugin or get professional assistance)
Congratulations! Now you know about the built-in system WordPress uses to display SEO-friendly URLs for your posts. To learn more about using Permalinks, refer to the official WordPress documentation here:
http://codex.wordpress.org/Using_Permalinks
***
"This is an awesome training series. I have a pretty good understanding of WordPress already, but this is helping me to move somewhere from intermediate to advanced user!" - Kim Lednum