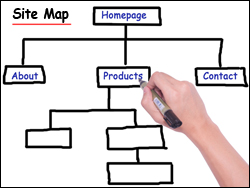
 Adding a site map helps visitors (and search engines) to find more of your content and is a great resource for people who experience difficulties navigating around your site. They can just visit the site map and click on where they want to go on your site.
In this tutorial, we’ll show you how to add an HTML site map to your WordPress website or blog.
Add An HTML Site Map To WordPress
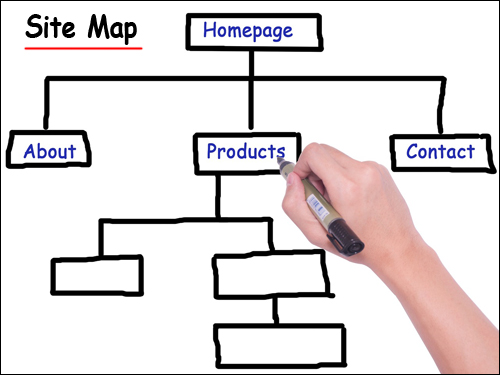
A “site map” (not to be confused with sitemap) is a regular web page containing links to other pages on your site that can be read by humans and search bots alike.
A site map can also help drive more visitors to your site by earning you free organic links from various assistive technologies and bots that roam the net looking for content or reference sites.
Building A Site Map
You can build a site map manually simply by creating a new page and then adding links on the new page to your main site pages, or even links to your category pages (which will then display content organized by categories). To improve search engine optimization and create a better experience for your site users, you could also include a short description of the content your visitors can expect to see when they click on the links.
In this tutorial, you will learn how to create a site map on your WordPress site for your visitors that will self-update automatically whenever new content is added, using a WordPress plugin called Dagon Design SiteMap Plus – an HTML sitemap plugin.
Dagon Design SiteMap Plugin
This plugin adds an HTML sitemap plugin to your WordPress site quickly and easily.
Plugin URL
Go here to download the plugin:
http://www.dagondesign.com/files/sitemap-generator.zip
Plugin Description
This plugin creates a sitemap for your WordPress-powered site. This is not an XML sitemap plugin but a true sitemap generator, which can be customized from its own options page in the WordPress admin panel.
Some of the plugin’s features include:
- Support for multi-level categories and pages
- Category/page exclusion
- Multiple-page generation with navigation
- Permalink support
- Choose what to display, what order to list items in, show comment counts and/or post dates, and much more.
Plugin Configuration
If you haven’t already activated this plugin, then scroll down your WP admin sidebar menu and click on Plugins …

Activate the “Dagon Design Sitemap Generator” plugin …

Step 1 – Create A Site Map Page
Before you can generate your site map using the plugin, you will need to create a page on your site to display the site map content.
Go to Pages > Add New …

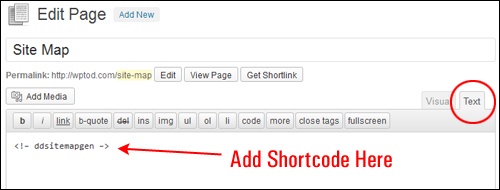
Create a page with the title “Site Map” and make sure that the slug of your new page is “site-map” (without the quotes) …

Select the “Text” editor option (NOT the “Visual” editor tab) and paste the shortcode below into the body of your new page:
<!– ddsitemapgen –>
This shortcode instructs the plugin to insert the site map data into this page …
![]()
Note: Below your Post editor area, make sure that the “Discussion” box is enabled and uncheck the “allow comments” and “allow trackbacks and pingbacks” options …

Also, make sure to add your “meta data” to the WordPress SEO section if you have already installed and configured the Yoast SEO plugin …

Click Publish when finished to create the page …

Step 2 – Configure Your Plugin Settings
Now that your site map page has been created (http://www.yourdomain.com/site-map)
Go to Settings > DDSitemapGen …

Configure the plugin settings as shown below:
General Options
Enter your “Sitemap page slug“.
If you are using the settings recommended in this tutorial, then enter “site-map” (without the quotes) into this field. This needs to match the “slug” or permalink that appears at the end of your site map URL exactly (eg: http://www.yourdomain.com/site-map) …

Sitemap Generation
Configure the settings in this section according to your own preferences. The screenshot below shows a recommended configuration for this section …

Exclusions
If you do not want certain categories or pages to be included in your sitemap, then enter the ID of the categories or pages you want excluded from the sitemap in this section (if you need help with this step, see this tutorial: How To Find Your WordPress Post Or Page Id).
Additionally,
- Check: Hide future-dated posts
- Check: Hide password-protected items

Note: See the “Additional Plugin Information” section at the end of this tutorial:
- If you have specified one of your pages to be the permanent homepage of your site, or
- If there are pages on your site that you would like to include in your sitemap, but not display to visitors on your site’s navigational menus.
Navigation
Configure the settings in this section according to your own preferences. The screenshot below shows a recommended configuration for this section …

Miscellaneous
Enter the “Full path to XML sitemap” value.
You currently have two options:
- http://www.yourdomain.com/sitemap_index.xml – choose this option to use the XML sitemap from the WordPress SEO Plugins tutorial
- http://www.yourdomain.com/sitemap.xml – choose this option to use the XML sitemap from the Google XML Sitemap Generator tutorial
![]()
Use either the XML sitemap created in the WordPress SEO Plugins tutorial to your robots.txt file or the XML sitemap created using the Google XML Sitemap Generator plugin into this section. You don’t need two XML sitemaps.
Additional settings:
- “Where to show XML sitemap link:” – Set this to “At the end of every page“
- Check: “Sitemap links open in new window“

Click Update options to save your changes …

Step 3 – Add A Link To Your Site Map On Your Site Footer
Now that you have configured your plugin settings, the next step is to add a link to your site map page on the footer section of your WordPress theme.
This will help search engines find and crawl all the pages listed in your site map …

Depending on your server’s settings and your WordPress theme, you can modify your footer.php file either by:
- Adding the code directly to your footer.php file, then uploading the file to your server and overwriting the existing file (always make a back up of your files before making any changes), or
- Editing content on your footer file directly through the Appearance > Editor menu inside your WP-admin area.
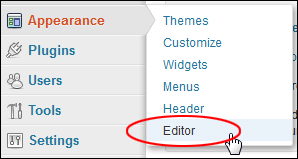
Also, we recommend adding a link to your site map on your sidebar navigation menu …

Load your website into a web browser window and click on the site map link to make sure that your site map display correctly …

![]()
If you don’t see your site map displayed on your Site Map page, check that you have entered the site map shortcode correctly into your page’s text editor tab.
The shortcode should look like this …

Not this …

The error shown above happens when you paste the code into the “Visual” editor tab instead of the “Text” tab …

Your plugin is now fully configured.
Plugin Usage Instructions
You don’t need to do anything further after configuring this plugin. When new content gets added to your site, a link pointing to new posts or pages published on your site will automatically be added to your site map.
Additional Plugin Information
Should You Include Your Index Page In Your Sitemap?
WordPress lets you to set any page of your site as the “home page” (see this tutorial: How To Display Any WordPress Page As Your Home Page).
If you set a WordPress page as the “home page” of your site, WordPress internally redirects the URL of that page to point to your main domain.
So, for example, let’s say that you create a page with a URL like this:
http://www.mydomain.com/travel-tips/how-to-choose-the-best-2-for-1-cruise-deals
If you set the above page as your home page, the page will display as shown below when visitors type the URL shown below into their browsers:
http://www.mydomain.com
In this situation, excluding your site’s default index page link from being listed on your site map can help prevent your index page being seen by Google as “duplicate content“.
To exclude your site’s default index page from being included in your sitemap, do the following:
Go to Pages > All Pages in your WordPress administration area …

Locate the page you’ve specified as your site’s index page and hover your mouse over its title …

Note down the ‘Post ID’ value displayed in the status bar of your browser window. (In the example above, the post ID is “26”) …
![]()
Go to Settings > DDSitemapGen …

Scroll down to the Exclusions section, and enter the ‘post id’ value (e.g. “26”) into the “Excluded pages:” field …

Click Update options to save your changes …

For more information about the Dagon Sitemap plugin, visit the plugin website:
Alternative Site Map Plugins
If you want to experiment with different WordPress site map plugins, here are a couple of alternative options:
Simple Sitemap

Plugin URL
http://wordpress.org/plugins/simple-sitemap
Plugin Description
As the plugin name implies, Simple Sitemap adds a very basic HTML site map to your site.
Simple Sitemap lets you add a single, one-column site map listing all your Pages and Posts quickly using a shortcode. You can also add a site map to your sidebar using a text widget.
Plugin Installation
From your WordPress administration area, select Plugins > Add New …
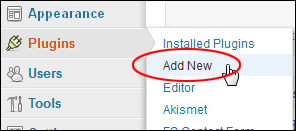
Select the Install Plugins > Search tab, then type in “simple sitemap” into the search field and click on the Search Plugins button …

Locate the plugin in the search results area and click Install Now …

Activate the plugin after installing it …
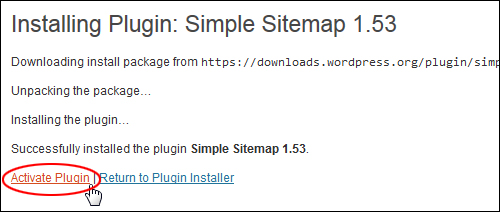
Once the plugin has been activated, click on Settings …

You can also get to the plugin’s settings screen by selecting Settings > Simple Sitemap from your dashboard menu …

This takes you to the plugin settings page …

Plugin Configuration
You can configure the plugin to:
- Display (or not display) Pages and Posts by ticking a checkbox (or leaving the box unticked)
- Exclude pages (by entering the page IDs you would like to exclude into the field), and
- Allow your visitors to sort the information on your site map page using drop-down menus …
 The order and style in which your posts and pages are displayed on the screen depends on the drop-down option chosen in the settings.
Post/pages are rendered as a single linked list of titles, or they can be grouped by date, author, category, and tag, where each heading acts as a link to the relevant taxonomy type as well, giving your visitors an efficient way to view all of your site content in one place and making it easier for spiders to index your site.
You can display pages by:
- Title
- Date
- Author
You can display posts by:
- Title
- Date
- Author
- Category
- Tag
Click ‘Save Changes’ when finished to update your plugin settings …

Plugin Usage
The plugin uses the following shortcode to create a site map …

To add a site map to your site, create a new page and add the shortcode to the content section of your page, then save and publish …

You can also add the shortcode to your sidebar menu by adding the shortcode to a Text widget …
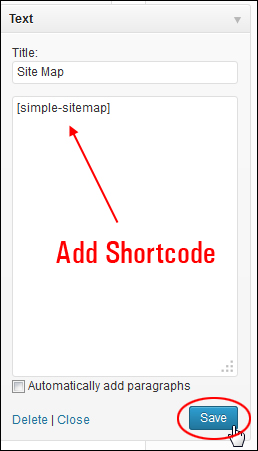
To learn more about adding widgets to your WordPress sidebar, see the tutorial below:
Once the page has been published, your site map will display to visitors and automatically update whenever new posts and pages are published …

For more details about this plugin, or to get plugin support, visit the site below:
If you want to have a little more control over the way your site map displays on your site, then try the plugins below.
PS Auto Sitemap

Plugin URL
http://wordpress.org/plugins/ps-auto-sitemap
Plugin Description
PS Auto Sitemap lets you add a site map to your WordPress site and choose different styles for displaying the list of Pages and Posts on your site map page …

This is easily done using a drop-down menu in the plugin settings page …

Below are some examples of the different styles you can choose for your site map …

![]()
Follow the instructions at the bottom of the plugin settings page when adding your site map …

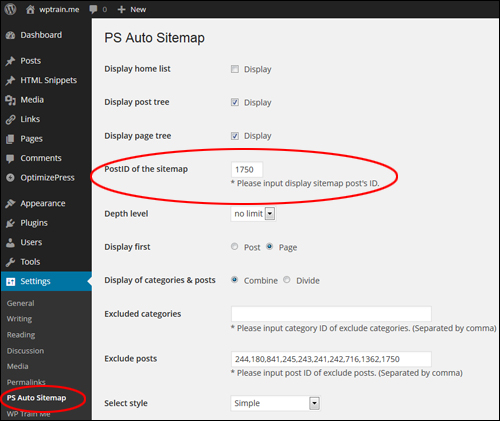
Essentially, the above instructions are asking you to create a new page for your site map, then paste the code exactly as shown above into your page using the “Text” tab (not the “Visual” tab), and specify the Page ID of the page you have added the site map code to in the settings section, as shown in the example screenshot below …
For more details about this plugin, or to get plugin support, visit the site below:
Page-List

Plugin URL
http://wordpress.org/plugins/page-list
Plugin Description
Page list lets you display site maps using various shortcode configurations.
The screenshots below taken from the plugin site show some examples of site maps you can create using different shortcode settings …
Example 1 – Creating A Site Map With Child Pages
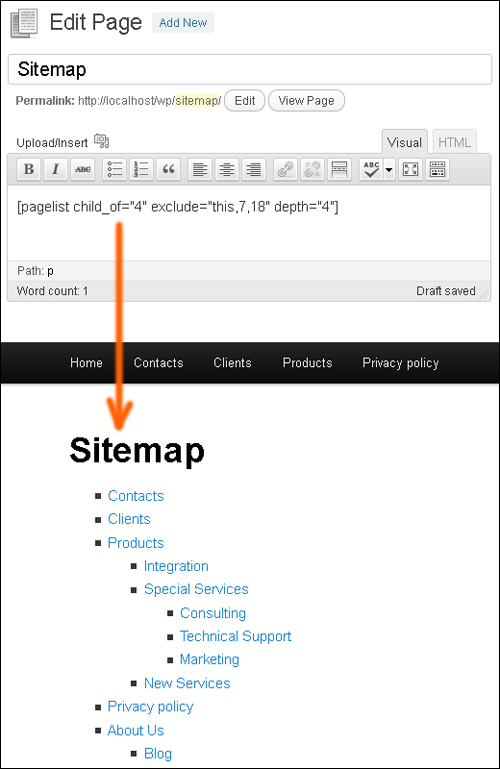
Example 2 – Creating A Site Map Which Displays Images With Listings

The Page-list plugin development site provides a documentation section that explains how to use all the shortcodes and variations to create your custom site map …

To access the Page-list plugin documentation section, or get plugin support, visit the site below:
WP SEO HTML SITEMAP

Plugin URL
https://wordpress.org/plugins/wp-seo-html-sitemap
Plugin Description
The WP HTML Sitemap lets you add a responsive HTML site map to your WordPress site using the XML sitemap settings from the Yoast SEO plugin for WordPress. Use this plugin to display a list of all your Pages and Posts, specify the number of columns and add styling options using CSS.
To see an actual site map created using this plugin, go here.
For more details about this plugin, or get plugin support, visit the site below:
![]()
To learn how to add an attractive site map for your visitors with post thumbnail images and descriptions, go here:
Congratulations! Now you know how to add an HTML site map to WordPress.
(Image: Pixabay.com)
***
"Your training is the best in the world! It is simple, yet detailed, direct, understandable, memorable, and complete." Andrea Adams, FinancialJourney.org
***