
In this tutorial, we explore a free service that lets you collect demographic data from your visitors with WordPress and Google Analytics.
If you have been following our tutorials, then you should already have a web analytics tool like Google Analytics installed on your site.
If not, you will need to install Google Analytics on your site first before you can complete the tutorial below.
To learn how to add Google Analytics to WordPress, see the tutorial below:
***
How To Collect Visitor Demographic Data With WordPress
Google Analytics is a powerful web analytics tool that provides comprehensive and detailed statistical information about your site visitors (useful for measuring things like your site’s performance, web traffic, and conversions).
Demographic information is vital, as it helps you identify potential customer groups for your products and services.
Google Analytics can provide demographic data and ‘Audience’ reports for some accounts (e.g. users who advertise online using Google AdWords and who have linked their AdWords accounts to Google Analytics). Some users, however, may not be able to access detailed insights and important demographic data about their visitors.
A free service called UserReport integrates data collected from your site with Google Analytics to provide you with important demographic data …

UserReport can provide detailed information about visitors coming to your website, such as age, gender, income, occupation and level of education …
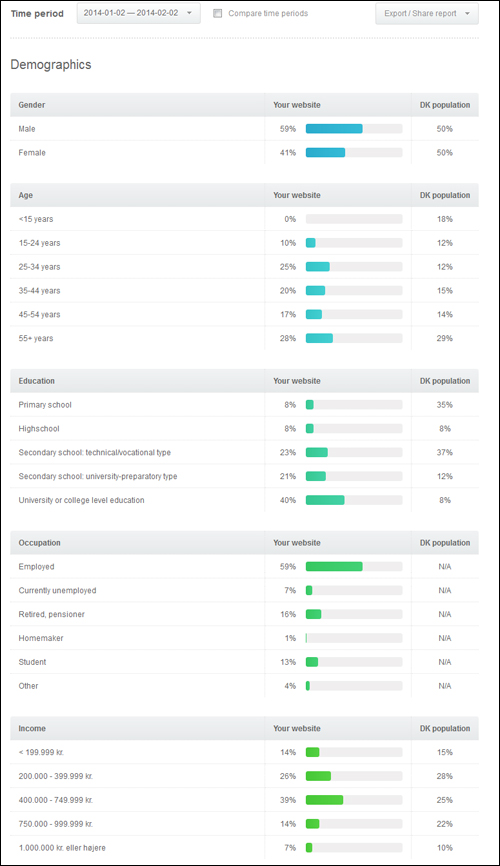
Having access to demographic data such as the above is extremely valuable and has many practical uses.
For example, you can:
- Identify the gender and age of visitors interested in buying a specific product.
- Identify the average income and education level of returning visitors, leads, prospects and customers.
- Identify geographical areas that convert best.
- Use gender, age, income, and education level information to create new products and services suited to your audience.
Now, of course, your site can’t “magically” extract demographic data about your site’s visitors. You have to set up a process that allows you to collect data from your visitors.
UserReport and GoogleAnalytics create an exchange of information between your accounts as shown in the diagram below:

The above image shows what type of data is transferred between both accounts. UserReport sends demographic data to Google Analytics’ custom variables allowing you to create custom reports and segments for better and easier analysis, and in return, UserReport fetches regular analytics data from your Google Analytics account and combines it with its demographic data to provide you with insightful information in your UserReport dashboard.
In this tutorial, you are going to learn how to set up UserReport and integrate it with Google Analytics to collect and view visitor demographic information, and then how to add the UserReport tracking code to your site’s pages using a free WordPress plugin created by the developers of UserReport to make the process easy and simple.
![]()
Note: Google Analytics is constantly introducing new features, including the ability to access detailed reports containing visitor demographic data, visitor interests, etc. If you can access demographic information directly from your Google Analytics account and feel that there is no need to use a tool like UserReport, then just skip the tutorial below.
Alternatively, if you are already using a plugin like Google Analytics Plugin For WordPress by MonsterInsights, you can enable Google Analytics’ own ‘Demographics and Interests’ reporting feature directly inside the plugin.
Step 1 – Set Up Your UserReport Account
You will first need to set up a Free account with UserReport.
Go to UserReport.com and click on the ‘Create free account’ button …

Enter your registration details and click on ‘Create my account’ …

After you have registered and have been redirected to the site’s admin area, click on ‘Add website’ …

Enter the URL of the website you want to obtain demographic data for, your site’s name and select a language, then click on ‘Create website’ …

Your website will be added to your account and a code snippet will display on the screen …

This code needs to be added to all of your site’s pages. For now, just select all of the code, and copy it to your clipboard. We’ll use this code in the next step.
Paste the code into a plain text file (e.g. notepad) and click on the ‘Done!’ button to complete this step …

Your website will be added to the UserReport ‘Your websites’ section. You can add as many websites as you want by simply repeating the simple process shown above …

The next step is to add the code snippet generated by UserReport to all of your site’s pages. To do this quickly and easily, we’ll use a WordPress plugin as shown in the section below.
Step 2 – Install And Activate The Demographic Data Plugin
The code snippet generated by UserReport in the previous step needs to be added to all pages of your WordPress site.
For this step, we’ll use the free WordPress plugin below.
Demographic Data In Google Analytics

Plugin URL
Download the plugin here:
http://wordpress.org/plugins/demographic-data-in-google-analytics
Plugin Description
This plugin adds the required javascript for the UserReport service which will enable you to transfer background information about your visitors to Google Analytics.
‘Demographic Data In Google Analytics’ supports transferring up to 5 custom variables into Google Analytics. The google analytics custom variables can contain information such as: Gender, Age, Education and more. The demographic data transferred to Google Analytics is collected using the free UserReport service.
Note: This plugin does not provide the tracking code for Google Analytics. You will need to add the Google Analytics code to your WordPress site separately, either through your theme options if available, or using a plugin.
To learn how to add Google Analytics tracking code to WordPress using a plugin, see the tutorial below:
Plugin Installation
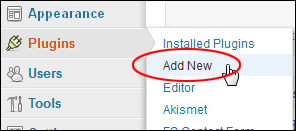
From your WordPress administration area, select Plugins > Add New …
Select the Install Plugins > Search tab, then type in “demographic” into the search field and click on the Search Plugins button …

Locate the plugin in the search results and click Install Now …

Activate the plugin after installing it …

Once the plugin has been activated, click on Settings …

You can also get to the plugin’s settings screen by selecting Settings > DGA (UserReport) from your dashboard menu …

This takes you to the plugin settings page.
Paste in the UserReport code snippet that you saved to your clipboard earlier into the field as shown in the screenshot below, and click the ‘Save Changes’ button to update your site with the code …

Plugin Configuration & Usage
There is nothing further to configure in the plugin. The plugin simply adds the required code to all of your site’s pages. The rest of the software configuration happens in your UserReport account dashboard.
This is covered in the next step.
Step 3 – Integrate UserReport And Google Analytics
After you have set up the plugin on your site, go back to your UserReport account.
In the ‘Your websites’ section, find your website’s details and click on the ‘Google Analytics’ link in your site panel to begin the process of enabling Google Analytics integration …

If you have not configured the integration with Google Analytics yet, a message will display telling you that you first need to configure this feature in order to use it. Click on the link in the message to go to the configuration settings screen …

You will be taken to the ‘Google Analytics integration’ screen.
As the screenshot below shows, if you haven’t configured the integration feature yet, you will see a message telling you that ‘Google Analytics integration is inactive‘ …
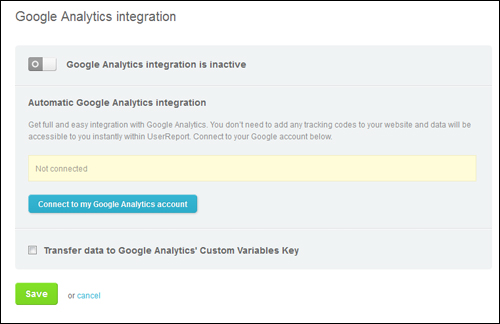
Before you can activate the integration with Google Analytics, you will need to connect your account, so leave the top button turned “off’ for now, and click on the ‘Connect to my Google Analytics account’ button …

Google will ask you to give UserReport permission to access your Google Analytics account data. Click ‘Accept’ to continue …

You will be taken back to UserReport and asked to select the Google Analytics account you want to send information to.
Note: Make sure you select the same website account that you have set up in UserReport and added the code snippet to. Click ‘Save’ when done …

After your account has been successfully connected to your Google Analytics account, click on the ‘Google Analytics integration …‘ button to activate the integration feature …

After Google Analytics integration becomes active, click on the checkbox next to ‘Transfer data to Google Analytics Custom Variables Key’ …

The settings box will expand to reveal a number of drop-down menus labeled ‘Select Custom Variable (Key X)’ …
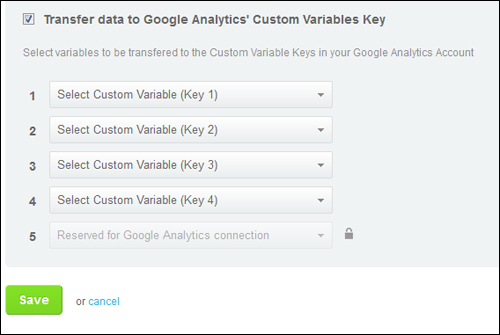
Select an option for each field from the choices available (e.g. Gender, Age, Current occupation, Education, etc.) …

Once you have selected your options, click on the ‘Save’ button …

After saving, you will be taken to the ‘Settings’ area of your UserReport dashboard.
This section also lets you set up surveys to collect visitor data, add a feedback forum, or a click map, collect leads via email, share your site with others, and more …

Note: There’s no need to edit the script code you have installed on your website in the previous step. Allow 24 – 48 hours for data about your site to be displayed in your UserReport dashboard.
UserReport – Additional Information
UserReport allows you to collect information from visitors and then send real demographic data to Google Analytics using online surveys …

You can create free online surveys from your UserReport account dashboard using your own custom logo and colors …

The strength of UserReport’s integration to Google Analytics is the ability to filter your behavioral data from Google Analytics by the answers collected with your online survey. The advanced integration between UserReport and Google Analytics sends data from your UserReport online surveys to your Google Analytics account’s custom variables …
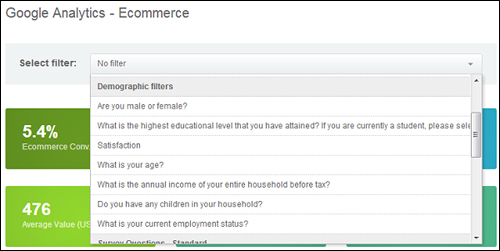
UserReport is then able to send data like gender, age and education to your Google Analytics account, which enables you to see the behavior of these specific demographic segments directly in your own Google Analytics account using Advanced Segments.
Filtering survey answers by Google Analytics data enables you to see how people with different characteristics engage with your website …

Once everything has been set up correctly, you can access reporting data about your visitors combined with Google Analytics information directly from your UserReport account …

For more information about UserReport, visit their site below:
Hopefully, you have found this tutorial on collecting demographic data from your visitors with WordPress useful.

***
"Wow! I never knew there's so much to learn about WordPress! I bought one of the WordPress for Dummies three years ago, such authors need to be on this course!" - Rich Law, Create A Blog Now
***