 This tutorial is part of our Content Marketing With WordPress tutorial series, which show you how to create effective content to promote your website and grow your business online.
***
There’s absolutely no way around it! If you want a successful presence online, you will need to learn how to create and produce content for your website pages, blog, newsletters, product descriptions, post headlines, sales copy, social media, ads, articles, promotional pieces, news releases, customer training, FAQs, forum signatures, SEO meta descriptions, etc.
Creating and producing content requires a system. Even if you plan to outsource all of your content writing, you will still need a system, as there are many content outsourcing challenges that you will need to overcome.
In this tutorial, we show you how to set up a simple system for storing, planning, and organizing your content ideas effectively, regardless of whether you plan to create content yourself or outsource it.
![]()
If you need help coming up with new content ideas, we recommend downloading our content creation guide here: Infinite Content Creation: A Practical Step-By-Step Course On How To Create Endless Content For Your Website Or Blog!
How To Store, Plan, And Organize Your Content Ideas

(To get results online you need to publish new content regularly)
Let’s say that you get an idea for an article or blog post but you’re just too busy to do something with it right now. What do you do? Do you write it down on the nearest piece of paper you can find? Do you not write it down and hope you’ll remember it later?
If your approach to creating content for your website or blog is to let an idea come to you spontaneously, work through it chaotically and publish only when you feel inspired or have the time to write, you will struggle to get results online. There’s way too much competition publishing way too much information online for this approach to be effective.
Fact: Businesses that get results online publish new content regularly.
If you are serious about getting results online for your business, you need a system for coming up with new content ideas and for turning your ideas into published content on a regular basis.
Anyone who publishes content online regularly will tell you that turning an idea into published content involves research, planning, organizing, editing, and refining points, sections, subsections, etc. Sometimes, things get in the way of the creation process or more research or information is required and ideas need to be put on hold until the process can be resumed later.
It’s important, therefore, to have a system that lets you store, plan, organize, and process your content writing ideas, regardless of whether you plan to create the content yourself or outsource your content creation.
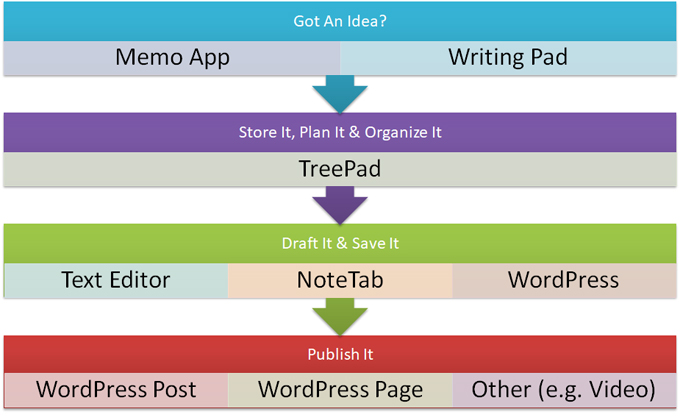
A Simple And Effective Content Production System
Ideally, we want to start with a simple, effective, and inexpensive system that can grow to accommodate your content creation needs. There are many useful tools and apps available to help you plan and organize your thoughts and ideas. The important thing is to have a system in place that allows you to effectively:
- Jot down your content ideas.
- Store, plan, and organize your content ideas
- Draft (i.e. flesh out) your content ideas
- Publish your finished content
Let’s show you how to set up a simple content production system like the one shown below using inexpensive tools and WordPress …
(A simple and inexpensive content production system)
Jotting Down Your Content Ideas

(Great content ideas can strike any time!)
A great idea for an article, blog post, video, podcast, e-book, lead generation report, etc. can strike you any time and anywhere. It could happen while you’re getting ready in the morning, going on a walk, shopping, standing in a queue, on your way to or from work, sitting in a meeting, watching TV, just before falling asleep, etc.
When an idea comes to you, you need an easy tool that will let you quickly jot the idea down. This can be an app on your phone that lets you create and save simple memos, a small writing pad that you carry in your purse, briefcase, or in your pocket, etc. Whatever tool you choose just make sure that you have something handy to record your ideas on when inspiration stikes.
For example, I recently attended a small business networking event. At the end of the event, I spoke with a business owner who doesn’t have a website. When I asked him why he has no website, his reply was that he doesn’t believe a website can help him grow his business.
I was intrigued by his answer, so I asked him to tell me more. He then told me that a website is just something businesses need for ‘credibility.’ In other words, this business owner believes that having a website doesn’t really help a business grow but if you don’t have a website, prospects will doubt the credibility of your business or whether it even exists.
As the non-techie owner of a website dedicated to helping other non-techies grow their business using a website, this naturally got me thinking about how I would educate other business owners like him about the benefits of using a website powered by WordPress to generate new business leads.
As I was waiting for the lift to take me down to the car park, I took out my phone and fired up the ‘Memo’ app I have installed specifically to record new content ideas …
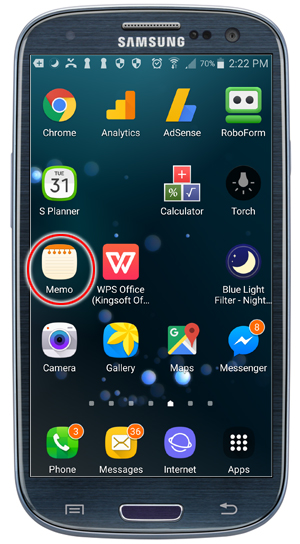
(Use a memo app to record your content ideas)
I then quickly jotted down a rough idea for an article about how to use a website as more than just a ‘credibility’ tool …
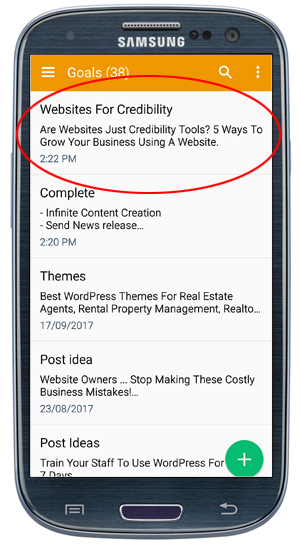
(Record your content ideas immediately)
Note: At this stage of the process, it doesn’t matter if you know the ‘5 ways to do XYZ’ or not … the important thing is to just record the idea as soon as you can. I certainly didn’t know what the ‘5 ways’ were going to be when I wrote the idea down and by the time the content gets written it may end up being the ‘3 ways,’ or the ‘5 ways,’ or even the ‘25 ways’ to do XYZ or become something completely different altogether. The end result is not important at this stage, only the process of recording the idea down. This should become a habit and you need to have some type of tool or medium to help you document your ideas.
After writing an idea down, the next step is to get it into a planning system. A phone app makes it easy to send memos to yourself or to your content production system via email …
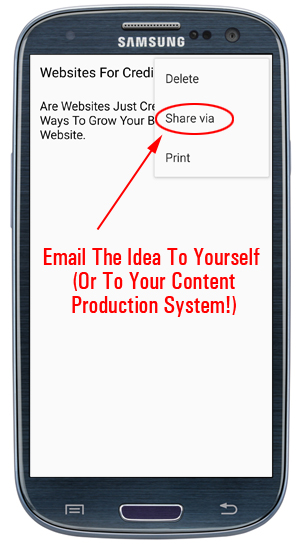
(Email the idea to yourself or to your content production system)
Now that the first part of the process is complete (jotting the idea down), the next step is to store, plan, and organize your ideas.
Storing, Planning, And Organizing Your Content Ideas
A great tool you can use to help you store, plan, and organize your content ideas is TreePad …
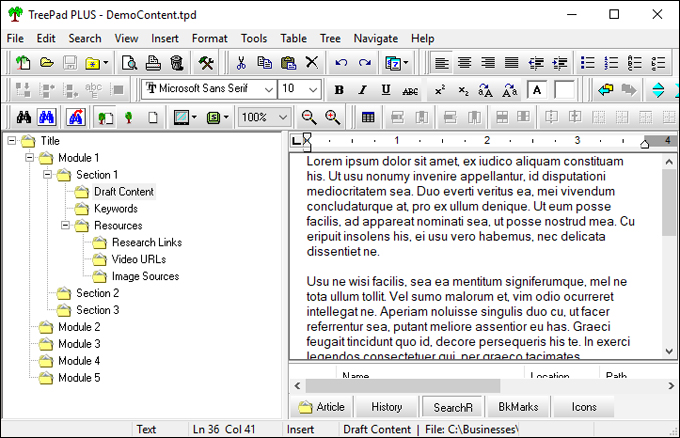
(TreePad)
TreePad lets you create a hierarchical structure of folders where you can store text, images, URLs, etc. If you create different folders for each section of an article or book, for example, you can then easily rearrange or organize these sections by moving folders up, down, or nesting them inside other folders.
With a tool like this, you can easily add 10, 100, or 1,000+ new ideas for content and keep everything stored, organized, prioritized, and immediately accessible.
In my earlier example, after the content idea I sent through from my phone app via email arrived in my inbox, I then transferred it to a simple content production planner I’ve created using TreePad …
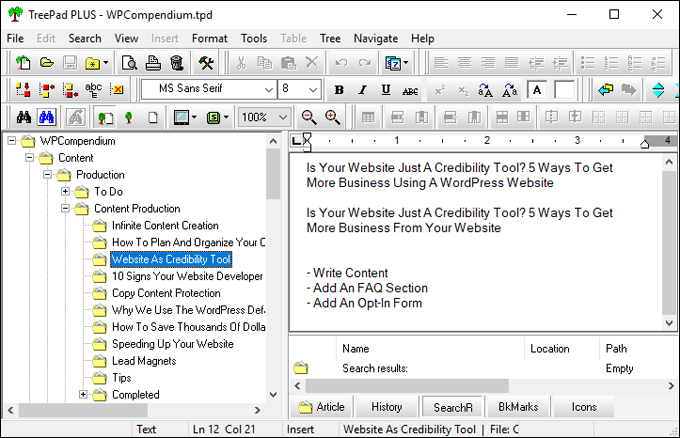
(A content production planner created with TreePad)
As you can see from the above screenshot, this is nothing more than a folder I’ve labelled “Content Production” with a new folder created for every new content idea I get.
This simple content production planner lets you easily:
- Add content ideas with a rough working title (can change it anytime)
- Prioritize ideas in the content production schedule (just move folders up or down to prioritize items)
- Add rough notes and bullet point sections, play with title ideas, etc.
- Add and save research notes, URLs of videos, images, additional references, resource links, etc.
Once the idea has been safely stored and saved in this simple content planning system, you can get on with other things and come back to it anytime it suits you to work on your idea and develop it further. When you come across new information that would be useful to add or help expand your idea, you can simply open the tool, paste the content in, save it, and continue working on it later.
This simple system lets you work on any idea you have stored, reassign its priority, archive it once you have completed and published it, or even delete it from your schedule if the idea turns out not to be worth pursuing any further.
To learn more about using this tool, see the tutorial below:
Drafting Your Content Ideas

(Once you have all the information you need, create your draft content)
Your content creation system should include having a content plan and setting aside regular time to work either on creating new content, or managing its production (e.g. outsourcing).
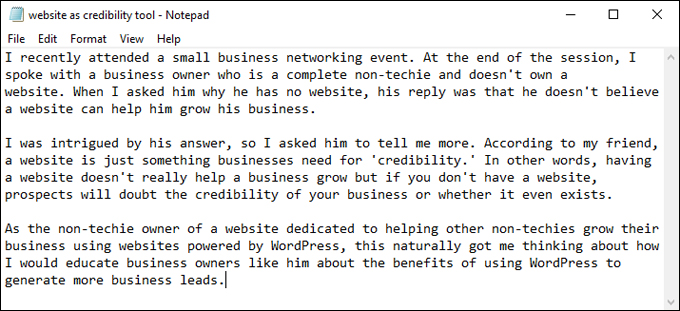
When the time comes to develop an idea further, open up your content planning tool and select the item to work on next. The first step of this process will be to assemble all the information and research you have gathered into a draft article, blog post, video/audio script, etc.
During the draft stage, don’t waste time worrying about things like formatting, styling, typefaces, font colors, font sizes, etc. These are unnecessary time-wasting distractions at this point. The best way to create a draft of your content is to write it in a plain text file. You can format this later.
Useful Writing Tools
Here are some useful tools we recommend including as part of your content writing system:
Built-In Plain Text Editor
(A plain text editor lets you create draft content without distractions)
Using your computer’s built-in plain text editor like Notepad (Windows) or TextEdit (Apple) lets you focus entirely on what you want to say. It also lets you create content quickly and without distractions.
Notetab
(NoteTab lets you work on multiple text files at once)
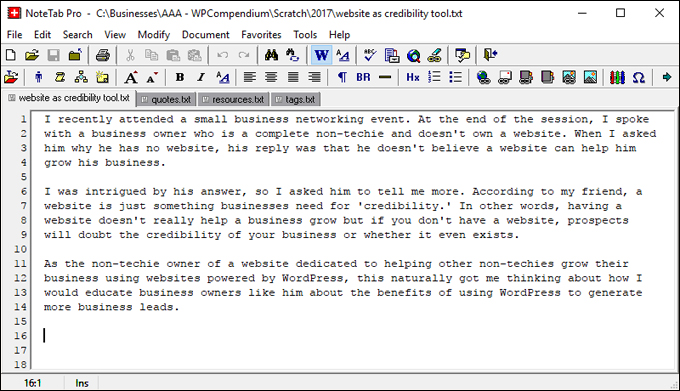
NoteTab is a plain text file editing tool that lets you work on multiple text files at once. This is like using your computer’s plain text file editor on steroids.
NoteTab is great for organizing your ideas during the initial draft phase. You can build your article in one open tab and paste in snippets of text like lists, quotes, research URLs, tags, etc. into other open tabs and perform a whole range of other functions while you work and assemble your content.
For more information about using this tool, see the tutorial below:
Grammarly
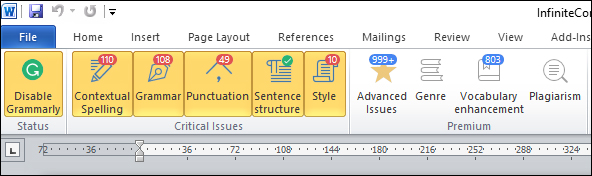
(Grammarly – Free Grammar Checking Software)
Grammarly is a powerful grammar checking tool for creating web content, reports, e-books, presentations, etc. You can install the free version of Grammarly on your web browser, Microsoft Word, etc.
After writing your content, run it through Grammarly and it will not only pick up all of your spelling and grammatical errors but also point out errors in your punctuation (e.g. wrong use of commas, double spacing between words, duplicated words, etc), poor sentence structure, style, etc.
As you scroll through each error, Grammarly shows you what’s wrong and gives you the option of automatically fixing errors with one click. You can also ignore the correction suggestions if you want and keep scrolling through to the next item.
The paid version of the software takes your content checking to a whole new level and lists advanced issues, suggests vocabulary enhancements, detects instances of plagiarism, etc.
To learn more about using this powerful tool, go here:
Publishing Your Finished Content
After you have created a draft article or blog post in a plain text file (or a word processor), you can create a new post or page in WordPress, paste in your draft content and format it using the built-in WordPress visual content editor …
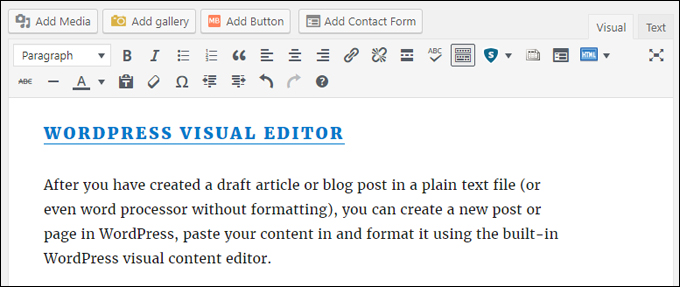
(WordPress visual content editor)
WordPress has a WYSIWYG (What You See Is What You Get) content editor that lets you format your text visually by clicking on menu buttons (similar to using MS Word).
Save your new article or blog post as a draft in WordPress until you are done editing, formatting, and checking it for spelling or grammatical errors and are ready to publish it.
To learn more about using the WordPress visual content editor, see the tutorial below:
Content Production System: 5-Step Summary

(Get your content production system in place and start publishing new content regularly)
To get results online, you will need to publish content regularly. This requires having a system for coming up with new content ideas and for turning your ideas into published content on a regular basis.
In this tutorial, we have described a simple, inexpensive, and effective system you can use to store, plan, and organize your content ideas.
Here are the steps again:
- Jot your ideas down on a writing pad or phone memo app as soon as new ideas present themselves to you.
- Add your ideas to a content planning tool like TreePad that lets you store, organize, prioritize, and add research notes and additional information.
- When you are ready to create a draft article, blog post, or video/audio script, use a plain text editor like Notepad, TextEdit, or NoteTab to flesh out your content idea without distractions.
- After your draft content has been written, create a new WordPress post or page and paste your content in, then format it using the WordPress Visual Content Editor. Save it as a draft in WordPress until you are ready to publish it.
- After you are done editing your content and have checked it for spelling and grammatical errors (use a tool like Grammarly), publish your content.
Additional Resources
As your content production needs grow, consider installing a WordPress editorial plugin to help you plan, manage, and schedule your content. To learn more about different plugins you can use, see the tutorial below:
If you need help coming up with new content ideas for your website or blog, check out our content creation guide below:
We hope that you have found the above information useful. Now you have a simple, inexpensive, and effective system for storing, planning, organizing and turning your content ideas into published content.

(Source: Pixabay)
In addition to original images and screenshots used in this article, these images were also sourced from Pixabay: New Idea, Inspiration Strikes, Draft Content, Content Summary
***
"This is an awesome training series. I have a pretty good understanding of WordPress already, but this is helping me to move somewhere from intermediate to advanced user!" - Kim Lednum
***