
Are you effectively managing your online reputation?
In this article, we show you a simple plugin for WordPress users that can help to avoid the escalation of problem reviews about your business through effective customer review management.
WordPress Plugin: Editor’s Pick …
Power Online Reviews – User Feedback Management Plugin For WordPress Users

Plugin Description
Power Online Reviews is a simple to install WordPress plugin that fast, easy and simple way to help you generate a lot more positive reviews on third-party review sites like Yelp, Yell.com, etc, and give your online reputation a boost.

According to a study by eVoc Insights, a company known for researching and measuring user experience, 63% of users indicate they are more likely to purchase from a site if it has ratings and reviews.
Power Online Reviews ensures that positive reviewers are prompted to add reviews to third-party review sites like Yelp, Trip Advisor, Google Plus etc. Negative user experiences are captured on the website for immediate attention by the business owner.
This simple sorting process ensures more positive 3rd-party reviews and happier customers where the service has been below standard.
![]()
According to research by Michael Luca, a professor at The Harvard Business School, “a one-star increase in Yelp ratings leads to a 5-9% increase in revenue”.
(Source: Yelp)
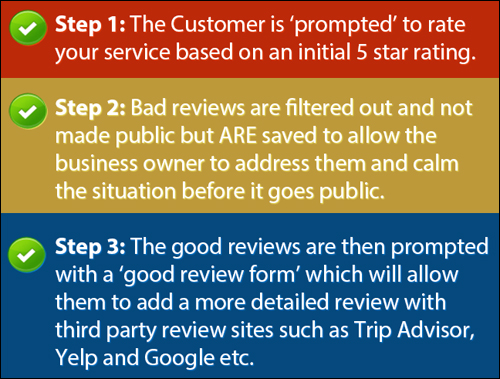
How The Plugin Works
The plugin automatically generates a review form for your site upon installation and activation.
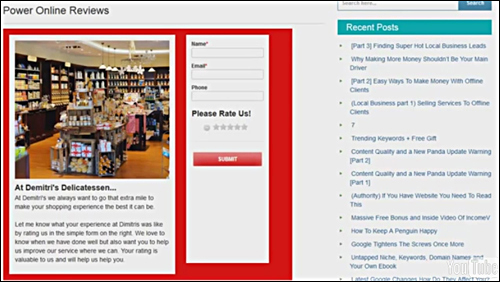
Ask visitors to rate your business. (Image: Power Online Reviews )
The form is very simple for your customers to fill in. Users enter their name and email address (phone number is optional). The customer is then asked to provide a rating of your products and services.
Positive Customer Rating
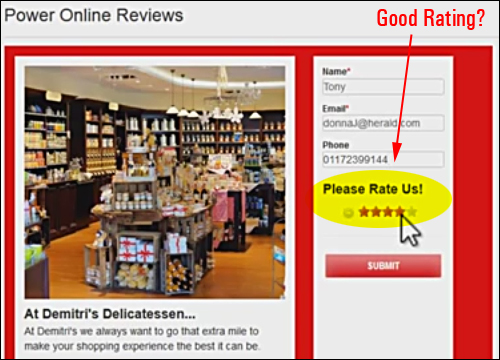
Visitors rate your products or services using a simple 5-star system. (Screenshot: plugin website)
When customers leave a good rating, they are asked to share their review on one or more third-party review sites (you can specify which 3rd-party review sites to display) …

Visitors who leave positive feedback are asked to provide a review on a third-party review site. (Screenshot: plugin website)
Clicking on the icon or logo takes your user to the third-party review site where they can then leave their positive review …
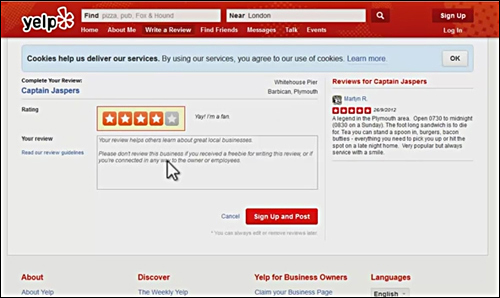
The plugin sends customers who leave good feedback to your third-party review pages. (Source: Power Online Reviews website)
Negative Customer Rating
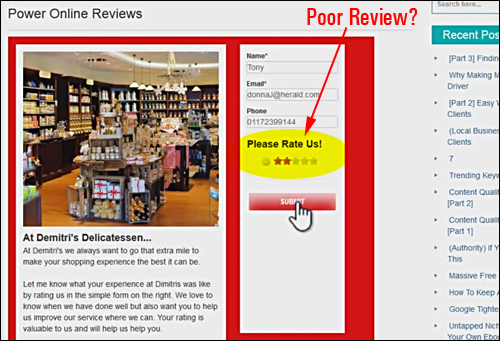
Poor ratings can have a serious impact on your business and need to be immediately addressed. (Screenshot sourced from Power Online Reviews website)
When users submit bad feedback (e.g. ”1”, “2”, even “3”), they are not sent to 3rd-party review sites.
Instead, the comments are saved locally, giving you the option to engage with the customer and hopefully turn them back into a happy customer.
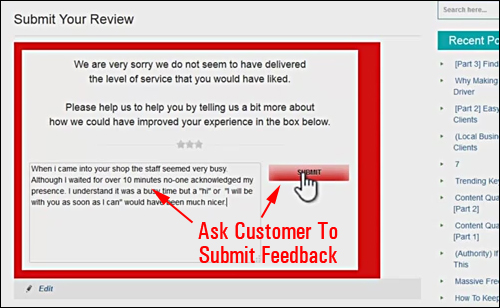
The plugin stores poor comments from users on your site. (Source: Power Online Reviews )
Go here to learn more: Power Online Reviews
Benefits
Here are just a few of the benefits of using Power Online Reviews to manage customer reviews from your web site:
Easy To Install
Power Online Reviews is quite easy to install. Simply upload the plugin file to your Plugins folder via your WP administrator section and activate.
Really Simple To Use
As shown in the previous section, Power Online Reviews automatically creates a review form for your site upon installation and activation. All you need to do after that is customize your form settings and you’re good to go.
Prevention Is Better Than The Cure
Poor reviews can seriously ruin your reputation. Positive feedback can grow revenues.
If, for any reason, your service has fallen below acceptable standards, you want to know about it a.s.a.p., so you can rectify the issue before things get out of hand.
Some additional benefits of using this plugin include:
- Repair Existing Damage: If you have any existing bad reviews, you can start repairing the damage ethically by increasing the number of positive reviews being made to third-party review sites and not allowing bad reviews from growing.
- Increase Campaigns For Customer Reviews With Confidence: Once you create an effective ”gateway” to filter bad user feedback and let through only positive content about your business, you can confidently increase your campaigns and client requests for feedback about your business on your site.
Plugin Features
Power Online Reviews offers many unique features to WordPress users. Here are just a few:
Features For Local Business Users
- Easy collection of visitor feedback.
- Centrally manage customer feedback on your website.
- Legitimate management of favorable and bad reviews.
- Good reviewers are automatically prompted to submit review to third-party review sites.
- Negative reviews are captured locally for the business owner’s attention.
- Forms are fully responsive and can be used on any computer, and portable device.
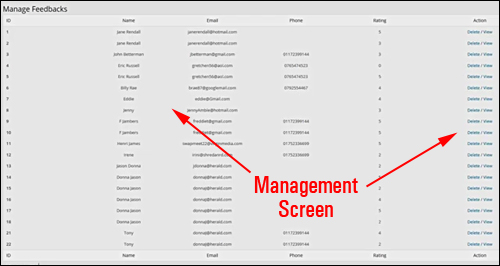
All customer feedback is centrally stored in the Feedback Management screen. (Source: Power Online Reviews )
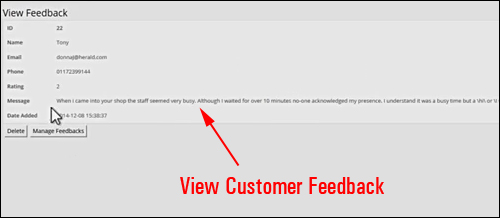
Click on a record to view user comments. (Screenshot source: Power Online Reviews )
Plugin Administration Features
- Forms are instantly created when plugin is activated.
- Completely editable review forms.
- Main Review Form: Edit image, default text title, default text, form background colour, submit button background color, submit button text colour.
- Follow Up Review Form- Add in your third-party review site names (e.g. Yelp, Epinions, Yell.com), logos, user account URLs (i.e. the URLs visitors go to leave a review about your business) and specify whether to display these on your form or not. You can store up to 5 review sites.
- Good Review Form – Add custom text to review form. Change color of submit button background and text
- Bad Review Form – Add custom text to review form. Change colour of submit button background and text
- Select minimum ”positive” rating option (e.g. ”4”).
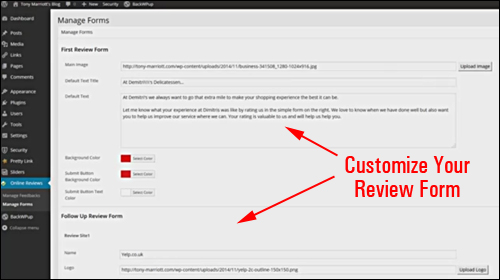
Your review form is completely editable. (Source: plugin website)
Plugin Tips
The plugin was developed for WordPress users. If you do not have a WordPress site as your main website, you can still benefit from the plugin by having WordPress installed with the plugin added on a subdomain or subfolder of your domain (e.g. “mydomain.com/customer-feedback”) and adding links to this “feedback” section from your main website.
Power Online Reviews Support
This plugin was developed and is supported by Tony Marriott, an experienced software developer, and comes with a risk-free, 30 day, 100% refund guarantee.
Product Cost
- Single Site Personal License – Install the plugin on a single of your own sites. Cost = $9.75
- Multi-User Edition – Install the plugin on multiple as many of your own sites as you like. Cost = $29.00.
- Developer License Edition – Install the plugin on any site you own. Install the plugin on all client sites for payment or as part of a paid service. Can be sold or flipped with site installation (passing on single user license). Price = $37.00.
Note: Pricing details of Power Online Reviews can vary, depending on whether there are any promotions or limited-time specials being offered. The above reflects the current price when this content was written. This may or may not be the actual pricing charged by the plugin developer when you visit the plugin site and there may be additional upsells or one-time offers after your purchase.
Check the plugin’s website for current pricing details:
Additional Plugin Info
For ”how-to” videos showing how the plugin works, including help documentation and tutorials, FAQs, customer help desk, contact details and more, visit the Power Online Reviews website.
Install The Plugin
Businesses are currently ignoring opportunities to create happier customers and boost their revenues because they are not effectively managing their online reputations. Power Online Reviews offers a simple and easy solution to manage customer reviews on your website.
For full details, check out the plugin here: Power Online Reviews – Easy Customer Reviews Management For WordPress
***
***