The WordPress WYSIWYG (What You See Is What You Get) editor is powered by TinyMCE, an Open Source application that integrates with the WordPress Content Management System.
While the default WordPress visual editor is feature-rich, there are some things it can’t do, such as easily adding tables to WordPress without requiring knowledge or skills of coding HTML and CSS.
If you are looking for more functionality and options than what is currently provided by the default WordPress Visual editor, this tutorial will show you how to add additional enhancements to your default WordPress WYSIWYG editor using WordPress plugins.
How To Enhance Your WordPress Editor
Complete the step-by-step tutorial below to learn how to install and configure the TinyMCE Advanced plugin.
TinyMCE Advanced

TinyMCE Advanced is a useful plugin that includes a number of additional WordPress editor-enhancing features.
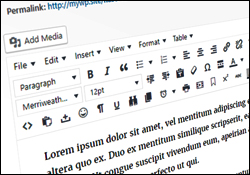
The screenshot below shows the default WordPress visual editor …
 Here is a screenshot of the same WordPress visual editor after TinyMCE Advanced plugin has been installed, activated and (minimally) configured on your site …
 The additional functions included in TinyMCE Advanced include:
- Advanced HR – insert a horizontal ruler
- Advanced Image – insert and format images
- Advanced Link – insert links to text and images.
- Advanced List – (use this only if you experience problems with how lists display on your page).
- Context Menu – adds a configurable context menu.
- Emoticons (Smilies) – insert smiley images.
- Date and Time – inserts date and time
- IESpell – inserts a spellchecker.
- Layer -adds some layer controls (only works on some browsers).
- Nonbreaking – inserts nonbreaking space entities.
- Print – adds a print button.
- Search and Replace – adds a search/replace function.
- Style – imports CSS classes from your themes style sheet.
- Table – adds table management functionality.
- Visual Characters – adds the possibility to see invisible characters.
- XHTML Extras – adds support for XHTML specific tags.
How To Install TinyMCE Advanced WordPress Plugin
![]()
Always backup your WordPress site and data before installing a new WordPress plugin!
If you don’t want to perform your own site backups, then consider hiring a professional, or use a WordPress backup plugin.
Learn about a great WordPress backup plugin that can fully automate your backup process here:
***
To install the plugin, log into your WordPress site and click on Plugins > Add New …

Make sure that you are in the “Search” tab of the Install Plugins screen. In the Search field enter TinyMCE Advanced and click on Search Plugins …

Locate TinyMCE Advanced in the results list and click on the Install Now link to automatically install the plugin on your site …

Once the plugin has been successfully installed, click Activate Plugin …

Your plugin is now activated …

Configuring TinyMCE Advanced Plugin
In your WP Admin menu, select Settings > TinyMCE Advanced …

The “TinyMCE Buttons Arrangement” screen will display in your browser …

(Click here for an enlarged view of the above screenshot)
The screen displays a number of pre-filled and empty toolbars and all other available buttons below the toolbars, as well as an advanced section.
The toolbars are fully configurable. Simply drag and drop buttons corresponding to the functions you want to have available on the toolbars to add, remove or rearrange your visual editor menu …

You can also drag and drop menu separators when customizing this section. This will add a vertical separator between buttons …

When you have finished customizing your toolbars, remember to click the Save Changes button to apply your changes and save your new settings …

Adding Tables To WordPress Using TinyMCE Advanced Plugin
The TinyMCE Advanced WordPress plugin adds a number of extra functions to your WordPress editor, including the ability to add tables to WordPress posts and pages …
 Here is an example of a table inserted into this post using the TinyMCE Advanced plugin:
| WIDGET COMPARISON CHART FOR XYZ COMPANY | ||
| Item No | Product Name | Description |
| W-001-PQA | MegaWidget 2000 | The MegaWidget 2000 provides the most value for the least cost. |
| W-019-RVY | PolyWidget | Use PolyWidget for multiple applications. |
| W-442-BCU | NanoWidget | NanoWidget comes in a variety of colors and sizes. |
TinyMCE Advanced lets you easily add, edit and delete tables, cells and rows, align and format content in tables, merge and split cells and more while working inside your post or page.
To learn how to create and manage tables in WordPress without HTML or CSS skills, see the tutorial below:
![]()
Tip #1: Some plugins add their own custom buttons to the visual editor toolbar. Sometimes this can cause the visual editor menu to interfere with other areas of your WordPress site’s administration area …

If this happens, don’t worry … there is a very simple solution! All you need to do is rearrange some of the standard buttons on the menu toolbar …

To do this, bring up the TinyMCE Buttons Arrangement screen (Settings > TinyMCE Advanced) and drag some of the buttons away from the toolbar that is crowded with too many custom buttons to an emptier toolbar …

Once you have finished rearranging your menu buttons, click the “Save Changes” button to save your new settings …

Now, when you bring up the visual editor on your screen, you should find that the problem has been solved (if it hasn’t just keep rearranging the buttons until the issue has been corrected!) …

For more information, documentation and FAQs about this plugin, visit the plugin website: TinyMCE Advanced
Tip #2: Another plugin that takes the concept of enhancing your WordPress visual editor even further, is Ultimate Tiny MCE …
Ultimate TinyMCE

Ultimate Tiny MCE seems to be a well supported plugin with lots of documentation (including video tutorials) that provides many of the same features as TinyMCE Advanced, but offers additional features such as:
- Advanced image features like mouseover and mouseout effects … even add your own popup javascript windows when a user clicks a link.
- Add your own custom CSS using drop-down menus (no HTML knowledge required).
- Easily Insert page anchors into long posts.
- Image mapping allows you to add separate navigation links to the same image.
- Over 40 emoticons (smilies)
- And a whole lot more …
To learn more about this plugin, visit the plugin site here: Ultimate Tiny MCE
![]()
Note: Ultimate TinyMCE recently announced that the plugin will not work on WordPress versions above 3.9. The plugin developers recommend switching to its successor, WP Edit (see below).
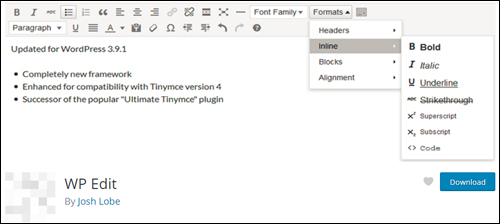
WP Edit
(WP Edit)
WP Edit gives you control of the default WordPress editor and access to additional editor tools.
WP Edit is the successor of the ‘Ultimate TinyMCE’ plugin (see previous item) and has been completely rebuilt to add extensive, additional editing functionality to the default WordPress editor. You can arrange buttons into toolbars and configure these however you like to improve your workflow.
WP Edit adds dozens of additional custom options to the WordPress editor, including new buttons, extended formatting abilities, and new features.
These features include:
- Easily insert images, media, YouTube videos, and clip art.
- Create tables via a graphical interface.
- Adjust table cell border and background colors.
- No need to learn HTML and CSS (use buttons with visual interfaces instead).
- Easily access all shortcodes available to your WordPress environment and insert them into the content editor.
- Use shortcodes to insert columns (similar to “magazine” style layouts) in your content areas.
To learn more about this plugin, visit the plugin page here: WP Edit
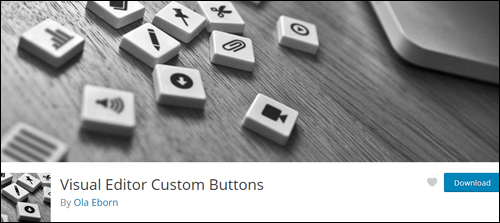
Visual Editor Custom Buttons
(Visual Editor Custom Buttons plugin)
Visual Editor Custom Buttons provides a fast and easy way to add custom buttons to the WordPress Visual Editor.
With this plugin you can easily add your own custom buttons in the Visual Editor, as well as the HTML Editor. You can then add HTML code to the button, either as a wrap (before, after) or as a single block. On top of that you can, from within the plugin, set the CSS so you can view the effect of the button directly in the Visual Editor.
The plugin comes with a large number of ready to use button icons, but you can also add your own.
For more information, visit the plugin page here: Visual Editor Custom Buttons
Congratulations! Now you know how to extend the functionality of your WordPress visual editor with additional features and how to customize the WordPress WYSIWYG editor.

***
"Your training is the best in the world! It is simple, yet detailed, direct, understandable, memorable, and complete." Andrea Adams, FinancialJourney.org
***