
 This tutorial is part of our WordPress installation step-by-step tutorials, where we show you how to install a WordPress site or blog on your own domain name.
***
As we explain in this tutorial, the easiest and fastest way to install WordPress on your domain is using software installation scripts like Fantastico or Softaculous inside the cPanel hosting management console.

(WordPress Installation Scripts)
If you followed our WordPress Installation tutorials, you should have a web hosting account already set up with cPanel.
For more information about choosing a web hosting provider, see this tutorial:
If you already have a web hosting account set up with cPanel, then see this tutorial to learn how to install WordPress with a couple of mouse clicks:
If you don’t have access to WordPress installation scripts on your server, then you will need to install WordPress manually (or change web hosting providers). This tutorial will show you how.
![]()
In addition to our step-by-step tutorials, we also recommend watching the videos listed in our WordPress Installation Video Tutorials section.
How To Install WordPress Manually On Your Domain Using FTP
In this tutorial, you will learn how to perform the “famous” 5-minute WordPress installation and install WordPress manually on your domain using FTP (File Transfer Protocol) …

(The famous WordPress 5-minute installation. Source: WordPress Codex: Installing WordPress)
![]()
*** IMPORTANT ***
In order to perform a manual WordPress installation, your web hosting account needs to provide you with access to MySQL database management features. Most cPanel hosting accounts provide this function. If you do not have access to MySQL databases, please contact your host, or get help from a professional.
Also, please keep in mind that this is a tutorial for non-techies, so we have simplified the WordPress installation process by leaving out technical explanations of the process (you will still get the same results if you just follow the tutorial below). If you want the technical details, refer to the official WordPress documentation on how to perform a manual installation of WordPress here.
Tutorial: Installing A WordPress Site On Your Domain Name Using FTP
There are 5 steps involved in the process of installing WordPress manually on your domain name:
- Set up a MySQL database
- Download WordPress files
- Edit “wp-config.php” file
- Upload files to your server using FTP
- Complete your WordPress installation
Let’s go through each of these steps …
The Famous WordPress 5-Minute Installation For Non-Techies
Step 1: Set Up A MySQL Database
Log into your web hosting account (in this tutorial, we’ll use cPanel) …

(cPanel login)
Scroll down to the ‘Databases’ panel and click on MySQL Database Wizard …

(cPanel: Databases – MySQL Database Wizard)
The MySQL Database Wizard will take you step-by-step through the process of creating a new WordPress database.
Step 1: Create A Database
The first step is to create a database with a unique database name. This can be anything you like (e.g. “example“).
Enter a database name and click ‘Next Step’ to continue …

(Step 1: Enter A Database Name)
Note: In the above screenshot example, the prefix “mywpsite_” is automatically assigned by the database creation wizard and “blog” is the database name. Your configuration will show a different username prefix based on your domain name.
Copy the entire prefix_databasename string and paste it into a plain text file (i.e. mywpsite_blog in our example). You will need this during the WordPress installation process.

(Save your database name into a plain text file)
Step 2: Create Database Users
The next step after creating a database name is to create a database user.
Enter a username (it can be anything you like), then enter and verify your password (aim for a score of “Very Strong” – use the Password Generator tool provided if you want), then click ‘Create User’ to continue …

(Step 2: Create A Database User)
In our example, the username is user123.
Copy and paste your password to the plain text file you’ve created to store your database details.
Step 3: Add User To The Database
In the next screen, do the following:
- Copy the “User” and “Database” details to the plain text file you have previously created. You will need this information later.
- tick the ‘ALL PRIVILEGES‘ checkbox.
- Click on the ‘Next Step‘ button to proceed …

(Step 3: Add User To The Database)
Step 4: Complete the Task
You have successfully created a new MySQL database …

(Step 4: MySQL database created)
You should also have a plain text file containing your database details (User, Database, and Password) …

(Your database details)
Log out of your cPanel administration area when finished.
You have now completed Step #1 of the WordPress manual installation process. Let’s move on to Step #2 …
Step 2: Download WordPress Files
The next step after creating your database is to download the WordPress installation files.
![]()
We recommend creating a folder on your hard drive for all of your WordPress files (e.g. plugins, themes and older versions of WordPress), just in case you experience any problems and have to reinstall these later …

(Create a folder on your hard drive to save your WordPress files)
Visit www.WordPress.org to download the latest version of WordPress …
 (Download WordPress from WordPress.org)
Click on the ‘Download WordPress’ button (1) and save the latest version of WordPress to the WordPress folder you’ve created on your hard drive (2) …

(Download WordPress files to your hard drive)
Once the .zip file containing the latest WordPress version has been downloaded to your hard drive, extract the application files to the WordPress folder you have created …

(Extract WordPress files to your hard drive)
The WordPress files you have extracted to your WordPress folder should look like the screenshot below …

(WordPress files)
![]()
If your computer’s operating system doesn’t let you automatically extract (i.e. open) zip/rar files on your hard drive, you will need to use a compression utility like WinZip, or search online for “how to extract files from a zipped compressed folder“.
Note: If you plan to install WordPress into a subfolder of your domain name (e.g. yourdomain.com/blog), you will need to rename the extracted folder and make sure it matches the subfolder name …
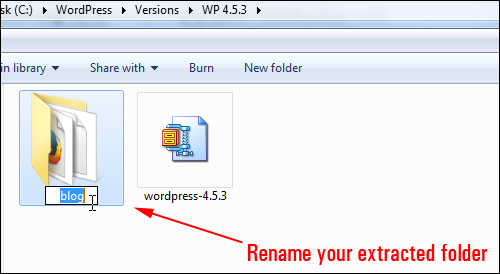
(Rename your extracted folder if installing WordPress into a subfolder)
In other words, if you plan to install WordPress into a subfolder called “blog” rename the folder containing the extracted WordPress files blog. If you plan to install WordPress into the main directory of your domain (called the “root” directory), then there’s no need to rename your folder.
For more information about choosing the location of your WordPress installation, see this tutorial:
You have completed Step #2 of the WordPress manual installation process. Let’s now move on to Step #3 …
Step 3: Edit The “wp-config.php” file
Locate the “wp-config-sample.php” file inside the folder containing the WordPress installation files you have extracted …

(wp-config-sample.php)
Rename this file to “wp-config.php” (to rename the file, click on the file name to highlight it and delete the unnecessary -sample text) …

(Rename file to wp-config.php)
Open the renamed wp-config.php file using a plain text editor like Notepad …
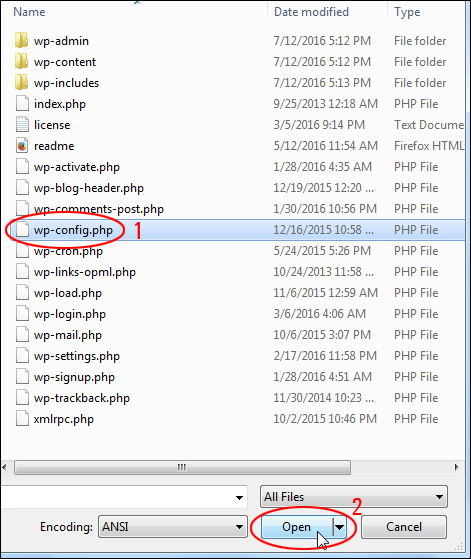
(Open wp-config.php file)
![]()
Tip: if you can’t see the wp-config.php file, make sure that ‘All Files’ is selected from the ‘Open File’ drop-down menu …

(Select ‘All Files’ to view .php files)
Replace the values highlighted in the screenshot below with your database details from Step#1 …

(Add your database details to wp-config.php)
You will need to make the following changes to the “wp-config.php” file:
- Replace ‘DB_NAME’ > ‘database_name_here‘ with your database name
- Replace ‘DB_USER’ > ‘username_here‘ with your database user
- Replace ‘DB_PASSWORD’ > ‘password_here‘ with your database password
In our tutorial example, your wp-config.php file would look like the screenshot below (remember to use your database details, not the ones used in our example) …

(wp-config.php with our example database details entered)
Once you have replaced the placeholder values with your own database details, select File > Save to update your wp-config.php file …

(Save your wp-config.php file)
![]()
*** Important ***
With most server configurations, you can just leave ‘DB_HOST’ value as ‘localhost‘, unless your web hosting company advises you to enter a different value in this field.

(Use ‘localhost’ unless advised otherwise by your web host)
Also, make sure that your new values have been entered correctly inside the single quote marks. Entering the wrong value or deleting one of the quote marks will create errors in your WordPress installation …

(Enter values correctly inside single quote marks)
Authentication Unique Keys and Salts
We’re not done yet with the wp-config.php file. You still need to insert the Authentication Unique Keys and Salts. These are security codes that are unique to every WordPress site.
Scroll down the wp-config.php file until you find the Authentication Unique Keys and Salts section …

(Secret keys need to be generated and added to your wp-config file)
Copy the URL shown in the wp-config.php file and paste it into your browser or type the URL shown below into your web browser to visit the WordPress secret-key service generator site and get your unique authentication keys …
https://api.wordpress.org/secret-key/1.1/salt/
(Copy this URL and paste it into your browser to create your secret keys)
Your salt keys will be automatically generated. Select and copy all of the screen content to your clipboard …

(Copy everything on this screen to your clipboard)
Go back to your wp-config.php file and replace the section highlighted below with the contents of your clipboard …

(Replace this section with the contents of your clipboard)
The unique keys will be added to your wp-config.php file …

(Salt keys added to your wp-config.php file)
After pasting the new values into your file, check to make sure that everything is ok, then resave and close your wp-config.php file …

(Unique keys and salts added)
You have completed Step #3 of the WordPress manual installation process. Let’s now move on to Step #4 …
Step 4: Upload Files To Your Server Using FTP
Now that you have edited your wp-config file, the next step is to upload all the WordPress files from your hard drive to your server.
![]()
If you don’t know how to transfer data from your computer to your server using FTP (File Transfer Protocol), please complete the tutorials below:
Open up your FTP application …

(FireFTP – FTP application for Firefox)
Create an account for your domain and connect to your server …

(Create an FTP account for your domain)
In the “local drive” window pane of your FTP application, open the folder where you have extracted all of your WordPress installation files and locate the public_html directory on your server …

(Locate the WordPress files on your hard drive and open the installation directory on your server)
Upload all the WordPress installation files from your hard drive to the public_html folder in your server using FTP …

(Transfer WordPress files from your hard drive to your server)
![]()
If installing WordPress into a subfolder (e.g. yourdomainname.com/blog), copy the entire folder you have previously extracted to your hard drive to your server (in our example, this is the folder renamed “blog”) …

(Installing WordPress into a subfolder? – Upload the folder and WordPress files to your server)
If you plan to install WordPress into the main directory (i.e. visitors will see your site when they type in your domain name), open up the folder on your hard drive where you have extracted all of the WordPress files to, then select and upload all of the files inside this folder directly into the public_html folder on your server …

(Installing WordPress into the root directory? – Upload all WordPress files to your server)
The file transfer will take a few minutes to complete. After all of your files have been uploaded to your server, close your FTP application …

(WordPress files transferred using FTP)
You have completed Step #4 of the WordPress manual installation process. Let’s now move on to Step #5 – the final step of the installation process …
Step 5: Complete Your WordPress Installation
Open your internet browser and type in the location of your installation (i.e. type in the URL that will lead to the location where you have installed WordPress), e.g.:
- If you have installed WordPress in your root directory, enter just your domain name (e.g. http://yourdomainname.com)
- If WordPress has been installed in a subfolder (e.g. blog), enter your domain name plus the subfolder (e.g. http://yourdomainname.com/blog)
If all the previous steps have been completed successfully, you should see a screen similar to the one shown below. Select a default language for your site and click ‘Continue’ …

(Select a default language for your website)
This now brings you to the famous 5-minute WordPress installation!
If a screen like the one seen in the example above is not showing, go back and check to make sure that you have entered all the details correctly into your wp-config.php file.
If you get a screen like the one shown below, enter the following information into the fields:
- Site Title – Type in the title that you want your site to display. You can change this later (for more details, see the WordPress Configuration tutorials).
- Username – The admin username cannot be easily changed, so please choose your username carefully (if you need to change your admin username later, see this tutorial).
- Password – Aim to get at least a “Strong” rating for your password. Write your password down and save it for your records. If you lose this password you will need to reset your WordPress password later.
- Your Email – Enter your site’s administrative email.
- Search Engine Visibility – if you don’t want your website to be indexed by search engines, tick the “Discourage search engines from indexing this site” box, otherwise, leave this option unchecked.
Once you have entered all of the fields click Install WordPress to complete the WordPress installation process …

(The famous five-minute WordPress install!)
Once your installation is set up, you will see a screen similar to the one shown below.
Click ‘Log In’ to continue …

(WordPress installed successfully!)
Test Your New WordPress Installation
The last step of the installation process is to log into your new WordPress site and make sure that everything is working correctly.
When the WordPress login screen appears, enter your username and password, then click the ‘Log In’ button …

(WordPress Log In Screen)
You will see your WordPress dashboard …

(Your WordPress dashboard)
Congratulations … You have successfully installed WordPress manually using FTP!
WordPress Installation – Important
WordPress Installation Details
Save and/or print the WordPress installation email you will receive from your hosting account. It contains important details about your new installation …

(Save your WordPress installation details)
Additional Tutorials
If you run into issues configuring file permission settings on your server, please complete the tutorial below:
If you have followed all of the tutorials in our WordPress Installation module, your new WordPress site should now be installed.

(Source: Pixabay)
The next step is to configure your WordPress settings. Click on the button below to view our WordPress Configuration tutorials and learn how to set up a professional website or blog for business or personal use.
I Want To Configure My WordPress Settings
***
"These tutorials have so much information and are easy to understand. If you use WordPress or plan to in the future these will help you with everything you need to know." - Valisa (Mesa, Arizona)
***