 As we have discussed in this article, there are lots of benefits in using the WordPress CMS platform for building and managing your web site. One of these is that you can easily add content, expand your site’s functionality, and rearrange the layout of your website with no code editing skills or knowledge required.
WordPress lets you easily insert, delete, and control content in your blog’s sidebar (and header and footer sections, depending on your theme) using widgets.
Once you know how to use widgets, you can easily add things to your site’s sidebar area (plus headers and footers and other areas, depending on the theme you have installed) like:
- site pages
- blog categories
- blog post archive
- menus that display only selected pages
- links to resources
- posts that you want to promote
- post comments
- text ads
- customer testimonials
- surveys
- RSS content excerpts
- shopping cart forms
- product catalog images
- social media sharing buttons
- display widgets from other sites (e.g. affiliate programs)
- administrative forms (e.g. login, register, etc.)

(WordPress widgets help make managing and using WordPress easier)
To learn more about what WordPress widgets are, how widgets work and why widgets make managing your site easier, go here:
In this tutorial series we explain how to use and configure a number of frequently-used WordPress widgets.
How To Use WordPress Widgets
Widgets – The Basics
Before we start learning how to configure widgets, let’s first cover some of the basic concepts of how to use widgets:
Most WordPress Themes Support Widget-Ready Areas
Many WordPress themes support widgets and provide built-in widgetized areas in the theme’s layout where you can add widgets, such as the sidebar, header area, and footer. Depending on the theme installed on your site, widgets can sometimes also be added in the content area …
")
(Many WordPress themes offer users multiple widget-ready areas)
These widgetized areas correspond to a feature inside the Widget administration panel called “Widget Areas” …

(Widget Areas)
The Widgets Screen
The Widgets screen displays a list of all the widgets that are currently available for use on your site.
The right-hand section of the window displays your “active” widgets …

(Activate or deactivate widgets with drag & drop ease)
Available widgets can be made Active or Inactive using drag & drop.
Widgets dragged from the Available Widgets section to widget areas like the sidebar, footer, etc. automatically become activated for use.
The Widgets screen also includes an Inactive Widgets section that lets you remove widgets that you no longer want to actively display on your website. Inactive widgets retain their settings.
Rearrange Widgets Using Drag And Drop
You can easily insert, activate, deactivate, rearrange and remove things using widgets using drag & drop in the Widgets section …

(Rearrange your site’s widgets using drag & drop)
You can also easily reorder your theme’s layout by dragging and dropping widgets.
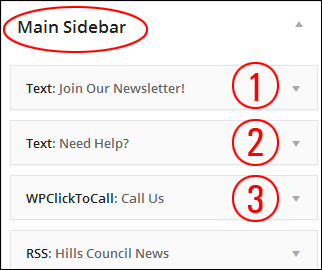
For example, in the image below, the widgets have already been configured to display things on your site like:
- A newsletter subscription form,
- A contact support banner, and
- A ‘click to call’ feature from a widgetized plugin (i.e. a plugin that adds an accompanying widget to your site) …

(Widgets control how certain features display on your site)
If we look inside the example site’s Widget area, you will see that these features correspond to the order of widgets inside the active widget area …
Let’s now change the above widgets in the Widget Area using drag and drop …

(Drag-and-drop widgets in your widget area to rearrange their order)
The widgets have now been reordered in the sidebar navigation section …
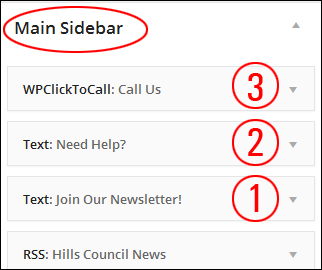
As you can see, this instantly changes the order of items in your sidebar.
Reorganizing sidebar layout with widgets can help to improve your site’s visitor experience.
Note in the screenshot below that the ‘click to call’ function (3) is now first the sidebar menu, and the support section (2) can now be found above the newsletter sign-up form (1) …

(Rearrange sidebar elements using widgets to improve your site’s visitor experience)
Removing Widgets From The WordPress Blog Sidebar Navigation Area
Deleting widgets from the sidebar is really easy.
For example, let’s show you how to remove the Search widget from your sidebar section …

(Search widget)
To remove an active widget, either expand the widget settings and click the Delete link …

(Delete a WordPress widget)
Or just drag the widget out of the Active Widgets section and into the Inactive Widgets area …

(How to remove a widget)
Repeat this process for any widgets you want to remove from the sidebar navigation area. You can always reactivate a widget by dragging it back into the active widgets area.
Widget Settings
Many widgets offer additional options that allow you to further configure your site features. This includes making certain types of information hidden to your site visitors but visible to registered users, displaying additional forms, fields, or data, specifying sizes of sidebar images, videos, etc.
Clicking on the little triangle in the corner of a widget expands the item and displays the settings for that widget …

(Toggling expands/collapse widget settings)
When the widget expands, you can change and save your settings, remove your widget from the “Active Widgets” section, close the widget, or click on the triangle to collapse the widget …

(Widget settings)
![]()
Some widgets offer little to no customizing options, or they may only allow you to add something like an optional title …

(Some widgets offer little to no customizing options)
Customize Widgets Section
Depending upon which theme you choose, you can also manage and customize your widgets without making actual changes to your site. This way, you can be sure that you like your customizations before making any permanent changes to your website.
Widget management is a great feature of WordPress. You can work in preview mode inside the WordPress Theme Customizer screen (Appearance > Customize) and see how your widget content will appear before publishing any changes (and avoid making errors), or change widgets on the fly using the Widget editor area.

(preview widget changes in the Customize feature)
If you need to make changes to the site while viewing the frontend, just click on the Customize link …

(Toolbar Customize Link)
This brings you to the Customizer section in the backend.
You can do a number of modifications and adjustments to the widgets in preview mode (like adding, removing and moving widgets around), and it will all be done in real time. If you are happy with the results, click the “Save and Publish” button and the changes will be instantly applied and made visible on your site to visitors.

(Widget management – work in preview mode)
After the changes are saved, WordPress will automatically update the widget settings and display the latest configuration to your site visitors.
![]()
Because the theme you choose affect how elements display on your site, we recommend installing the theme first before configuring widgets on the sidebar.
Also, remember to use the Customizer feature to preview all changes. This saves you from having to keep two browsers open while you complete this tutorial.
Now that you know the basics of using widgets, the next step is to learn how to begin configuring a number of commonly-used widgets in WordPress.

***
This is the end of part 1 of this series of tutorials.
To view Part Two, click here:
***
"Your training is the best in the world! It is simple, yet detailed, direct, understandable, memorable, and complete." Andrea Adams, FinancialJourney.org
***