A Basic Guide To HTML For WordPress Users
Learn basic HTML formatting you can use to format content in your posts and pages …
A Basic Guide To HTML Formatting In WordPress
 The worldwide web, your web site, your web pages, and even your web content are built and driven by code.
HTML is one of the main “code” languages used in WordPress to format content in your web pages and blog posts.
Fortunately, if you are a WordPress user, you don’t need to learn how to program code or build pages with HTML to compose and format content on your blog or web site.
WordPress has easy-to-use editors like the Classic Editor and Block Editor that let you create and format content using clickable menu buttons and drag and drop, and unique features like plugins, themes, and widgets that let you manage your website without having to touch code.
If you plan to do anything online other than surf the web, however, you will probably need something done on your web site or content at some point that will require having some knowledge of code.
Having a basic knowledge and practical understanding of HTML can be a useful and handy skill to have when composing, editing, or formatting content on your WordPress site. It can also save you time and money, especially with minor content edits and corrections.
In this tutorial, we will cover some of the basic HTML tags used to format content in WordPress posts and pages.

Formatting Content In WordPress Using HTML Tags
As mentioned above, if you plan to run or manage a website, having some knowledge and familiarity with HTML can be useful when creating, editing, or formatting content for posts and pages on your site. and can help you save time and money.
For example:
- You would like to edit certain elements in your content, (e.g. insert formatted text, a text link, a clickable image, etc.). If you know basic HTML, you can do this very quickly and easily without resorting to professionals and avoid incurring unnecessary costs or delays.
- You outsource your content writing to a freelance writer and receive files containing text formatted with HTML code. Knowing basic HTML can help you better proof your content and assess or review the quality of the work before you sign off.
- You outsource your content writing to a freelance writer and receive plain text files. Knowing basic HTML can help you add formatting to your content quickly and inexpensively.
- Someone creates content for your site. You spot a couple of text formatting errors, like a sentence that should or should not have been made bold, a missing hyperlink, or a link pointing to an incorrect URL, etc. With a little knowledge of HTML, you can quickly fix these without having to ask, pay, or wait for a webmaster, web designer, or someone else to do it for you.
- You want to discuss a project, custom work, or changes on your site with a web developer. Having basic knowledge and understanding of HTML can help you communicate your technical requirements more confidently and effectively. Being knowledgeable when presenting or discussing your ideas can also help you negotiate better with service providers.
What Is HTML?
HTML is an acronym for HyperText Markup Language. According to Wikipedia’s definition of HTML …
HTML is the main markup language for creating web pages and other information that can be displayed in a web browser.
HTML is written in the form of HTML elements consisting of tags enclosed in angle brackets (like
<table>), within the web page content. HTML tags most commonly come in pairs like<h1>and</h1>, although some tags, known as empty elements, are unpaired, for example<img>. The first tag in a pair is the start tag, the second tag is the end tag (they are also called opening tags and closing tags). In between these tags web designers can add text, tags, comments and other types of text-based content.The purpose of a web browser is to read HTML documents and compose them into visible or audible web pages. The browser does not display the HTML tags but uses the tags to interpret the content of the page.
HTML elements form the building blocks of all websites. HTML allows images and objects to be embedded and can be used to create interactive forms. It provides a means to create structured documents by denoting structural semantics for text such as headings, paragraphs, lists, links, quotes and other items. It can embed scripts written in languages such as JavaScript which affect the behavior of HTML web pages.
Source: Wikipedia, HTML
![]()
Important: Like everything else on the web, HTML is also subject to regular changes, and sometimes these changes will affect WordPress.
Presently, the latest version of HTML standards is version 5 (also called HTML5). This version has introduced several new “tags” to help sites keep up with the latest advances in web applications and browser technologies. As some of the markup tags used in older and even recent versions of WordPress get phased out, you can expect WordPress to continue updating its software to ensure compatibility with industry-wide coding and HTML standards.

How To Use HTML Tags To Format Content In WordPress
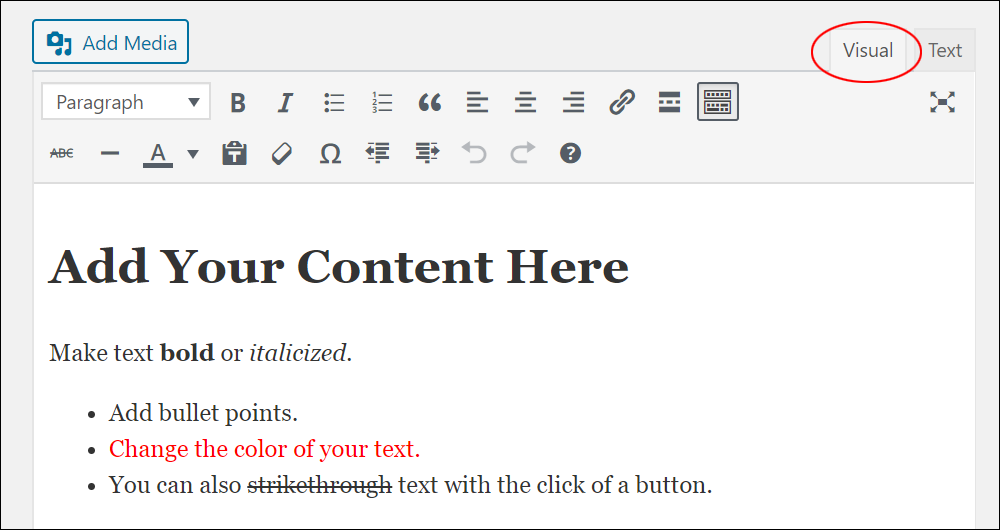
With the Classic Editor, WordPress gives you the choice of adding content using a built-in rich Visual Editor (also called a WYSIWYG editor, which stands for What You See Is What You Get) and a Text Editor that allows you to work directly with HTML code and other script languages (e.g. Javascript).
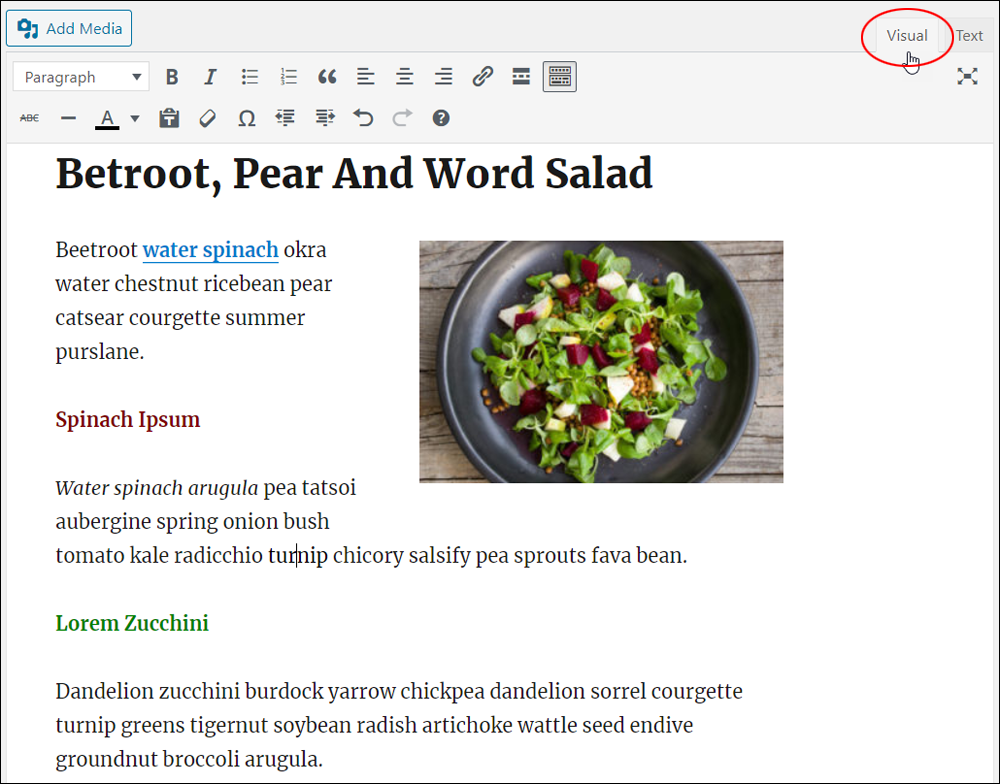
This lets you work with your content using the Visual Editor to format text using menu buttons…
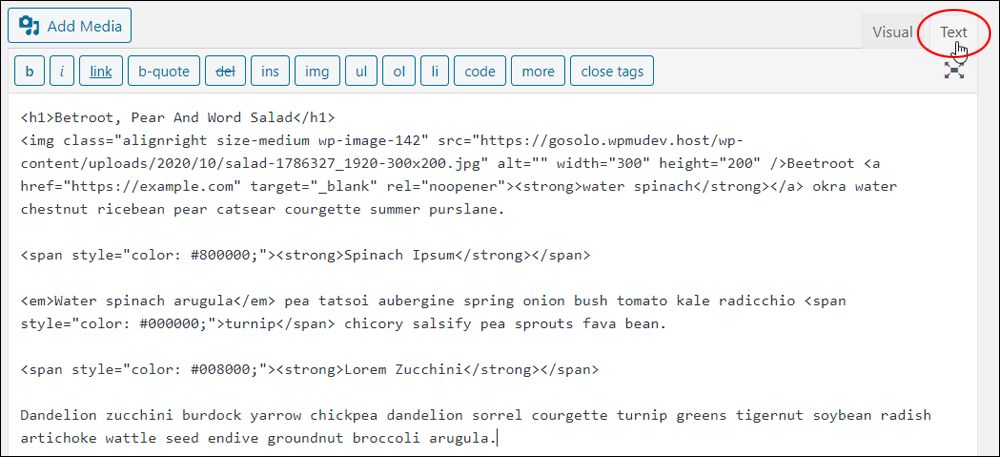
And with the HTML code used by those menu buttons to format your content…
![]()
To learn how to add content to your posts and pages, see the following tutorials:
- How To Create A New Post In WordPress – Part 1
- How To Create A New Post In WordPress – Part 2
- How To Edit and Delete Posts In WordPress – Part 1
- How To Edit and Delete Posts In WordPress – Part 2
- How To Use The WordPress Classic Editor
- How To Create A Page In WordPress
- How To Edit And Delete Pages In WordPress
HTML Tags Allowed In WordPress Content
For security reasons and to ensure that posted data content cannot be used to exploit sites, WordPress limits certain types of content that users can save to its database and filters out potentially harmful and/or invalid HTML by default. It also prevents potentially harmful content from displaying on your site when it is already in the database.
WordPress employs different methods to do this depending on:
- Whether users are posting content on a free hosted site (WordPress.com) or a self-hosted site (WordPress.org)
- The type of content being saved (e.g. a post or a comment)
- Whether the content is being posted by a trusted user or an unknown and unregistered user.
This filtering process allows users like site administrators and editors to use a larger set of HTML tags in their posts, pages, and comments, whereas other users can employ the same set of HTML tags in their post content, but a smaller set in their comments.
Any HTML that is not allowed is stripped out. This includes tags like <iframe>, <script>, and <style>
Additionally, any HTML that is not well-formatted is encoded, so that it displays as the HTML source and it is not actually parsed as HTML.
For example,
a href="http://somewebsite.com" target="_blank" rel="noopener">This is a poorly-formatted hyperlink.
Having said this, however, WordPress still allows you to use an extensive set of HTML tags.
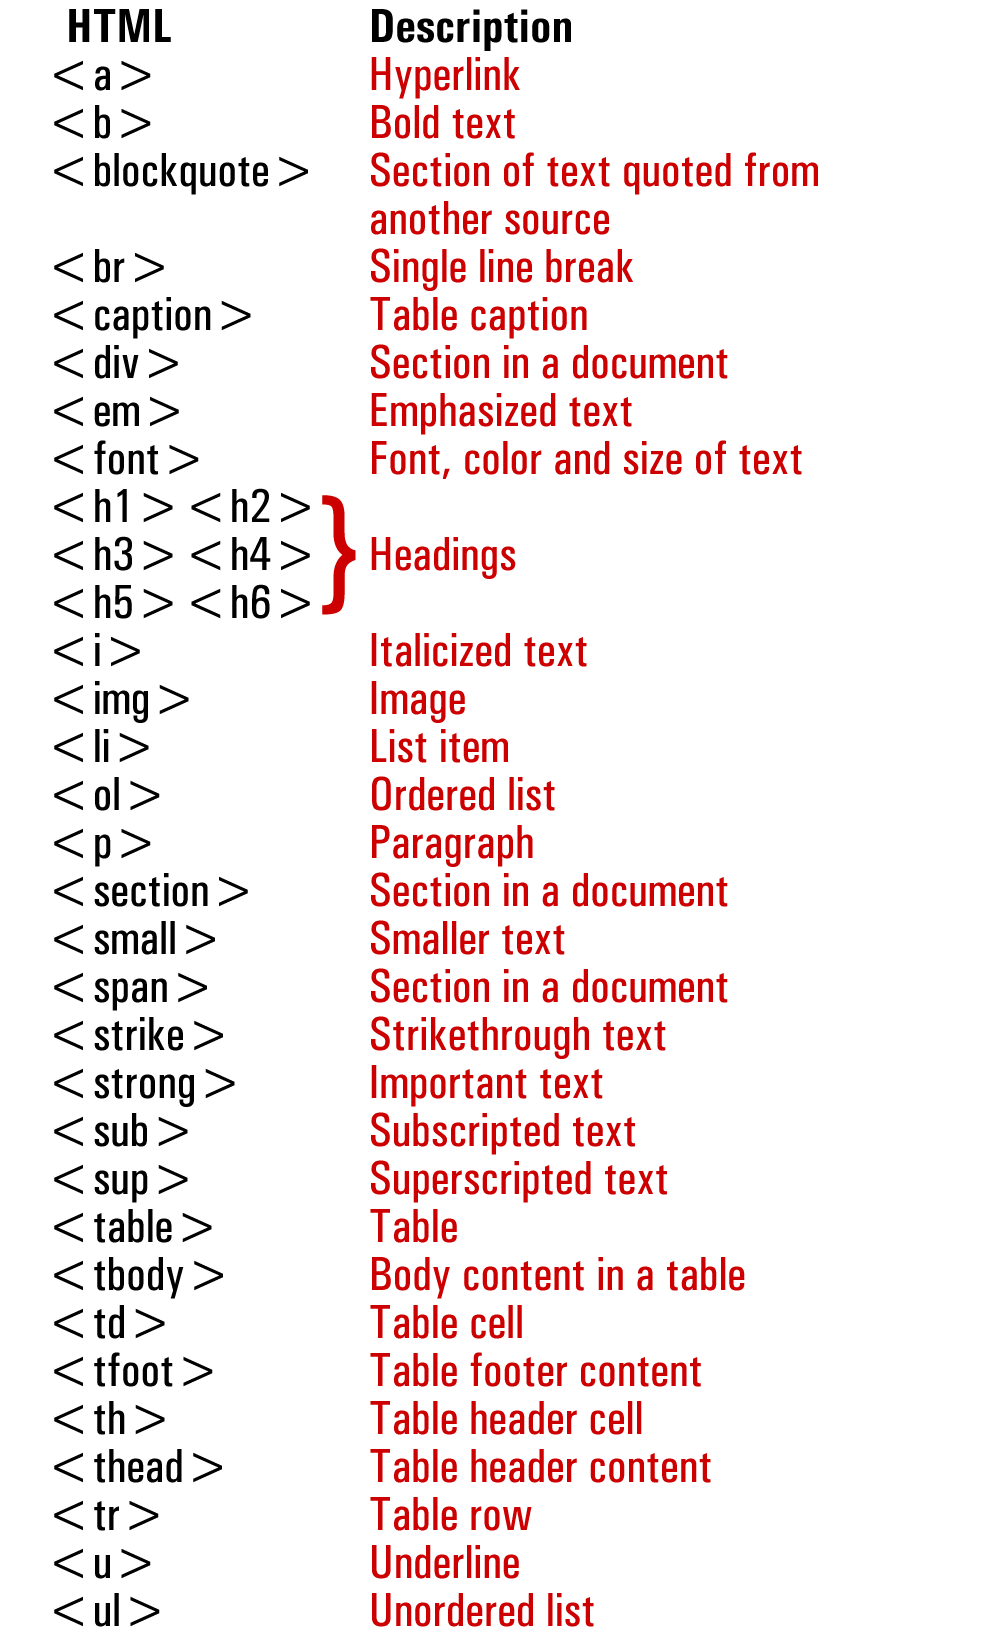
Here are some of the most commonly used HTML tags in WordPress:
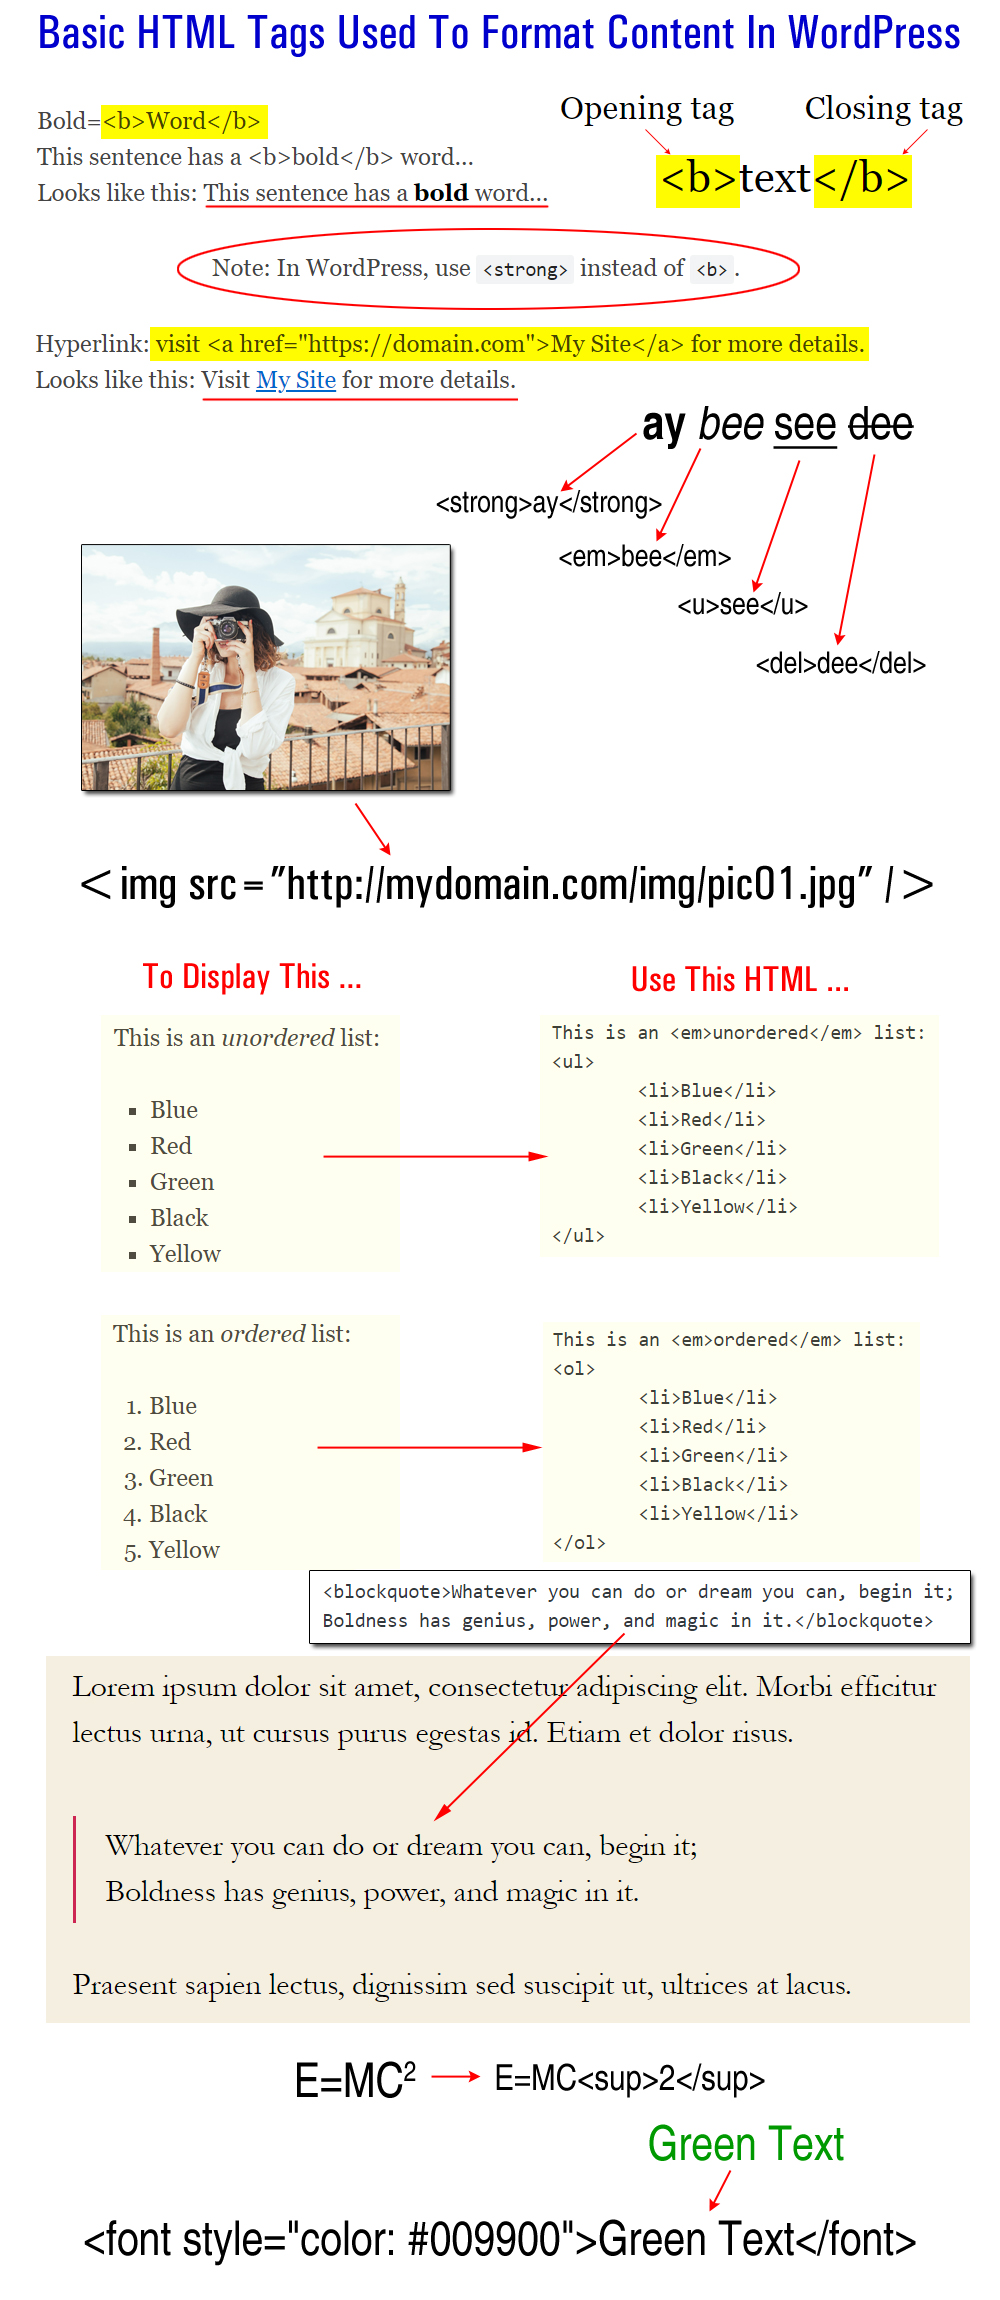
Here are some of the practical ways to format your content using a few of the HTML tags listed in the table above:
![]()
As explained earlier, this tutorial covers only some of the basic HTML tags that are used to format WordPress content. If you are interested in learning more about using HTML, then check out these tutorials: Free HTML Tutorials
The WordPress Text (HTML) Editor Explained
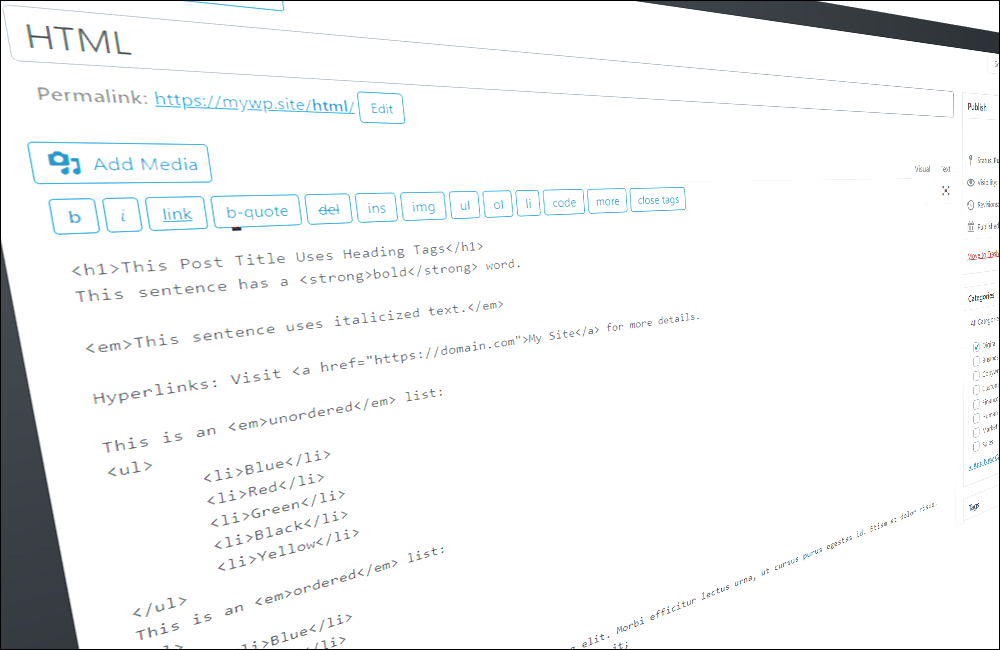
The Text tab in the WordPress Classic Editor lets you add (type, insert or paste in) and edit directly with HTML code and other script languages (e.g. Javascript) when inputting content into posts and pages.
By default, the Text (HTML) editor also comes with a standard set of menu buttons that help make it easier to insert the right HTML formatting tags into your text.

Below is a brief description of what each of the Text Editor menu buttons do with their corresponding HTML tag:
- b:
<strong></strong>Use this HTML tag for strong emphasis of text (i.e. make your selected text bold.) - i :
<em></em>Use this button to italicize text your highlighted text. - hyperlink:
<a href="http://example.com"></a>Clicking this button lets you add a hyperlink to your selected text. - b-quote –
<blockquote></blockquote>Click this button to turn your selected text into a quote or citation. del:<del></del>Use this button to indicate that the selected text has been deleted. Most web browsers will display deleted content as strikethrough text.- ins:
<ins></ins>Use this button to indicate that the selected text has been inserted. Most web browsers will display inserted content as underlined text. - img:
src="http://www.yourdomain.com/img/image.jpg" alt="image description" />Click this button to insert an image into your post or page and add an “alt” tag to the image. An alt tag adds a text description of your image in case the image doesn’t display or render on your reader’s web browser and improves your content’s accessibility (e.g. it can be read aloud by some web browsers to help visually impaired users). Note: You can also use the “Add Media” button (15) to insert images into your content. - ul:
<ul></ul>Click this button to turn selected text into an unordered list. Unordered lists normally display as a bulleted item list. Note: This tag needs to be used with the<li>tag (see below) in order for bullet lists to work and display your list correctly. - ol:
<ol></ol>Click this button to turn selected content into a numbered list. Items in an ordered list are normally numbered (like this list). Note: Like bullet lists, use this tag with the<li>tag (see below) to display numbered lists correctly. - li:
<li></li>Select this button to turn your selected text into a list item. (This tag should be used in conjunction with theuloroltag). - code:
<code></code>Use this button to highlight your selected text as code. If you don’t use these tags when displaying code, WordPress will convert your tags into its actual code and you may get errors like broken or missing text). Note: the content enclosed within the<code>tags normally will display using a preformatted text style, such as a monospaced font. (See the “Tips” section below for more details). - more:
<!--more-->Insert this tag to break your post content into “teaser” and main content sections. For example, if you add content to your post and insert this tag after the second paragraph, your post will only display the first two paragraphs on your blog page with a hyperlink (e.g. continue reading…). Your visitors will then need to click on this link to view the rest of your post. - Close Tags – This button closes any HTML tags left open in your content. Note: proof your content after using this function to make sure that all tags have formatted correctly.
- Distraction-Free Writing Mode – Click this button to work in “distraction-free” writing mode (see screenshot below). You can toggle between the Visual Editor and Text Editor modes, insert media and hyperlinks, and update your content while in “distraction-free” mode. Click the button again to return to normal editor display mode.
- Add Media button – Click this button to insert media into your content (e.g. images, videos, audio files). This button displays in both the Visual and Text editors.
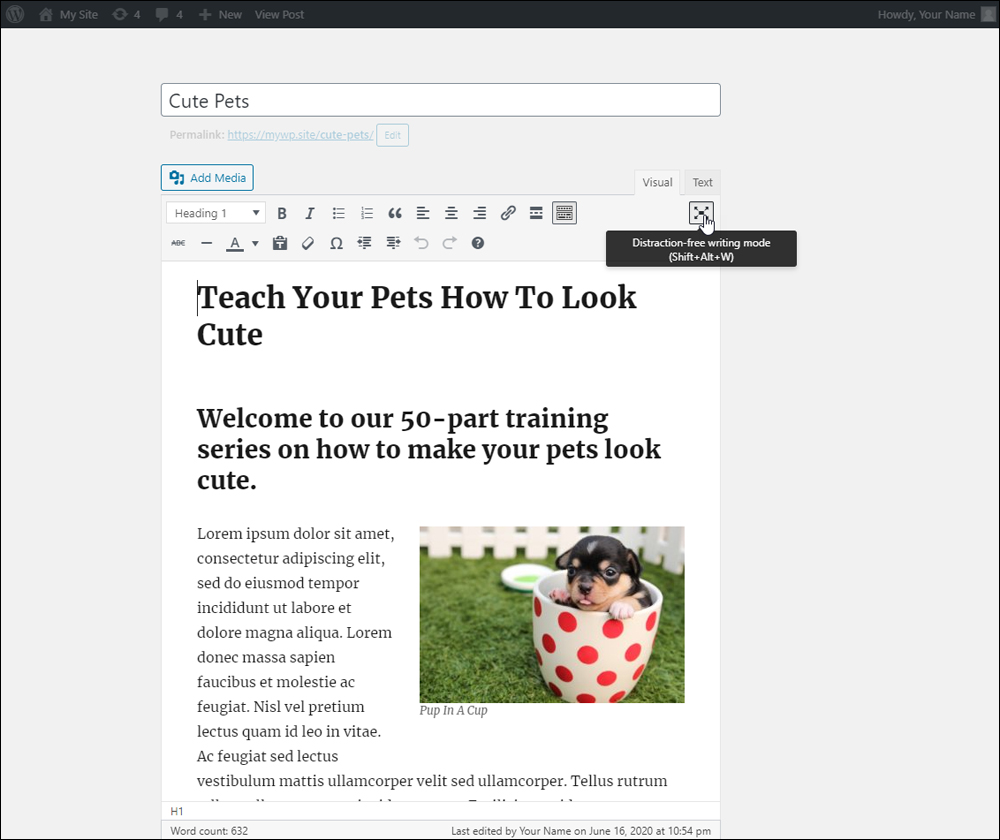
With distraction-free writing mode [#14] everything but your editor fades away, removing all distractions and leaving only the content you’re working on showing on your screen.
Useful Tips About Using HTML Formatting In WordPress
Using HTML Content Editors
If you plan to use HTML extensive and go beyond knowing the basics and simple text formatting tags, there are several free (or low cost) HTML editor software tools available to help you get started.
HTML5-Editor
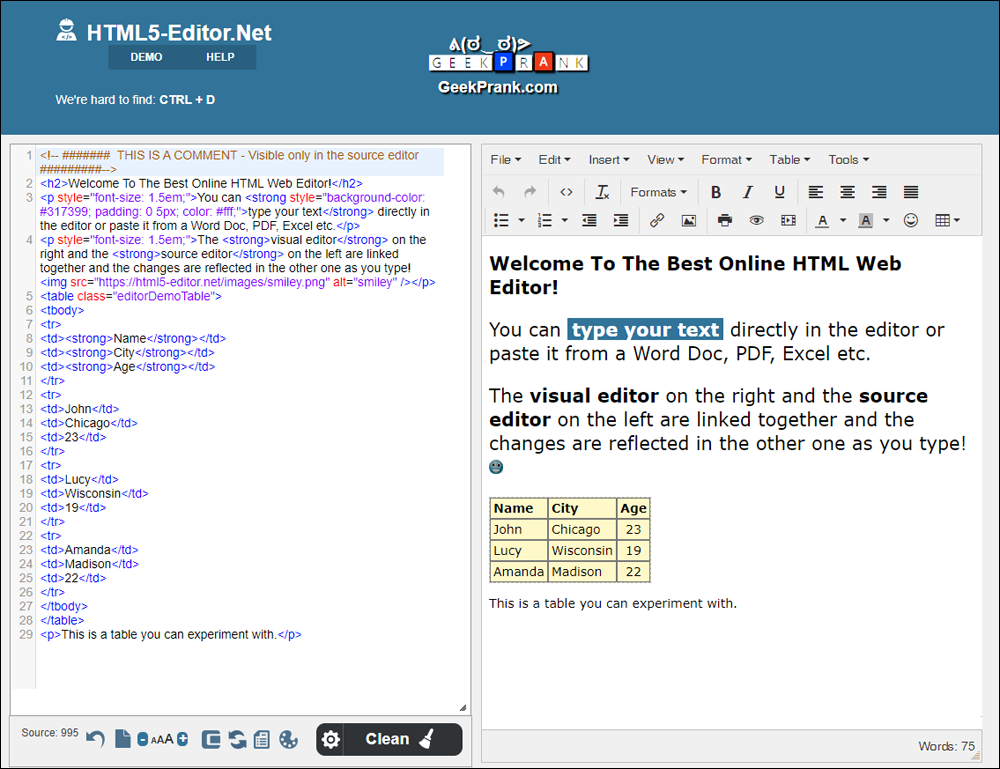
HTML5-Editor is a free online HTML content editor. It lets you type text directly into the editor or paste it in from a Word Doc, PDF, Excel, etc. and it generates the HTML code for your content as you type.
Quick HTML Tutorial #1: How To Add HTML-Formatted Content To The “About Yourself” Section Of Your User Profile
WordPress has areas that allow rich text content formatted with HTML to be added, like sidebar widgets and the “About Yourself” section of your User Profile.
However, these areas don’t provide a content editor like the Posts and Pages Visual editor.
In order to use HTML-formatted content in these sections, you will either need to compose the content using an external HTML editor like the one described above or use the tip provide below to create HTML-formatted text and then paste it into those areas.
Let’s go through an example, so you can see how to easily do this using the Classic Editor and Visual tab formatting menu buttons.
Normally, when a post is published in WordPress, a link to the post author is displayed somewhere at the bottom or at the top of the post.
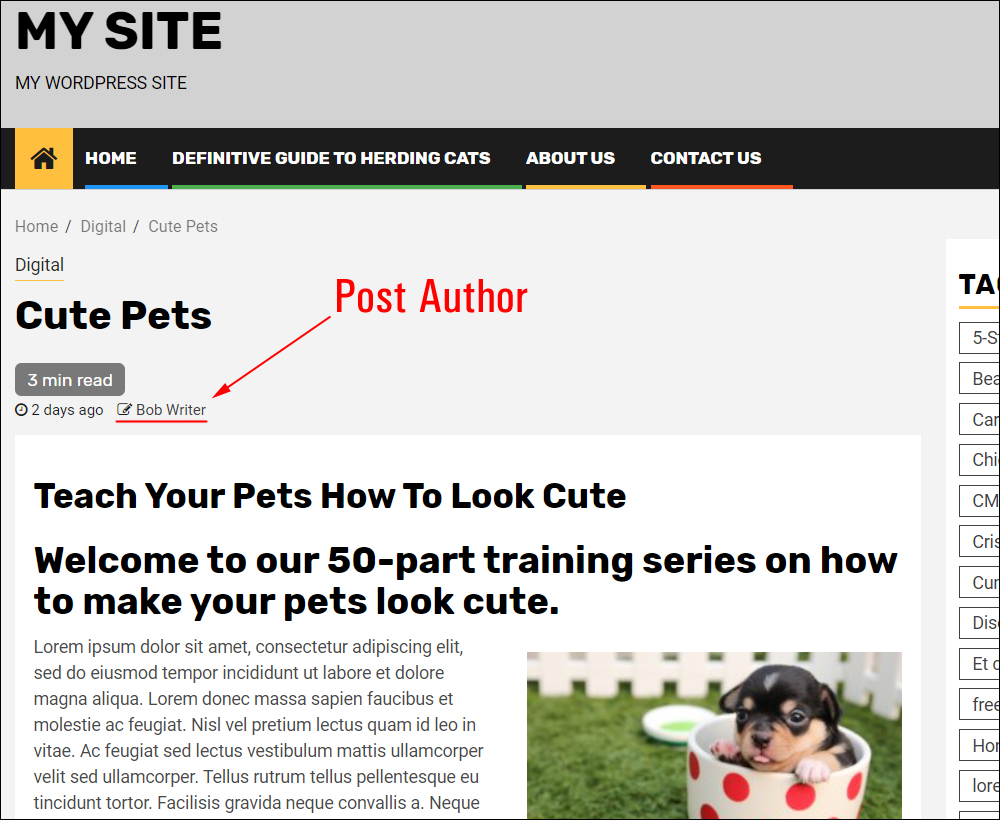
Clicking on the author link takes your visitor to the Author Archives section, where they can learn more about the author and browse other posts and articles they have published.
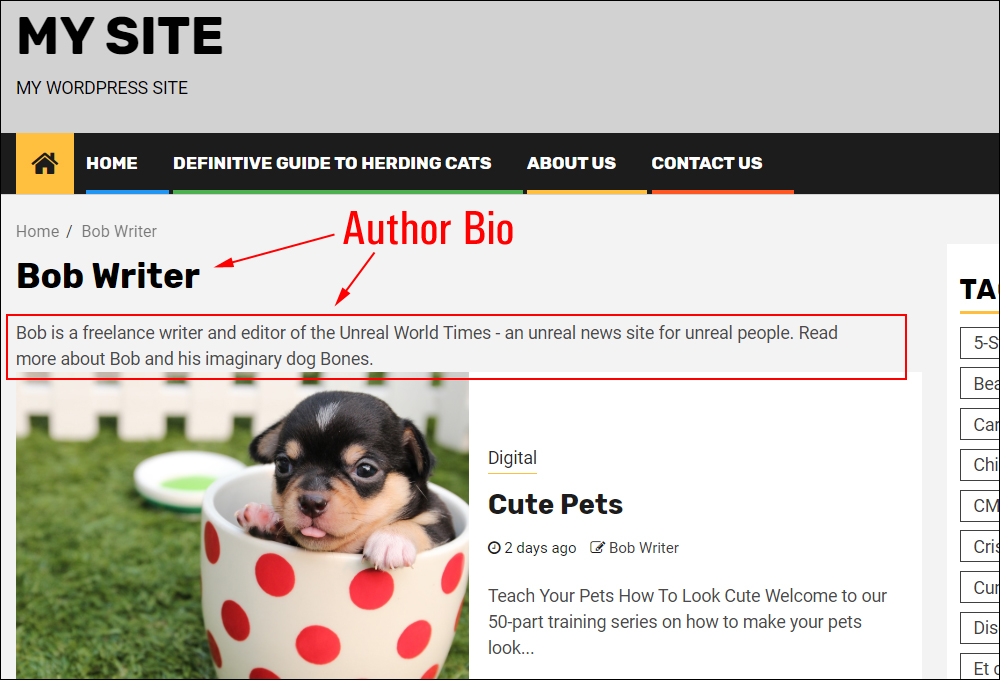
Note that there is no formatting (e.g. bold text, hyperlinks, etc.) in the above author bio example.
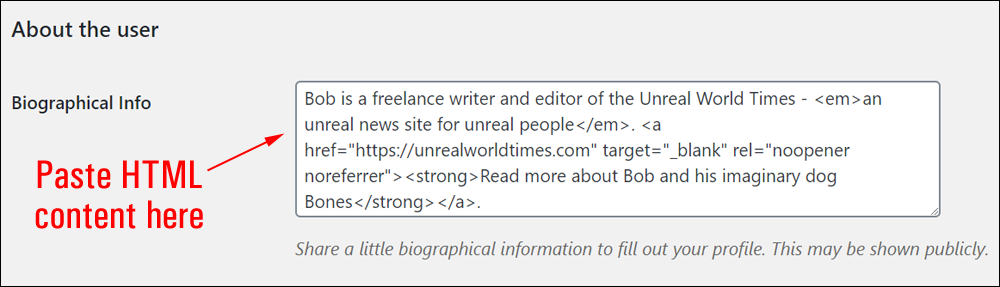
This is because, in this example, no HTML formatting has been added to the author profile section, which is located in the User Profile screen.
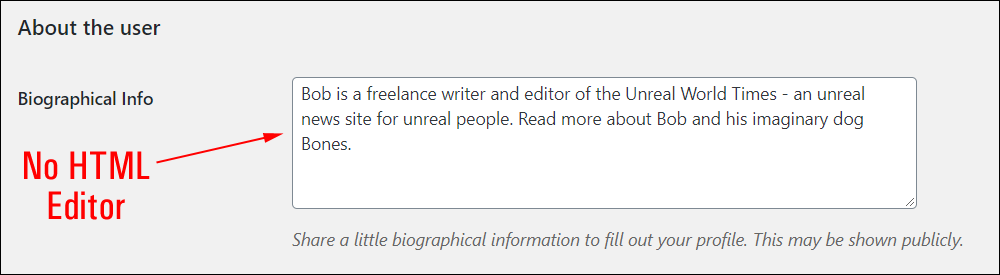
Notice too, however, that there is no HTML editor in the Biographical Info box section. You will need to paste content with HTML formatting tags to display these in your author’s bio.
Let’s show you how to easily do this without having to learn HTML.
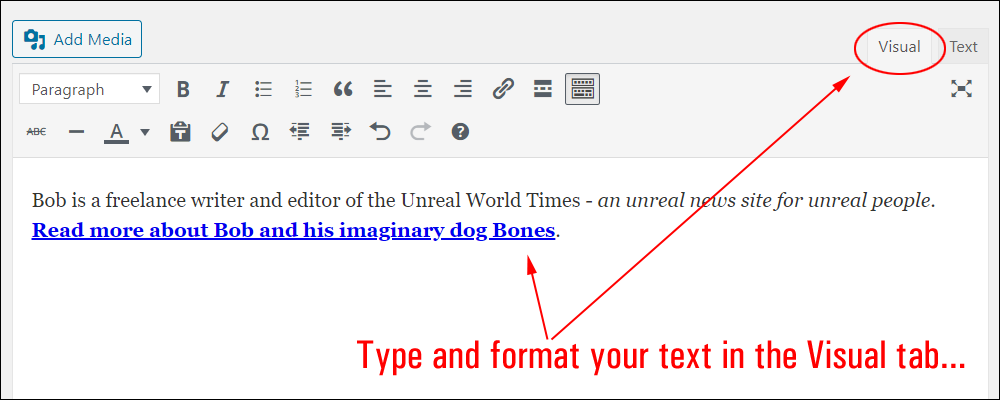
First, create a new post, then type or paste in your author bio information in the Visual tab.
Next, format your content using the menu buttons. You can add hyperlinks to other websites, social media pages, internal pages (e.g. product or services pages, newsletter subscription page, etc.), and simple text formatting to enhance your author’s profile description like bold and italics.
Switch to the Text Editor tab, then select and copy all the content to your clipboard.
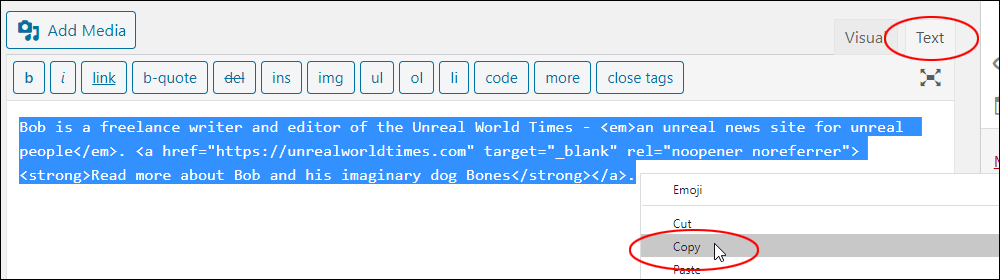
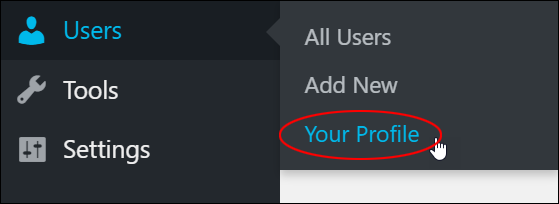
With the content copied to your clipboard, go to your user profile section by selecting Users > Your Profile from the main navigation menu on your dashboard.
Scroll down to the About Yourself section and paste the content from your clipboard into the Biographical Info text area.
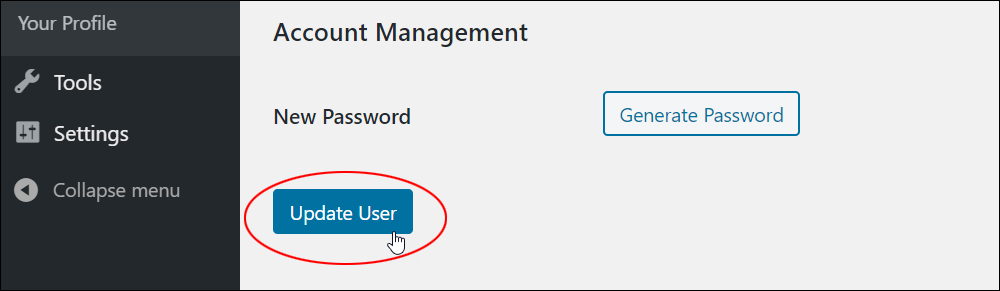
Remember to click the Update User button to save your changes.
Preview your author bio post page to confirm your changes.
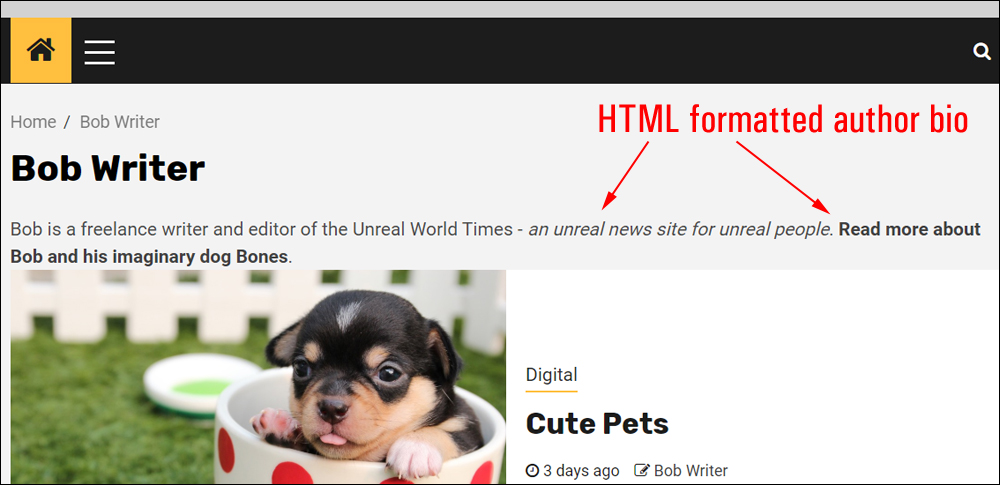
Congratulations … now you know how to create an author description for your posts and format it using basic HTML without having to learn code!
To learn more about editing your user profile settings, see this tutorial: How To Edit Your WordPress User Profile
Quick HTML Tutorial #2 – How To Add Jump Links To Posts And Pages
Jump links (also known as anchor links, or bookmark links) are hyperlinks that allow users to navigate to different sections of content without leaving a post or page.
Jump links are especially useful for creating a dynamic table of contents on long documents.
Follow the simple tutorial below to learn how to create jump links in your content.
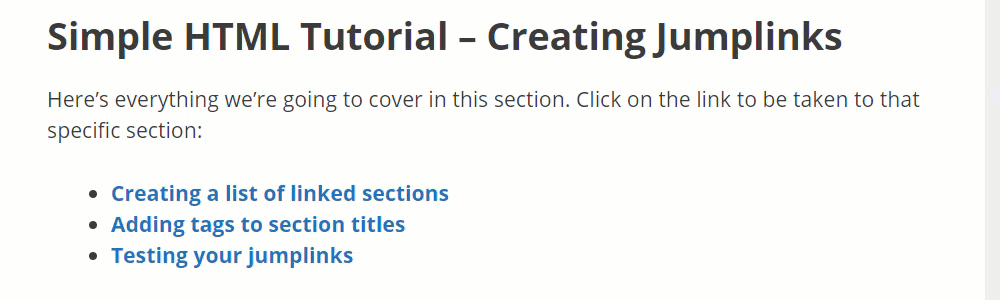
Simple HTML Tutorial – Creating Jump Links
Here’s everything we’re going to cover in this section. Click on the link to be taken to that specific section:
Creating A List Of Linked Sections
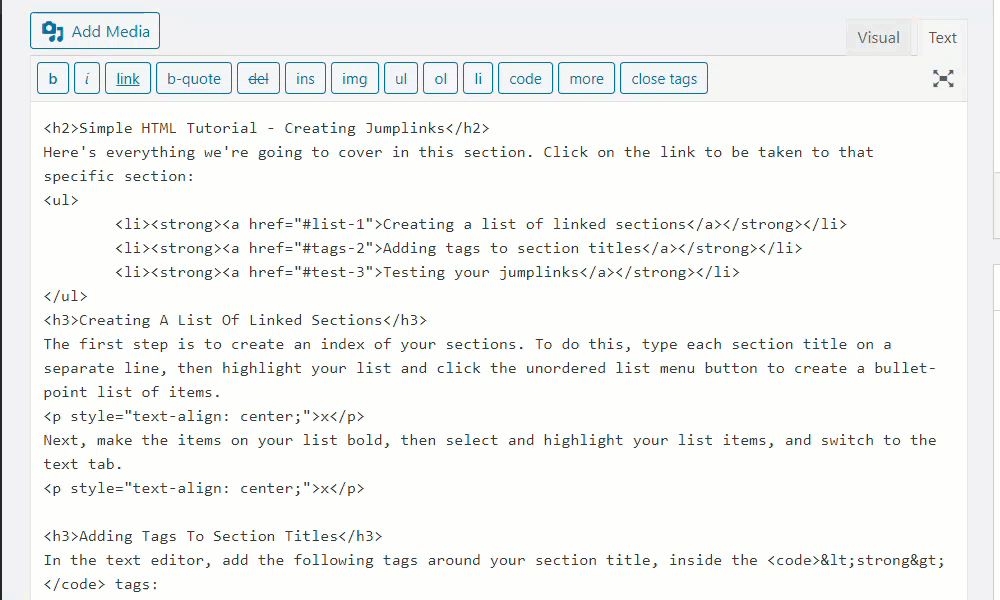
The first step is to create an index of your sections. To do this, type each section title on a separate line, then highlight your list and click the unordered list menu button to create a bullet-point list of items.

Next, make the items on your list bold, then select and highlight your list items, and switch to the text tab.
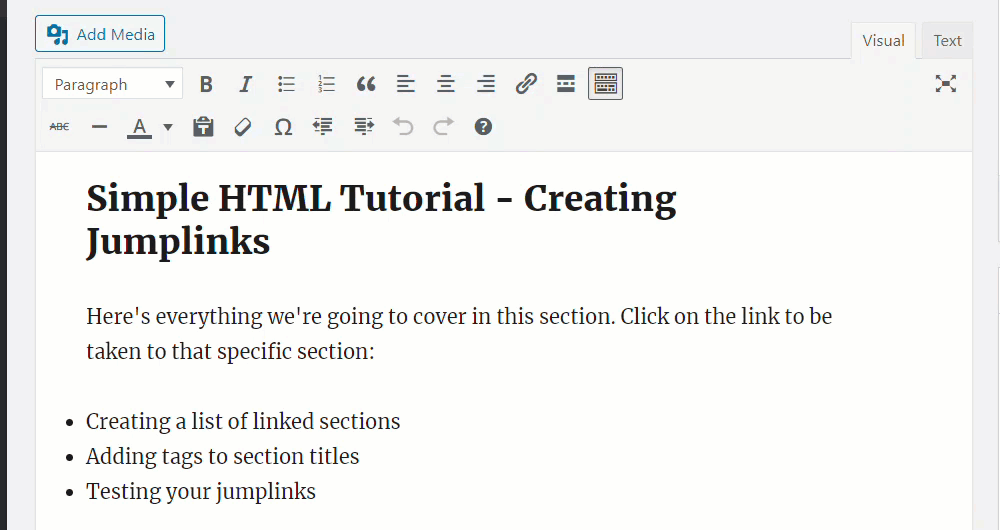
Adding Tags To Section Titles
In the text editor, add the following tags around your section title, inside the <strong> tags:
<strong><a href=”#enter-text-here”>Section Title</a></strong>
Replace #enter-text-here for each item on your list with a unique name.

Now, go through each of the section titles in your content where you want users to jump to when they click on the link, and add the following inside the heading tag (this example uses h3 headings – change the headings to whatever you like, e.g. h1, h2, etc.):
<h3 id=”enter-text-here”>Heading 1</h3>
Now, make sure that the text you type into enter-text-here corresponds to and matches the unique name added in each section title in your index list.
Testing Your Jump Links
The last step is to test your jump links and make sure all the links work.
Save and preview your post and click on each of your jump links.
HTML Plugins For WordPress
You can enhance the functionality of your WordPress Editor using different WordPress plugins.
Here are some examples:
WordPress HTML
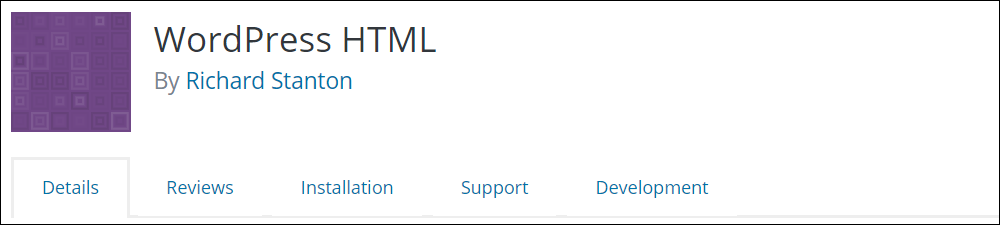
WordPress HTML lets you add custom HTML to the post and page body and head sections.
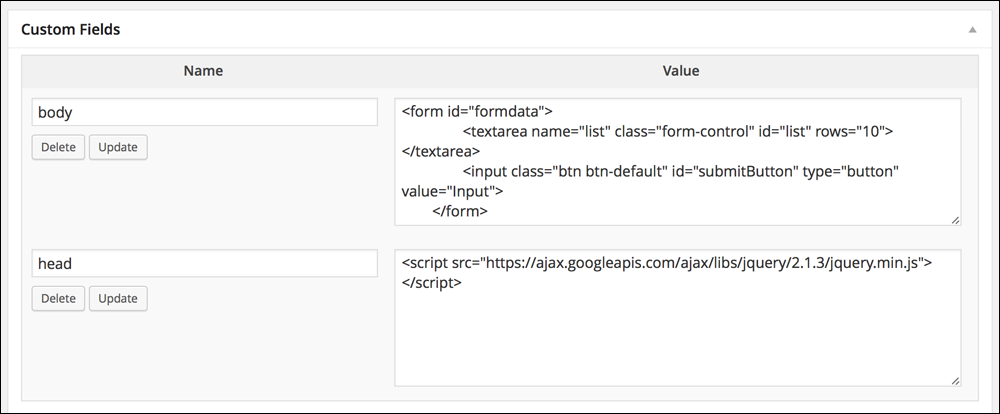
Pasting HTML directly into your WordPress editor can break elements and corrupt the HTML. By pasting the HTML code into the code in the plugin’s custom fields dialogue boxes, you can output the right HTML-formatted content to your post or page.
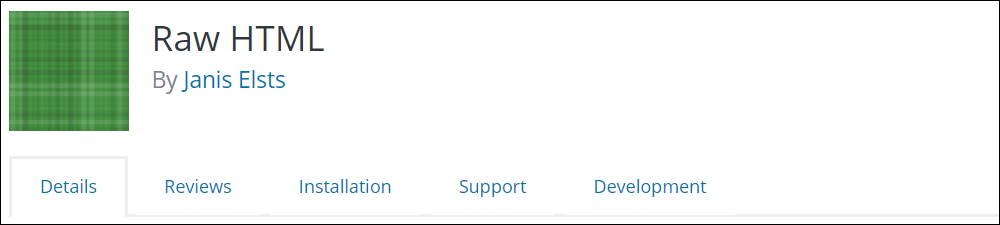
Raw HTML
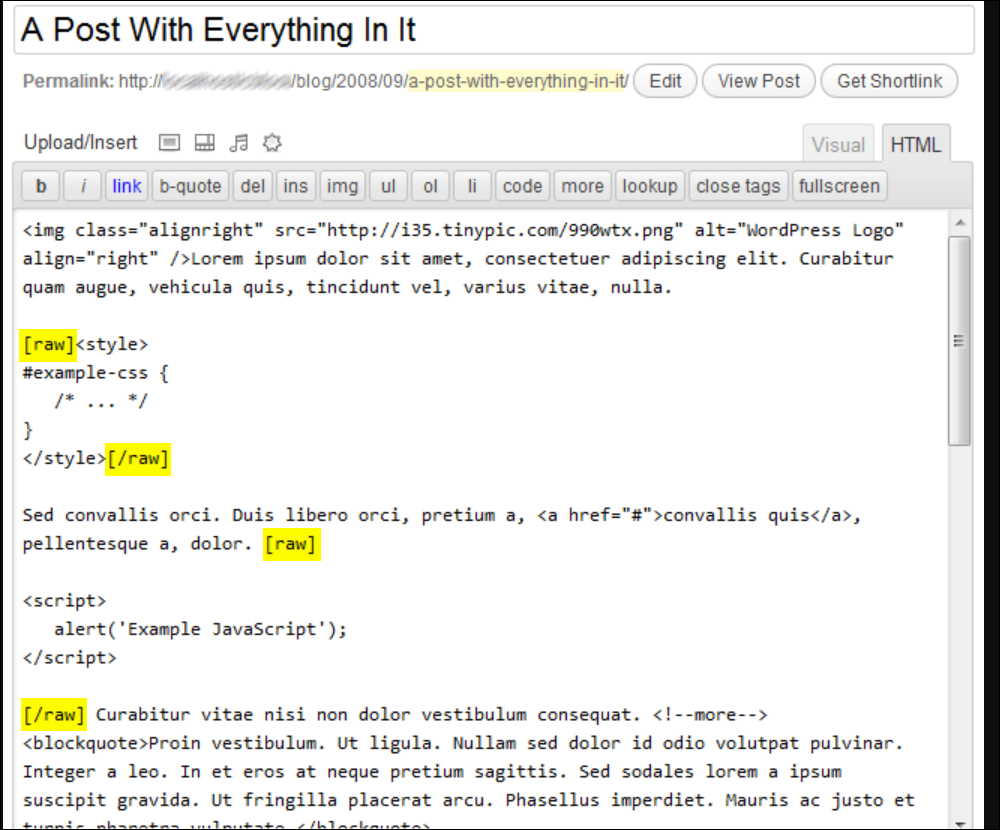
Raw HTML lets you disable automatic formatting like smart quotes and automatic paragraph creation and use raw HTML/JS/CSS code in your posts without WordPress messing it up.
With this plugin installed, you can wrap any section of your post in [raw]...[/raw] tags to prevent WordPress from converting new lines to HTML paragraphs, replacing apostrophes with typographic quotes, and so on. This is useful if you want to insert a CSS block or JavaScript into your post content.
Troubleshooting HTML Tag Errors
Tip #1: Text Formatting Displays Incorrectly
If your text formatting displays incorrectly after publishing your posts or pages, make sure that you have entered your HTML-formatted text correctly in the Text tab, not in the Visual tab.
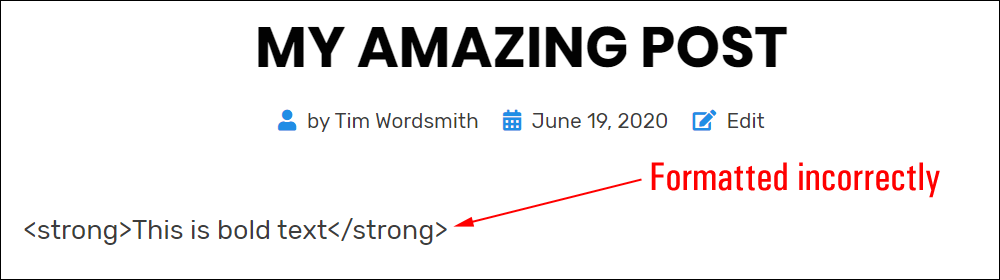
For example, if you enter the following text in the Visual Editor …
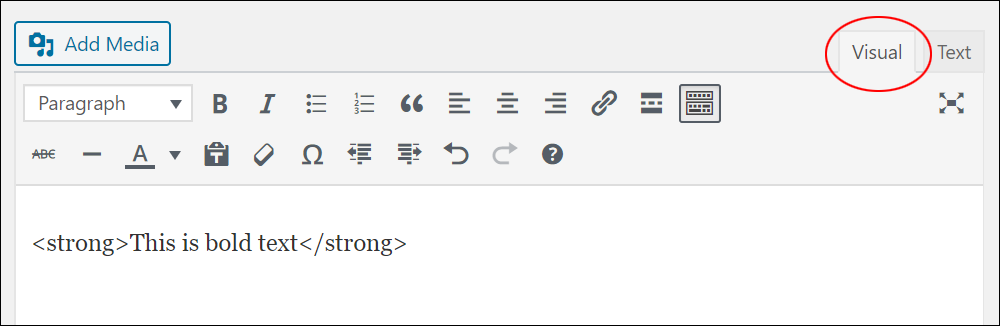
This is what your text will look like when you publish your post…
You can see what is causing the problem if you switch over to the Text Tab …
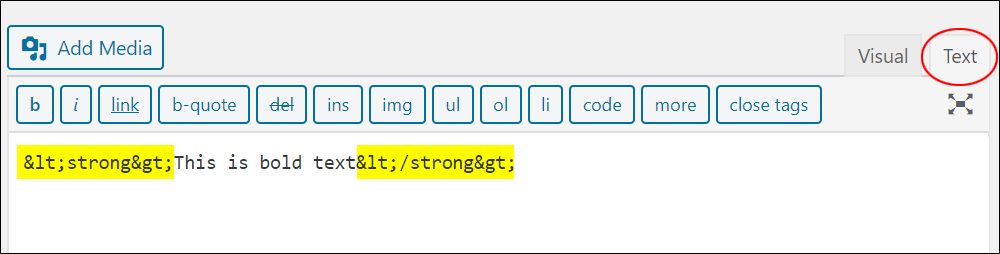
As you can see in the screenshot above, WordPress has converted the symbols < and > into their HTML code equivalents (called ASCII characters).
So:
<(open angled bracket) =<>(closed angled bracket) =>
To preserve the symbols < and > intact and ensure that your text will format correctly, you need to paste your code directly into the Text tab, not the Visual tab.
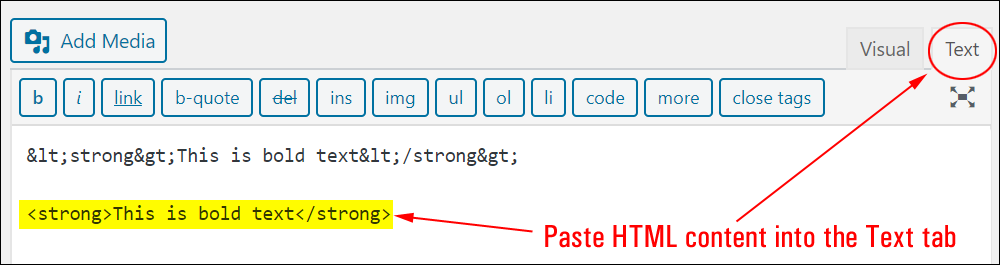
Now … when you publish your post, you will find that your text has been formatted correctly.

Tip #2: Disable The Visual Editor
By default, and for security reasons, WordPress does not allow some HTML tags to be used (e.g. codes such as embed, iframe, form, input, object, textarea, and others).
If you experience any issues when adding commonly used HTML tags that are allowed by WordPress to be used in your content, try disabling the visual editor in your user profile section.
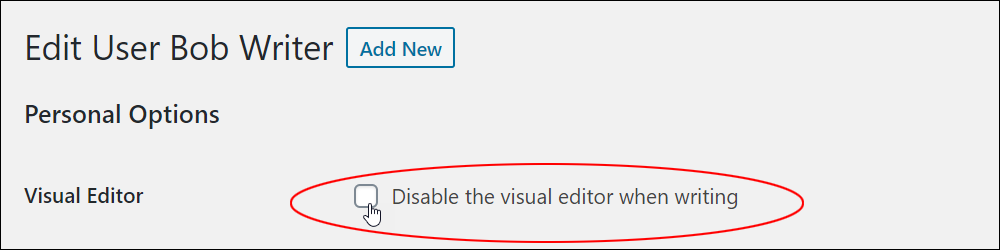
After disabling the visual editor and updating your settings, go back to your post or page and reinsert the content with the problematic HTML tags, then republish your post.
If the above suggestion fixes the issue, go back to your User Profile screen, reactivate the Visual Editor, and see if the HTML code is still working fine with the visual editor restored.
![]()
Note: If the above suggestion does not fix the issue and you continue to experience problems adding HTML code to your content, you may need to look at other options, like:
- Getting help from an experienced WordPress support service provider.
- Searching the WordPress Support Forum or WordPress troubleshooting resources for possible causes and solutions.
- Reinstalling your WordPress application (i.e. performing a clean site installation)
- Contacting your web hosting company for help or assistance.
Congratulations! Now you know how to format and style your content in WordPress using basic HTML.
***
"These tutorials have so much information and are easy to understand. If you use WordPress or plan to in the future these will help you with everything you need to know." - Valisa (Mesa, Arizona)
We are not affiliated, associated, sponsored, or endorsed by WordPress or its parent company Automattic. This site contains affiliate links to products. We may receive a commission for purchases made through these links.