 In Part One of this step-by-step tutorial series, we explained how to use WordPress widgets and in Part Two, you learned how to configure a text widget.
In Part 3, we began configuring a number of default widgets.
In this final installment, we are going to complete the tutorial by configuring a few more frequently-used sidebar widgets.
![]()
In WordPress v. 4.8, WordPress introduced new media widgets covering images, audio, and video, and an updated text widget that supports visual editing …
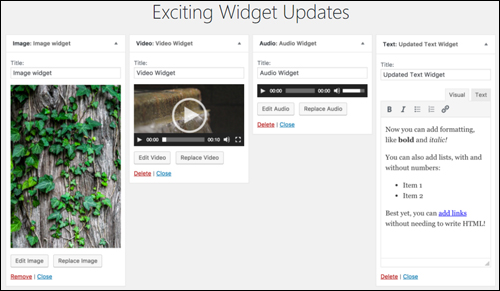
(WordPress 4.8 introduced new widget updates)
These widgets let you add content from your media library and media stored in other servers or storage locations (e.g. Google Drive, Dropbox, Amazon S3, etc.).
Let’s go through how to configure and use each of these widgets:
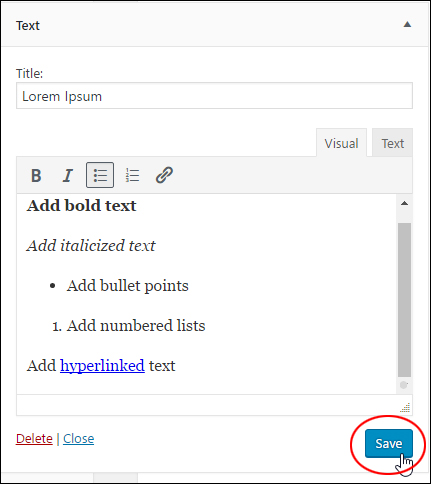
Rich Text Widget
From version 4.8 onward, WordPress has added native rich-text editing capabilities to text widgets …
(Rich Text Widget)
This lets you format text, create lists, add emphasis, and insert links into your sidebar text quickly and easily …
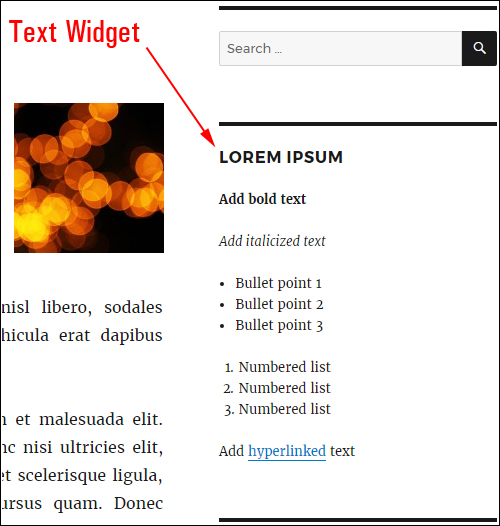
(Format text easily with the new text widget)
To learn more about using text widgets in WordPress, see the tutorial below:
WordPress Image Widget
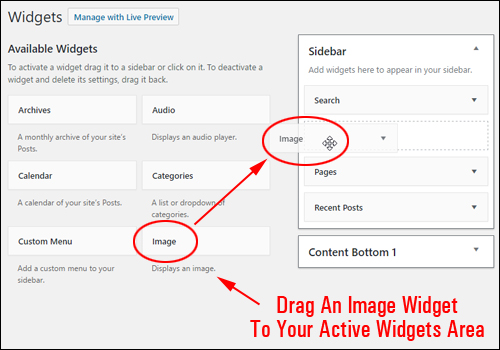
The WordPress Image Widget lets you add an image to your sidebar from your Media Library or an external storage location.
To add an image, drag an image widget to your active widgets area …
(Image Widget)
Click on ‘Add Image’ …
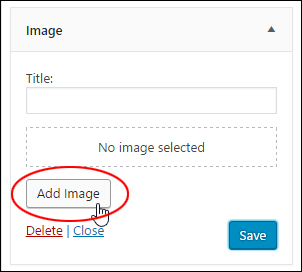
(Let’s add an image!)
Select an image from the Image Library, check or add image details (e.g. Caption, Alt text, Description, etc.) if desired and click the ‘Add to Widget’ button …
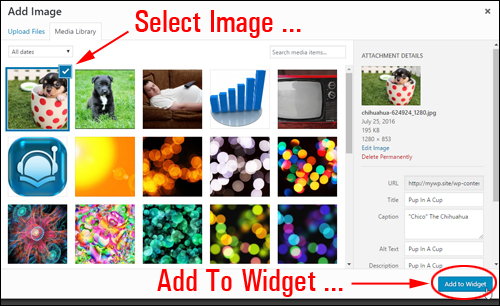
(Select an image)
The image will automatically load into the widget area …
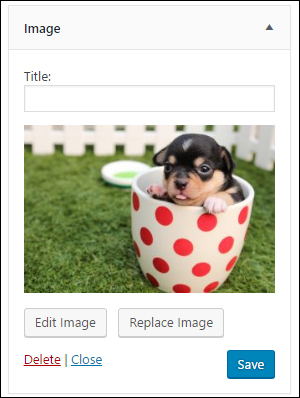
(Image added to widget)
Add a Title to your image if you want, or leave the ‘Title:’ field blank and click ‘Save’ …
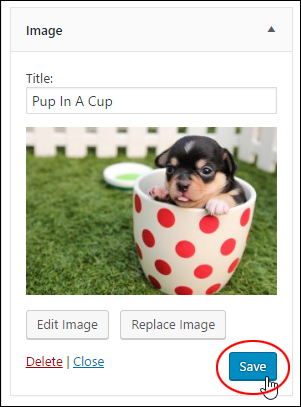
(Save your image)
Preview your website and you should see the image displayed where you have placed your image widget …
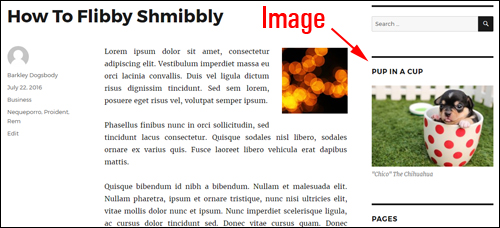
(Image added to website using WordPress image widget)
If you want to link your image to an URL, go back to your image widget and click on ‘Edit Image’ …
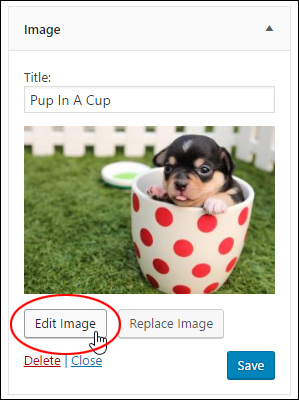
(Image Widget – Edit Image)
Add a URL in the ‘Image Details’ > ‘Display Settings’ > ‘Link To’ screen and click the ‘Update’ button …
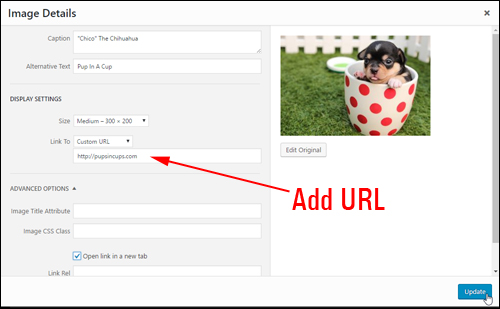
(Link your image to an URL)
To add an image stored in an external server or remote location, locate and copy the URL of the image to your clipboard …

(Copy image URL to your clipboard)
Go back to your image widget and click on ‘Replace Image’ …
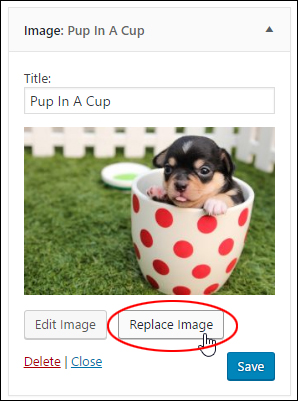
(Image Widget – Replace image)
The Media Library browser opens. Click on ‘Insert from URL’ and paste in the image URL copied to your clipboard, then click on ‘Add to Widget’ …
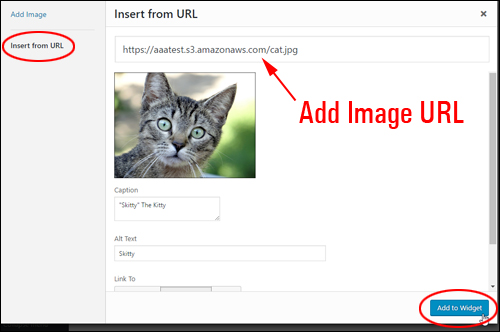
(Add image URL)
If you have previously added an image title in your widget, remember to replace it if required, then click ‘Save’ …
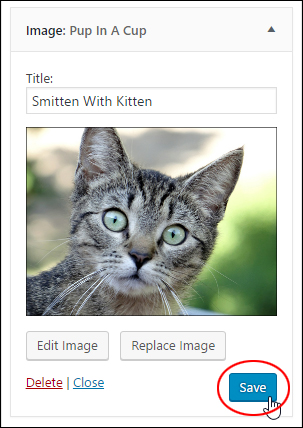
(Save your new image)
The new image will now display on your sidebar …
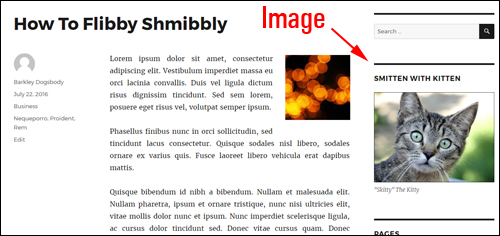
(New image added using WordPress image widget)
To learn more about adding images to WordPress, see this tutorial:
WordPress Video Widget
The WordPress Video Widget lets you add audio files to your sidebar from your Media Library, YouTube, Vimeo, or an external storage location.
To add a video to the sidebar, drag a Video widget to your active widgets area …

(Drag a Video widget to your sidebar)
Click the ‘Add Video’ button …
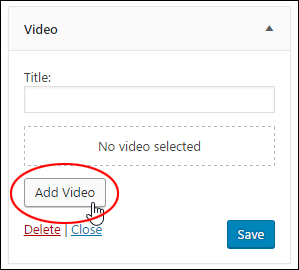
(Video widget – Add Video)
Select a video from your media library or add a video URL and click the ‘Add to Widget’ button …
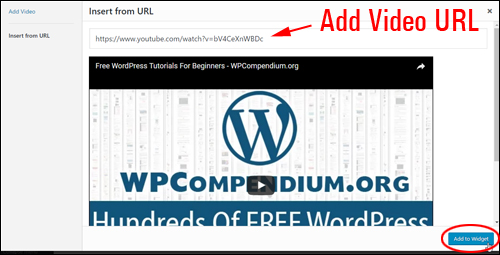
(Add a video URL)
Add a title to the widget if desired and click ‘Save’ …
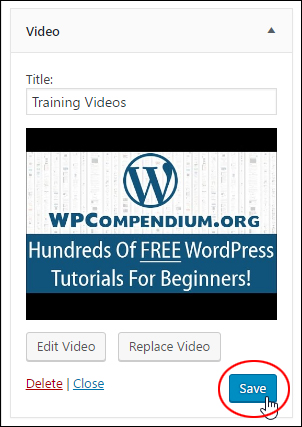
(WordPress Video Widget – Save Button)
Your video will display on your site where the video widget has been added …
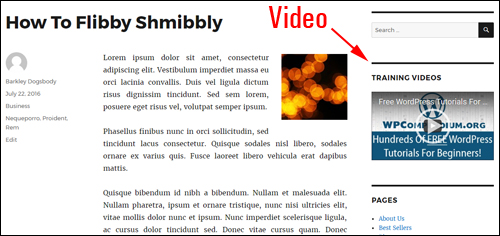
(Video added using WordPress video widget)
To learn more about adding video to WordPress, see this tutorial:
WordPress Audio Widget
The WordPress Audio Widget lets you add audio files like podcasts, music or a personal greeting to your sidebar from your media library or an external storage location.
To add an audio file to your sidebar, drag an audio widget to your active widgets area …
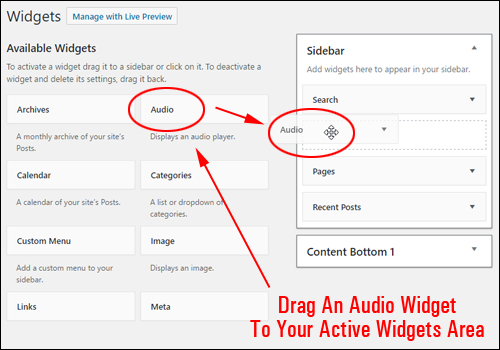
(Add an audio widget to your sidebar)
Click the ‘Add Audio’ button…
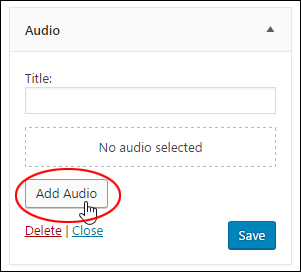
(WordPress Audio Widget – Add Audio button)
Select an audio file from your media library or insert the URL of an audio file stored in an external location …
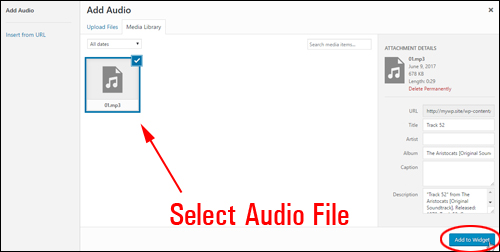
(Select your audio file)
Add a title to your widget if desired and click the ‘Save’ button …
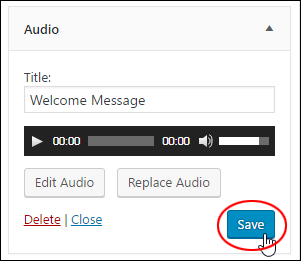
(Save the audio file on your audio widget)
Your site will now display an audio file to visitors where you have placed the audio widget …
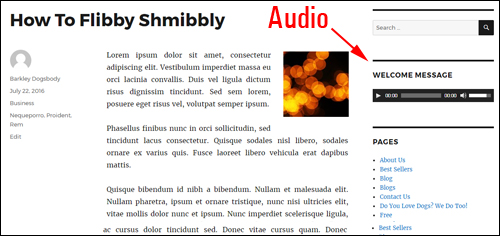
(Audio file added to your site using the WordPress Audio Widget)
To learn more about adding audios to WordPress, see this tutorial:
Adding A Newsfeed To The WordPress Sidebar
Now, let’s add An RSS widget to your sidebar.
To add the widget, find an RSS widget in the Available Widgets section and drag it to your sidebar area …

(WordPress RSS Widget)
Enter the following information into the widget settings:
- RSS feed URL: Paste the RSS feed URL here.
- Feed Title: If you want to add an optional title to the feed, enter it into this field.
- Items to display: Choose how many items you want to show on your sidebar menu from this drop-down menu.
- Display item content: Tick this box if you would like to show the RSS feed content.
- Display item author: Check this box to show the RSS feed item author.
- Display item date: Tick this box if you would like to show the feed item item date.

(RSS Widget settings)
Experiment with different widget settings to find the ideal combination for you.
The screenshot below shows the RSS widget configured with the settings shown above …

(RSS Widget displayed on sidebar navigation menu)
The example below shows a published RSS Feed widget configured with additional options selected …

(RSS Widget settings)
To learn more about using RSS feeds in WordPress, see this tutorial:
Add A Tag Cloud To The Sidebar
Let’s now add a widget to display clickable tags on the sidebar navigation area.
![]()
Tags displayed in your Tag Cloud widget are managed in the Tags screen …

(WordPress Tags area)
To use the widget, find a Tag Cloud widget in the Available Widgets section and drag it to your active area …

(Tag Cloud Widget)
There’s really not much to set up in this widget. You can add a title, and choose whether to display items in the tag cloud using Tags or Categories. Click Save when done …

(Tag Cloud Widget settings)
Your Tag cloud will now display on the sidebar …

(Tag cloud set to display WordPress post tags)
The example below shows a published Tag Cloud widget set for displaying Categories instead of Tags …

(Tag cloud set to display WordPress categories)
To learn more about using post tags in WordPress, see this tutorial:
How To Configure Your WordPress Archives Widget In Your Blog Sidebar
To complete this tutorial series, we’ll configure the default Archives Widget, which is a common WordPress widget.
As you continue publishing new posts in WordPress, your older posts begin to get pushed further down the chronological list and become less visible to site users. Your content is still there, it’s just not as visible.
The Archives Widget allows your visitors to access less visible content …

(WordPress Archives Widget)
There’s really very little to configure. You can add a title, and choose whether to display items in your sidebar in a dropdown menu, and display the number of posts published each month . Click Save when finished …

(Archives Widget settings)
The example below shows the Archives widget set to show posts as a dropdown menu with post counts checkbox enabled …

(Archives Widget added to blog sidebar)
Now that you know how to configure most of the frequently-used widgets in WordPress, let’s explore some other useful things about using WordPress widgets.
Useful Widget Tips
Here are some additional things to know about using widgets:
Add ‘Visibility’ Function To Widgets
Installing the Jetpack plugin not only adds many new widgets to your widgets area …

(Jetpack Widgets)
It also adds a useful ‘Visibility’ function to all WordPress widgets …
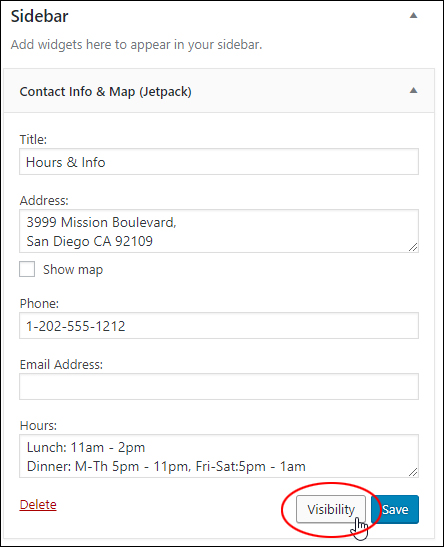
(Jetpack adds ‘Visibility’ to all widgets)
This function lets you specify whether to display or hide widgets from your sidebar based on conditions you set for a particular category, author, user. role, tag, date, or page …
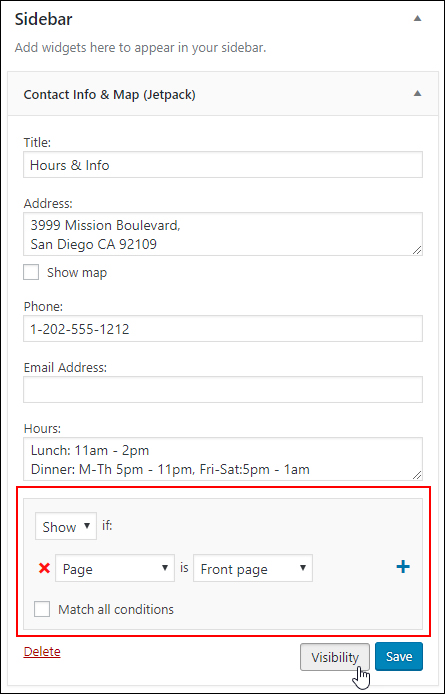
(Set conditions to show or hide widgets)
This is a really useful function to have.
For example, you can:
- Display a widget only on your home page or only on posts published under certain categories, tags, authors, dates, etc.
- Configure widgets to display specific or time-sensitive announcements based on a post’s category, date, etc.
- Configure widgets to display targeted ad banners based on a post’s category or tag.
- Hide widgets from appearing on certain posts or pages to prevent users from being distracted (e.g. remove widgets with ads from your sales pages).
- And more!
To learn more about using the Jetpack plugin, go here:
Overriding Default WordPress Sidebar Widgets
If you see widgets showing up on your blog sidebar navigation area that aren’t listed under your active sidebar inside your Appearance > Widgets section, it’s because with some themes, until you add widgets to your sidebar, the theme will display its own default set of widgets.
For example, the site below shows some widgets in the sidebar section …

If you look inside the Widgets area, however, you will find that no widgets have actually been added to any of the available widget areas …

The above theme is using default widgets.
As soon as you add one or more widgets to an available widget area, the other widgets will your selected widgets will be used instead.
Note: If you don’t want anything to appear in your sidebar navigation menu, either use a theme page template without a widgets section or just add a blank Text widget to the sidebar.
Just add a blank text widget …

And the default widgets will not appear in your sidebar/footer section …

Accessibility Mode
As we have shown you earlier, with WordPress you can quickly and easily rearrange how information is displayed in widgetized areas of your site sidebars, footers and navigation menus with just a few clicks of your mouse button, using drag-&-drop …

(Reorganizing sidebar layout using widgets can help to improve your site’s visitor experience)
In the screenshot above, for example, you can see that we have change the order of elements in the site’s sidebar menu by switching around the search and testimonial sections. This is easily done by dragging and dropping the widgets into different positions inside the sidebar widget area.
Rearranging sidebar layout using widgets can help to improve your site’s visitor experience.
If, however, you find that you cannot move widgets using drag-and-drop (e.g. using a mobile device that doesn’t support dragging-and-dropping), then you can still use widgets by enabling Accessibility Mode.
How To Enable Accessibility Mode For WordPress Widgets
Enabling Accessibility Mode, via Screen Options, allows you to use Add and Edit buttons instead of dragging and dropping.
To enable Accessibility Mode, log into your admin area and go to Appearance > Widgets …

(Widgets Menu)
Click on Screen Options on the top right hand corner of your screen …

(WordPress Widgets – Screen Options)
Click on Enable accessibility mode …

(Switch On accessibility mode)
Once accessibility mode has been enabled, the widgets in the Available Widgets section will display an Add link, and the widgets in the Active Widgets section will display an Edit link …

Click on a Widget’s Add link in the Available Widgets section …

A screen will display the selected widget with options for customizing its settings, selecting the location to add the widget, and dropdown menus that let you specify the position of the widget in your selected area (e.g. position “1”, “2”, “5”, etc.) …

Click Save Widget to add the widget to the Active Widgets section, or click the Cancel button to return to the previous screen …

Click on the Edit link of an active widget …

A screen displays the selected widget with options for modifying its settings.
Click Save Widget to update your settings and go back to the Active Widgets section, or click the Delete button to delete the widget from the Active Widgets section …

Click on Disable accessibility mode in the Screen Options section to go back to using drag and drop …

(Switch off accessibility mode)
How To Create Your Own Custom Sidebar Widgets
Most of the widgets that you will use will either be installed by default when you create a new WordPress site, or be automatically added to your Available Widgets section when you install a new plugin on your website.
Here is an easy way to create your own sidebar widget:
First, create a new Post and type in the content that you want to display on your sidebar…

Ensure that any images you plan to use fit the maximum width of your sidebar section. Also, keep in mind that there’s no a lot of room to put content on the blog sidebar, so try and keep your information concise.
Also, don’t worry about publishing your Post – all we are after is to copy the content so we can paste it into a sidebar widget.
After composing your content, click on the Text tab …

Select and copy everything to your clipboard…

Now, go into your Widgets Area.
Add a new Text widget to your sidebar, paste the content from your clipboard into the content field and click Save …

Your new widget is now added to the sidebar navigation menu…

(Create your own custom sidebar widgets)
Congratulations! Now you know how to use and configure a number of sidebar widgets.

Subscribe below & receive 101+ useful WordPress tips that will help grow your business online faster ...
***
"These tutorials have so much information and are easy to understand. If you use WordPress or plan to in the future these will help you with everything you need to know." - Valisa (Mesa, Arizona)