 In Part One of this step-by-step tutorial, we explained the basics of how to use WordPress widgets.
In this tutorial you are going to configure various commonly-used WordPress sidebar widgets.
Widget Configuration
By default, your site comes with several built-in active widgets, such as widgets that let you display links to your pages, filter posts by categories, news items, adding search features, etc.

(In a default WordPress installation, your site comes with a number of built-in widgets)
How To Add Frequently-Used WordPress Sidebar Widgets To WordPress: Step-By-Step Tutorial
In this tutorial series, you are going to learn how to add, configure and reorder various frequently-used WordPress widgets, including:
- Adding a Help button linking to your contact details page.
- Adding a Categories section with a drop down menu.
- Adding a Recent Posts section to display your latest posts.
- Add a list of your site’s Pages.
- Display important Links on the sidebar section.
- Display news items with an RSS Feed section.
- Add tags to the sidebar menu using a Tag Cloud section.
- Configure how Archived Posts display on your sidebar.
To use widgets, access the Widgets panel located inside your WP admin by going to Appearance > Widgets …
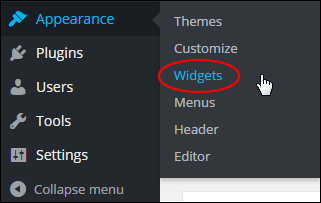
(Widgets Menu)
This brings up the Widgets panel in your web browser …

(Widgets Panel)
Let’s start by configuring text widgets …
Text Widgets
Text widgets are versatile …

(Text widget)
![]()
Rich Text Widget
From version 4.8 onward, WordPress has added native rich-text editing capabilities to text widgets …
(Rich Text Widget)
This lets you quickly and easily format text, create lists, add emphasis, and insert links into your sidebar text …
(Format text easily with the new text widget)
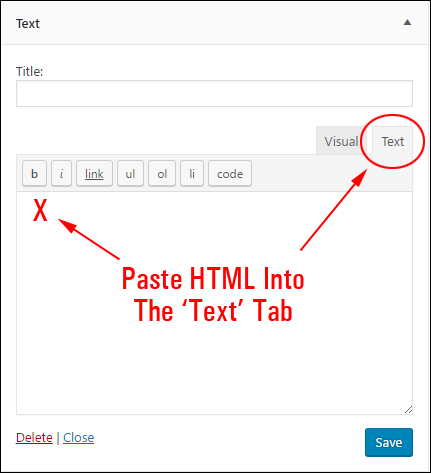
Text widgets let you insert just about anything you want into your sidebar or other widget sections, such as notices, videos, messages and more to your site … simply type in text or add HTML into the widget content area. You can also give the widget a title. Remember to save your settings when done …
(A text widget is extremely versatile!)
Example: Add A Contact Button To Your Sidebar Area Using A Text Widget
For this example, let’s set up a contact button on your sidebar that takes your visitors to a page on your site (or an external site, e.g. a helpdesk) where they can contact you for help and support.
First, create or source a “help button” graphic image that visitors can click on …

We’ll set up the clickable button to display at the top of your sidebar like in the example shown below …

Step 1 – Upload your image.
To display the clickable image on your site, first you must upload the graphic image to your server and note down the URL pointing to your image location.
For example …
http://www.yourdomain.com/images/supportbutton.jpg
You will use this information in Step 3.
In order for visitors to go to your contact page when the help button gets clicked, either create a contact page, or have an existing destination page already set up (e.g. a helpdesk). We will then link the button graphic to this URL in Step 3 …
Step 2 – Create your support page.
Create a contact page and note its URL …

Step 3 – Create your text widget code.
Don’t worry … this sounds a lot more technical than it is. In simple terms, you just need to create the instructions for your clickable button.
Your instructions can be typed into a plain text file and will look something like this …

- Replace “http://www.yourdomain.com/contact-us” in the code above with the URL of your contact page location.
- Replace “http://yourimagelocation.com/img/supportbutton.jpg” in the code above with the URL of your image location.
The image below shows which sections of the above sample code you will need to replace with your actual contact details …

Replace the above URLs and then copy all of your text file content to your clipboard when finished.
If you need help with basic HTML code, refer to this tutorial:
Now, go back to your Widgets section …

(Widgets Screen)
Step 4 – Add a Text widget.
Add a Text widget to your sidebar where you want the button to display.
In the Available Widgets area, find the Text widget …

(Text widget)
Drag your Text widget to the Active Widgets section and release the widget at the very top of the Widget Area …

(Dragging and dropping your Text widget)
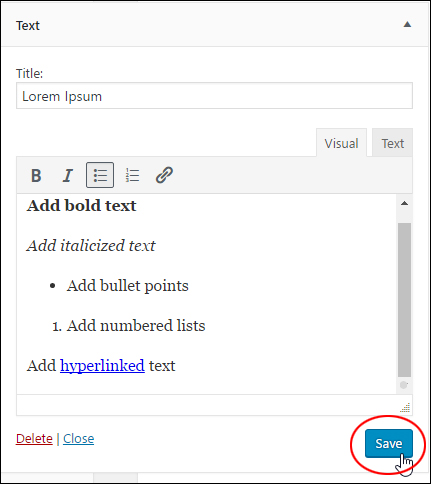
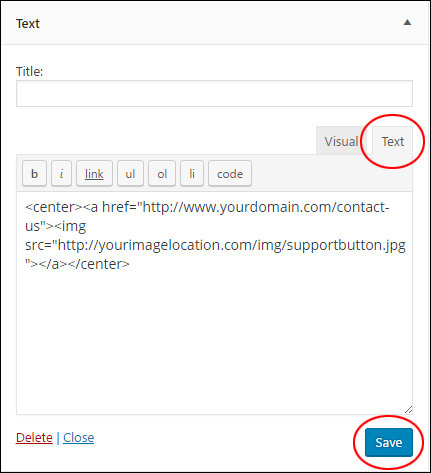
Step 5 – Configure your widget settings.
Click on the widget title bar to configure the widget settings. Paste the code with the URLs to your contact page and graphic button into the text widget content area and click save …
Add a title to the widget if you want (e.g. “Need Help?”, “Get Help”, etc.) and paste the code with the correct destination links into the Content box, then click the save button …
![]()
Note: Remember to test all URLs before pasting scripts into the Text Widget, or your button will not work.
*** If using WordPress version pre-4.8 ***
If adding text with no formatting tags, you may want to tick the Automatically add paragraphs box to wrap each block of text in an HTML paragraph code (note: this is not necessary if you type in code like we’re doing in this tutorial).
Here is some text with Automatically add paragraphs option not selected …

(Automatically add paragraphs box unchecked)
Here is some text added to a Text widget with Automatically add paragraphs option ticked …

(Automatically add paragraphs box selected)
***
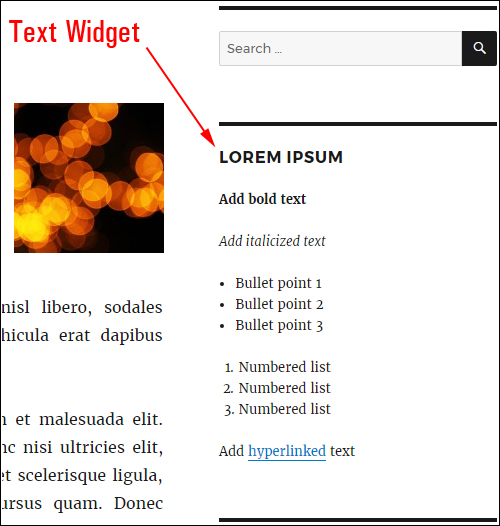
Step 6 – Refresh your web browser.
Once you have added your text widget and HTML code, go to the front-end of your site and refresh the web browser. If you have entered all of the links correctly, then the clickable support button should display at the top of the sidebar menu …

(Clickable support button widget on blog sidebar)
The above screenshot shows the button in the sidebar of a brand new WordPress site.
Step 7 – Test the button.
The last step is to ensure that the clickable button works. Test the button to make sure that your visitors will go to your contact page when clicking the button. You should be taken to the contact page …

(Test the text widget to ensure you’ve set up everything correctly)
![]()
Text Widgets – Useful Tips:
If you want a new window to open up when visitors go to the contact page (so they don’t leave the page they’re on), then change the button code from this:

To this (i.e. add the part that says: target=”_blank” in your html code):

When inserting images into your sidebar menu, make sure that the width of your image does not exceed the width of your sidebar column, especially if you are using a non-responsive WordPress theme. As we’ve previously mentioned, some themes can display different column widths depending on their templates and their layout. Some sidebars may be too wide or too narrow. If the sidebar of your theme is narrower than the width of the button image, then you may have to either adjust the size of your images, or the width of your sidebar column to make the images display correctly on your sidebar area.

(Adjust column width or reduce image size)
More Tips:
- If you don’t want your button to be centered in your sidebar, delete the <center> and </center> tags from the beginning and end of the line of code. The image will then align to the left.
- Link your contact button to any destination you want (e.g. to an external link, contact form, FAQ page, etc.) and change this anytime by editing the links in the widget.

***
This is the end of section two of this series of tutorials on how to use WordPress widgets.
To view Part 3, click this link:
***
"I was absolutely amazed at the scope and breadth of these tutorials! The most in-depth training I have ever received on any subject!" - Myke O'Neill, DailyGreenPost.com