 In Part One of our Web Site Traffic Blueprint article series overview, we explained that the key to creating an automated web traffic generation machine is to use an “expertly configured” WordPress website.
As we also explained, an expertly configured WordPress website is different than a professionally-configured WordPress website. An ”expertly configured” WordPress web site is a blog that is not only built with the WordPress CMS, but has also been expertly set up and configured (either by yourself or professionally) to take advantage of the tremendous power, ease-of-use and functionality of WordPress and its integration with other services, specifically in areas like SEO, third-party site syndication and reporting.
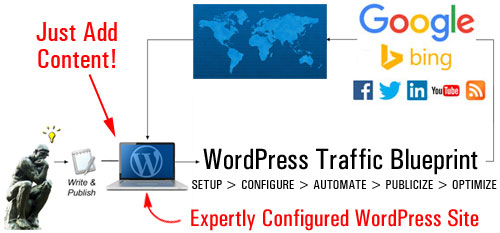
(With an expertly configured WordPress website, all you have to do to bring web traffic is add content on a regular basis!)
Once your WordPress site has been expertly configured and fully set up, all you need to do then to generate more web traffic is add content on a regular basis.
As outlined in Part One of this article series, the components of the automated website traffic system are as follows:
- Setup
- Configure
- Automate
- Optimize
In this article, we discuss the “Setup” phase of the automation process. The focus of this section is to help you understand the best way to start if you don’t have a web presence yet, or if you already have an existing site that may or may not have been built using WordPress.
WordPress Web Traffic System – Setup Phase
If You Don’t Have A Web Presence
If you haven’t got a website yet, then it’s really quite simple … build your website with WordPress!
WordPress is the most powerful, flexible, cost-effective and easy-to-use content management system available. We provide many articles, tips, and tutorials about the benefits and advantages of using WordPress to grow your business online.
For example, to learn just how popular WordPress is as a web content publishing platform, see this article: How Popular Is WordPress? Some Facts And Figures About WordPress
After making the choice to build your site with WordPress, the next step is to choose which type of WordPress platform you will use to run your web presence on.
This step is very important as there are two types of WordPress platforms available …
Hosted Or Self-Hosted WordPress Site?
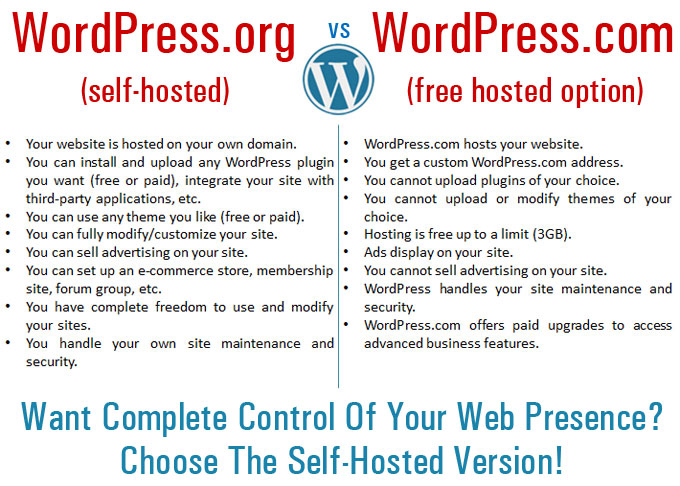
(WordPress Hosted vs WordPress Self-Hosted)
WordPress offers a ”hosted” and a “self-hosted” option.
The “self-hosted” option means you can download the full-featured WordPress application at no cost from WordPress.org and host a WordPress site or blog using your own domain name.
In the “hosted option”, WordPress hosts your blog for free at WordPress.com. There are, however, some limitations on what you can and can’t do with your blog when it is hosted for free at WordPress.com.
If you plan to build a professional business presence online and you want to set up the traffic system described here, then choose the “self-hosted” WordPress platform. The benefits of choosing the “self-hosted” option (WordPress.org) far outweigh those of hosting a free blog at WordPress.com. You can fully customize your web presence and avoid the limitations of the hosted option. Keep in mind that You can overcome the limitations of the free hosting options by upgrading to a paid option, but then why not just start off with a WordPress site hosted on your domain and avoid the hassles of upgrading later?
If You Already Have An Existing Web Site
If you already own an existing web site, first, check if the website has been built using WordPress.
If you need help with this step, check this article: The Easy Way To Tell If Your Blog Runs On WordPress
If your web site is a WordPress web site, move to the next step, and make sure that your site’s internal settings have been properly configured. We cover this step in more detail in another tutorial.
If your website is not powered by WordPress, then you will need to make some choices.
Take a look at the diagram below. It will help you decide where to set up a WordPress website or blog on your domain …
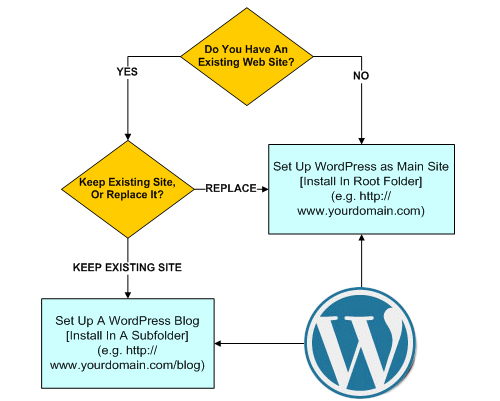
(Use the above diagram to help you decide where to set up WordPress on your domain)
Basically, you have two choices:
- Replace your existing website so that your main website is built using WordPress, or
- Keep your existing website and add a WordPress-powered blog. Your WordPress blog will then be expertly configured and used to drive traffic to your main web site.

If you choose to keep your existing site and add a WordPress blog, make sure to use the self-hosted version of WordPress, which requires your own domain name and webhosting, but allows you to fully configure your blog’s settings and customize the look and feel of your existing website using a closely-matching WordPress theme.
To use WordPress as your main website, install the software in the “root” directory of your domain (e.g. www.mydomainname.com).
If you have an existing website, then you will want to install WordPress in a subfolder of your domain, e.g. www.mydomainname.com/blog (you can name the subfolder whatever you like).
If you already have a site that you don’t want to delete or replace with a WordPress site, you can choose to set up your WordPress site or blog on an entirely different domain.
This way:
- mydomainname.com – goes to your existing website
- myotherdomain.com – goes to your WordPress site
Once you have set up your WordPress site, the next step is to configure it. This step is addressed in the next article in the series.

This is the end of Part Two
To keep reading about this topic, click on the link below:

This tutorial is part of a comprehensive series of tutorials aimed at helping you learn how to grow your business online cost-effectively with a WordPress website and proven marketing strategies that are easy and quick to implement.
Would You Like To Get Notified When New WordPress Tutorials Are Published? Then Subscribe To This Site!
***
"If you're new to WordPress, this can stand on its own as a training course and will stay with you as you progress from beginner to advanced and even guru status." - Bruce (Columbus, Ohio)
***