 In Part 1 of our Web Traffic Blueprint article series overview, we explained that the key to creating an automated traffic generation machine is to use an “expertly configured” WordPress website.
As we also explained, an expertly configured WordPress site is different than a professionally-configured WordPress site. An expertly configured WordPress web site is a blog that is not only driven by the WordPress CMS platform, but has also been expertly set up and configured (either by yourself or professionally) to take full advantage of the tremendous power, ease-of-use and built-in functionality of WordPress and how it can be integrated with other services, specifically in areas like search engine optimization, content syndication and reporting.
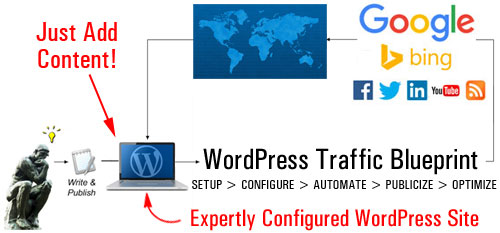
(With an expertly configured WordPress web site, all you have to do is add content on a regular basis to start driving traffic!)
Once you have your WordPress site expertly configured and fully set up, all you need to do then is publish content on a regular basis to bring more traffic organically.
As outlined in Part One of this article series, the components of this automated web traffic blueprint are as follows:
- Setup
- Configure
- Automate
- Optimize
In this article, we look at the “Setup” phase of the automation process. The focus of this section is to help you understand the best way to get started if you don’t have a website yet, or if you already have an existing site that may or may not have been built using WordPress.
WordPress Web Traffic Automation Blueprint – Setup Phase
If You Don’t Have A Web Presence
If you haven’t got a web presence yet, it’s quite simple … get a WordPress site!
WordPress is the most powerful, flexible, cost-effective and easy-to-use content management system available. We provide loads of articles, tips, and tutorials about the benefits and advantages of using WordPress to grow your business online.
For example, to learn just how popular WordPress has become as a web content management system, see this article: WordPress: Some Facts And Statistics
After choosing to build your site with WordPress, the next step is to decide which type of WordPress platform you will run your web presence on.
This is important because there are 2 types of WordPress platforms you can choose from …
WordPress.org vs WordPress.com
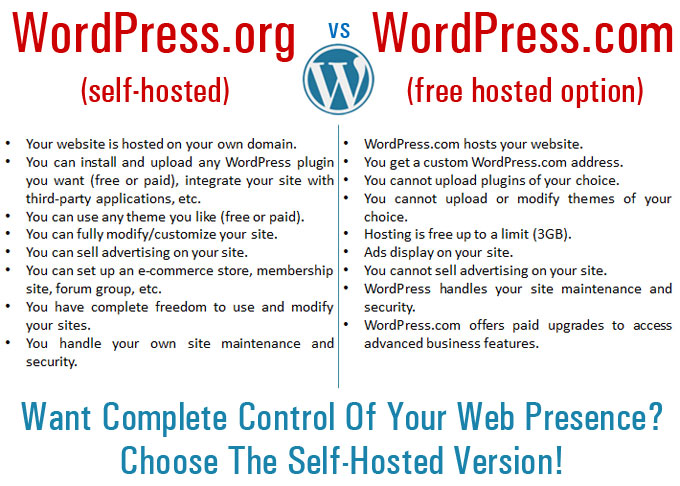
(Hosted vs Self-Hosted WordPress)
WordPress offers users a “self-hosted” and a “hosted” option.
The “self-hosted” option lets you download the full-featured WordPress application for free from WordPress.org and host a WordPress site or blog under your own domain name.
With the “hosted option”, WordPress hosts your blog for free at WordPress.com. There are, however, some limitations on what you can and can’t do with your site when it is hosted for free at WordPress.com.
If you plan to build a professional web presence and you want to set up the traffic system described here, then choose the “self-hosted” WordPress version. The benefits of choosing the “self-hosted” option (WordPress.org) far outweigh those of hosting a free site at WordPress.com. You get to have full control over your web presence and avoid the limitations of the hosted option. Keep in mind that you can overcome the limitations of the free hosting platform by upgrading to a paid option, but then why not just start off by hosting a WordPress site on your domain and avoid the hassles of upgrading later?
If You Already Have An Existing Web Site
If you already own an existing web site, first check to see if the web site has been built using WordPress.
If you need help with this step, check this article: Tell-Tale Signs It’s A WordPress Site And Free WordPress-Checking Tools
If your existing web site was built using WordPress, move to the next step, and make sure that your site’s internal settings have been properly configured. We cover this step in more detail in another tutorial.
If your existing website was not built with WordPress, then you have to make some choices.
Take a look at the simple flowchart below. It will help you choose where to set up a WordPress website on your domain …
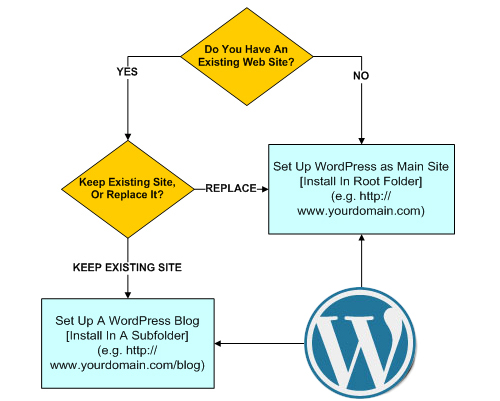
(Use this simple flowchart to help you decide where to set up WordPress on your domain)
Basically, you have two choices:
- Replace your existing site with a WordPress-driven site, or
- Keep your existing website and add a WordPress blog. This blog will then be expertly configured and used to drive traffic to your main site.

If you choose to keep your existing website and add a WordPress-powered blog, make sure to use the self-hosted version of WordPress, which requires your own domain name and web hosting, but allows you to fully configure your site’s settings and customize the design and style of your existing website using a suitable theme for WordPress.
To use WordPress for your main site, install it in the “root” folder of your domain name (e.g. http://mydomainname.com).
If you already have an existing website, then you will want to install WordPress in a subfolder of your domain, e.g. www.mydomainname.com/blog (you can name your subfolder whatever you want).
If you have an existing site that you don’t want to delete or replace with a WordPress site, the other option you have is to set up your WordPress site or blog on an entirely different domain.
This way:
- mydomainname.com – goes to your existing website
- myotherdomain.com – goes to your WordPress blog
Once you have set up your WordPress site, the next step is to configure it. This step is explained in the next article in the WordPress Traffic Blueprint series.

This is the end of Section Two
To read the rest of this article, click on the link below:

This article is part of an article series designed to help site owners learn how to grow their business online using a WordPress-powered website and proven web marketing methods.
Subscribe To WPCompendium.org And Get Notified When New WordPress Tutorials Get Published!
***
"This is AMAZING! I had learnt about how to use WordPress previously, but this covers absolutely everything and more!! Incredible value! Thank you!" - Monique, Warrior Forum
***